# Software and Applications

How to install the most requested software yourself.

# Adobe Acrobat Sign

(click on the chapter to fast jump to it)

How to:

[**Sign in to use Acrobat Sign:**](https://docs.isb.be/link/136#bkmrk-sign-in-to-use-acrob-0) Acrobat Sign is a web-based application.

[**Configure your user account:**](https://docs.isb.be/link/136#bkmrk-configure-your-user--0) verify and edit your profile information; choose a default signature and style; set up your events and/or notifications.

**[Prepare and send a document for signature:](https://docs.isb.be/link/136#bkmrk-%C2%A0-0)** select a document, add fields for signatures, names, date, etc., and send it.   
Supported files that can be edited, sent, and signed - DOC, DOCX, RTF, XLS, XLSX, PPT, PPTX, TXT, CSV, HTML, HTM, TIFF, TIF, BMP, GIF, JPG, JPEG, and PNG. Adobe Sign can also read and use your Google docs.

**[Complete and Sign a document using Fill and Sign:](https://docs.isb.be/link/136#bkmrk-%C2%A0-2)** use Adobe Sign to fill in a document and sign it.

**[Manage and track documents sent for signature:](https://docs.isb.be/link/136#bkmrk-manage-and-track-doc-1)** find a document, view their status, and print or export as PDFs. Send a reminder, or cancel the transaction.

**[Sign an agreement:](https://docs.isb.be/link/136#bkmrk-%C2%A0-4)** how to sign a document received over email. No additional software is required.

**Sign in to use Acrobat Sign**

- Please open [https://secure.echosign.com/public/login](https://secure.echosign.com/public/login) to sign in. 
    - Use your ISB email; click on the password field and wait a few seconds for Adobe to recognize the account. When asked what type of account it is, please select **Company or School Account**.
    - If not automatically logged in, use your ISB email password to sign in.

**Configure your user account:**

- In the video below, you can learn how to verify and edit your profile (**important**), choose a default signature and style, and set up your events and email notifications. Note: most alerts are unavailable in our environment because Adobe cannot check when or if somebody opened an agreement.

<video controls="controls" height="375" style="width: 800px; height: 399px;" width="751"> <source src="https://images-tv.adobe.com/mpcv3/1209/8f30fc93-8d77-4053-a70d-a2283350c72c_1587767772.960x540at1200_h264.mp4" type="video/mp4"></source></video>

**Prepare and send a document for signature:**

- Select a document, then add fields for signatures, names, date, etc., and send it for signage.  
    
    - Supported files: DOC, DOCX, RTF, XLS, XLSX, PPT, PPTX, TXT, CSV, HTML, HTM, TIFF, TIF, BMP, GIF, JPG, JPEG, and PNG.
    - Adobe Sign can also read your Google docs. When first accessing it, please allow the pop-up to open, reload the page, and give Adobe permission to read your Google Drive. It will read the selected document, transform it into a PDF and send it.
- Password protect the document if needed
- Some of the options presented here are not available because Adobe doesn't have control over our environment.
- A quick look at what the signer will receive

<video controls="controls" height="374" style="width: 800px; height: 398px;" width="751"> <source src="https://images-tv.adobe.com/mpcv3/1209/8f30fc93-8d77-4053-a70d-a2283350c72c_1587767772.960x540at1200_h264.mp4" type="video/mp4"></source></video>

**Complete and Sign a document using Fill and Sign:**

- Use Adobe Sign to fill in a document and sign it

<video controls="controls" height="400" style="width: 800px; height: 400px;" width="800"> <source src="https://images-tv.adobe.com/mpcv3/e9625056-eec8-4265-bd74-e13d5de22b8d_1584556262.960x540at1200_h264.mp4" type="video/mp4"></source></video>

**Manage and track documents sent for signature:**

- Select the Manage tab and find the document you want to manage by using the search field or the Status panel on the left. You can view documents and their status and print or export them as PDFs. For the ones In Progress, you can also send a reminder or cancel the transaction.

**Sign an agreement:**

- How to sign a document received over email.

<iframe allowfullscreen="allowfullscreen" height="449" src="https://www.youtube.com/embed/xVf7bdbq36M" style="width: 801px; height: 449px;" width="801"></iframe>

- No additional software is required to sign documents, but Adobe will try to convince you (see underneath) to log in or create an account with them at the end. Please ignore this and close the page; no other actions are needed.

[![Acrobat Sign.jpg](https://docs.isb.be/uploads/images/gallery/2023-03/scaled-1680-/ht4yaoTGUec3fyzk-acrobat-sign.jpg)](https://docs.isb.be/uploads/images/gallery/2023-03/ht4yaoTGUec3fyzk-acrobat-sign.jpg)

# How to install Adobe software

How to install the newest version of Photoshop, Illustrator, Premiere, Acrobat, Lightroom, etc. on your computer.

(First, please check with the IT office to make sure that your ISB Adobe account is active and merged with your email account.)

<table border="1" id="bkmrk-windows-version.-%C2%A0-" style="border-collapse: collapse; width: 100%;"><tbody><tr><td style="width: 46.1728%;">**Windows** version.

Press the **Start** button and write Adobe Creative in the search field. Open the **Adobe Creative Cloud** app.

</td><td style="width: 53.8272%;">**Mac** version.

Press the **Spotlight** button and write Creative Cloud in the search field. Open the **Creative Cloud** app.

</td></tr></tbody></table>

[![creative_cloud.JPG](https://docs.isb.be/uploads/images/gallery/2019-09-Sep/scaled-840-0/creative_cloud.JPG)](https://docs.isb.be/uploads/images/gallery/2019-09-Sep/creative_cloud.JPG)

In the window that pops up Sign in using your email and click on **Continue.** If it asks you to choose an account chose the **Company or School Account** one. If not, please insert the **password** that you use to log in to your email and click on Sign In.

![](https://docs.isb.be/uploads/images/gallery/2020-10/scaled-1680-/image-1602594756125.png)![](https://docs.isb.be/uploads/images/gallery/2020-10/scaled-1680-/image-1602594792971.png)

In the new window that pops up insert your ISB email and click Next , your password, and click on Sign In. Insert the code that you receive on your phone or approve your sign in via the authenticator App.

![](https://docs.isb.be/uploads/images/gallery/2020-10/scaled-1680-/image-1602594854796.png)

![](https://docs.isb.be/uploads/images/gallery/2020-10/scaled-1680-/image-1602594873278.png)

![](https://docs.isb.be/uploads/images/gallery/2020-10/scaled-1680-/image-1602594930269.png)

After the sign-in is complete Creative Cloud will check to see what Adobe apps you have installed on your computer, this can take up to 10 minutes. When done, in the new Creative Cloud window, click on the Apps tab and update or install the ones that you need. You can always come back and install more if needed.

[![adobe10.JPG](https://docs.isb.be/uploads/images/gallery/2019-11/scaled-1680-/adobe10.JPG)](https://docs.isb.be/uploads/images/gallery/2019-11/adobe10.JPG)

Use the same technique as in the first step to find the installed apps. If you use them often pin them to the taskbar or dock.

# Office - Word, Excel, PowerPoint - No editing rights

If you discover that Word, Excel, PowerPoint, or any other Office apps, do not let you edit your documents, please follow the steps underneath to fix the problem.

- If the problem persists, please let the IT department know at <ithelpdesk@isb.be>

[![Screenshot 2022-01-20 at 09.23.59.jpg](https://docs.isb.be/uploads/images/gallery/2022-01/scaled-1680-/DHtH4CJiE5w8KlXF-screenshot-2022-01-20-at-09-23-59.jpg)](https://docs.isb.be/uploads/images/gallery/2022-01/DHtH4CJiE5w8KlXF-screenshot-2022-01-20-at-09-23-59.jpg)

Bring the app into focus, and click on its name on the top bar (in our example Word); from the drop-down list, select Activate Office.

[![Screenshot 2022-01-20 at 09.24.14.jpg](https://docs.isb.be/uploads/images/gallery/2022-01/scaled-1680-/eZwdfQoSQDr1E9II-screenshot-2022-01-20-at-09-24-14.jpg)](https://docs.isb.be/uploads/images/gallery/2022-01/eZwdfQoSQDr1E9II-screenshot-2022-01-20-at-09-24-14.jpg)

In the window that pops up, select Already bought Office? Enter your password and Sign in. Start Using Word.

[![Screenshot 2022-01-20 at 09.24.50.jpg](https://docs.isb.be/uploads/images/gallery/2022-01/scaled-1680-/OTQeGJuA1H5Hr2cB-screenshot-2022-01-20-at-09-24-50.jpg)](https://docs.isb.be/uploads/images/gallery/2022-01/OTQeGJuA1H5Hr2cB-screenshot-2022-01-20-at-09-24-50.jpg)

# Powerschool v21.11 - New Features

## ADMIN

### New Top Navbar, Manage Profile and Quick Data

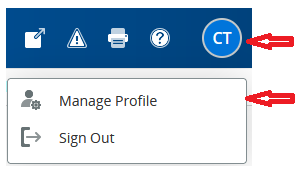
The top Navbar icons have changed slightly but still do the same thing (
eg. Print )

The Personalize menu item has been removed, instead use **Manage
Profile** from the User icon at the top right. This is used to view your
profile details and set the initial student screen and various Interface
and Smart Search options.

<img src="https://docs.isb.be/uploads/images/gallery/2022-06/scaled-1680-/9Nrw59eq32R5fBDj-image4.png" width=200>

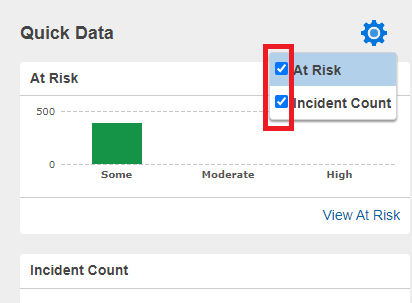
Users can personally disable the Quick Data boxes on right by clicking
the cog and unticking the two checkboxes
<img src="https://docs.isb.be/uploads/images/gallery/2022-06/scaled-1680-/8oQz92atXbCDKs8B-image2.png" width=300>

### New Search

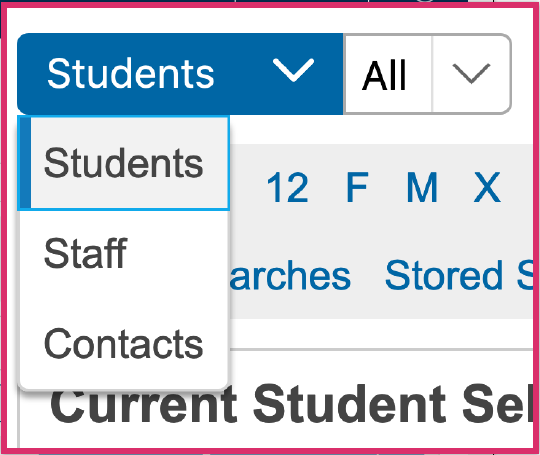
**Student / Staff / Parents** tabs replaced by a single drop-down menu.

<img src="https://docs.isb.be/uploads/images/gallery/2022-06/scaled-1680-/l37JDQa3nY0UEwXk-image11.png" width=200>

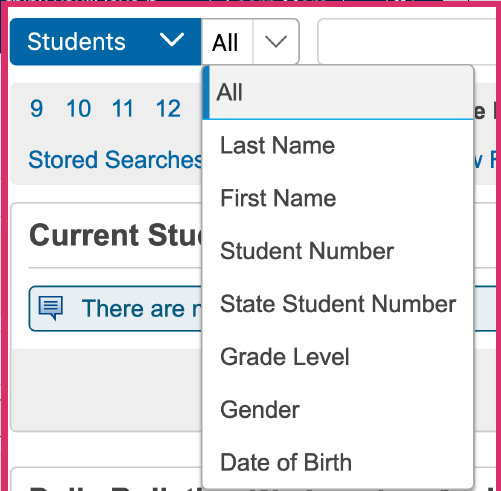
**Direct field search** on commonly used fields

<img src="https://docs.isb.be/uploads/images/gallery/2022-06/scaled-1680-/iEHcKTqIjCnp8iXM-image1.png" width=200>

**Search term building** - search terms build as you enter them and can
be removed individually or a new search started with Clear All.


<img src="https://docs.isb.be/uploads/images/gallery/2022-06/scaled-1680-/aeUoKwoowIT9ci6D-image3.png" width=200>

NOTE: this makes the search more like spreadsheet filtering than the
previous search behaviour, where a new search would be performed.

**Quick Search alphabet** is turned off by default - users can enable it
personally via **Manage Profile**

<img src="https://docs.isb.be/uploads/images/gallery/2022-06/scaled-1680-/LpomfpXvIz1JXxtY-image9.png" width=500>

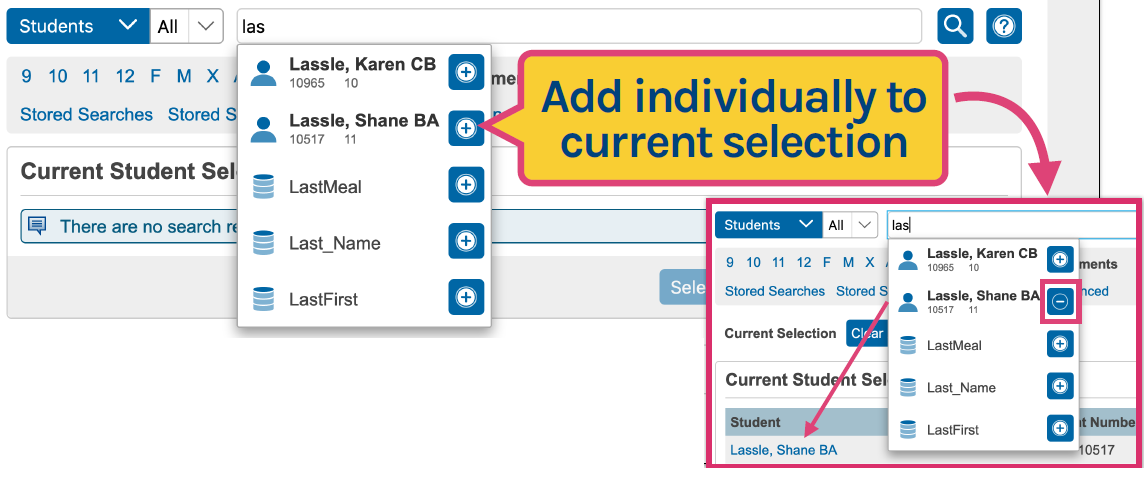
**Live Smart Search** - as you type, provides all possible solutions
which you can add individually to the current selection or select all by clicking Return

<img src="https://docs.isb.be/uploads/images/gallery/2022-06/scaled-1680-/hOSTKz7gVhtcbi4O-image10.png" width=500>

Note: Smart Search is enabled by default - a user can disable it via
Manage Profile

**Advanced Search** moved to drawer on right to separate it and make it
easier to see the impact on the current selection

For more information, click the Help ? icon to the right of the search
bar.

### Parents -\> Contacts

Instead of each student having mother/father information ( repeated for
each sibling ), parent Contacts are now their own entity. They also have
their own Portal accounts ( rather than sharing between a family ), but
only if they have specified a valid email address. SSO will be
implemented for these Parent Contacts during the summer of 2022.

Now to view the parents of a student, Admin users should not use the 
Parents pages, but should instead use the Contacts
screen. This displays the name, email, relationship, main phone number,
address and whether or not the child lives with them ( main/secondary
family ). If the Contact has a Portal account associated with them, Data
Access will be ticked.
[![image8.png](https://docs.isb.be/uploads/images/gallery/2022-06/scaled-1680-/Ceav5h4jk9rA7BR3-image8.png)](https://docs.isb.be/uploads/images/gallery/2022-06/Ceav5h4jk9rA7BR3-image8.png)


## POWERTEACHER

Changes in PowerTeacher are just cosmetic and there are no changes in
PowerTeacher Pro

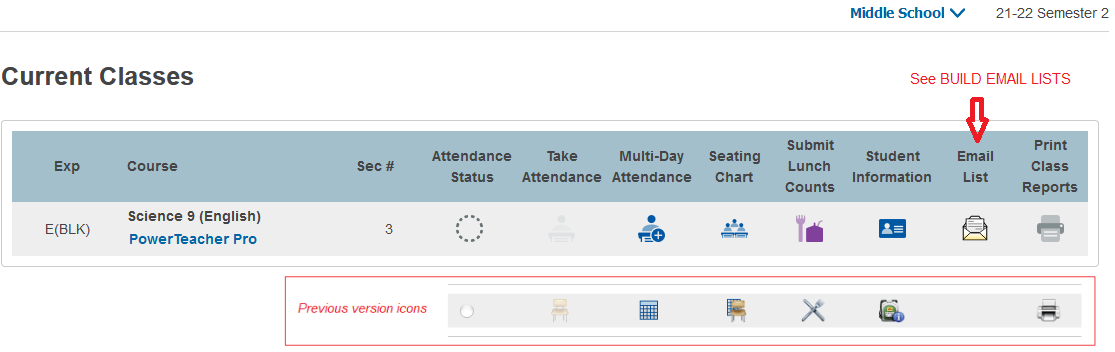
### Start Page icons
[![image7.png](https://docs.isb.be/uploads/images/gallery/2022-06/scaled-1680-/DWn0HjvXEK5a58N2-image7.png)](https://docs.isb.be/uploads/images/gallery/2022-06/DWn0HjvXEK5a58N2-image7.png)

### Manage Profile

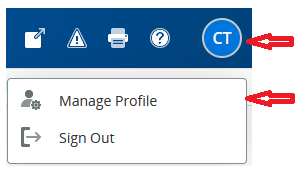
The Personalize menu item has been removed, instead use Manage Profile
from the User icon at the top right. This is used to view your profile
details and set the initial student screen.

<img src="https://docs.isb.be/uploads/images/gallery/2022-06/scaled-1680-/OhHaWGM6tSqexmNE-image4.png" width=200>

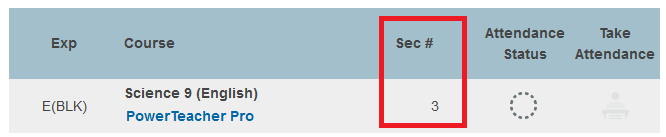
There is a new option in Manage Profile to show the course section
number on the Start Page
[![image6.png](https://docs.isb.be/uploads/images/gallery/2022-06/scaled-1680-/r1TAQyDwiEYjUx1U-image6.png)](https://docs.isb.be/uploads/images/gallery/2022-06/r1TAQyDwiEYjUx1U-image6.png)


If set to yes, the section number column appears in the Current Classes
list

<img src="https://docs.isb.be/uploads/images/gallery/2022-06/scaled-1680-/Js50SeUnVXcOkUJi-image5.png" width=500>

## BUILD EMAIL LISTS

There is a slight change to the way you can build email lists of
students and/or parents to copy/paste into an email.
[![image12.png](https://docs.isb.be/uploads/images/gallery/2022-06/scaled-1680-/DCYo2ax95EWJB2yR-image12.png)](https://docs.isb.be/uploads/images/gallery/2022-06/DCYo2ax95EWJB2yR-image12.png)
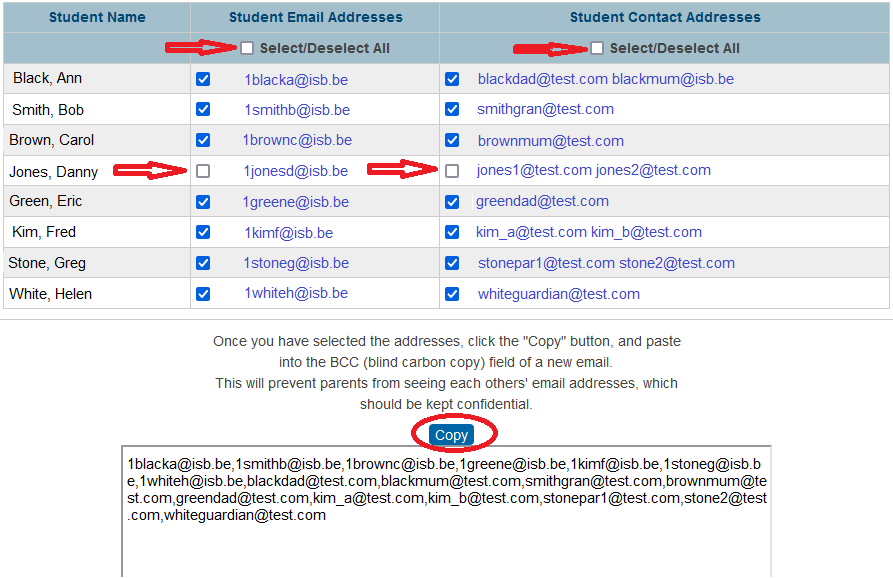

First use the Select/Deselect toggle to select all students and/or
Student Contact Addresses (parents). Optionally, you can then remove any
single email items you don't require in the list. The list at the bottom
will change dynamically depending on your selections. Once complete,
click the Copy button to copy to your clipboard for pasting into your
email.

In the Admin Portal, this can be invoked as before, using group function
Build Email Lists.

In the Teacher Portal, it can be invoked directly from the new Email
List icon on the Start Page - all students in all your classes will be
available to select from. Alternatively you can select Student
Information for a single class and select the Email Addresses menu link.

It is not currently possible to generate these email lists from
PowerTeacher Pro.

# Mac - Install Software - Self Service

Self Service is a software distribution platform from where you can install apps on Mac machines.

Please search and open the Self Service portal using the Magnifying Glass in the upper-right corner. Find the app that you need in the list, and click on install.

[![all.JPG](https://docs.isb.be/uploads/images/gallery/2020-10/scaled-1680-/all.JPG)](https://docs.isb.be/uploads/images/gallery/2020-10/all.JPG)
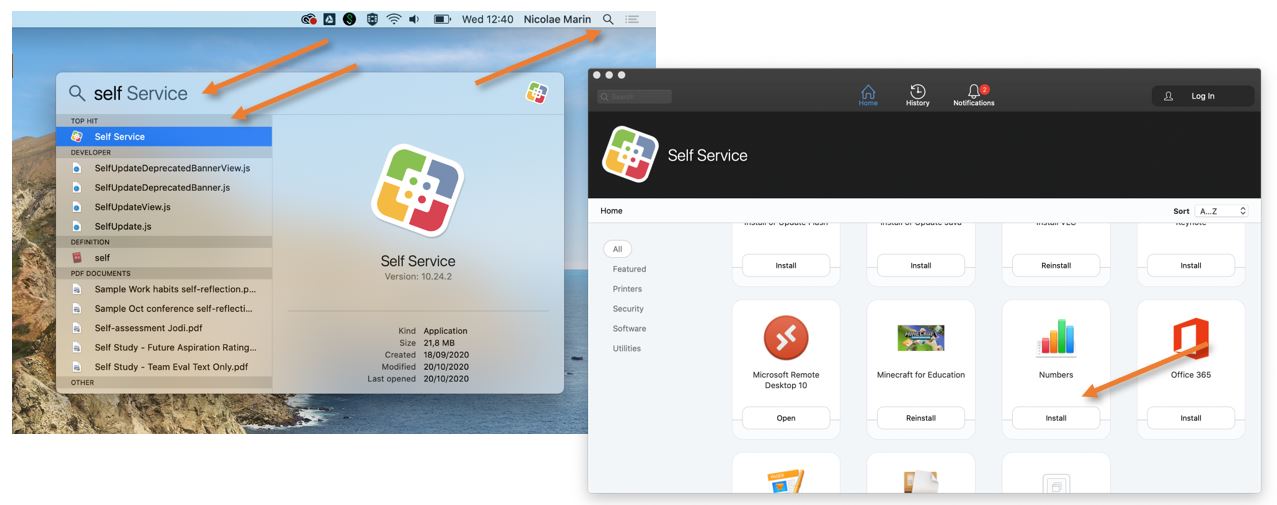
The list of applications is constantly being updated. We are trying to add all the usually requested apps. If what you want/need to install is missing from the list, please let us know by sending an email @ <IThelpdesk@isb.be>, and, if possible, we will make it available for you in the Self Service portal.

Depending on the application, the installation can take between one and 30 minutes. When done, the Install button usually changes to Reinstall. To start the installed application, search for it as you did with the Self Service.

# Advanced Math/Equations symbols

For now, Math Type cannot be activated on Macs, but Word has its own equation creator/editor.

To use the menu, click on the Insert tab, select the education symbol, and "Insert new equation."

[![Screenshot 2022-02-11 at 09.27.39.jpg](https://docs.isb.be/uploads/images/gallery/2022-02/scaled-1680-/XISJ8ciumKWxd5eg-screenshot-2022-02-11-at-09-27-39.jpg)](https://docs.isb.be/uploads/images/gallery/2022-02/XISJ8ciumKWxd5eg-screenshot-2022-02-11-at-09-27-39.jpg)

# Windows - Install Software - Company Portal

The company portal is a distribution platform from where you can install software on Windows machines yourself.

To install an app, please open company portal, find and select the software you need in the Store or Available Everywhere category, and click on install.

The list of applications is constantly being updated. We are trying to add all the usually requested apps. If what you want/need to install is missing from the list, please let us know by sending an email @ <IThelpdesk@isb.be>, and, if possible, we will either make it available for you in Software Center or install it remotely.

[![image-1611240056122.png](https://docs.isb.be/uploads/images/gallery/2021-01/scaled-1680-/image-1611240056122.png)](https://docs.isb.be/uploads/images/gallery/2021-01/image-1611240056122.png)

Depending on the application, the installation can take between one and 30 minutes. When done, the Install button usually changes to Reinstall. To start the installed application, search for it as you did with the Company Portal.




