ISB Help Center
Find quick answers and step-by-step guides for ISB technology, Google Workspace, Google Meet, Wi-Fi, printing, laptops, iPads, and classroom equipment.
- Start here
- Getting started to MacBook.
- Where are my menus? (File, Save As, Print, Insert, etc.)
- How do I minimize, maximize, close an app, exit full screen?
- How do I take a screenshot?
- What about my keyboard shortcuts? (Copy-paste, print, find, etc.)
- Where are my Documents, Apps, Downloads?
- Mac - Install Software - Self Service
- Zoom Setup
- Automatically Delete Files in Bin after 30 Days
- Getting Mac Version Information
- Installing Zoom for students
- Setting Up Zoom for Students
- Update MacOS
- Accessing ISB Drives
- Google Essentials
- Sign in to your ISB Google account
- Use two Google accounts at the same time
- Chrome profiles
- Start or join a Google Meet
- Chrome - Clear Cache
- Chrome - Enable Spell Check
- Take Your Google Data With You - for Teachers and Staff
- Take Your Google Data With You - for Students
- How To Change Your Google Account Picture
- i3 Classroom Screens
- I3 Screen in the classroom
- Turn the i3 screen on or off
- Present wirelessly on an i3 screen
- Use the Windows 11 OPS module on the i3 screen
- Printing and Scanning
- Xerox Copiers - First Log in - New users
- Xerox Copiers - Copy, Print, Scan (work in progress)
- Xerox Copiers - Enlarge/Reduce
- Xerox Copiers - Booklets
- XeroX-Paparcut Missing on Mac? Install it from Self-Service
- XeroX-Paparcut Missing on Windows? Install it from \\paper
- Xerox Printing - Jobs Stuck in the Queue - Fixes
- LS Student Printer - iPad - how to
- LS Student Printer - Mac - installation and tips
- Accounts and Security
- eID - Install the Belgium eID app to access government related pages
- eID - Accessing the AG website using the Belgium ID - initial setup
- Microsoft Authenticator app (setup)
- iPads and Apple Classroom
- Wifi and Network Access
- Connect to ISB
- Connect to ISBConnect
- Wireless – ISB Connect, ISB, How, What, Where
- VPN - Initial Setup
- VPN - How to connect to the ISB network using the VPN
- Projectors
- Projectors - How to Connect to the Projector in the Atrium.
- Projectors - How to Connect to the Projector in the Annex
- Software and Applications
- Adobe Acrobat Sign
- How to install Adobe software
- Office - Word, Excel, PowerPoint - No editing rights
- Powerschool v21.11 - New Features
- Mac - Install Software - Self Service
- Advanced Math/Equations symbols
- Windows - Install Software - Company Portal
- Phones and Voicemail
Start here

Welcome to the ISB Help Center
Find quick answers and step-by-step guides for the technology used at ISB.
What do you need help with?
- MacBook basics
- i3 classroom screens
- Google Workspace and Google Meet
- Wi-Fi and network access
- Printing and scanning
- Accounts and security
- Software and applications
- iPads and Apple Classroom
- Phones and voicemail
Most common tasks
- Sign in to your ISB Google account
- Start or join a Google Meet
- Connect a MacBook to an i3 screen
- Present wirelessly on an i3 screen
- Connect to ISB Wi-Fi
- Update macOS
- Mac - Install Software
- Print or scan
If you cannot find the answer
Contact the ISB IT team through the usual support channel. ithelpdesk@isb.be.
When reporting a problem, include:
- Your name and role
- Your room or location
- Your device and operating system
- The application or service affected
- What you were trying to do
- A screenshot of the problem, if possible
Audience: Everyone
Last reviewed: 24 July 2026
Owner: ISB IT
Getting started to MacBook.
Tips and tricks for beginners.
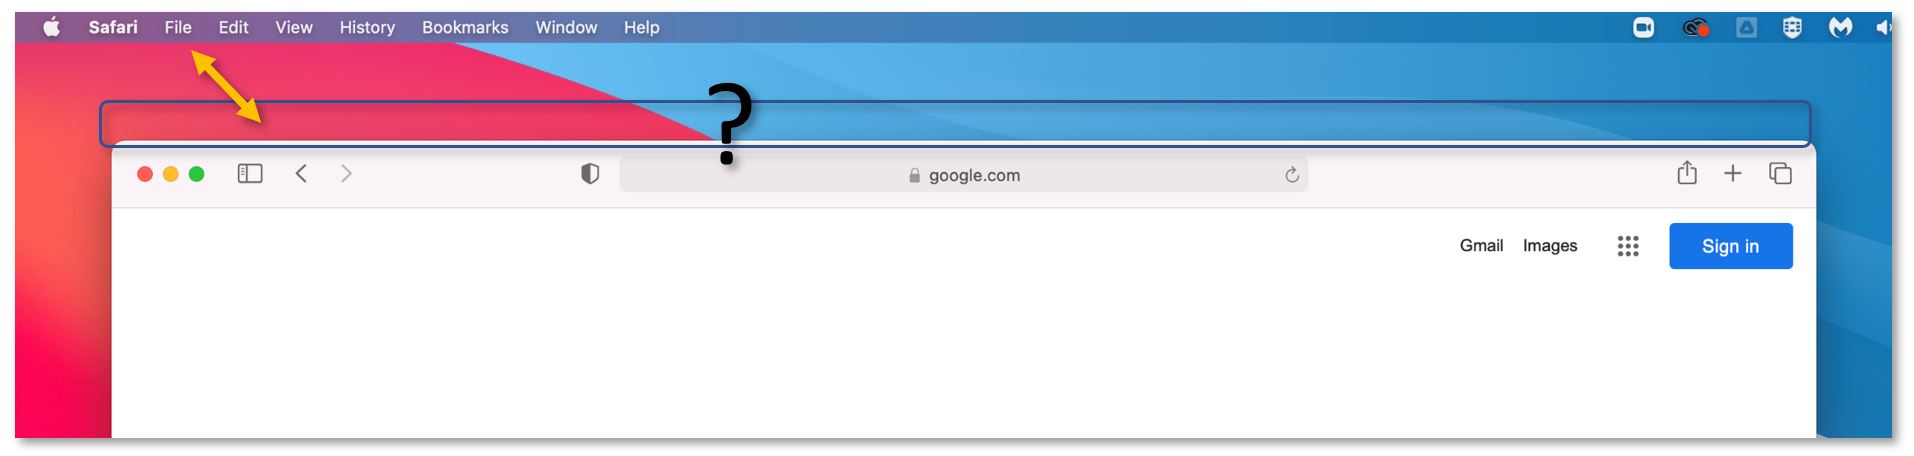
Where are my menus? (File, Save As, Print, Insert, etc.)
On macOS, the majority of the apps do not carry the menu bar on top of their windows. The menu is anchored at the top of the screen and changes depending on what app is in focus.
If no apps are open, the available menu is the Finder’s (File Explorer / My Computer) menu. If you need to access the Finder’s menu, a fast way to do it is to click on an empty space on the desktop.
How do I minimize, maximize, close an app, exit full screen?
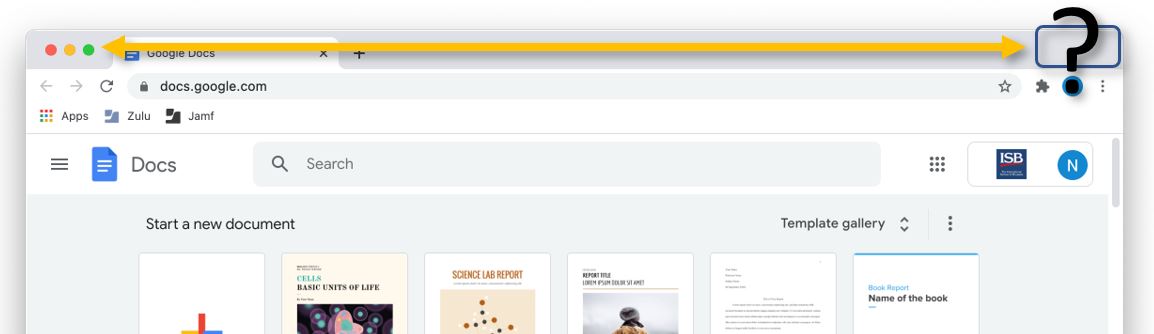
To exit full screen, you can press control+command+F at the same time, or you can push the mouse cursor against the screen's upper edge, forcing the menus to appear- click on the green button again to exit full screen.
On a Mac, the difference between closing and minimizing an app became vague in time. Minimizing an app keeps it active in the dock (taskbar) while closing it, forces the app in a standby state. The app is still active and ready for future use.
If an app has a dot underneath its icon, it means that it's still active, either minimized or in standby mode.

To truly close an app - maybe it became heavy, and it slows down the whole system (I'm looking at you Chrome) or is misbehaving, and it needs a restart – right-click (click on it with 2 fingers) its icon on the dock and select Quit from the contextual menu that appears.
How do I take a screenshot?
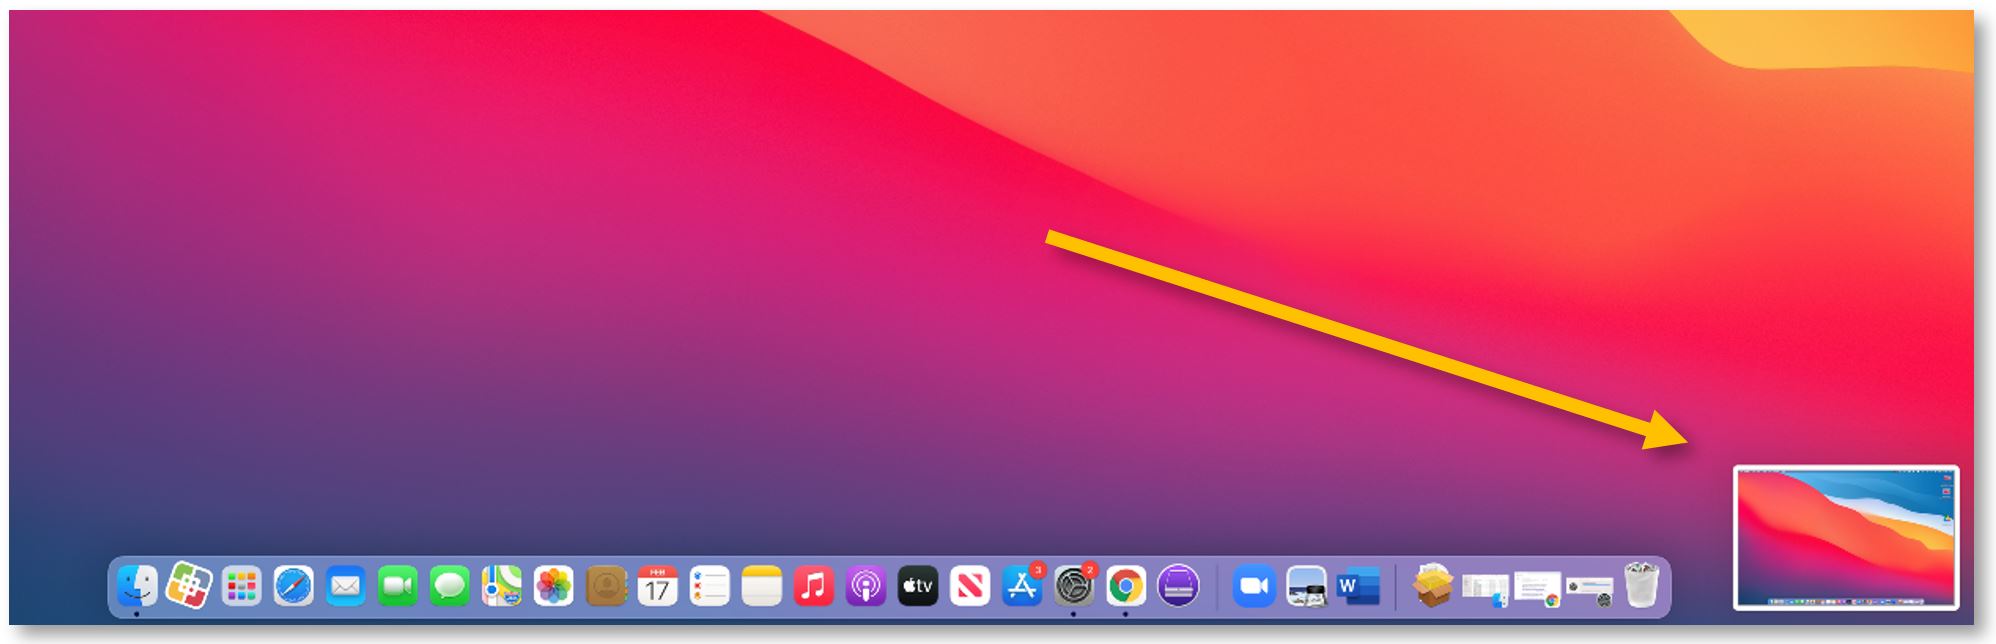
Press together Shift, Command, and 3.

A thumbnail with the screenshot will appear in the lower-right corner of your screen. You can click on it to edit the screenshot. Or wait 1 second for the thumbnail to disappear – the screenshot will automatically be saved on your desktop.
To capture a portion of the screen, press and hold together Shift, Command, and 4.

Your mouse pointer will change into a crosshair. Drag the crosshair to select the area of the screen to capture. To move the selection, press and hold Space bar while dragging. To cancel taking the screenshot, press the Esc (Escape) key.
To take the screenshot, release your mouse or trackpad.
A thumbnail with the screenshot will appear in the lower-right corner of your screen. You can click on it to edit the screenshot. Or wait 1 second for the thumbnail to disappear – the screenshot will automatically be saved on your desktop.
How about a window or menu?
Open the window or menu that you want to capture and press these keys together: Shift, Command, 4. Press the Space bar once, the crosshair will change into a camera icon. Click the window or menu to capture it.

A thumbnail with the screenshot will appear in the lower-right corner of your screen. You can click on it to edit the screenshot. Or wait 1 second for the thumbnail to disappear – the screenshot will automatically be saved on your desktop.
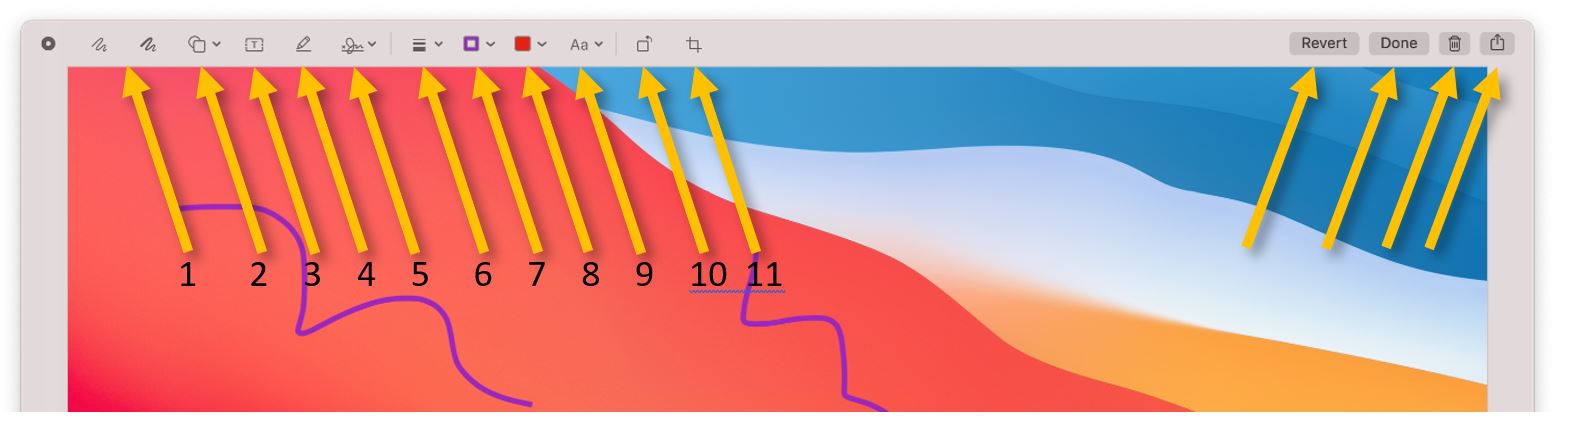
What can I do with the editing tool?
1 – scribble; 2,3 – add shapes or text; 4 – highlight the selection; 5 – sign; 6,7,8,9 – change the shape, size or color or the scribbles, shapes or text; 10 – rotate the screenshot; 11 crop; Revert – undo; Done – save on desktop; Trash -?; Share – attach to email, share it with other Apple devices, add it to photos, etc.
What about my keyboard shortcuts? (Copy-paste, print, find, etc.)
For most of them, use the '⌘ command' key instead of the Windows' darling, Ctrl.
You can find underneath the most used shortcuts in alphabetical order. Please read the last phrases if what you need is not on the list.
Close window or tab: ⌘ command + w
-
-
- Reopen closed tab: ⌘ command + shift + t (Safari, Chrome, etc.)
-
Copy: ⌘ command + c
-
-
- Paste: ⌘ command + v
-
Cut: ⌘ command + x
Cycle through all open apps: ⌘ command + tab
Cycle through browser tabs: ⌘ command + options + arrows (← →)
Find: ⌘ command + f
Find and replace: ⌘ command + Shift + f
Force quit an app (task manager style): ⌘ command + option + esc
Minimize window: ⌘ command + m
New: ⌘ command + n
Paste: ⌘ command + v
Print: ⌘ command + p
Quit: ⌘ command + q
Rename file: select the file and press return (Enter)
Reopen closed tab: ⌘ command + shift + t (Safari, Chrome, etc.)
Save: ⌘ command + s
Search (for apps, documents, etc.): ⌘ command + spacebar
Select all: ⌘ command + a
Undo: ⌘ command + z
Where can I find the whole list?
Open System Preferences, select Keyboard and go to the Shortcuts tab.
OK, OK, but where are my function keys? (F1, F2… F12)
Press and hold the Fn key (the first key in the lower-left) - the Control Strip will show the old function keys.
What's up with the Control Strip?
The Control Strip is in flux, and it tries to show the most used actions or shortcuts when needed. The screen brightness and the system volume controls tend to be there all the time, but the buttons will change depending on the in-use app. You can select back-forward, search, new tab, and so on, while browsing, or play, pause, and jump to, when listening to music or watching a video.
The Control Strip can also be customized to show other buttons if needed. For example, I do not use Siri, but I need to lock my screen every time I leave my desk. I've changed the Siri button with the lock-screen one.
To customize the Control Strip, open System Preferences, select Keyboard, and click on Customize Control Strip. If what you need is in the list, grab it with the mouse cursor and drag it into the Control Strip. Press Done.
What if the shortcut that I need, or usually use on Windows, it's not available on Mac?
You can try to create it using the underneath tutorial:
https://support.apple.com/guide/mac-help/create-keyboard-shortcuts-for-apps-mchlp2271/mac
Where are my Documents, Apps, Downloads?
On a Mac, My Computer (or File Explorer) is called Finder (1). Its shortcut is usually the first one in the dock (1). You can also invoke it by pressing Option+Command+Space, or by searching for Finder.
By default, everything that you download or receive through Airdrop goes into the Downloads folder (2).
Almost all productivity apps (Word, Pages, Excel, etc.) will ask where you want to save your work; the default save location is your Documents folder (3) or, rarely, your Desktop (4).
All the apps are installed in the Applications folder (5).
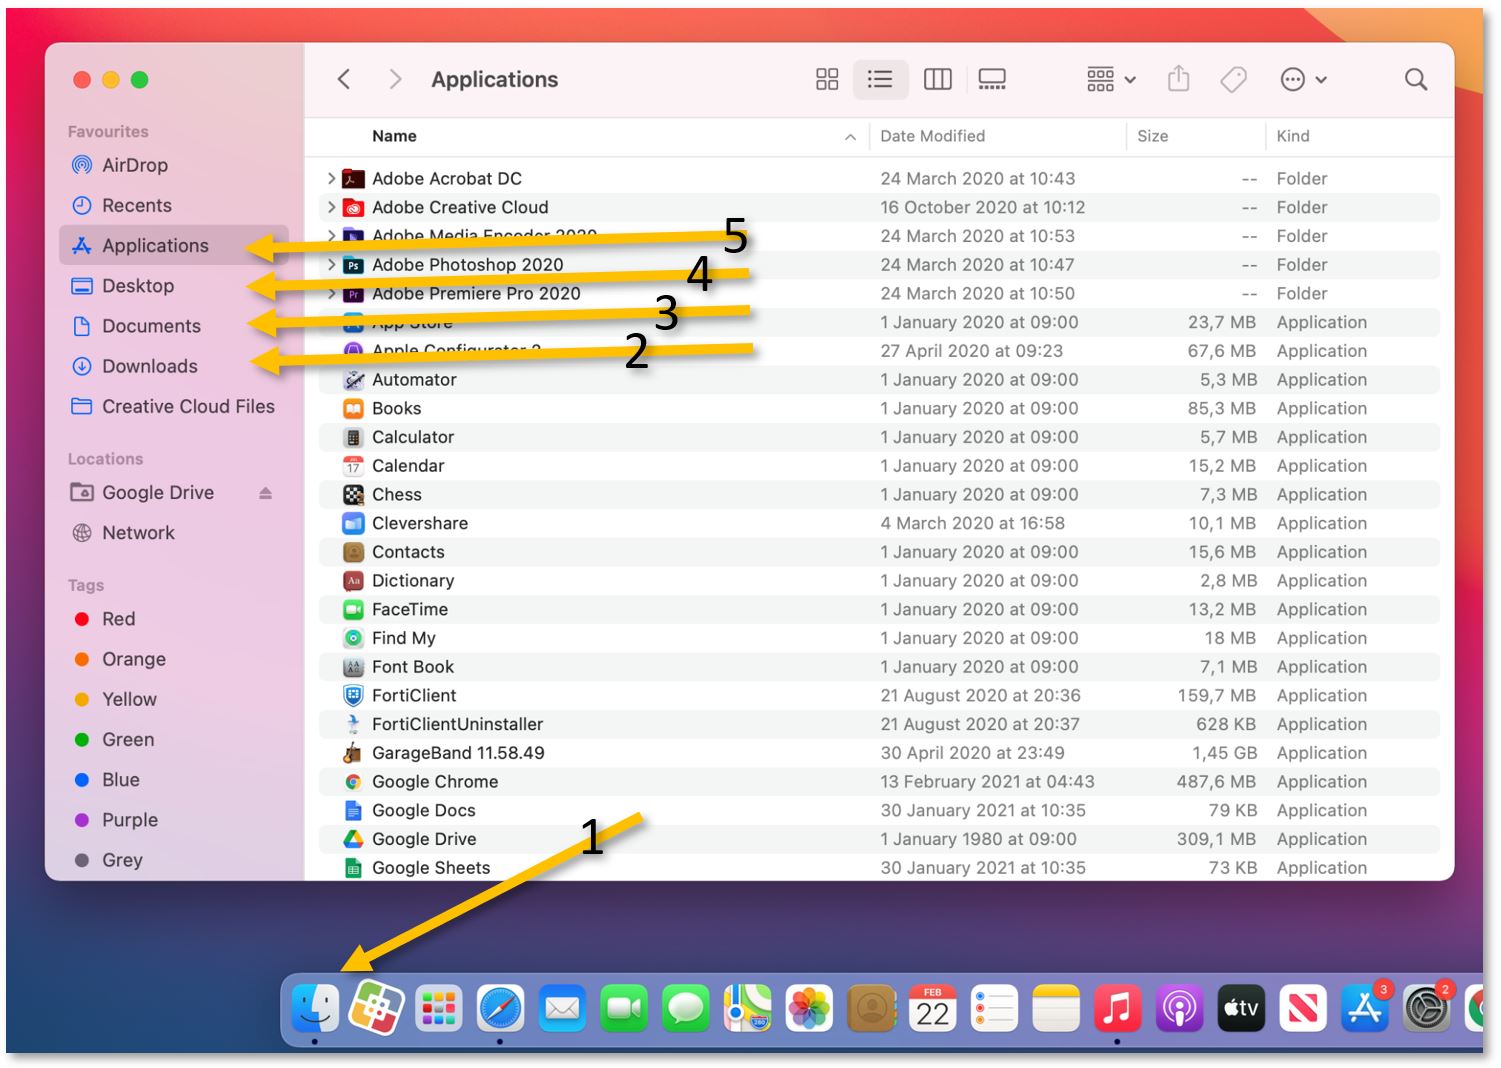
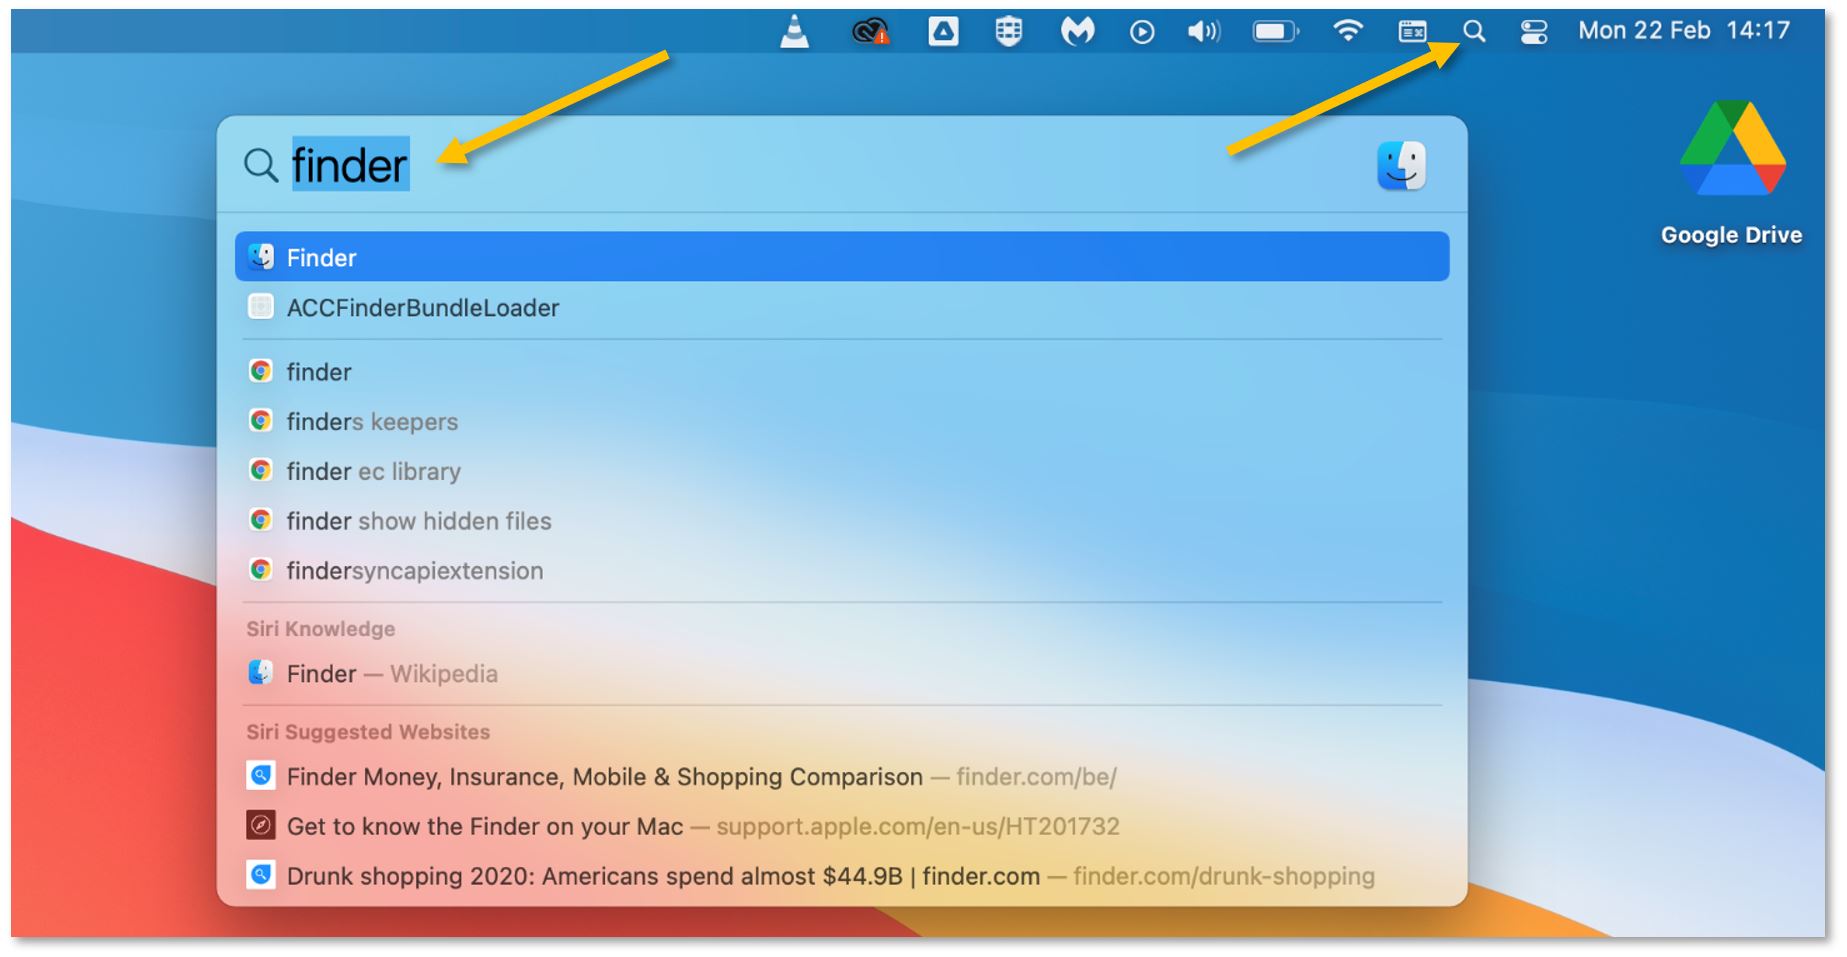
If you remember the name of the app or document that you need, you can also use Spotlight (the magnifying glass in the upper-right part of the screen) to search for it.
Mac - Install Software - Self Service
Self Service is a software distribution platform from where you can install apps on Mac machines.
If Self Service is not present in the dock (the icon with the ISB logo) please search for and open it using the magnifying glass (Spotlight) in the upper-right corner. In the window that opens up find the app that you need in the list, and click on install.
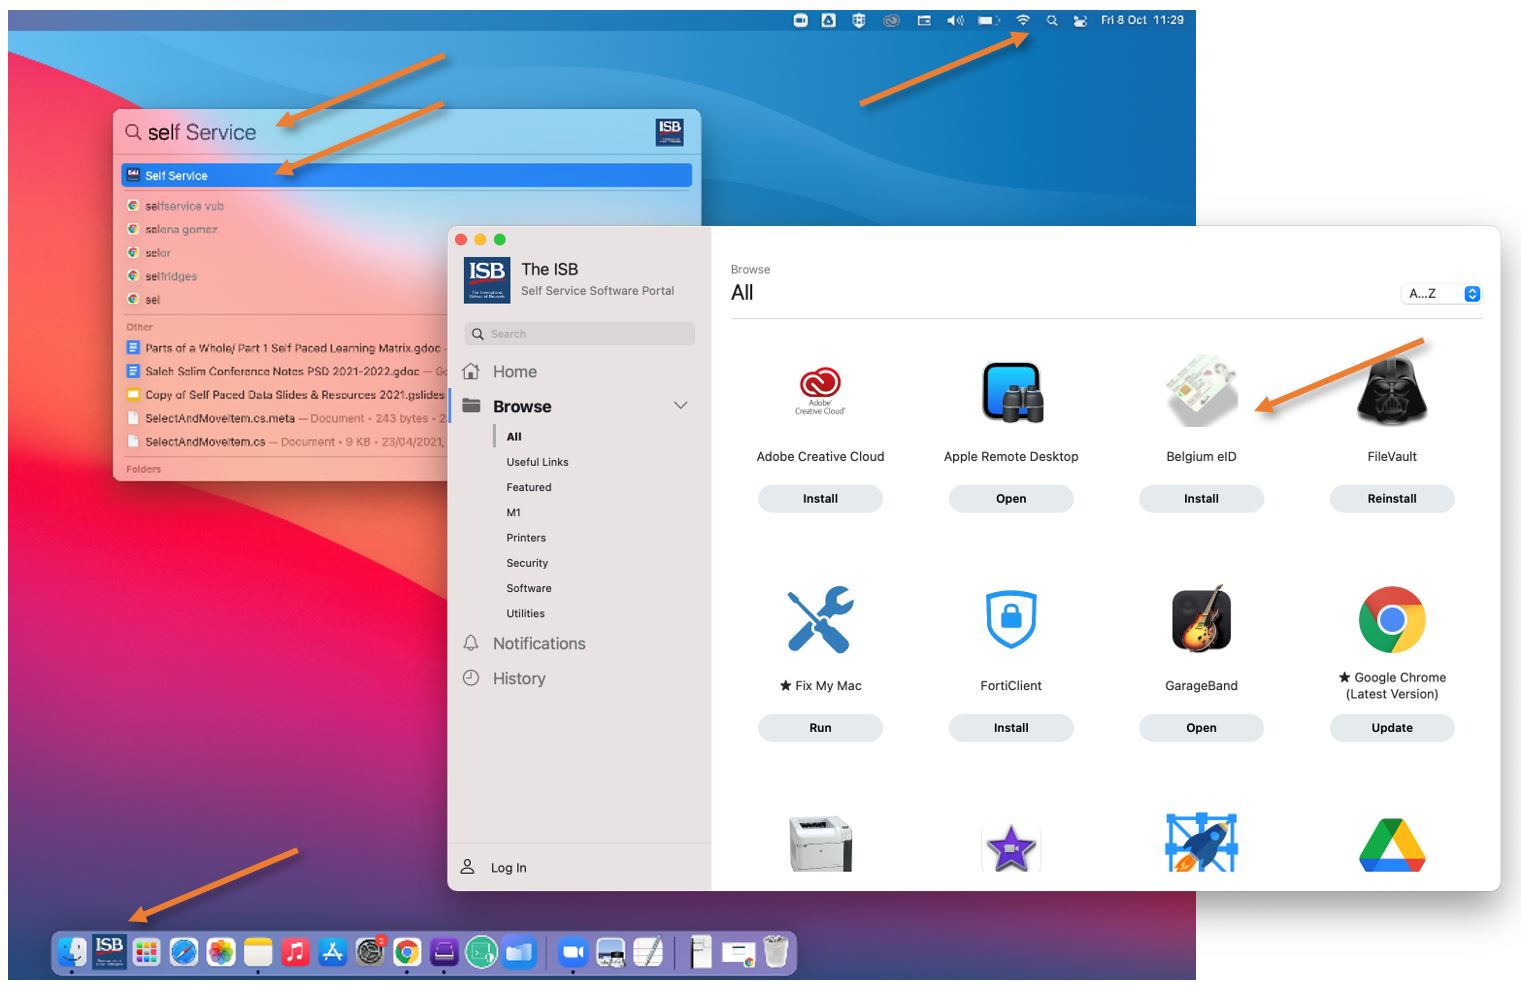
The list of applications is constantly being updated. We are trying to add all the usually requested apps. If what you want/need to install is missing from the list, please let us know by sending an email to IThelpdesk@isb.be, and, if possible, we will make it available for you in the Self Service portal.
Depending on the application, the installation can take between 1 and 30 minutes. When done, the Install button usually changes to Reinstall. To start the installed application, search for it as you did with the Self Service.
Zoom Setup
1. Click here to Update or install Zoom or install via the Self-Service Portal (ISB Logo)
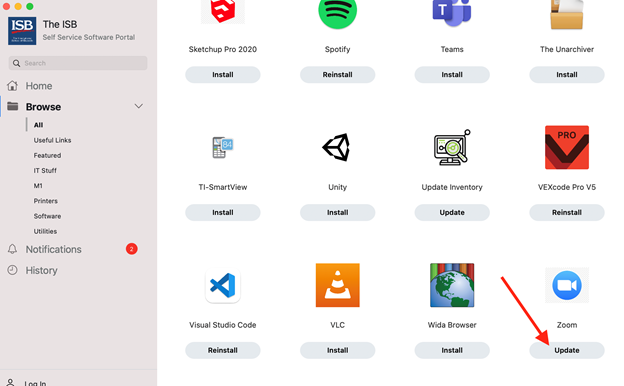
2. Once installed, go to System Preferences and select Security & Privacy
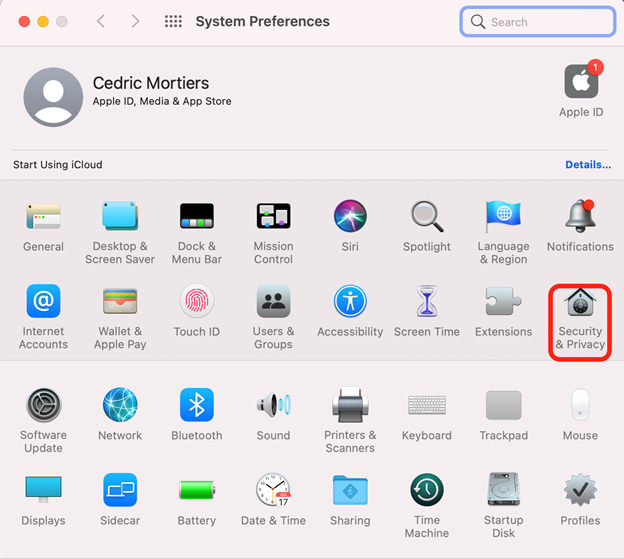
3. Then click on Privacy, Microphone and make sure that zoom.us is ticked. (this needs to be done to be able to mute your microphone)
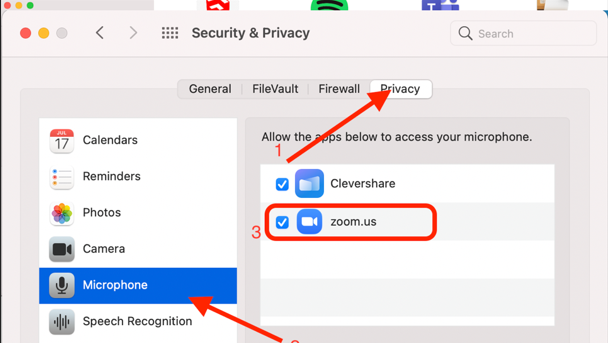
4. Do the same thing for the Screen Recording and the Camera settings. (This will allow you to share your screen)
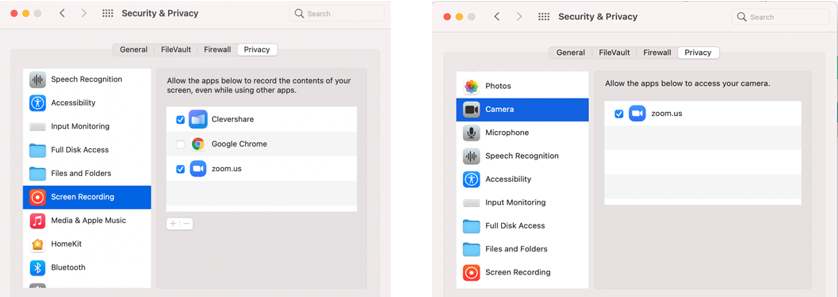
5. Finally, you can open Zoom and you should be ready for your Zoom meetings
Automatically Delete Files in Bin after 30 Days
Automatically Delete Files in Bin after 30 Days
By default, on the Mac laptops, your recycle bin does not delete files automatically. This means that the recycle bin can grow very big.
The Mac laptops can actually automatically delete files in the recycle after they have been there for 30 days. To enable this feature, follow these steps:
Open a Finder window:
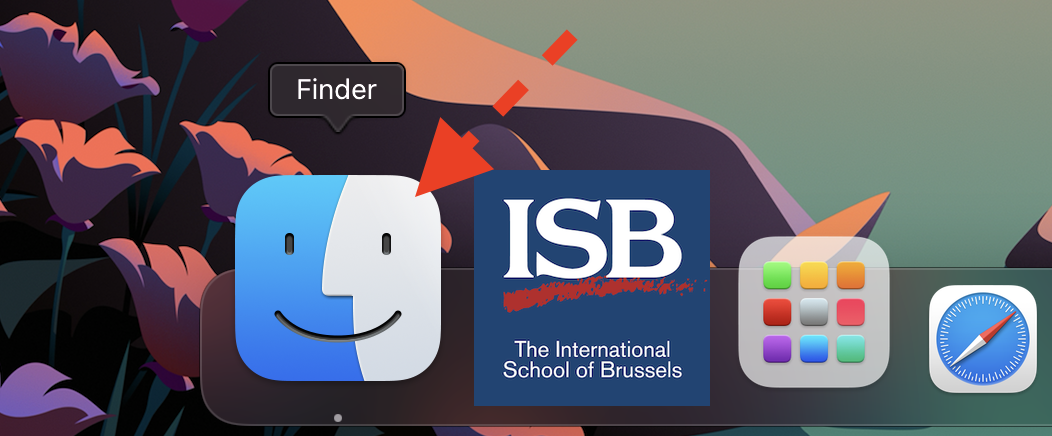
Go to Finder Preferences:
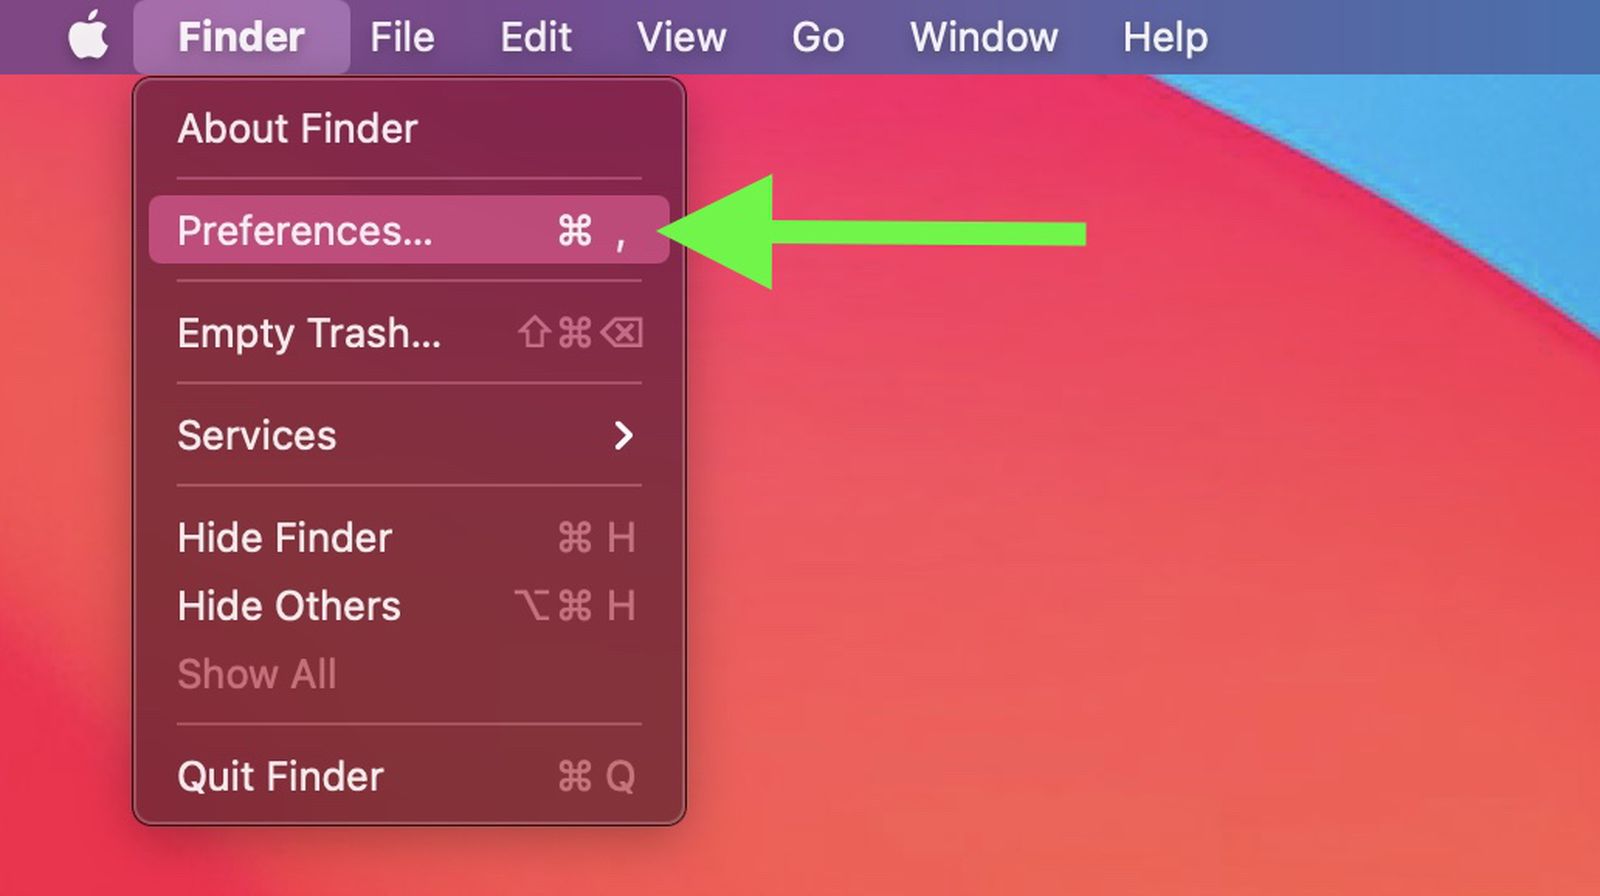
Click on the "Advanced" tab:

Tick the box "Remove items from the Trash after 30 days":
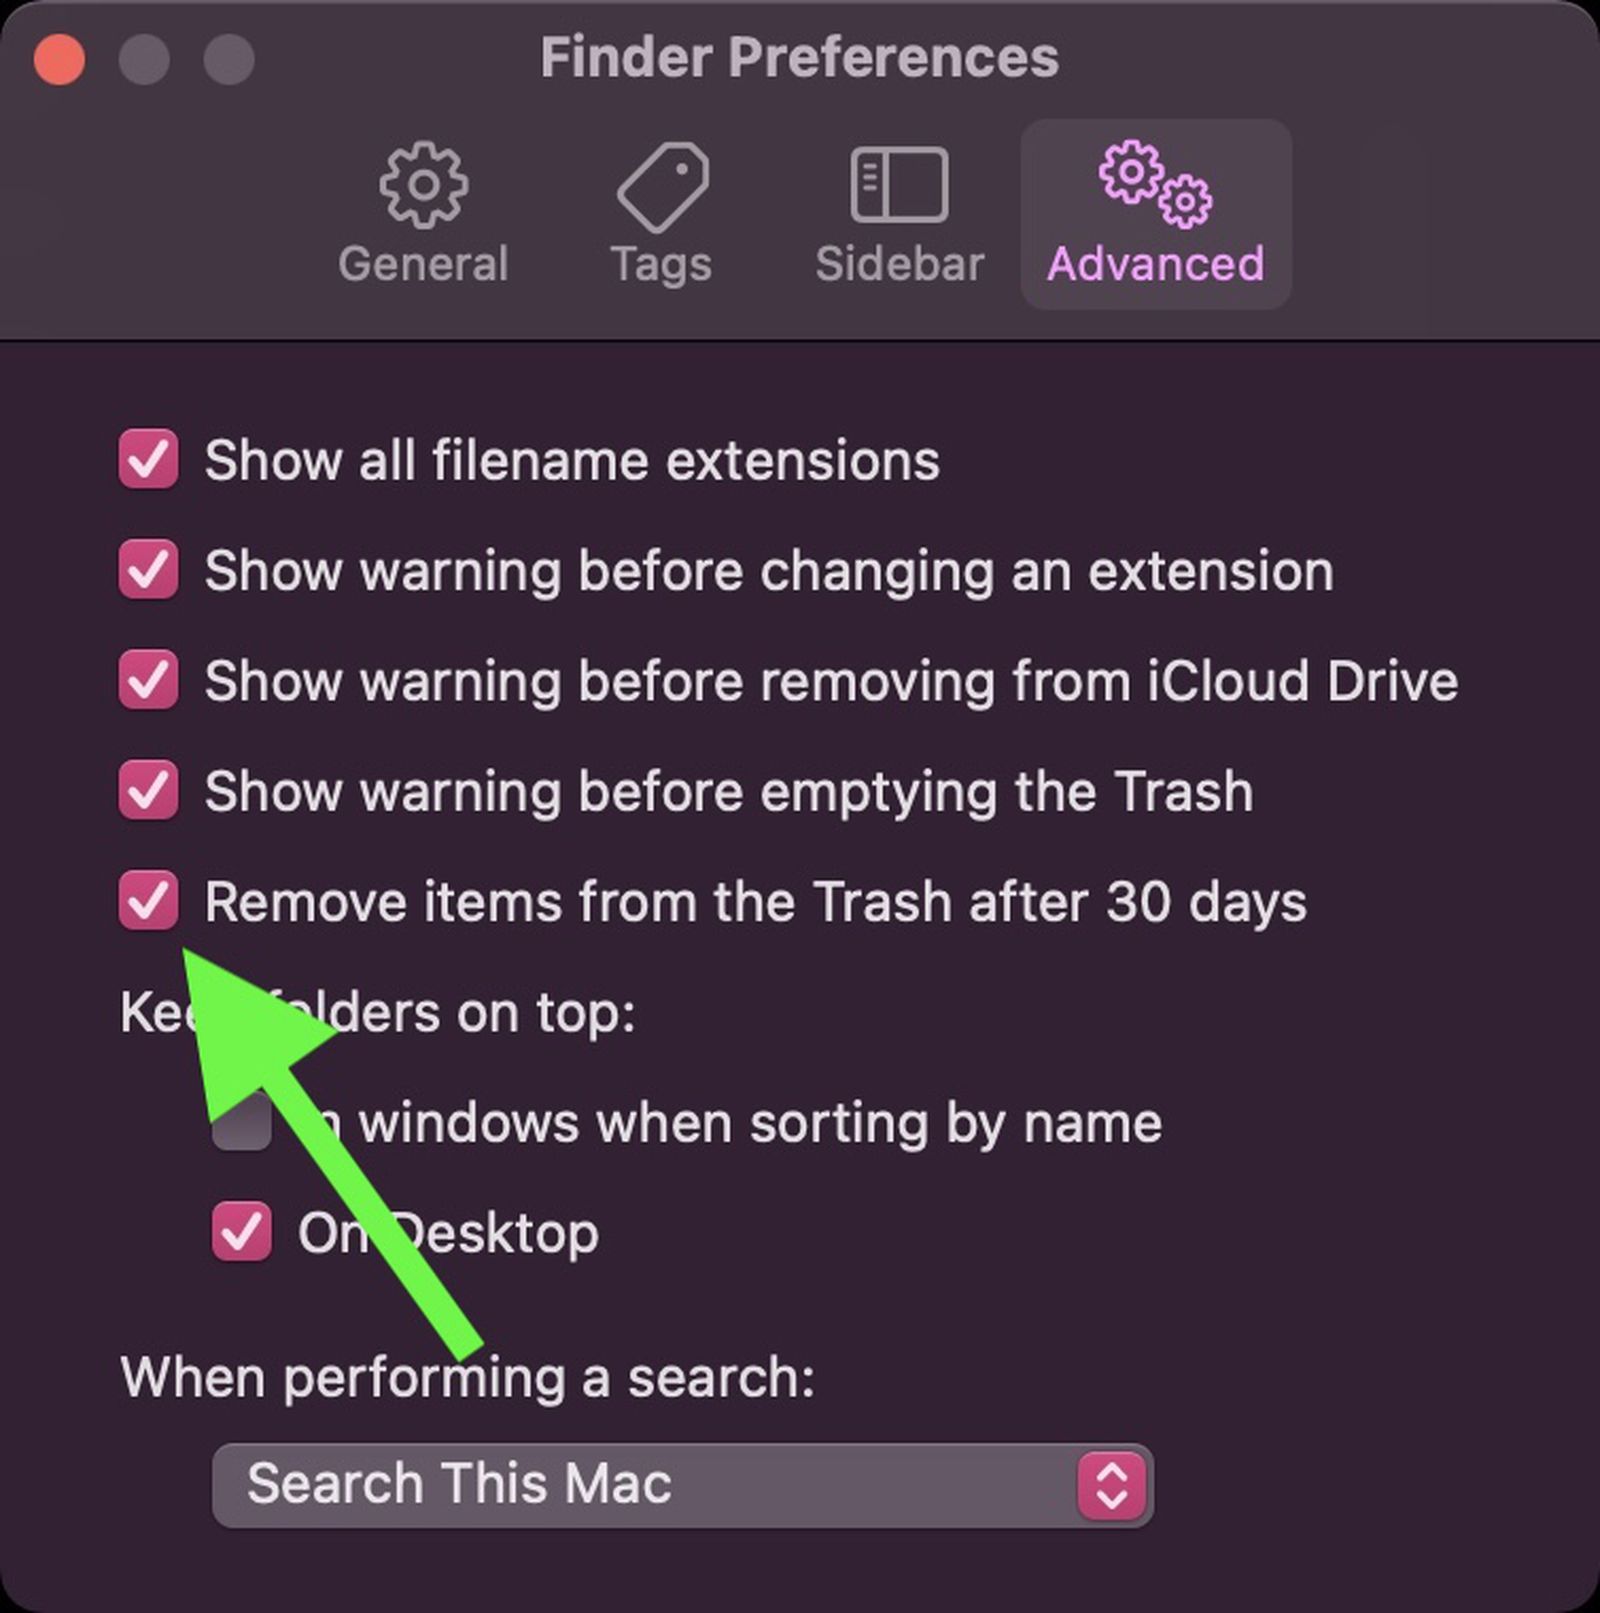
You're done :-)
Getting Mac Version Information
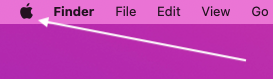
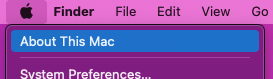
To get the current version of Mac you have installed, follow these steps:
Click the Apple logo in the top left corner of the screen:
Select "About This Mac":
The version information is now available to you:

Installing Zoom for students
1. To install the Zoom app on your laptop, click on this link.
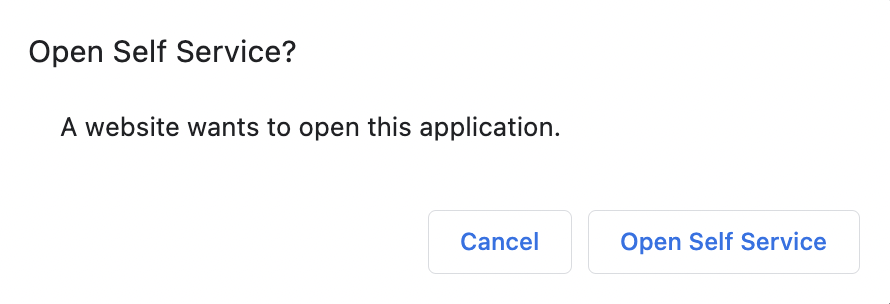
2. In the pop-up window, select Open Self Service.
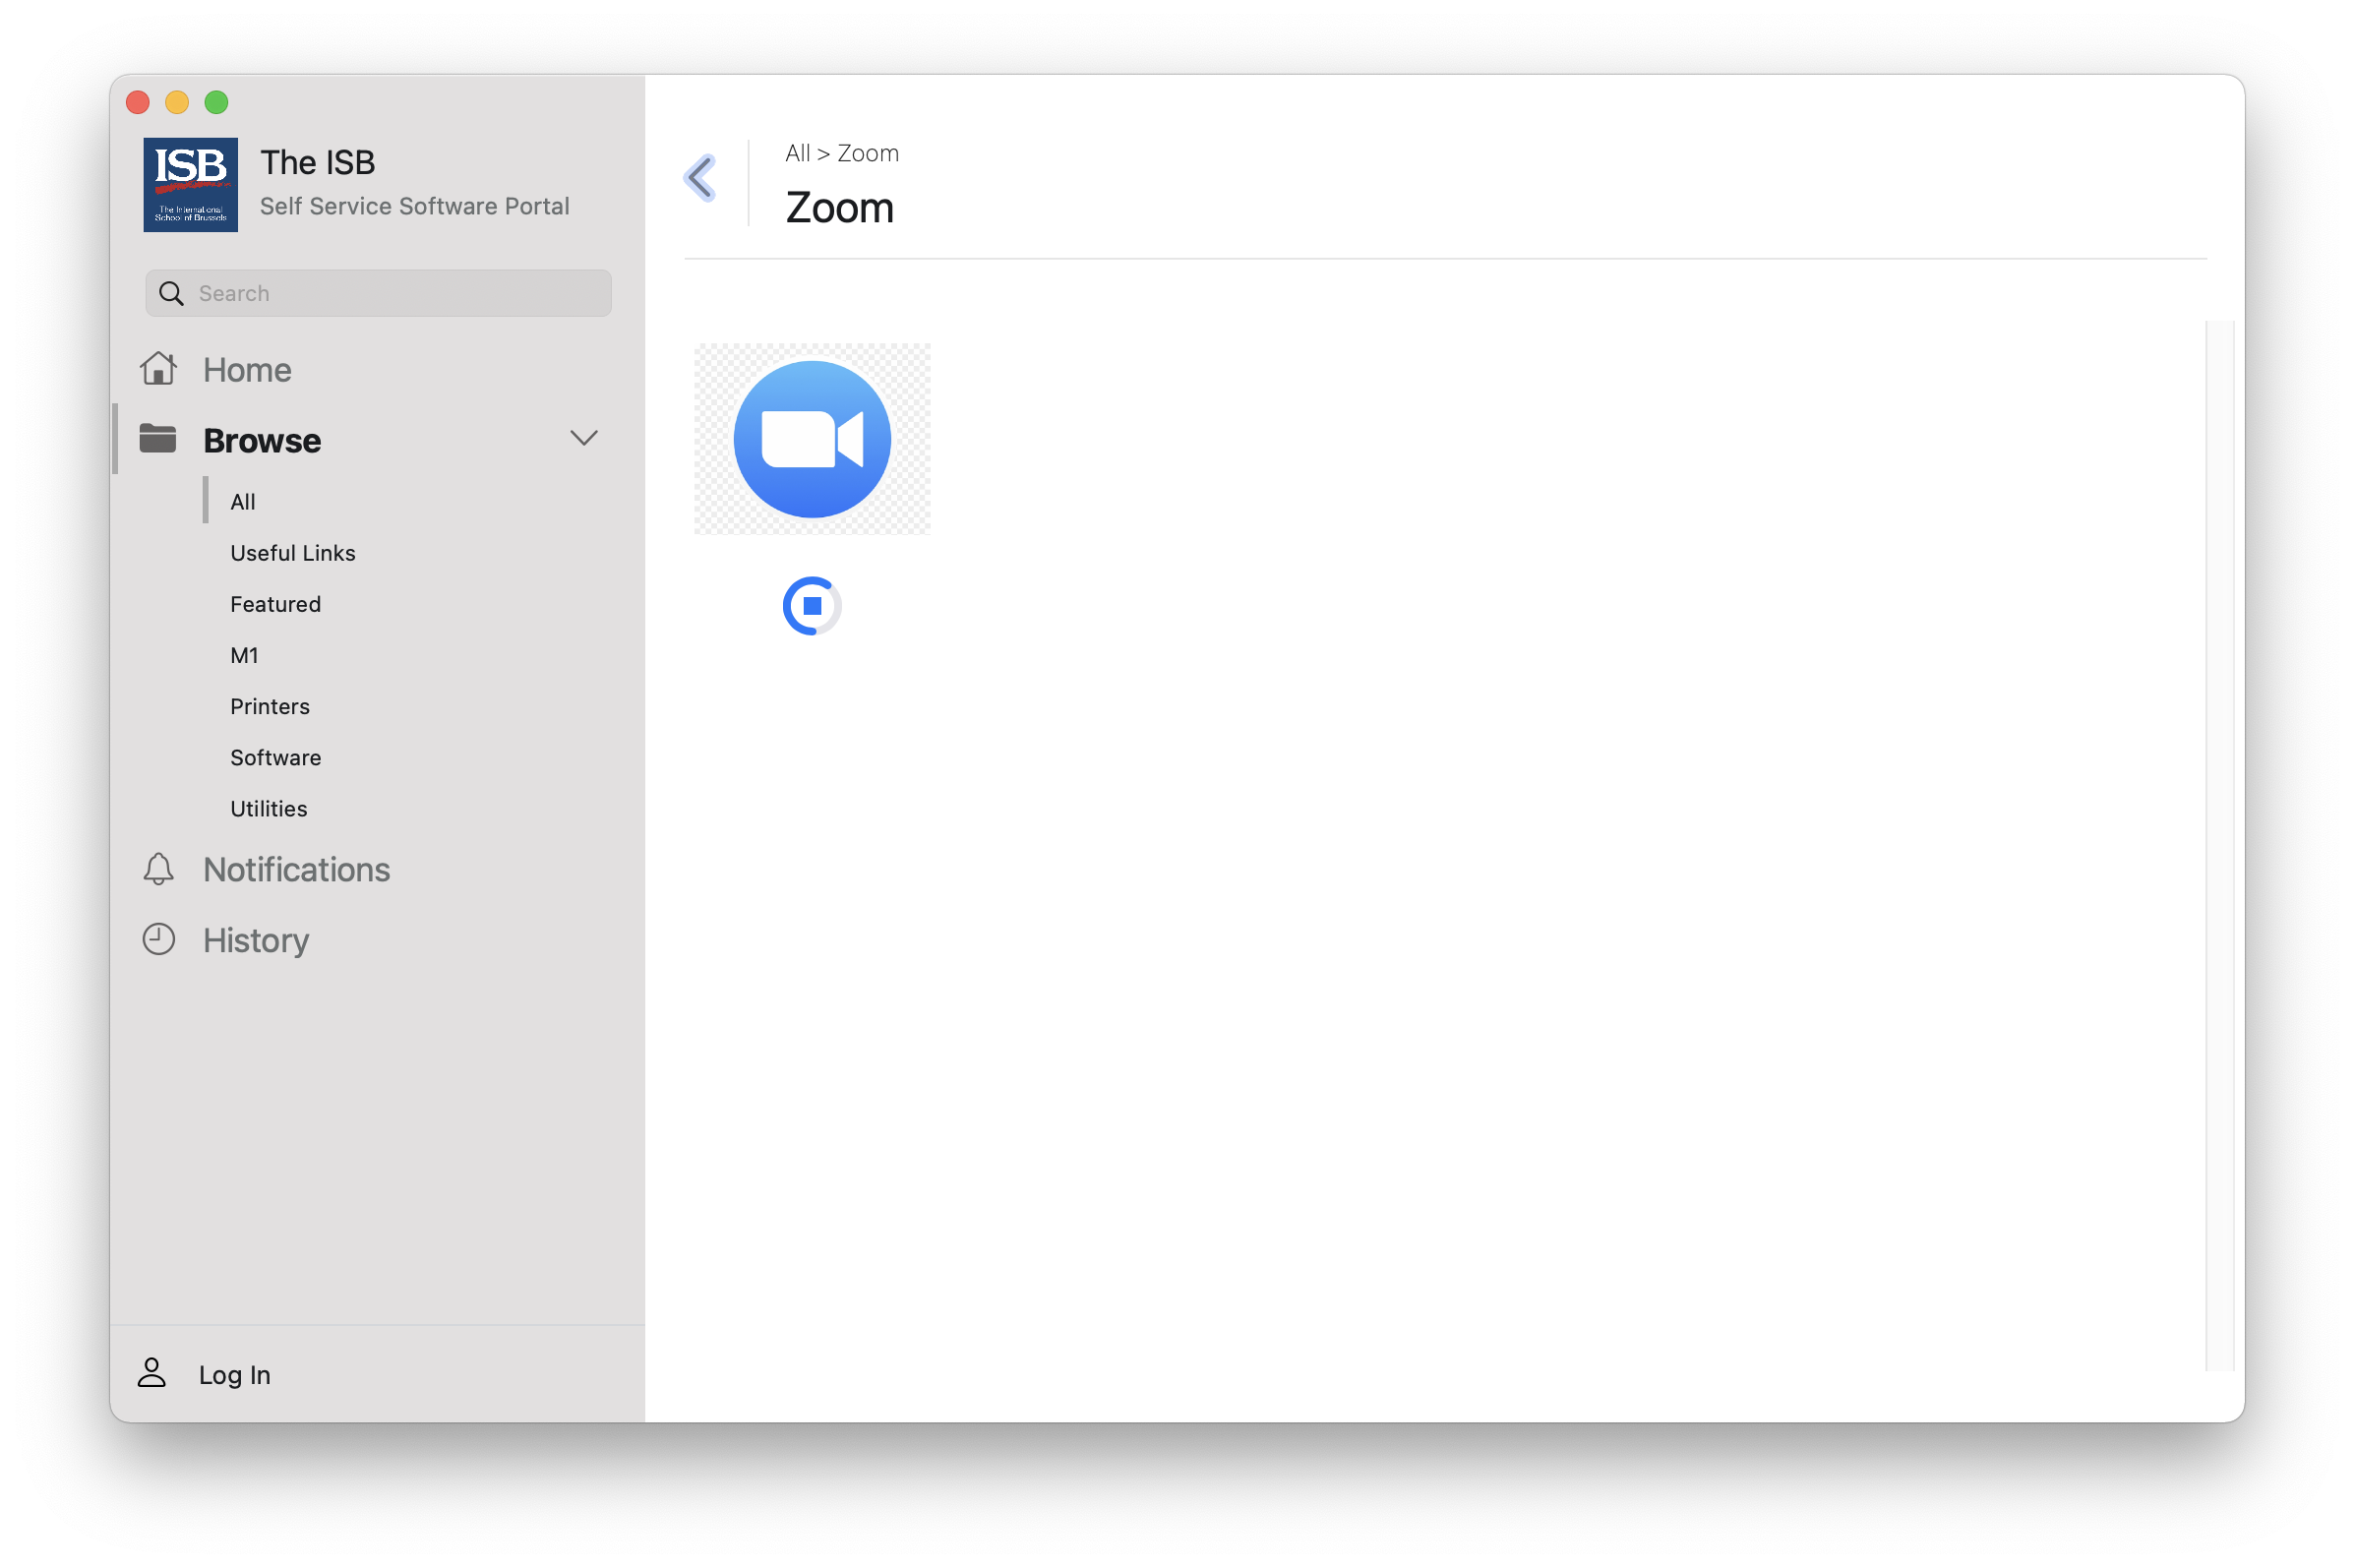
3. Wait until the latest version of the Zoom app gets installed.
Setting Up Zoom for Students
To make sure your camera, microphone and screen sharing works on your computer, please follow the next steps.
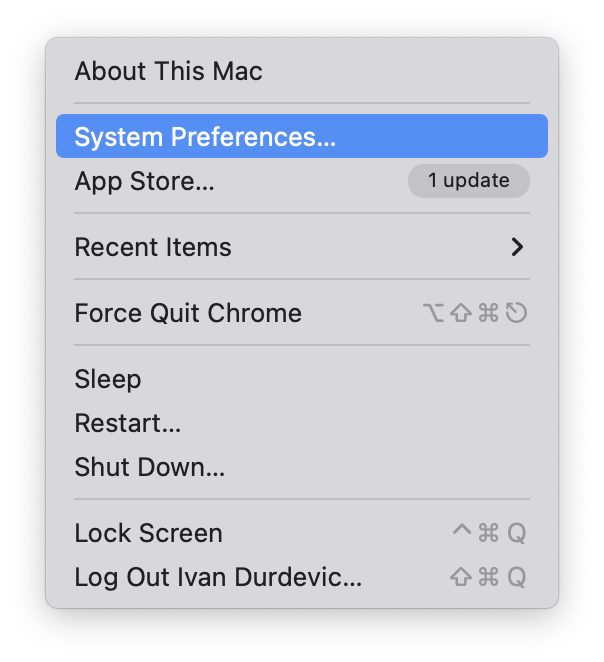
1. On your computer, open System Preferences. You can do so by clicking on the Apple logo in the top-left corner of your screen, and select System Preferences from the manu.

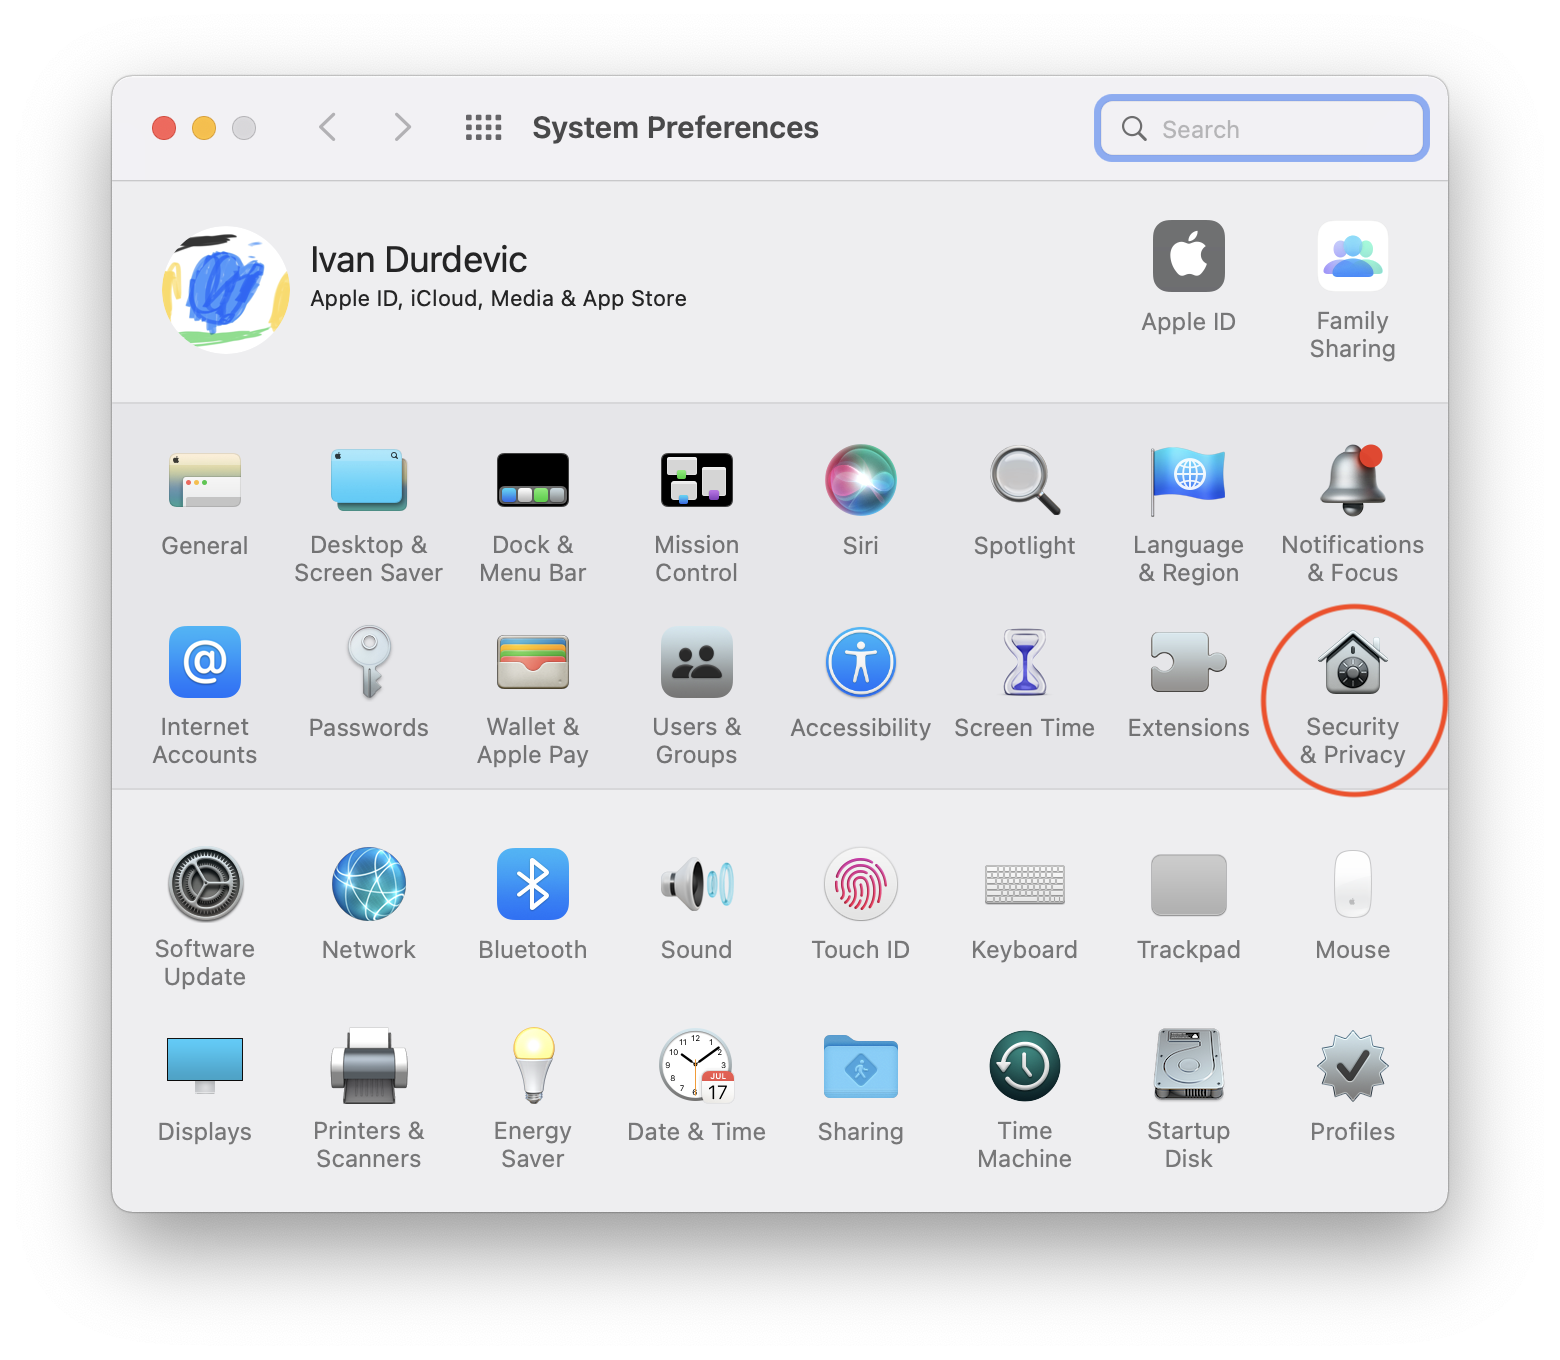
2. Once opened, head out to Security & Privacy.
3. Make sure to select Privacy tab, and in the column on the left, we will have to go through Microphone, Camera and Screen Recording, making sure the Zoom app has the blue checkmark next to it.
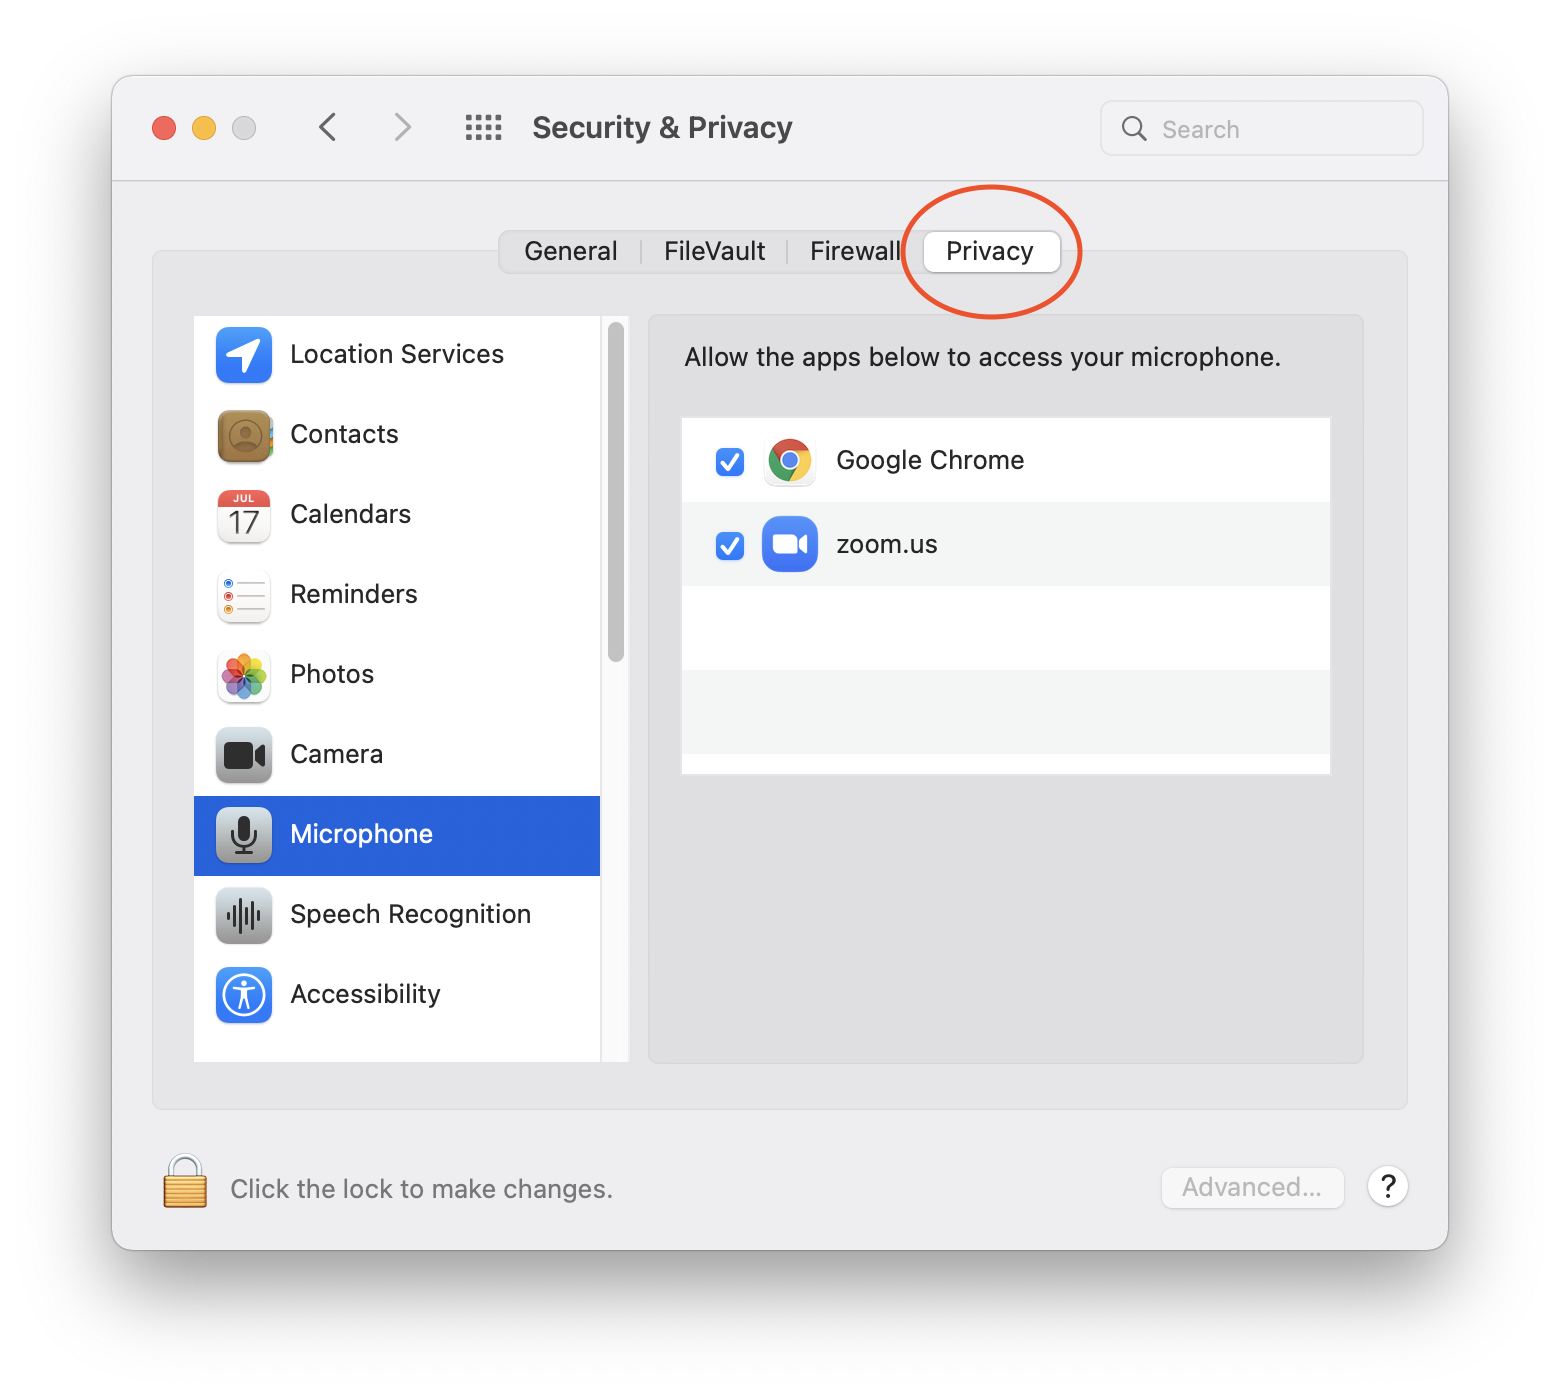
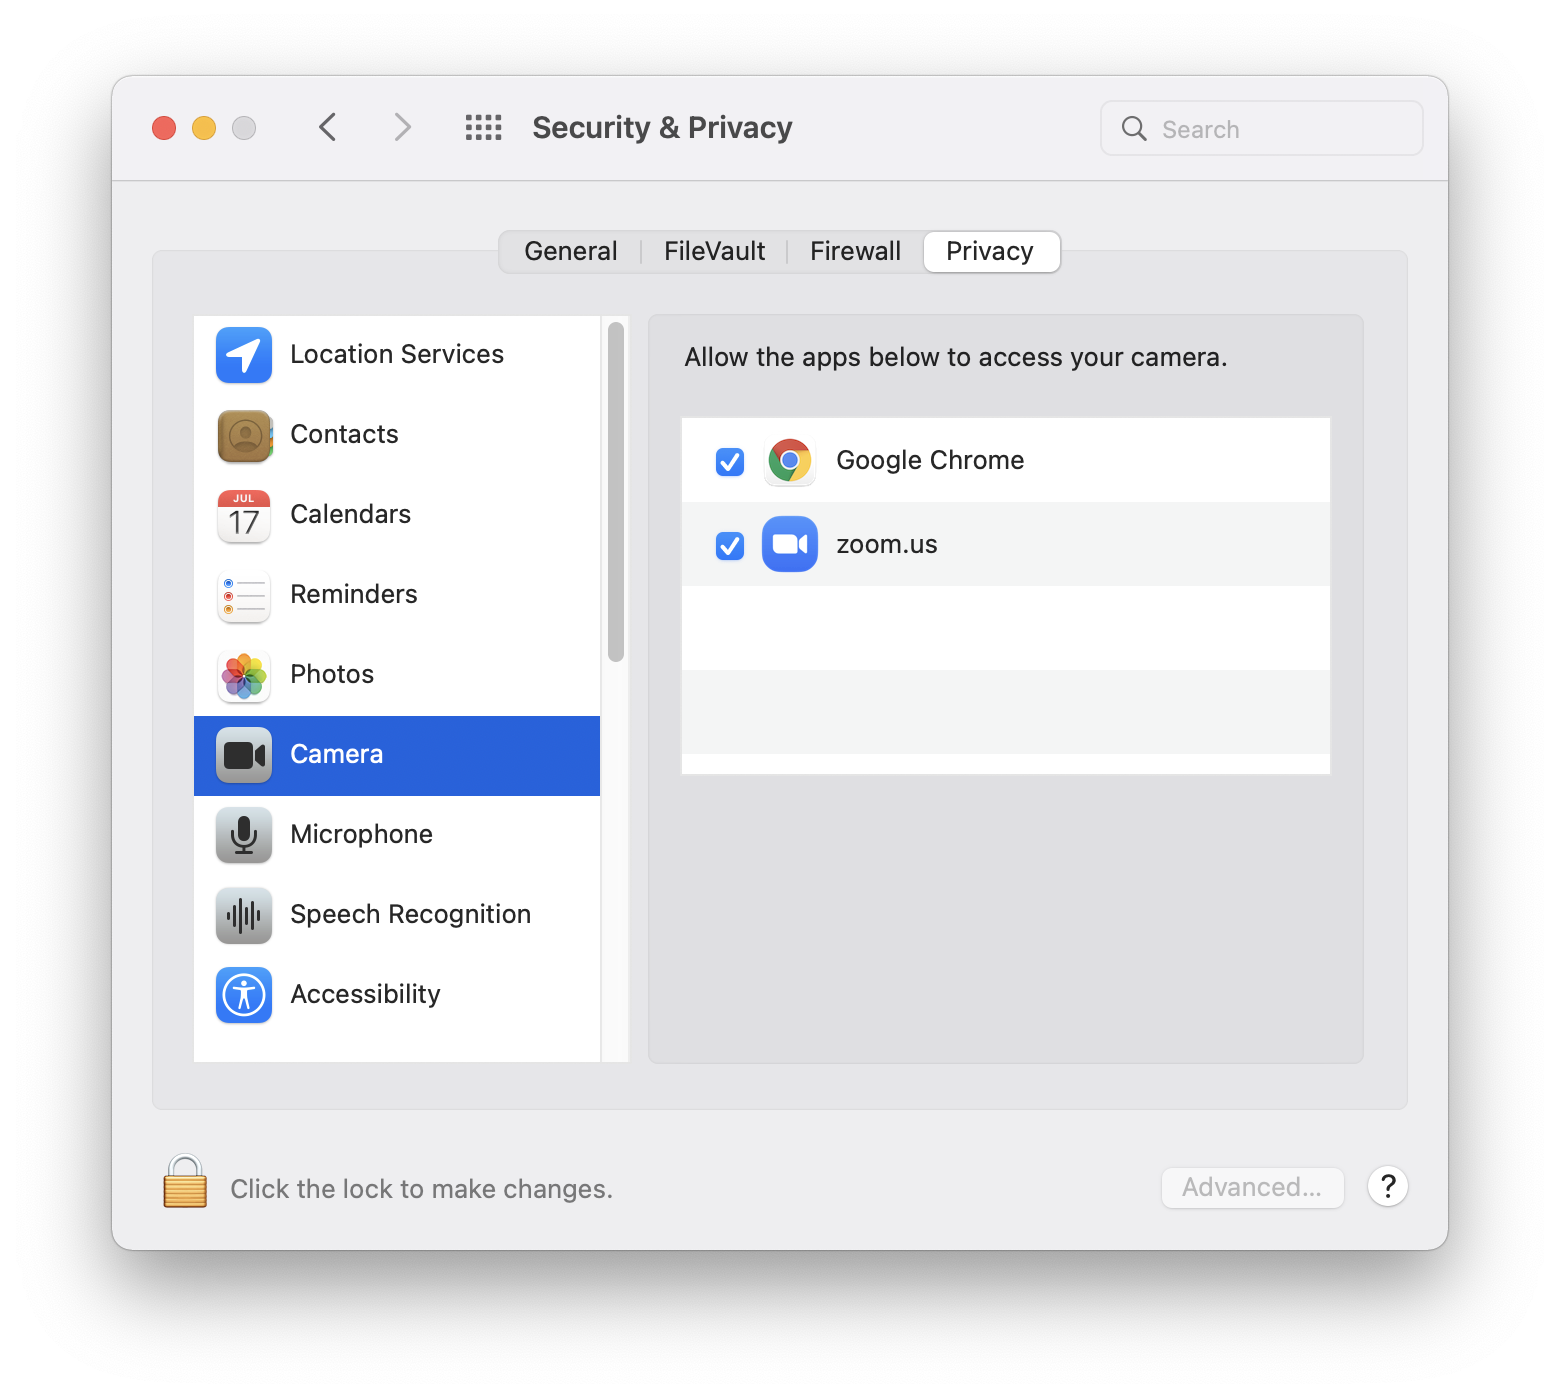
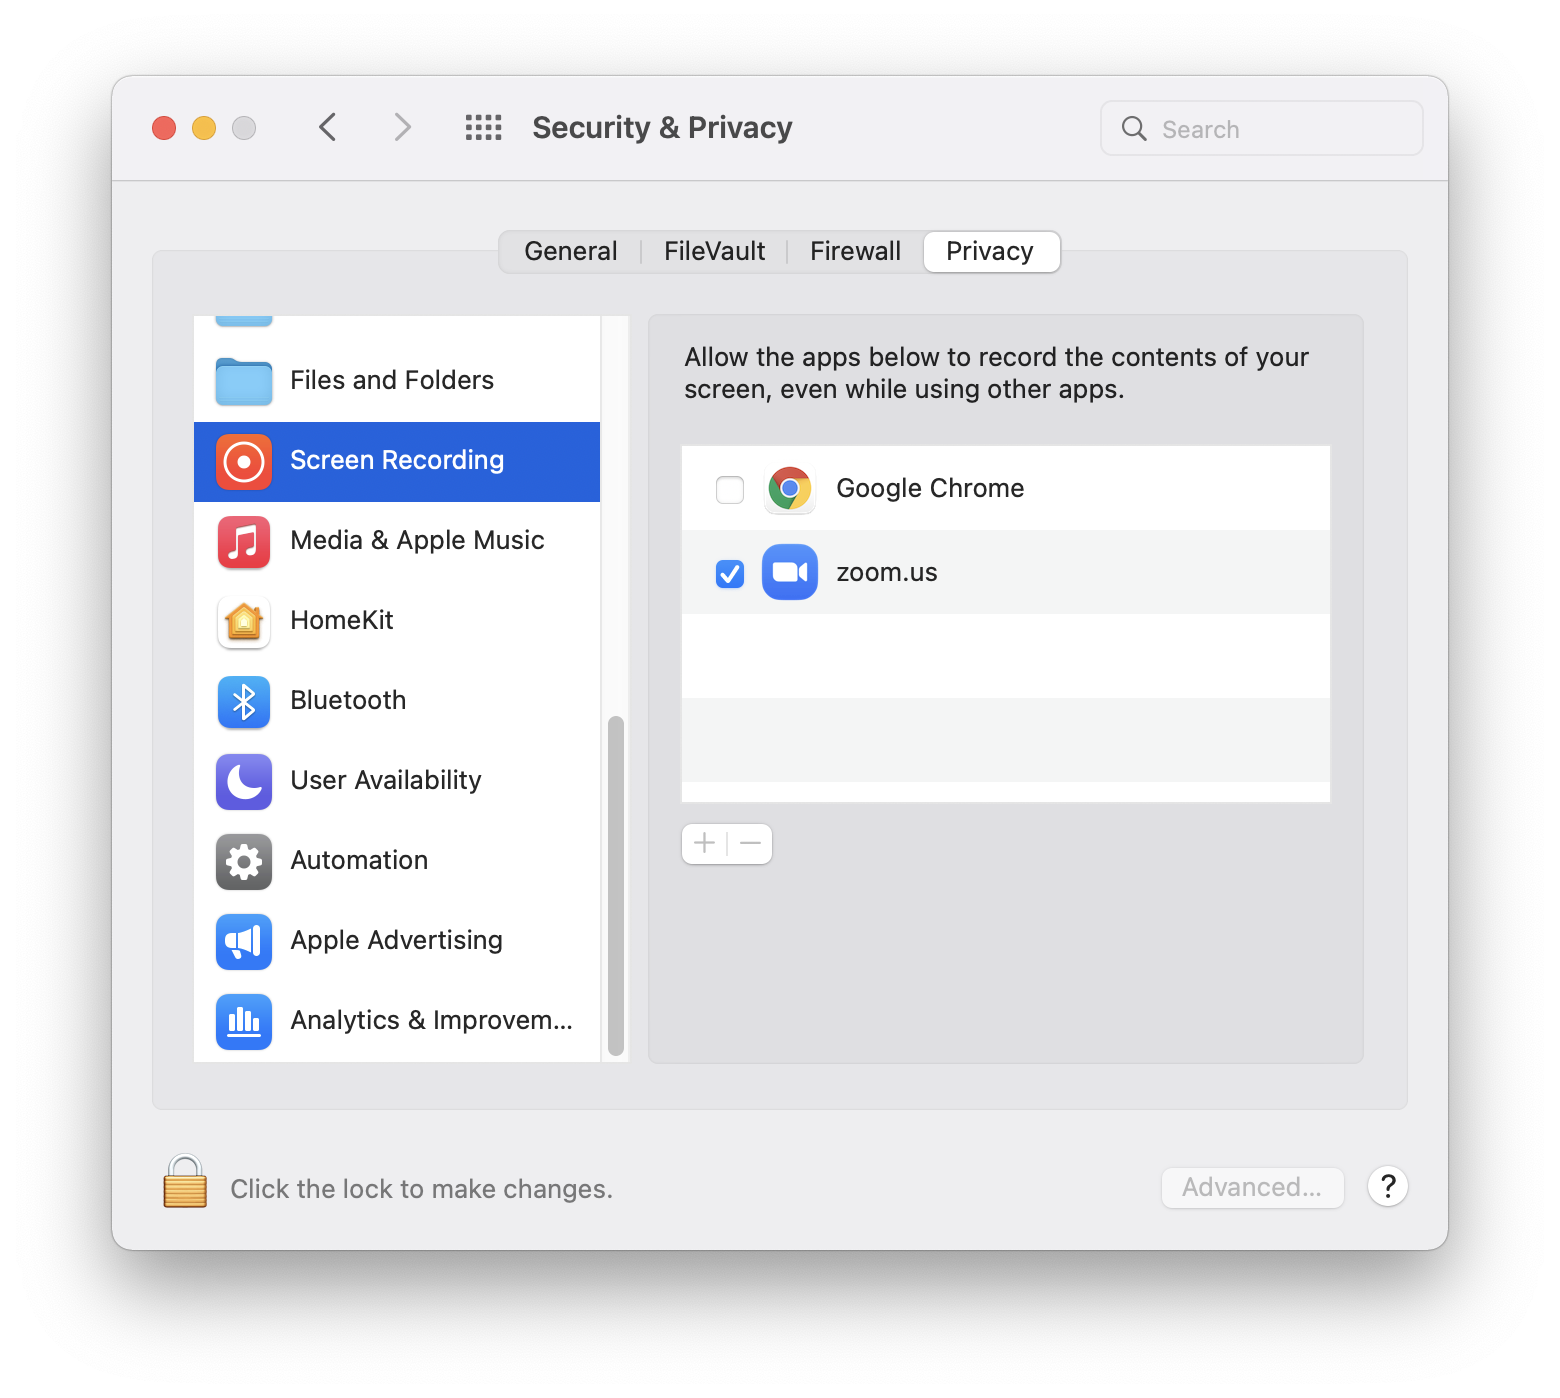
Now you can close the System Preferences, and your Zoom app will have all the features you need.
Congratulations!
Update MacOS
Due to changes in how macOS is being updated, you cannot update your school computer by going into System Preferences.
To bypass the administrative needs, we have deployed an application in Self Service.
Please note that once started, the process cannot be stopped.
Follow these steps to update your Macbook:
- First, open the Self Service (the ISB Icon in the Dock)
- Search for the application called Update MacOS and click on install.
- Enter the password you use to login into your Mac.
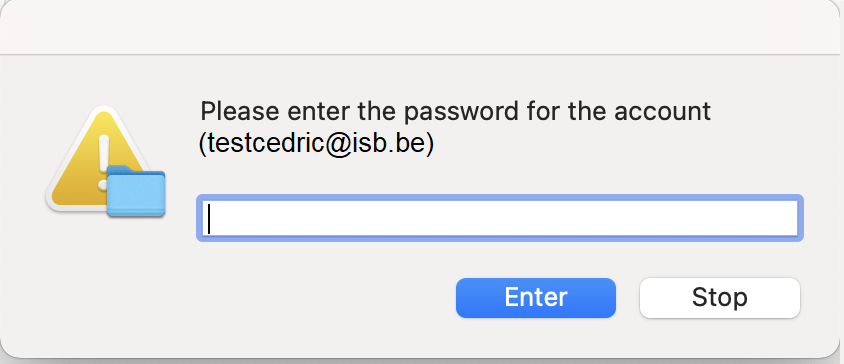
If you don't see the pop up, restart your Mac and start the process again. (Click the Apple logo at the top Left corner, then Restart)
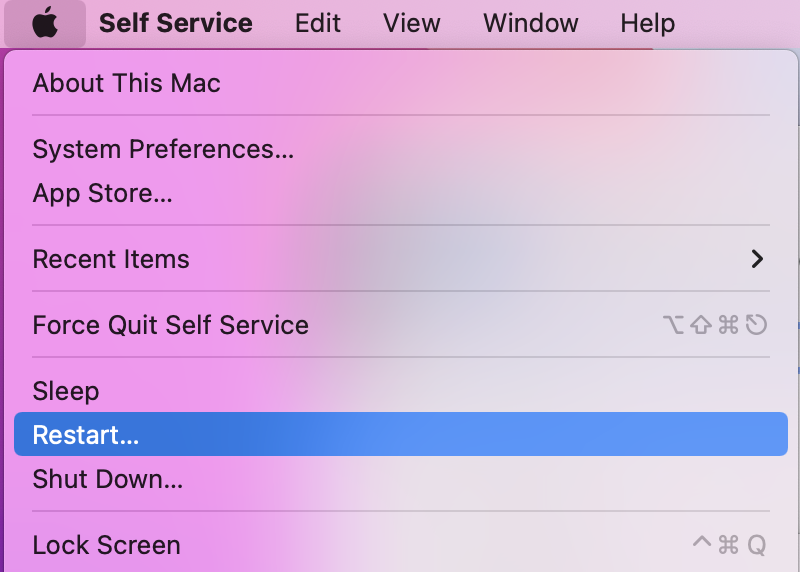
- The update process will start. If the MacOS Installer is not downloaded, you will see the following message
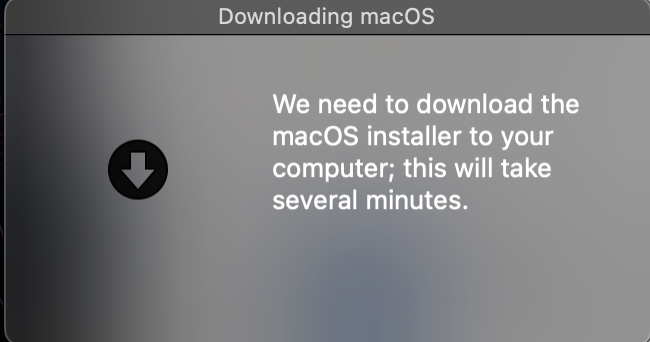
Once the MacOS Installer is downloaded, the update will start and take from 30 min to an hour.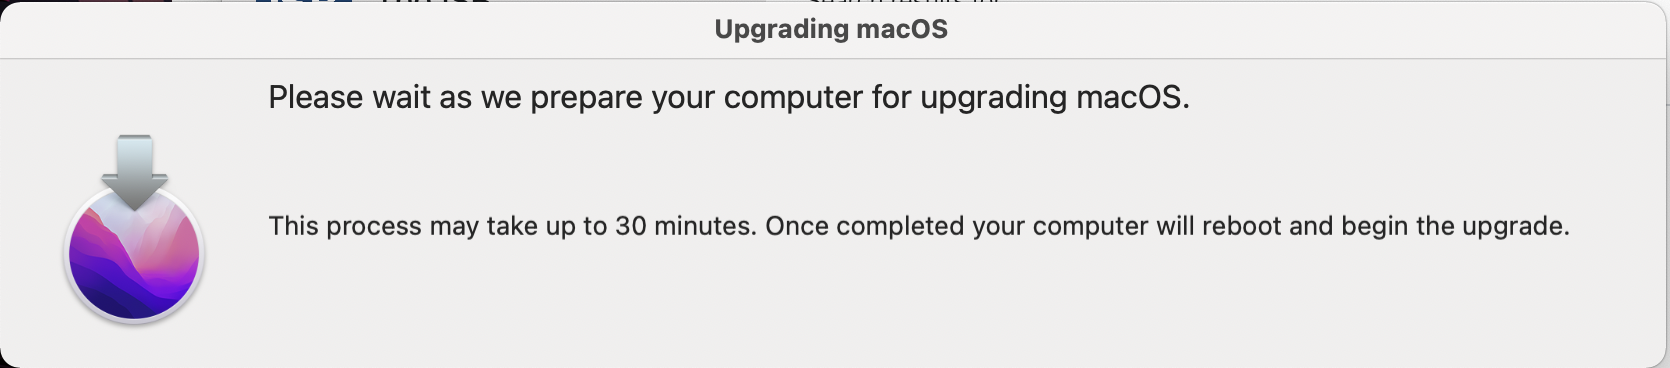
After it restarts and the installation process is done, you might not see the bubble with your user on the login page.
To fix it, you need to restart your computer.
Your username is your email address without @isb.be.
The password is the same as the one you usually use to log in to the computer.
Accessing ISB Drives
ISB has many drives. To connect to one, follow these steps:
Open a Finder window:
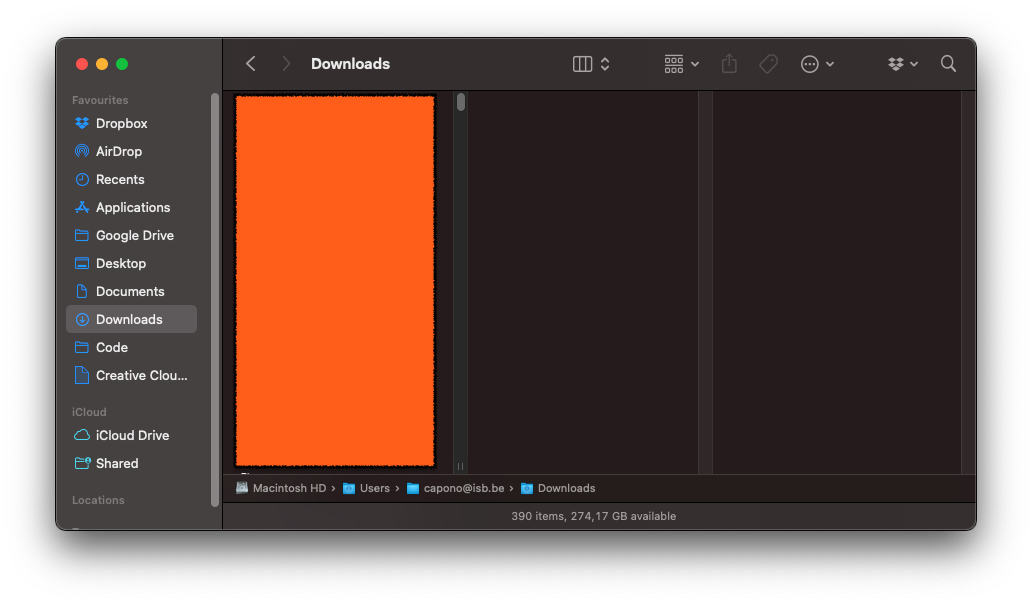
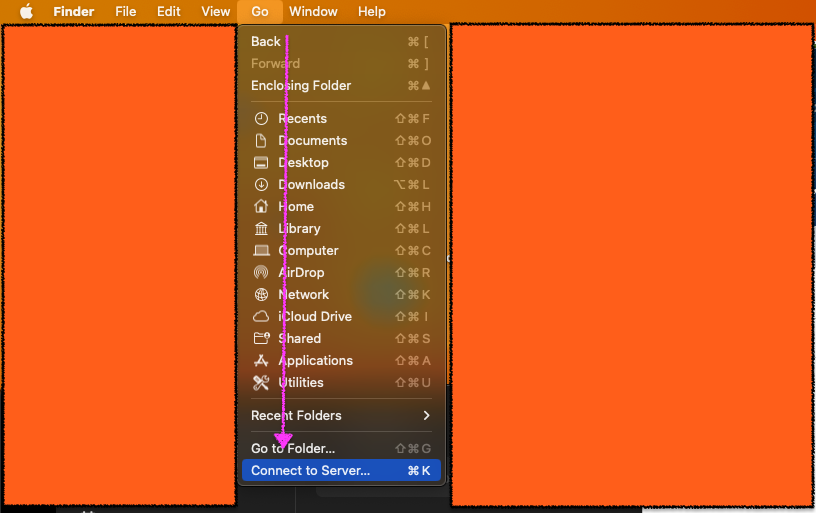
In the top bar, click on "Go" and then "Connect to Server":
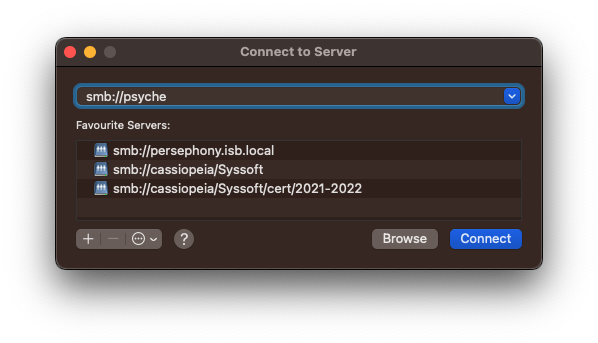
Type in the name of the server:
Be sure to put smb:// before the name of the server or it won't be able to connect
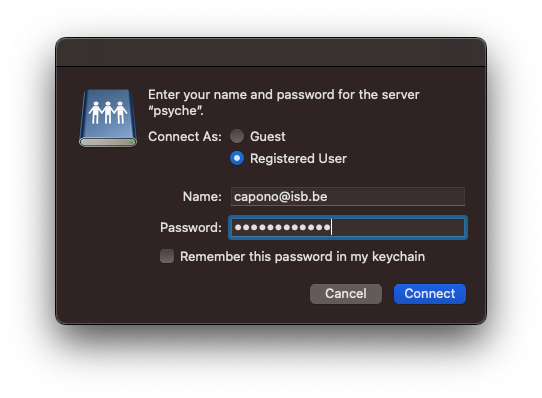
You will be prompted to sign in, this should be the same user details as you use to sign in to your email:
Select the folder you wish to access:
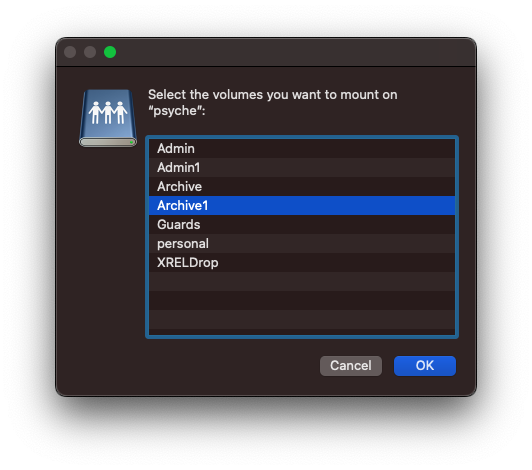
Click ok, you are now connected to the drive:
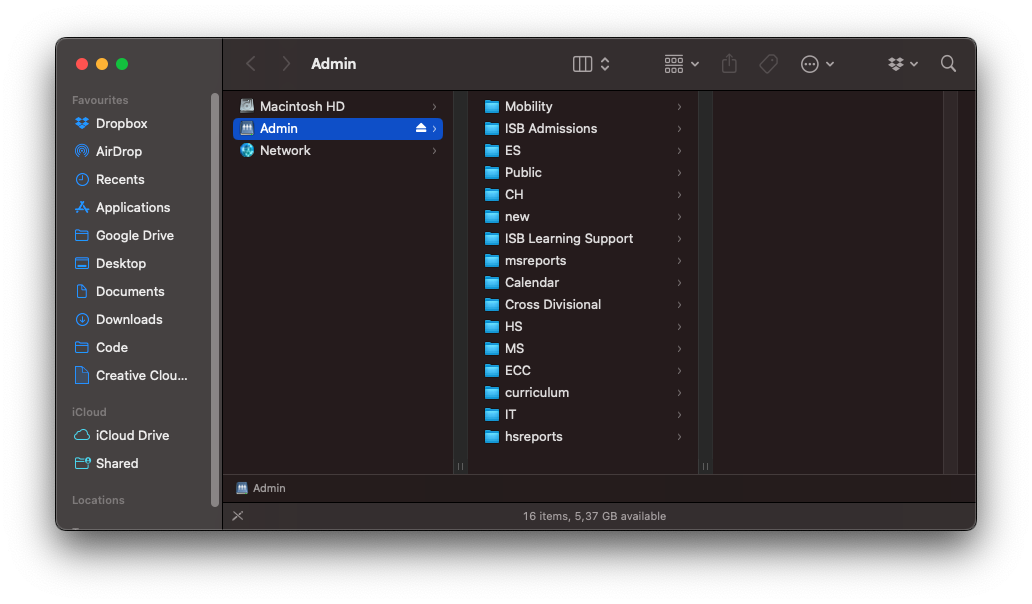
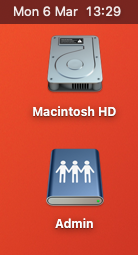
If the window doesn't open, you will see an icon in the top right corner of your desktop which you can click to open the drive:
Google Essentials
Gmail, Google Drive, Docs, Sheets, Slides, Google Meet, and account help.
Sign in to your ISB Google account
ISB Google services are protected by Microsoft single sign-on (SSO). You use your ISB Microsoft account to authenticate before accessing Gmail, Drive, Docs, Sheets, Slides, Google Meet, and other school services.
Steps
- Open Google or the ISB-provided Google service link.
- Select Sign in.
- Enter your ISB email address.
- When redirected to Microsoft, sign in with your ISB Microsoft account.
- Complete Microsoft verification or MFA if requested.
- Wait for Google to complete the sign-in.
If you cannot sign in
- Check that you are using your ISB account, not a personal Google account.
- Check that you are using your ISB email address.
- Check your Microsoft sign-in details and keyboard language.
- Try an incognito/private browser window.
- If you recently changed your Microsoft password, sign out and sign in again.
- Contact ISB IT if Microsoft SSO, MFA, or your account is locked.
Audience: Everyone
Last reviewed: [23 July 2026]
Owner: ISB IT
Use two Google accounts at the same time
Chrome profiles are the safest way to keep your ISB account and personal Google account separate.
Recommended method: Chrome profiles
- Open Chrome.
- Select your profile picture in the top-right corner.
- Select Add or Add new profile.
- Sign in with your ISB Google account.
- Give the profile a clear name, such as ISB.
Use the ISB profile for school Gmail, Drive, Docs, Sheets, Slides, and Google Meet.
Important
- Check the profile picture before creating or sharing a file.
- Do not store school documents in a personal Drive.
- Do not share confidential school information with a personal account.
Audience: Everyone
Last reviewed: [23 July 2026]
Owner: ISB IT
Chrome profiles
Create a Chrome profile for your ISB account
Chrome profiles keep school browsing, bookmarks, history, and sign-in sessions separate from personal browsing.
Steps
- Open Chrome.
- Select the profile picture in the top-right corner.
- Select Add.
- Choose Sign in if prompted.
- Sign in with your ISB Google account.
- Name the profile ISB and choose a recognizable color.
Good practice
- Use the ISB profile for school work.
- Check the active profile before uploading or sharing files.
- Do not enable sync for a personal account on a shared school computer.
Audience: Everyone
Last reviewed: [23 July 2026]
Owner: ISB IT
Start or join a Google Meet
Google Meet is used for online meetings, lessons, interviews, and collaboration.
Join a meeting
- Open the Meet link from your ISB email, Calendar event, Classroom, or message.
- Check your camera and microphone before joining.
- Select Join now or Ask to join.
- Keep your microphone muted when you are not speaking.
Start a meeting
- Open Google Meet with your ISB account.
- Select New meeting.
- Choose the available meeting option.
- Share the meeting link only with the intended participants.
During the meeting
- Use the microphone button to mute or unmute.
- Use the camera button to turn video on or off.
- Use Present now to share your screen or a window.
- Use captions when helpful.
- Leave the meeting when finished.
Audience: Everyone
Last reviewed: [23 july 2026]
Owner: ISB IT
Chrome - Clear Cache
If Chrome displays a page incorrectly or it fails to sign you in, clear the cache and try again.
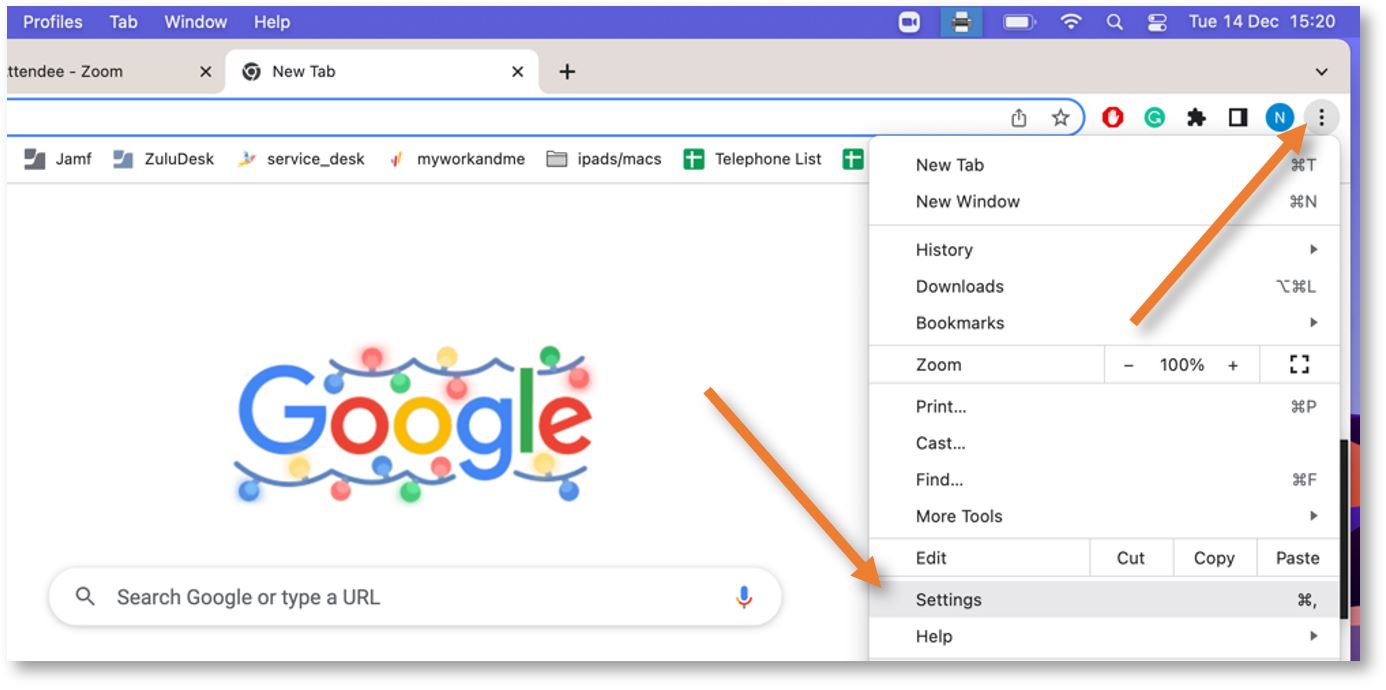
Click the 3 vertical dots from the upper-right corner and select Settings.
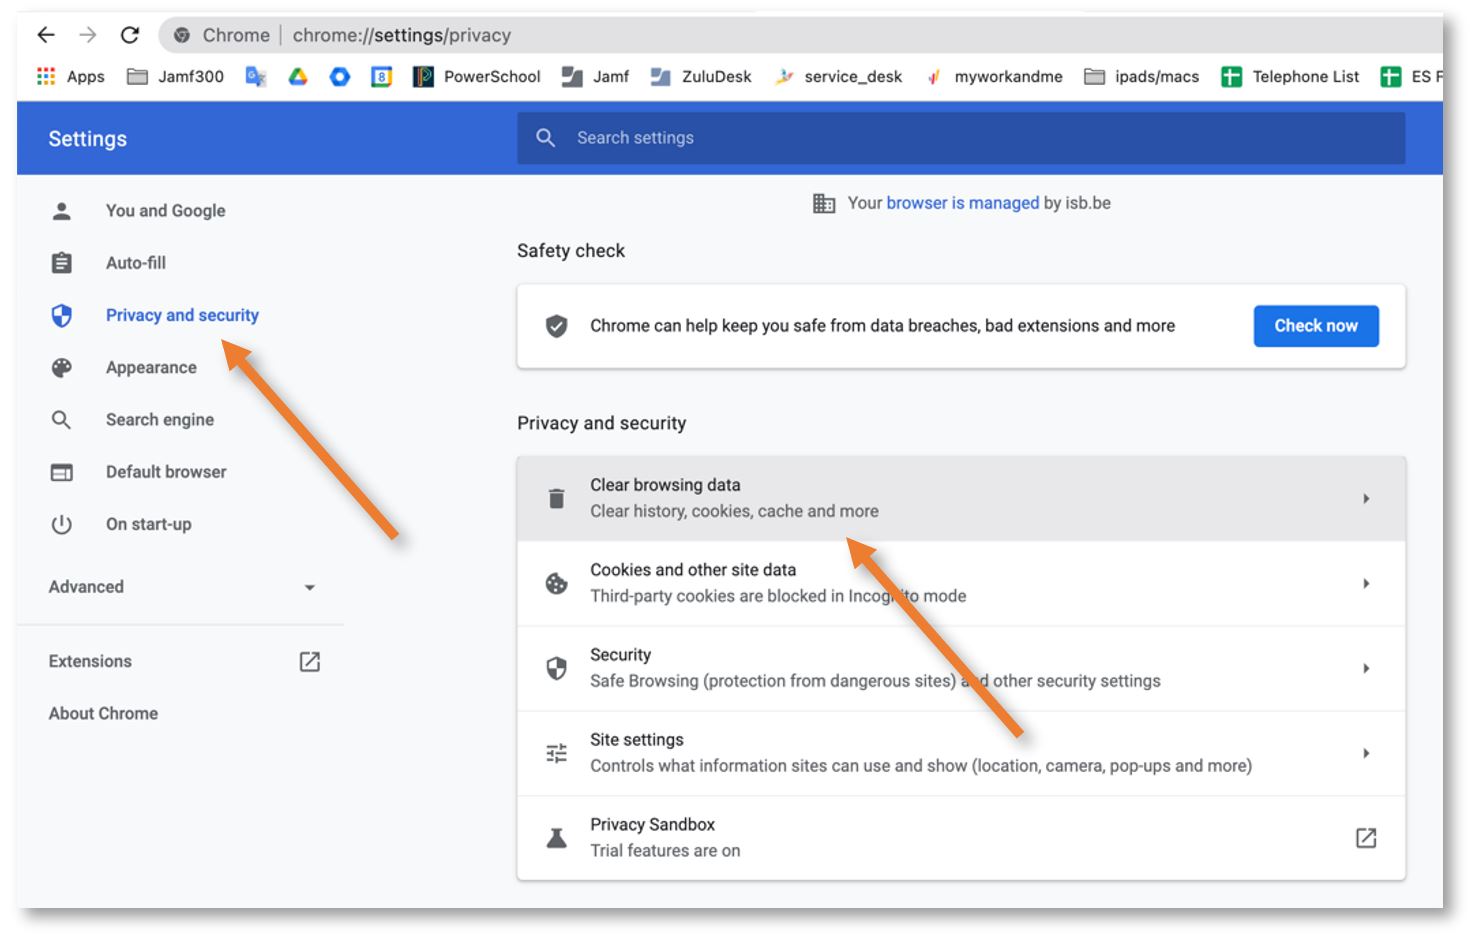
Click on Privacy and security in the left panel and select Clear browsing data.
Uncheck Browsing history, choose All Time under Time range, and click Clear Data.
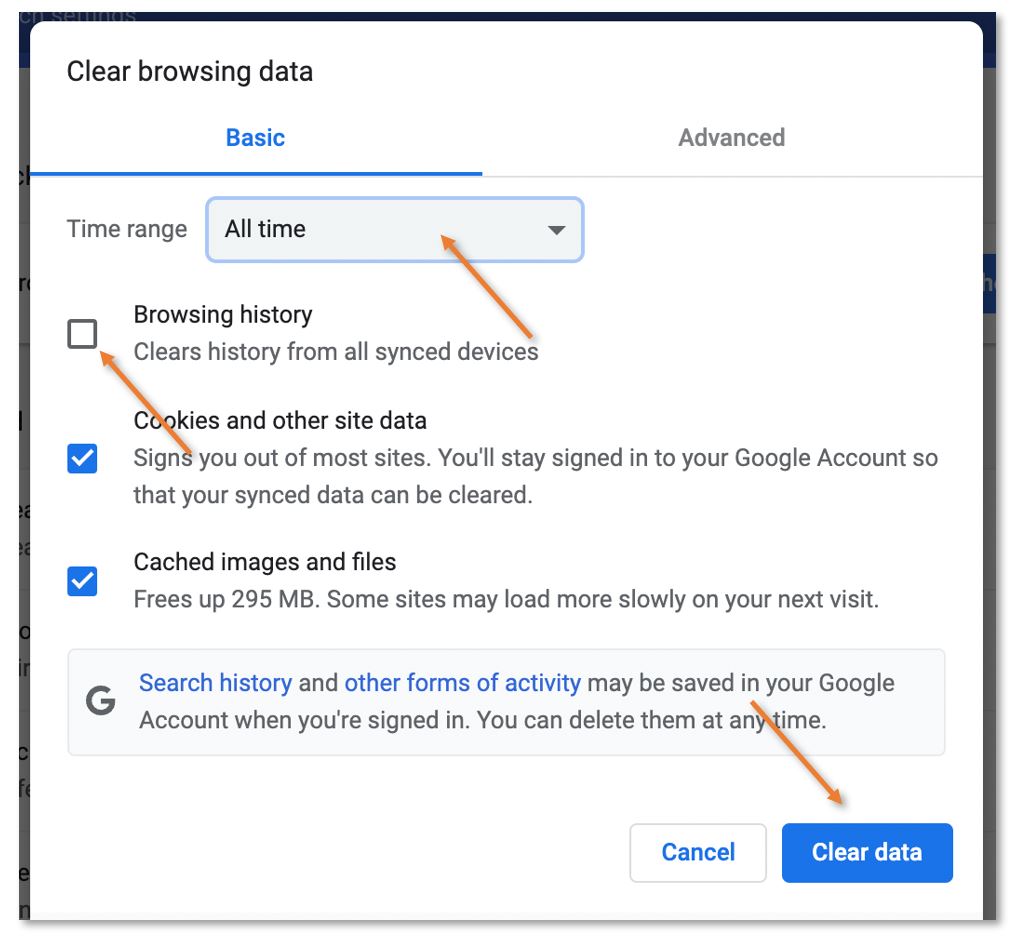
Reload the page and try again.
For other browsers, you can find instructions here
Chrome - Enable Spell Check
To activate the spellcheck in Chrome, please open the Customize Menu (1) and click on Settings (2). Under You and Google (3) select Sync and Google services (4), scroll down and activate Enhanced spell check (5). 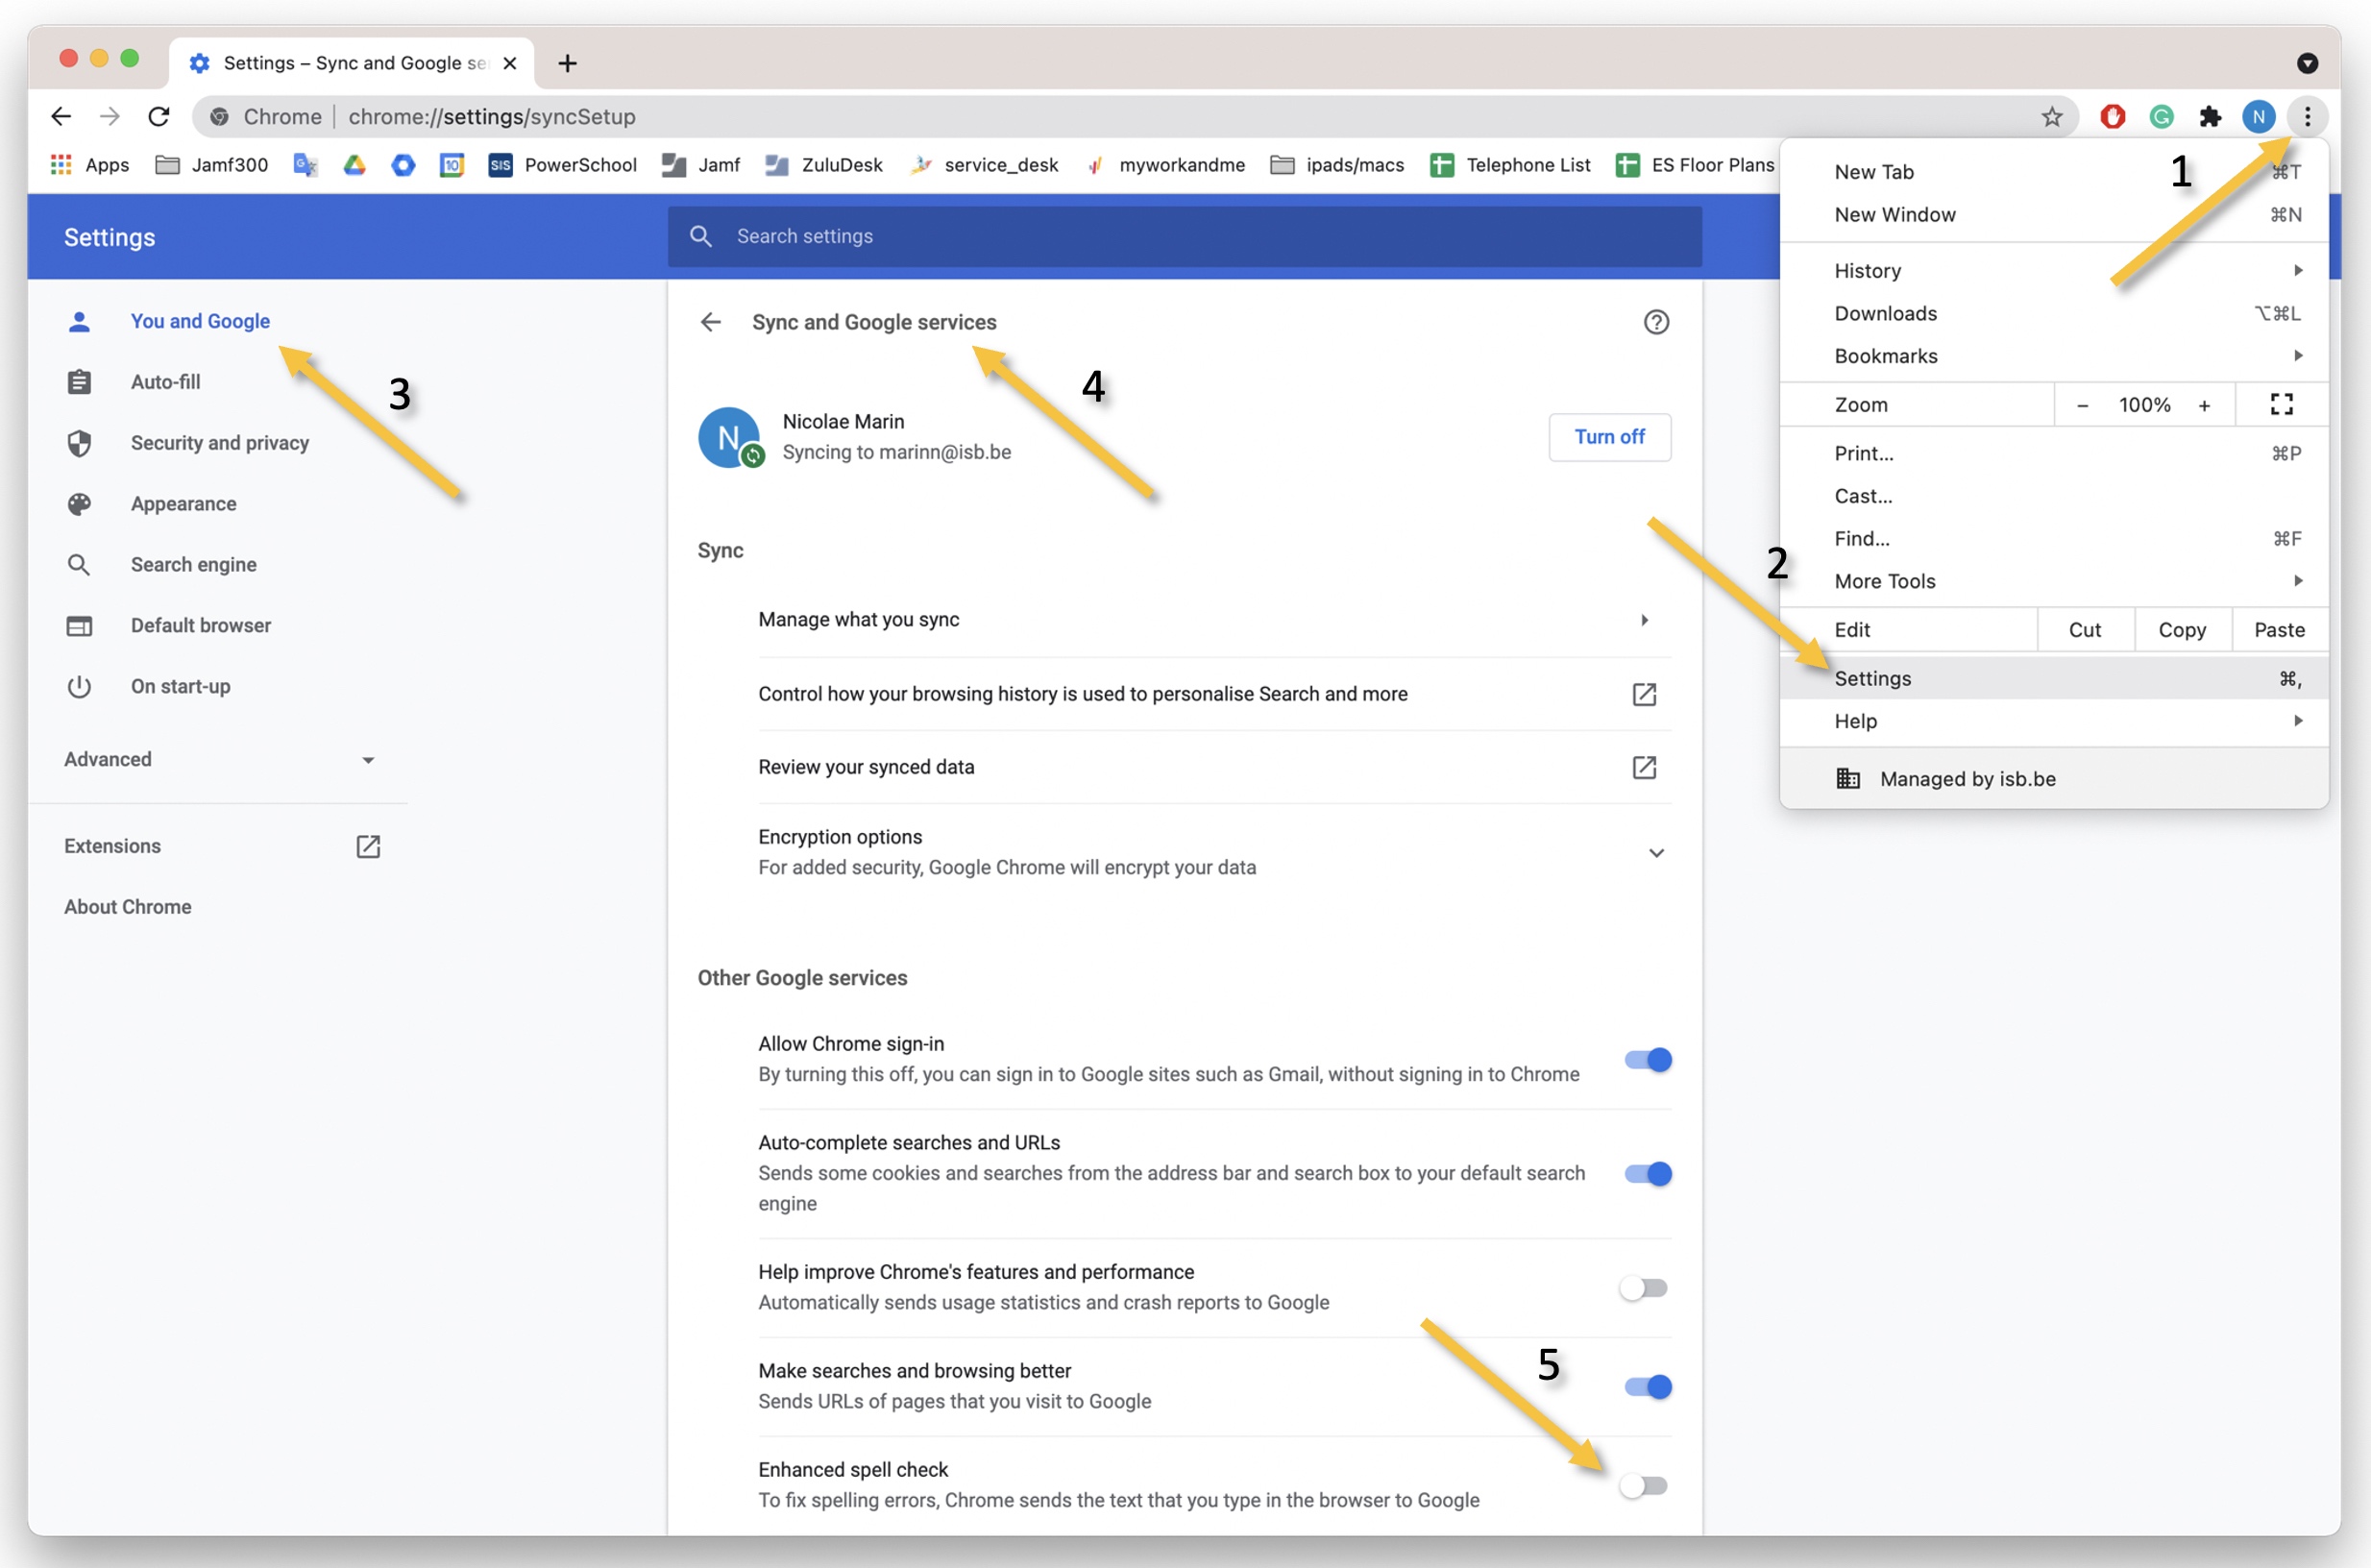
Take Your Google Data With You - for Teachers and Staff
Google Data
If needed, it is possible to export all of your Google data. Your ISB account will be deactivated in December after you leave. Your content will be deleted. We cannot help you recover data once you have departed from ISB.
Before you begin, please become familiar with these guidelines on removing sensitive information.
There are two ways to export your data; please read the Option's intro and choose what works for you.
Option 1 - Copy to new drive
If you would like to copy your data from your ISB Google Drive to a personal Google Drive, the process outlined below is recommended. But first... please make sure that you have enough space on your personal drive which is limited to 15GB by default.
In your ISB Google Drive:
- Create a folder where you will place all the files you would like to move.

- Move the files you want to keep into the new folder. You can add folders as well, but that might make the next steps more tedious.

- Share the folder you created with your personal account.

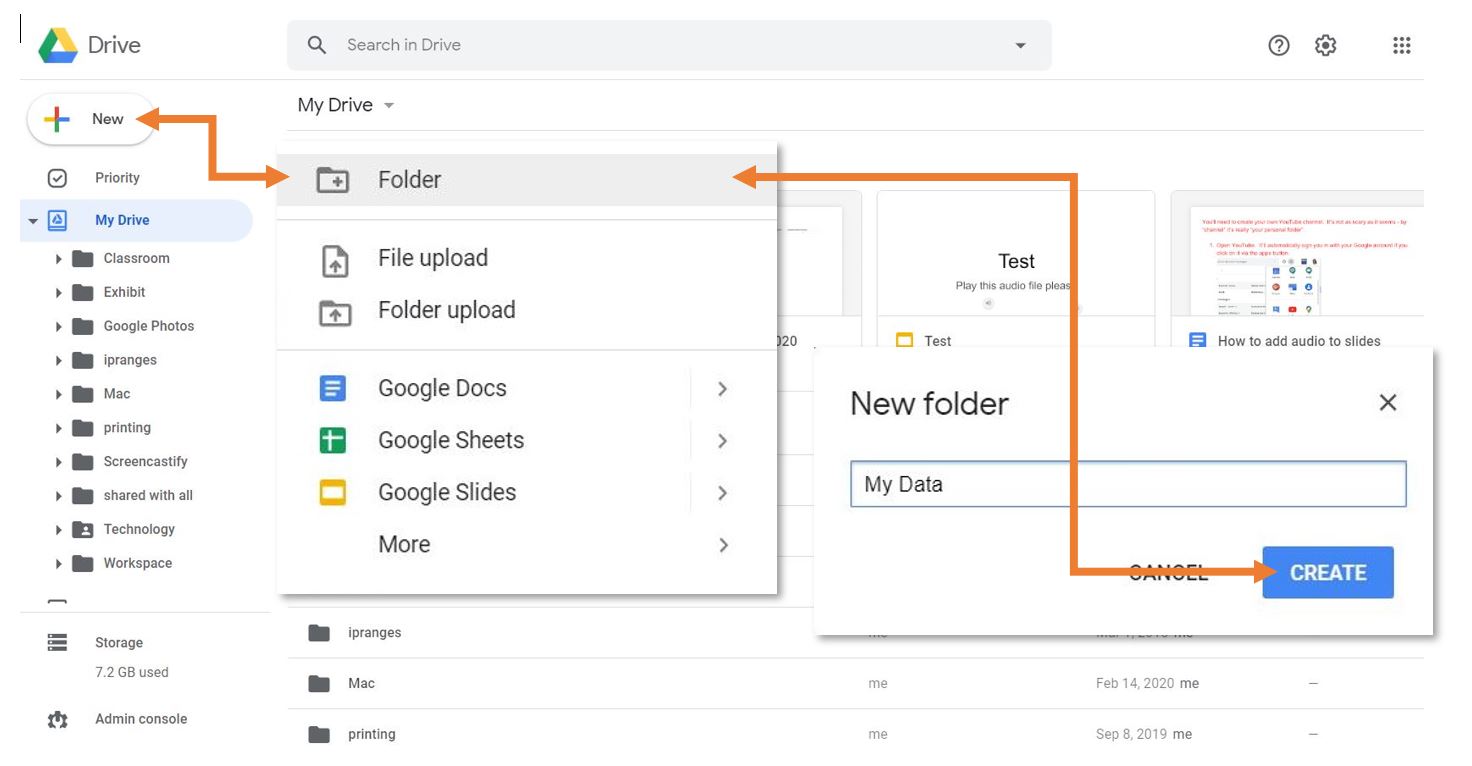
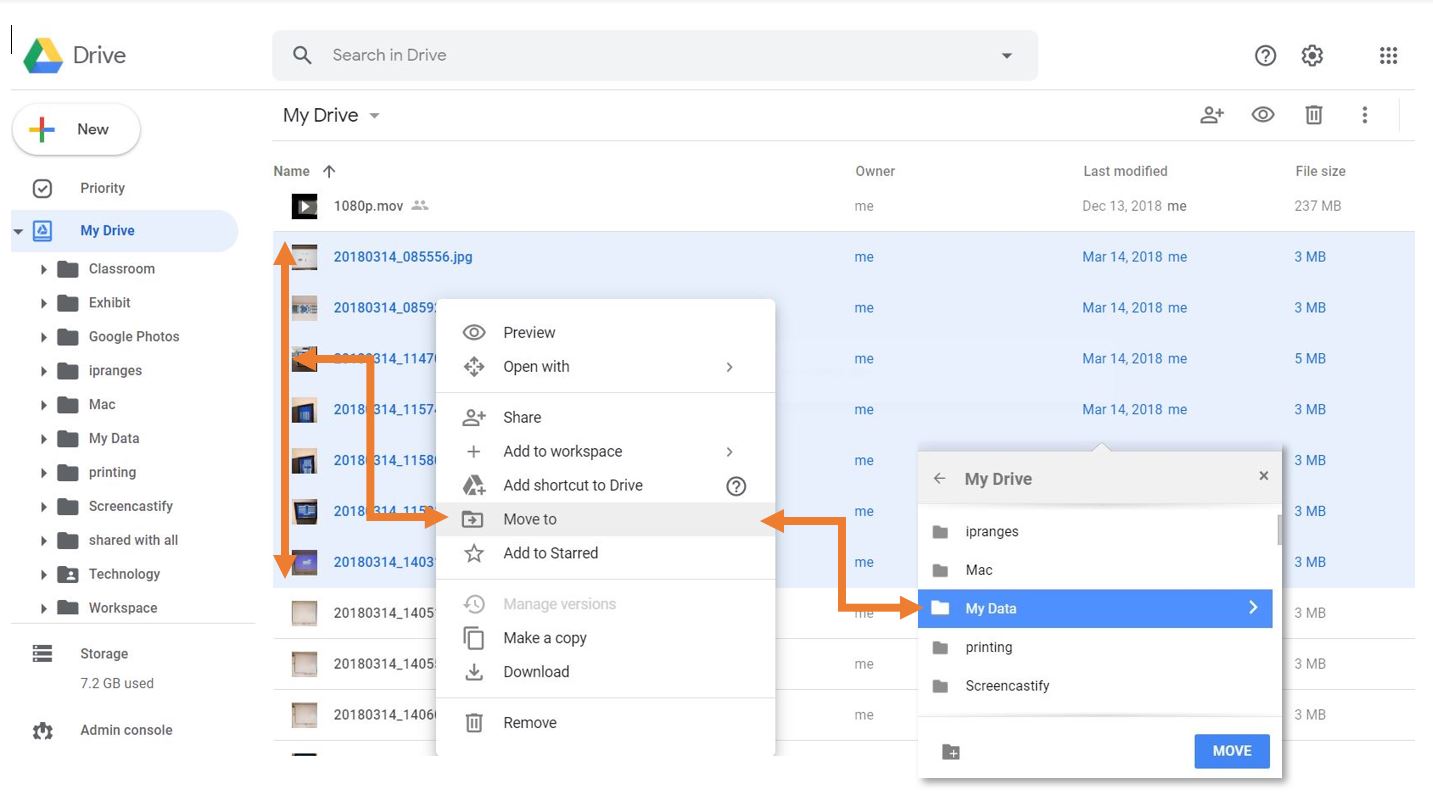
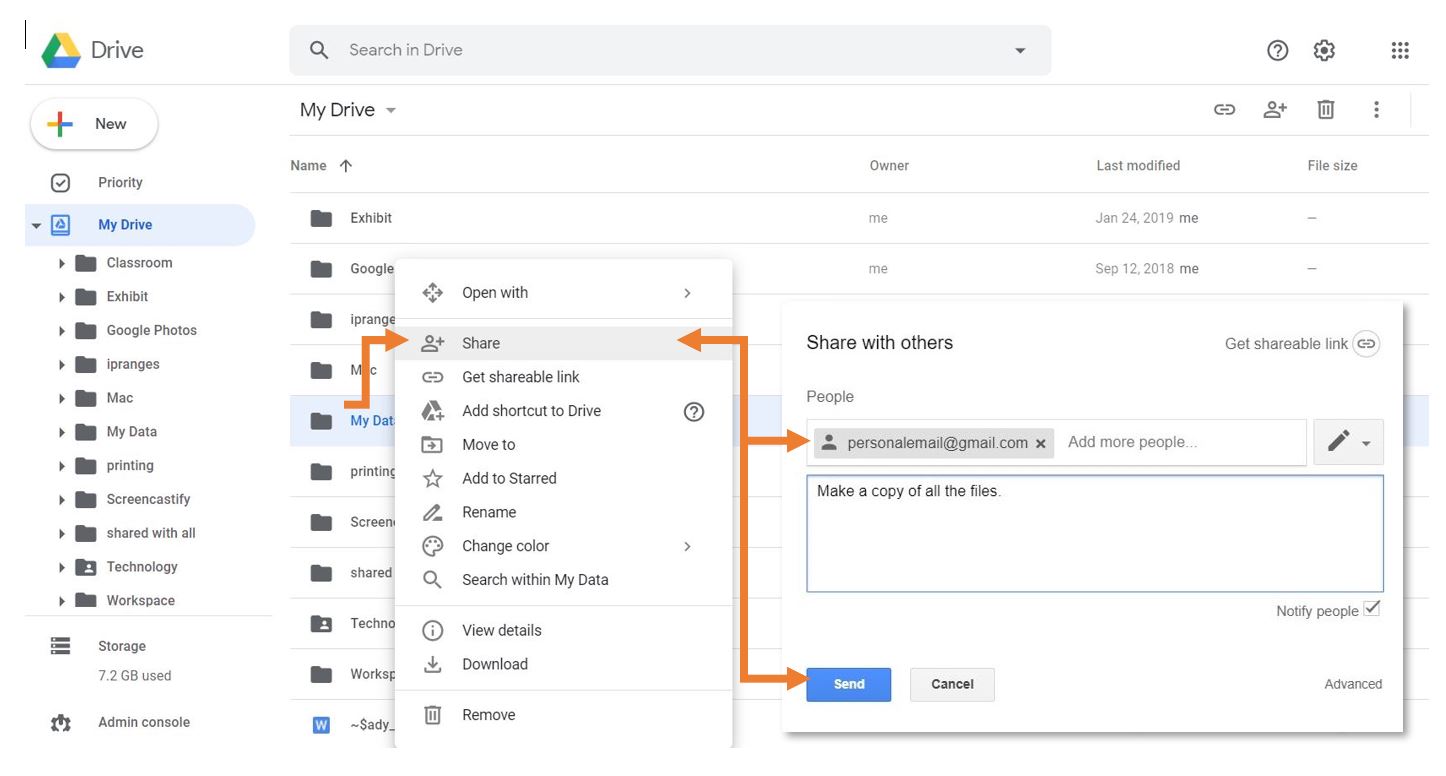
In your personal Google Drive:
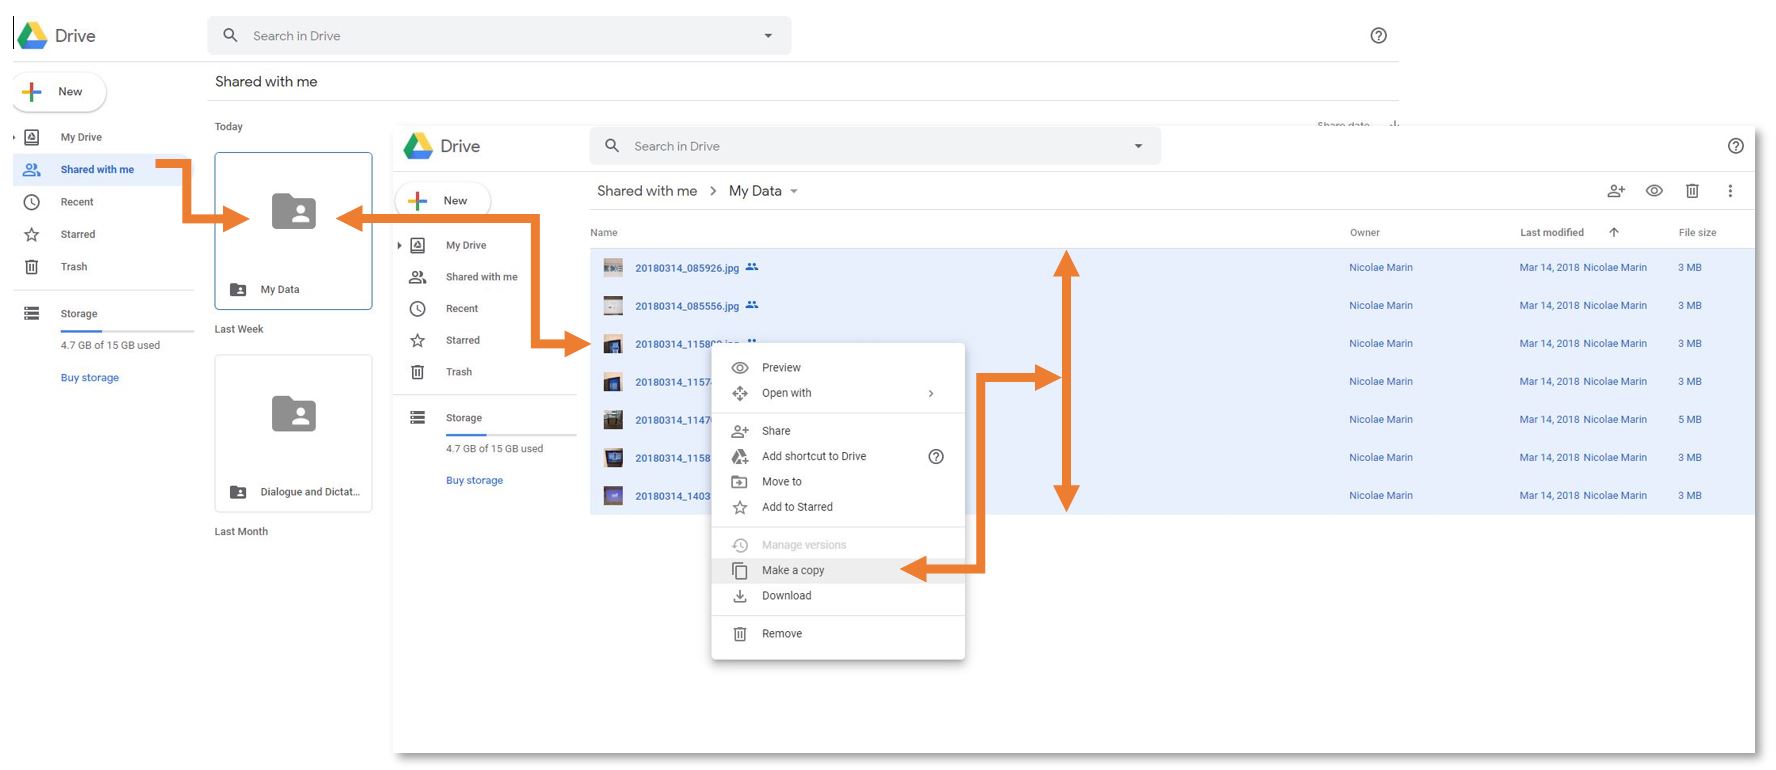
- Open the folder that you shared with your personal account.
- Select all the files inside the folder (Ctrl+A (select all) OR Shift+left click) *FILES ONLY, NOT FOLDERS*
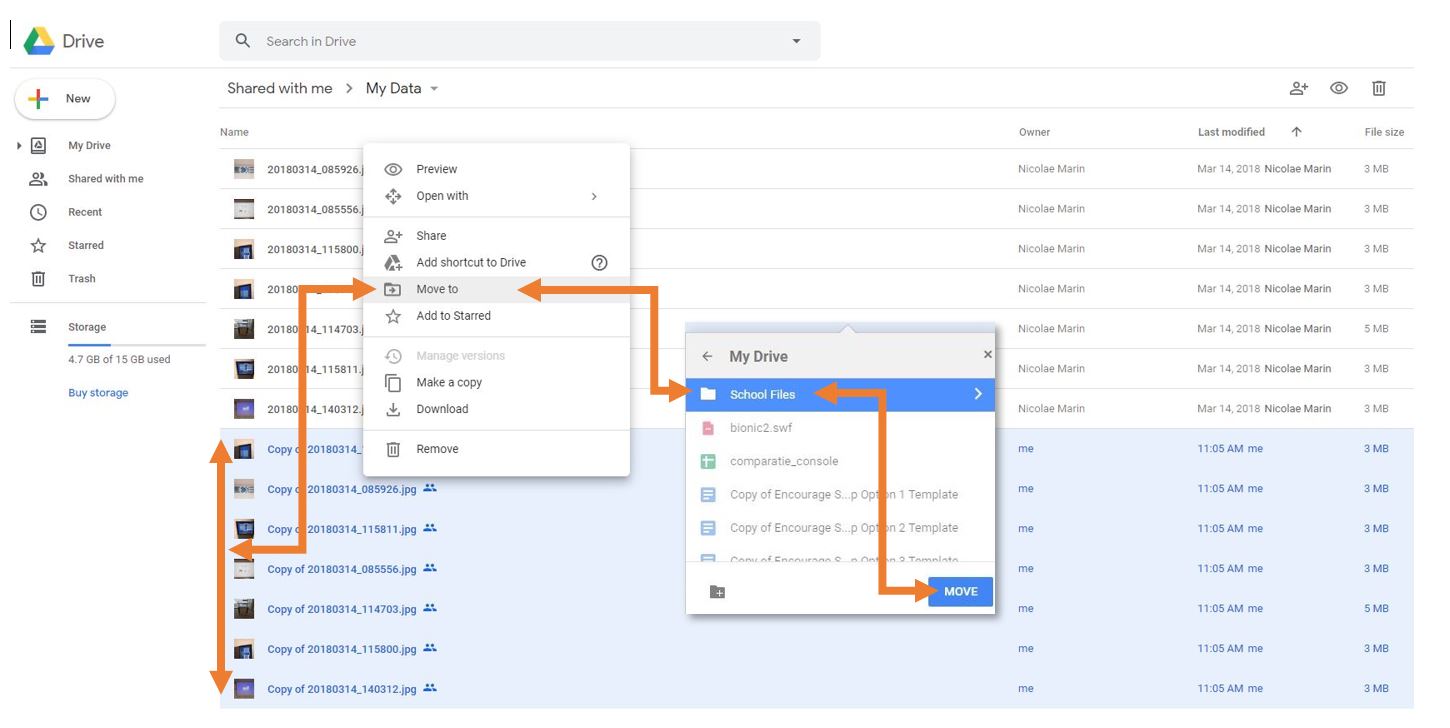
- Right-click on one of the files you selected and choose “Make a copy.” This will create a copy of all the files. Your personal account will be the owner of the copies. The copies will have the name “Copy of…”

- Move the files with the name “Copy of…” to another location on your personal Google Drive.

Option 2 - Download your Data:
You can choose to download an archive of your files as well. This process is easier than the copy method, but Google Apps documents (docs, sheets, slides…) will be converted to Microsoft-compatible files (Word, Excel, PowerPoint…).
- In your ISB Google Drive, right-click on a file or folder that you would like to download.
- Select “Download” from the list of options.
- Save the downloaded archive to an external hard drive or a personal cloud storage service (a personal Google Drive, Dropbox, etc.).
Take Your Google Data With You - for Students
Google Data
In December, after you leave, your ISB account will be deactivated. Your content will be deleted. We cannot help you recover your data once you have departed from ISB.
You can 'copy' your data to your personal Google Drive, or download it to a storage device or service.
Option 1 - Copy to new drive
If you would like to copy your data from your ISB Google Drive to a personal Google Drive, the process outlined below is recommended. But first... please make sure that you have enough space on your personal drive. Your personal drive is limited to 15GB by default.
In your ISB Google Drive:
- Create a folder where you will place all the files you would like to move.
- Move the files you want to keep into the new folder. You can add folders as well, but that might make the next steps more tedious.
- Share the folder you created with your personal account.
In your personal Google Drive:
- Open the folder that you shared with your personal account.
- Select all the files inside the folder (Ctrl+A (select all) OR Shift+left click) *FILES ONLY, NOT FOLDERS*
- Right-click on one of the files you selected and choose “Make a copy.” This will create a copy of all the files. Your personal account will be the owner of the copies. The copies will have the name “Copy of…”
- Move the files with the name “Copy of…” to another location on your personal Google Drive.
Option 2 - Download your Data
You can choose to download an archive of your files as well. This process is easier than the copy method, but Google Apps documents (docs, sheets, slides…) will be converted to Microsoft-compatible files (Word, Excel, PowerPoint…).
- In your ISB Google Drive, right-click on a file or folder that you would like to download.
- Select “Download” from the list of options.
- Save the downloaded archive to an external hard drive or a personal cloud storage service (a personal Google Drive, Dropbox, etc.).
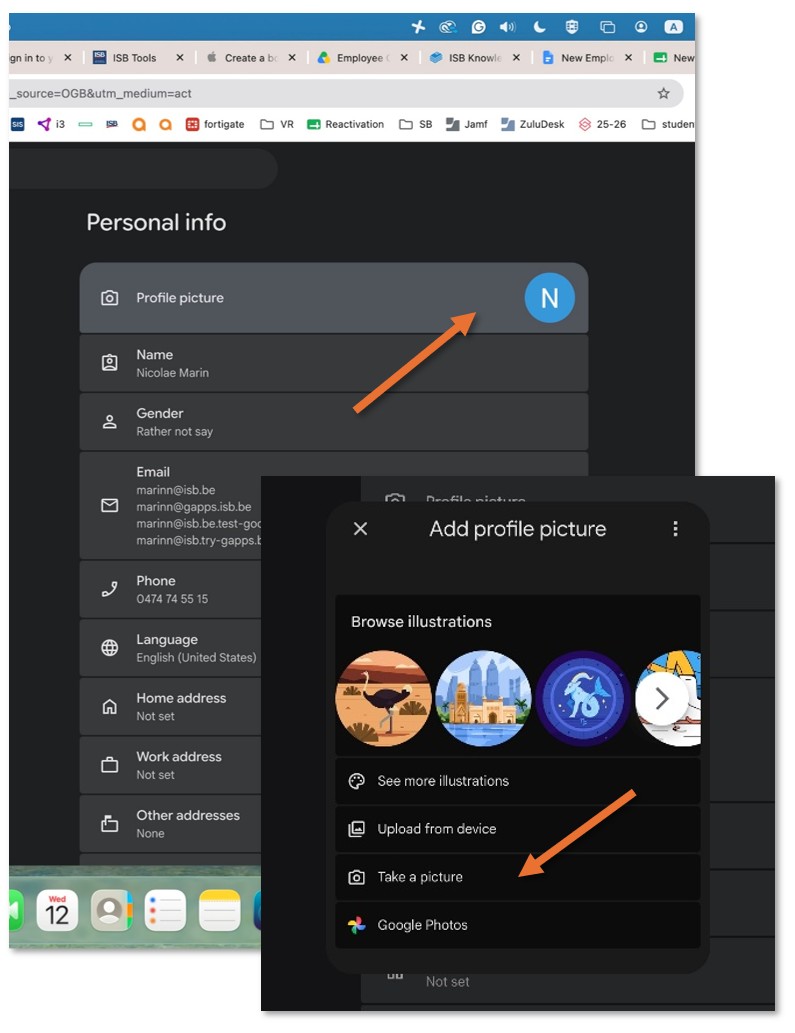
How To Change Your Google Account Picture
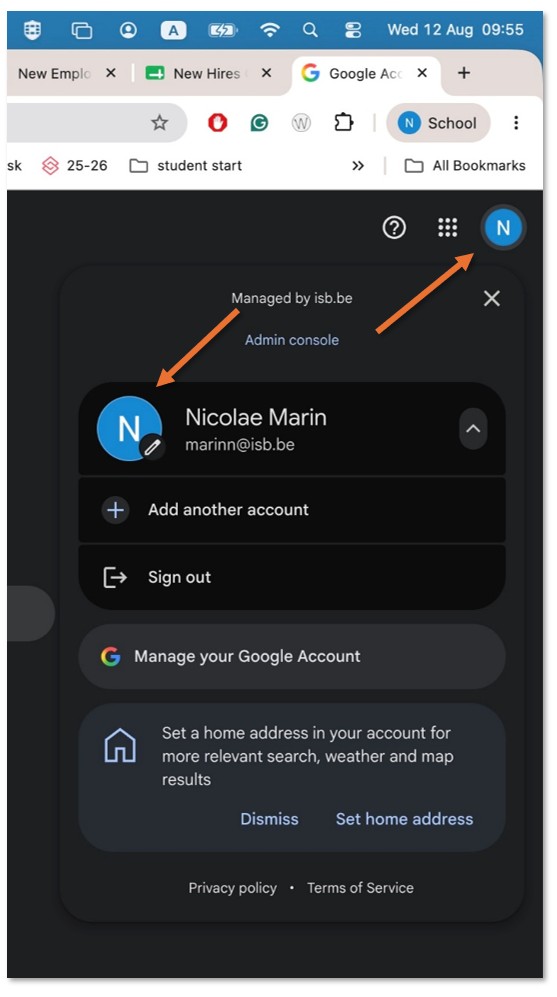
Open a new tab in Chrome, or any Google page if you are using a different browser, and click the bubble with your initial in the upper-right corner. Then, in the menu that pops up, click on the bubble again.
i3 Classroom Screens
I3 Screen in the classroom
Every classroom at ISB is equipped with an i3 ELM 2 interactive screen.
Use the screen to display your MacBook, present wirelessly, use the Windows 11 OPS computer, write on the digital whiteboard, and support classroom activities.
What do you need to do?
Screen basics
Connect your MacBook
Present wirelessly
Use Windows 11
Quick reminders
- Use only approved ISB cables, adapters, pens, and accessories.
- Select the correct input before troubleshooting the MacBook connection.
- Use a cable or the Windows 11 OPS computer for long videos.
- Save whiteboard work before turning off the screen.
Need help?
ithelpdesk@isb.be
When contacting IT, include the classroom number and explain whether the problem affects the picture, sound, touch, wireless presentation, or Windows OPS computer.
Turn the i3 screen on or off
Turn the screen on
- Press the screen's power button.
- Wait for the display to start.
- Select the required input or home screen.
Turn the screen off
- Save your work in the whiteboard or any open application.
- Disconnect your laptop if you no longer need it connected.
- Long-press the power button.
- Confirm the shutdown prompt.
Do not unplug the screen while it is running unless IT has instructed you to do so.
If the screen does not respond
-
Press the power button once and wait.
-
Check whether the power indicator is lit.
-
Contact IT if the screen still does not start.
-
If the screen is on, but unresponsive:
-
Long-press the power button. Confirm the shutdown prompt.
-
Contact IT if the screen still does not respond.
Present wirelessly on an i3 screen
Before you start
- Turn on the i3 screen.
- Make sure that your MacBook is connected to the ISB network. The classroom screen should be connected to Touchscreen.
- Make sure the screen is showing the AllSync presentation screen.
- Do not share confidential information with the wrong classroom display.
Start sharing
- On the i3 screen, open the Present or AllSync tile.
- On your MacBook, open Control Center from the menu bar.
- Select Screen Mirroring.
- Select the classroom i3 screen.
- Enter the four-digit PIN shown on the i3 screen, if requested.
- Your MacBook screen should now appear on the i3 screen.
Stop sharing
- Open Control Center on your MacBook.
- Select Screen Mirroring.
- Select Stop Screen Mirroring.
If it does not work
- Confirm that the AllSync presentation screen is open.
- Check the PIN carefully.
- Turn Screen Mirroring off and on again.
- Restart the AllSync app.
- Contact IT and include the classroom number and MacBook name.
Important
Wireless presentation is best for slides, documents, and short demonstrations. For long videos, use a cable or the Windows module/input.
Use the Windows 11 OPS module on the i3 screen
All i3 classroom screens include a built-in Windows 11 computer called an OPS module. Use it when you need Windows-only software or a Windows classroom workflow.
Switch to the Windows 11 OPS module
- Turn on the i3 screen.
- Open the screen’s Home, Input, or Source menu.
- Select OPS, PC, or Windows.
- Wait for Windows 11 to start.
- Sign in using the account provided by ISB.
The exact input name may vary between classrooms.
Switch back to the i3 home screen
- Save your work in Windows.
- Open the i3 Home, Input, or Source menu.
- Select the i3 home screen or Android/i3CONNECT Studio input.
Shut down Windows correctly
- Select the Start button in Windows.
- Select Power.
- Select Shut down.
- Wait until Windows has fully shut down.
- Turn off the i3 screen if you are finished.
Do not switch off the screen while Windows is updating or shutting down.
If the OPS module does not appear
- Check that the i3 screen is turned on.
- Open the Input or Source menu again.
- Wait a few moments for the OPS module to start.
- Restart the screen.
- Contact ISB IT if OPS, PC, or Windows is not listed.
If Windows has no network connection
- Click on the wireless or the globe symbol next to the time, in the lower-right corner, and select the ISB network from the list.
- If it doesn't connect, please contact IT and provide the classroom number.
Printing and Scanning
Xerox Copiers - First Log in - New users
|
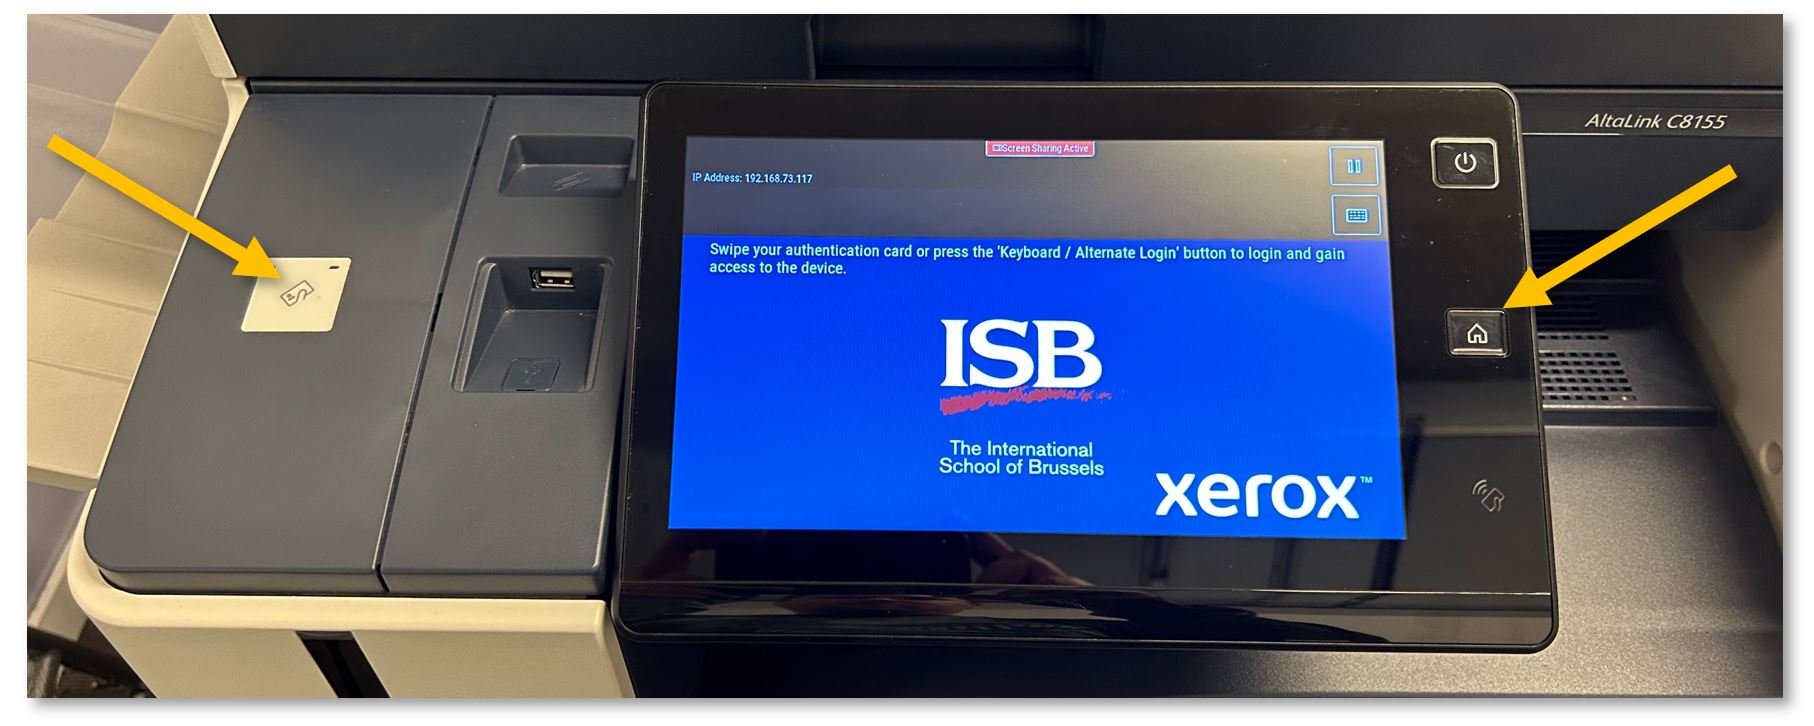
If the copier is in standby, scan your card or press the Home button to wake it up.
|
|
|
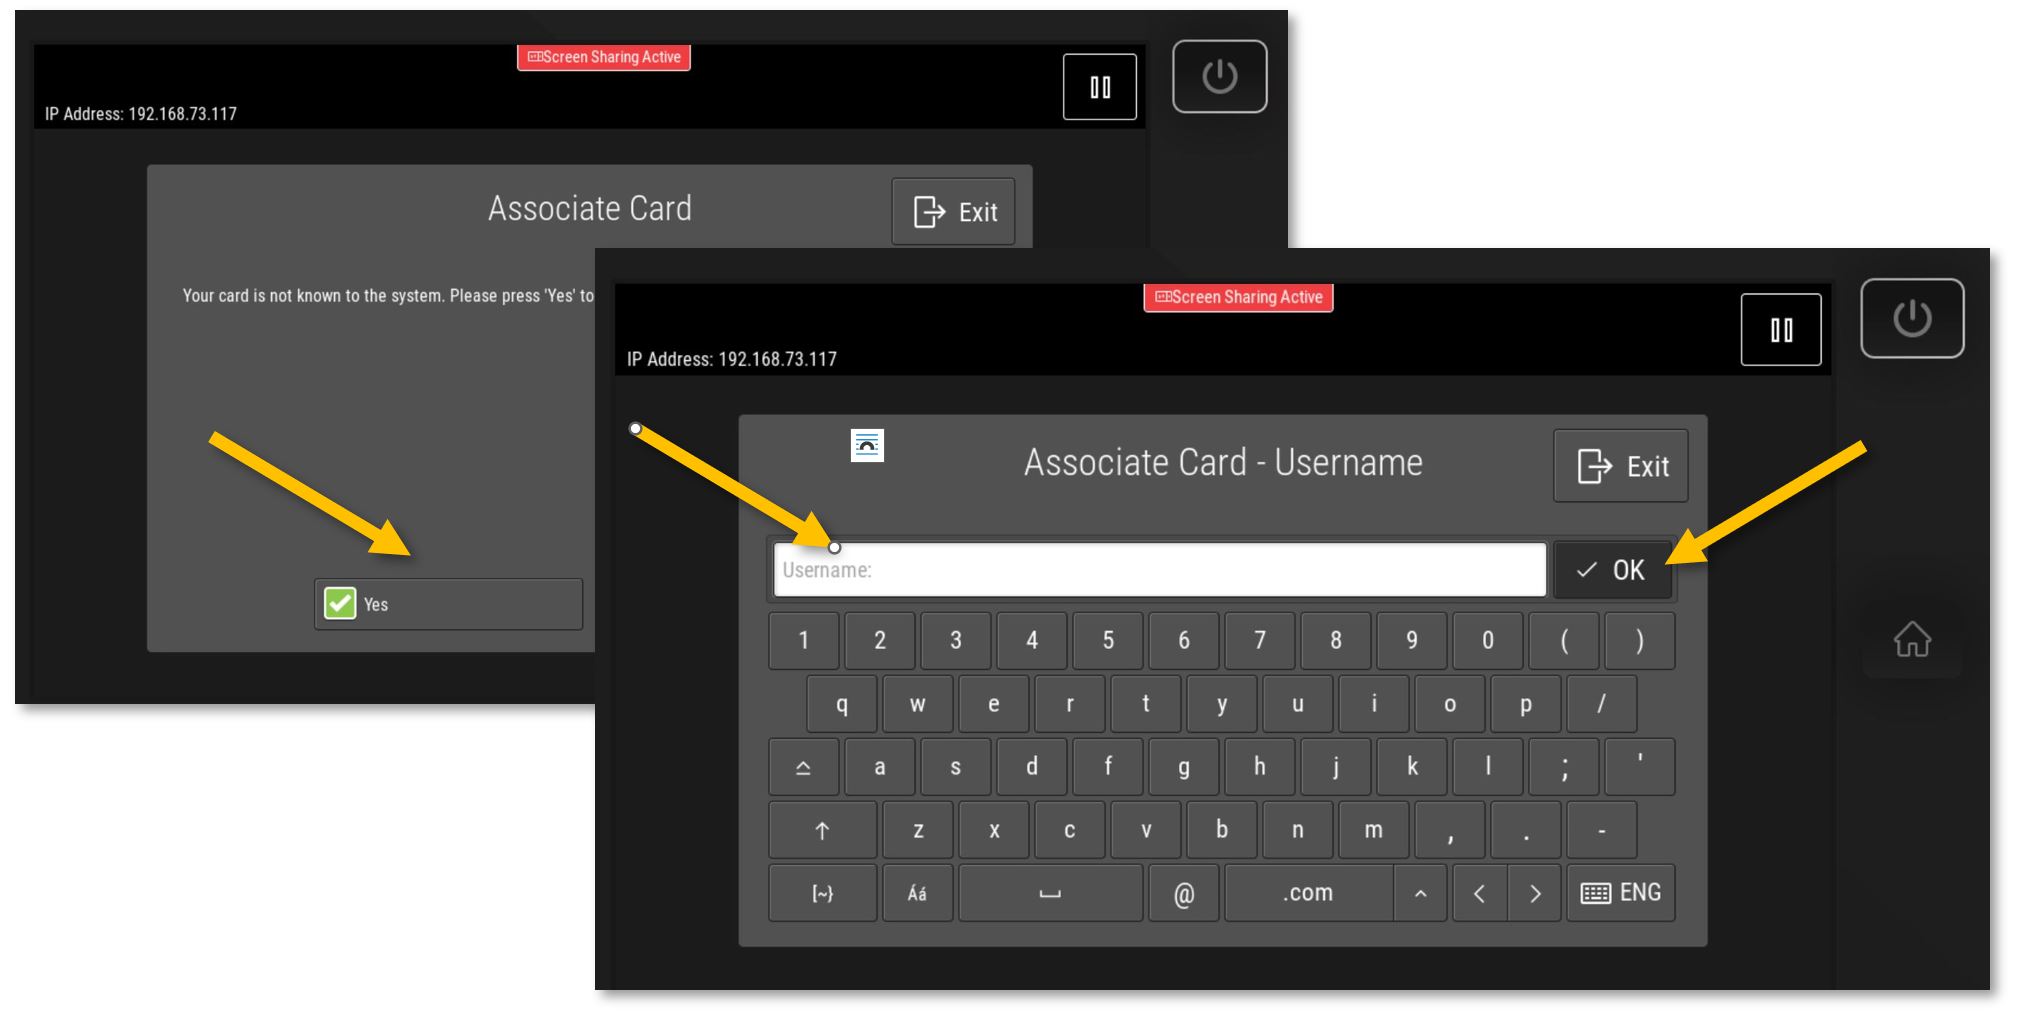
If you have never used the copiers at ISB, scan your card, press Yes, type your username (your email without @isb.be), press OK, and add your network/email password. Press OK again; the copier will associate your card with your account.
Swipe your card again to log in.
|
|
|
|
|
Xerox Copiers - Copy, Print, Scan (work in progress)
|
If the copier is on standby, scan your card or press the Home button to wake it up.
|
|
|
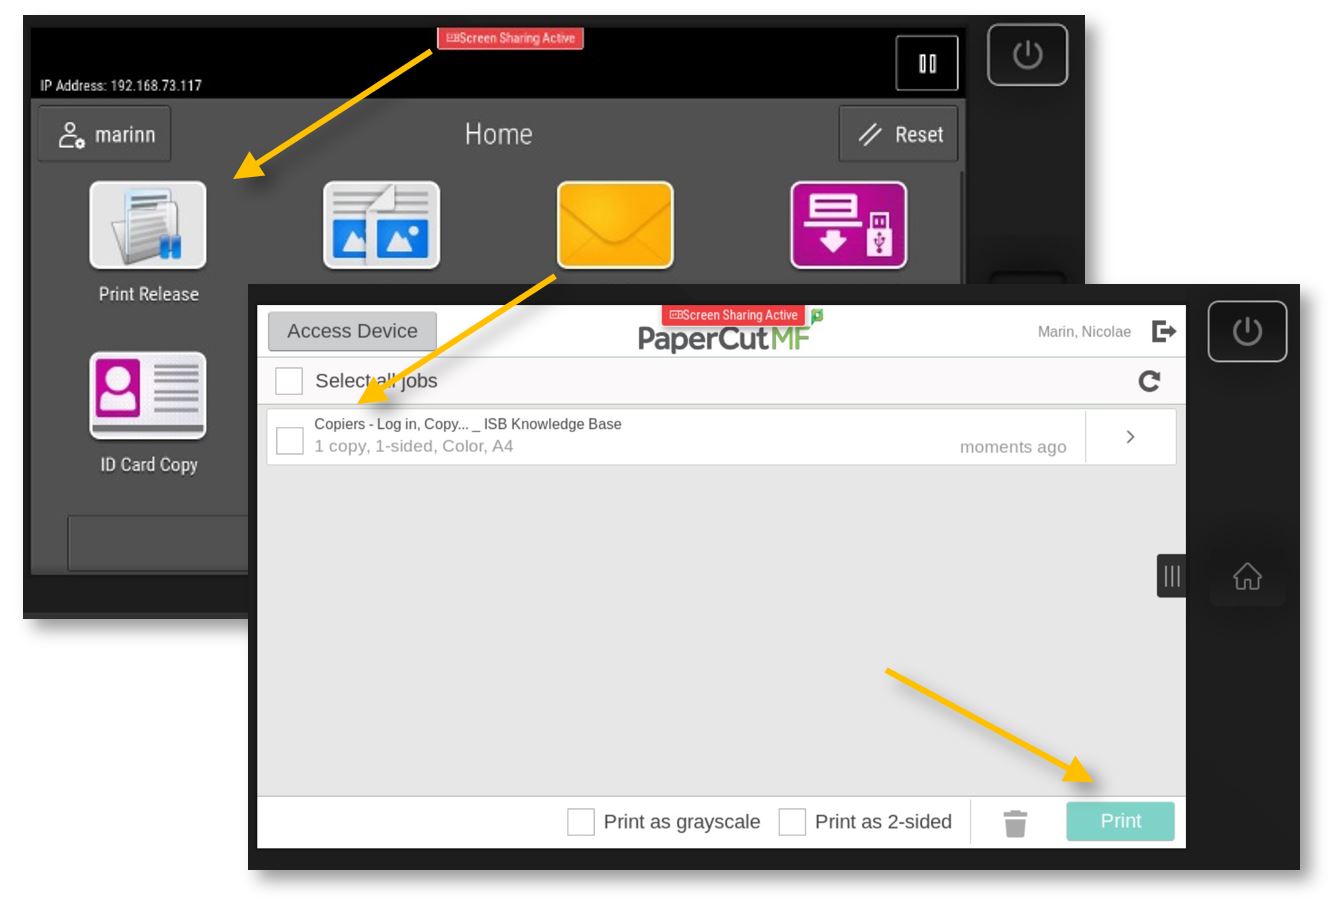
Print Release: Computer: if not already the default, select the 'XeroX-Papercut' printer and press Print.
Copier: Swipe your card to log in and select the Print Release option. Select the job that you want to print and press Print. Log out by pressing your name, the sign-out icon next to your name, or by swiping your card again.
|
|
|
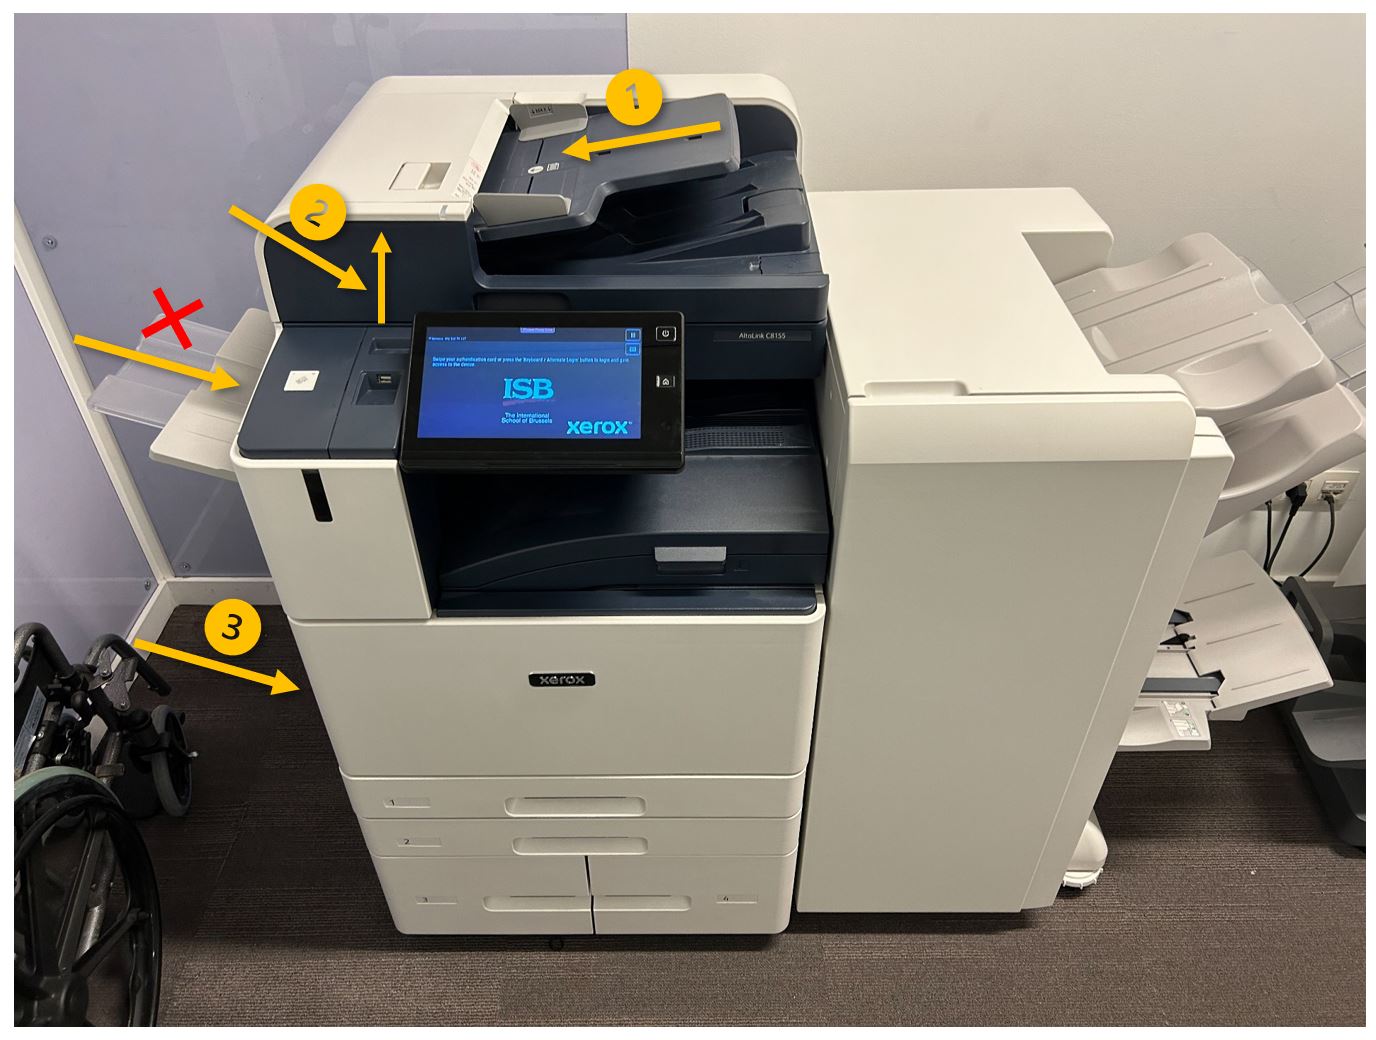
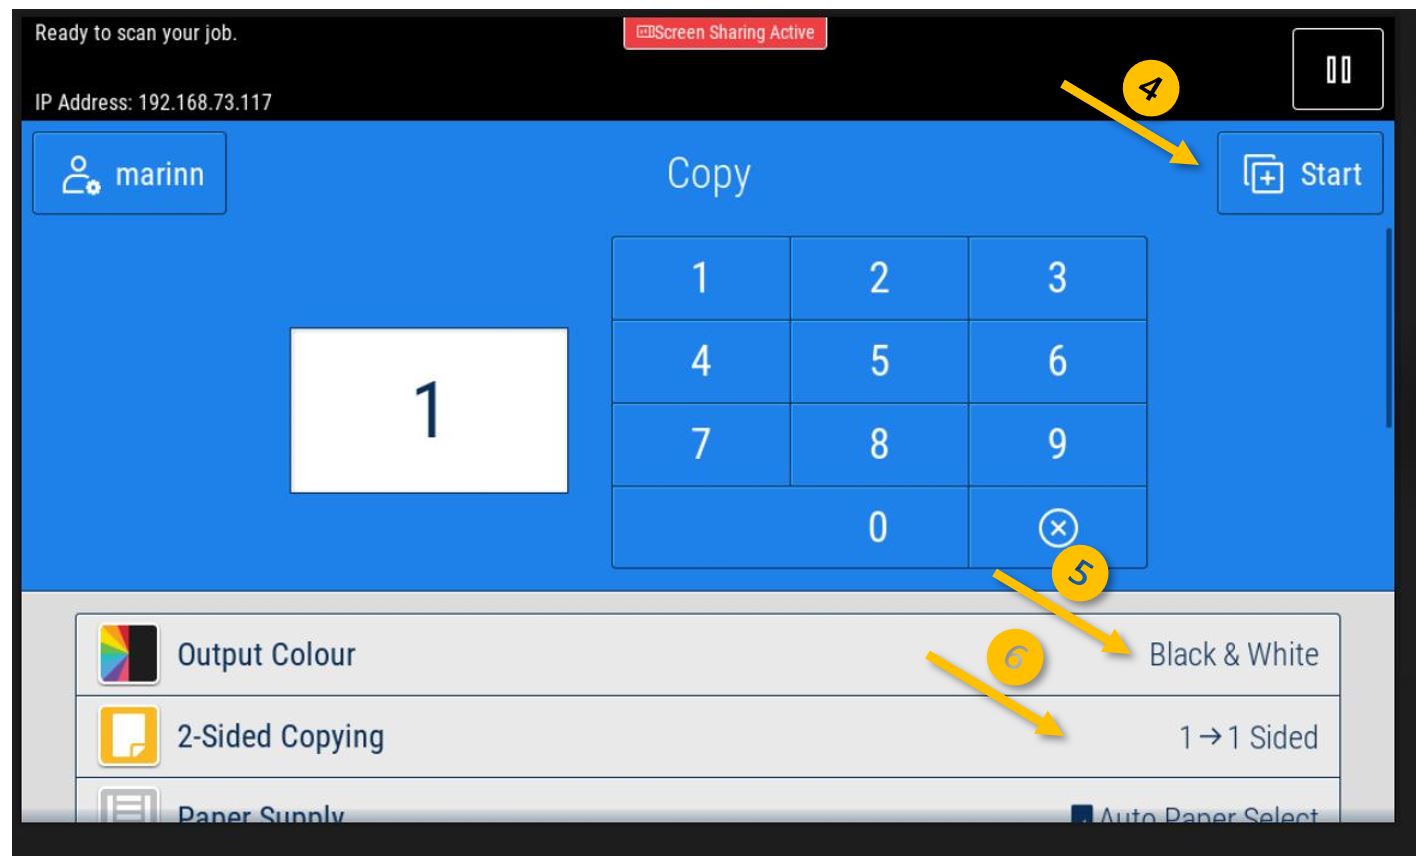
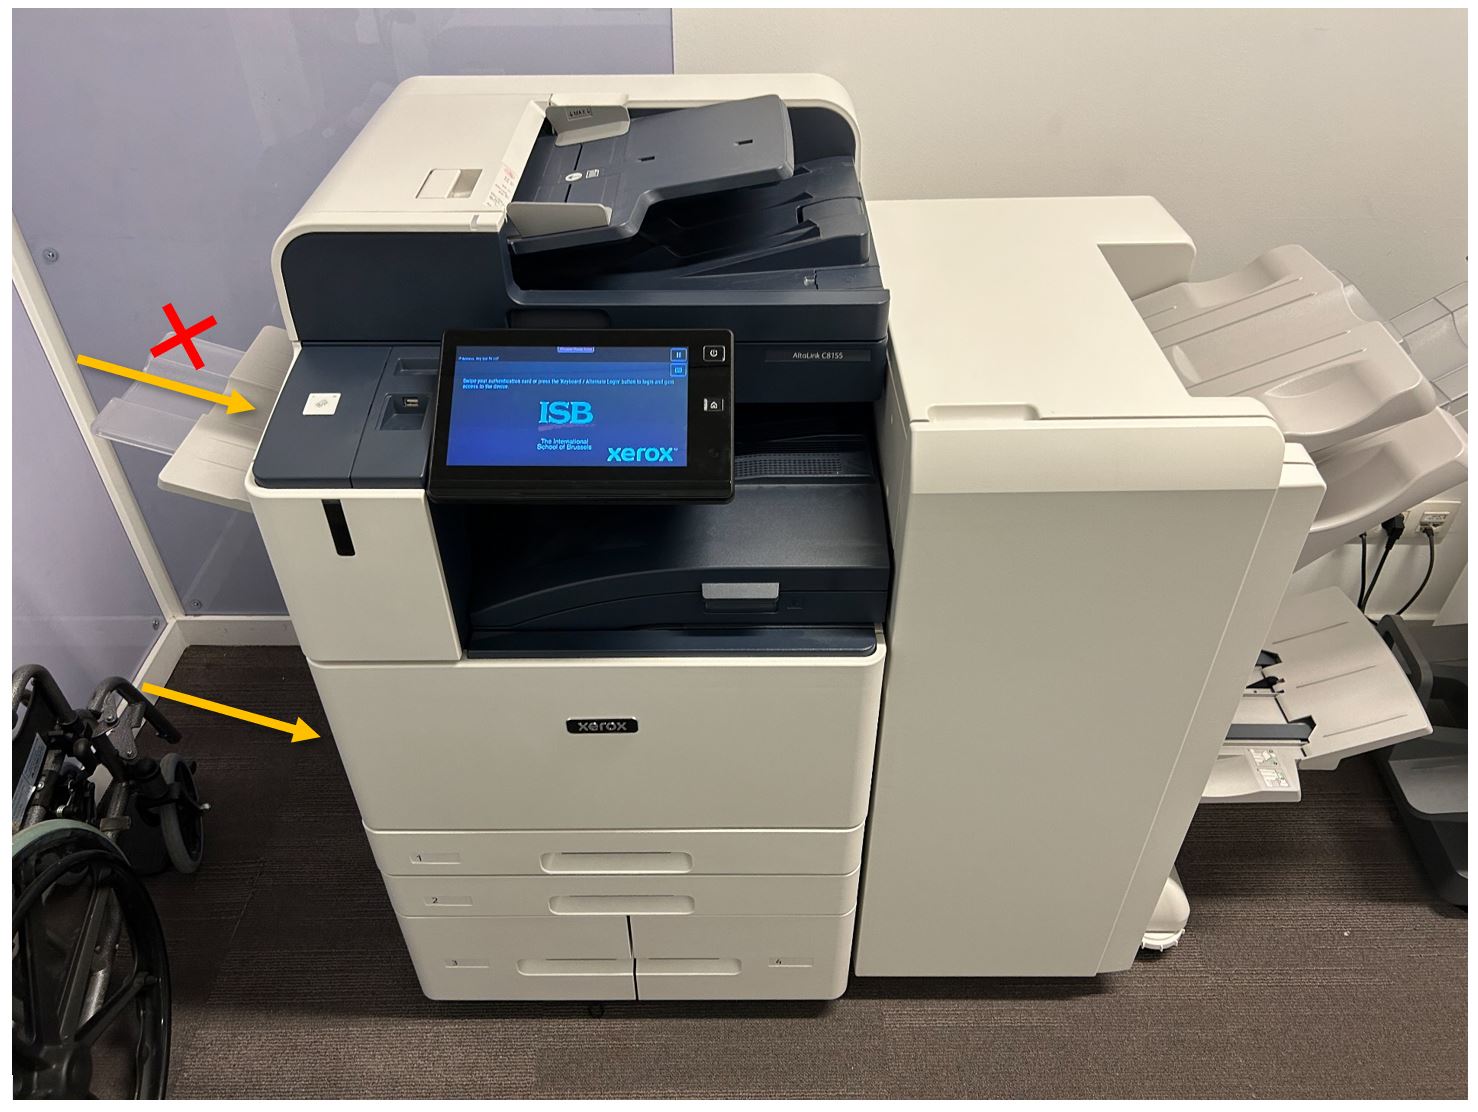
Copy: Swipe your card to log in and select the Copy option. Put the document you want to copy in the tray that will give you the best/fastest results (arrows 1 or 2), and press Start (4).
For simple pages that are not stapled, creasy, too thick, etc., you can use the ADF (automatic document feeder) on top of the copier (1). The ADF will rapidly scan all the pages. To scan both sides automatically, press the '2-Sided Copying” option (6) on the display and change it as desired.
If your document is a book, maybe it is stapled, you need/want to use multiple small pages at once, etc., please open the lid and place the original/s on the glass (2).
If you want the results on a different type of paper (thicker, colored, labels, etc.), please open and use the side tray (3), which you can find underneath the small tray noted with X (the X tray is used for faxes). Please remember that once this tray is opened, the copier will prioritize it.
Copying defaults to black and white; you can change to color from the Output Colour (5) option.
If you scroll down, you can find more interesting options, like Reduce/Enlarge, Finishing (staples, hole punch, folding), or Booklet Creation. Mirror Image, Book Copying, or Page Layout (for when you want multiple pages on the same page). ETC. |
|
|
Scan to Email:
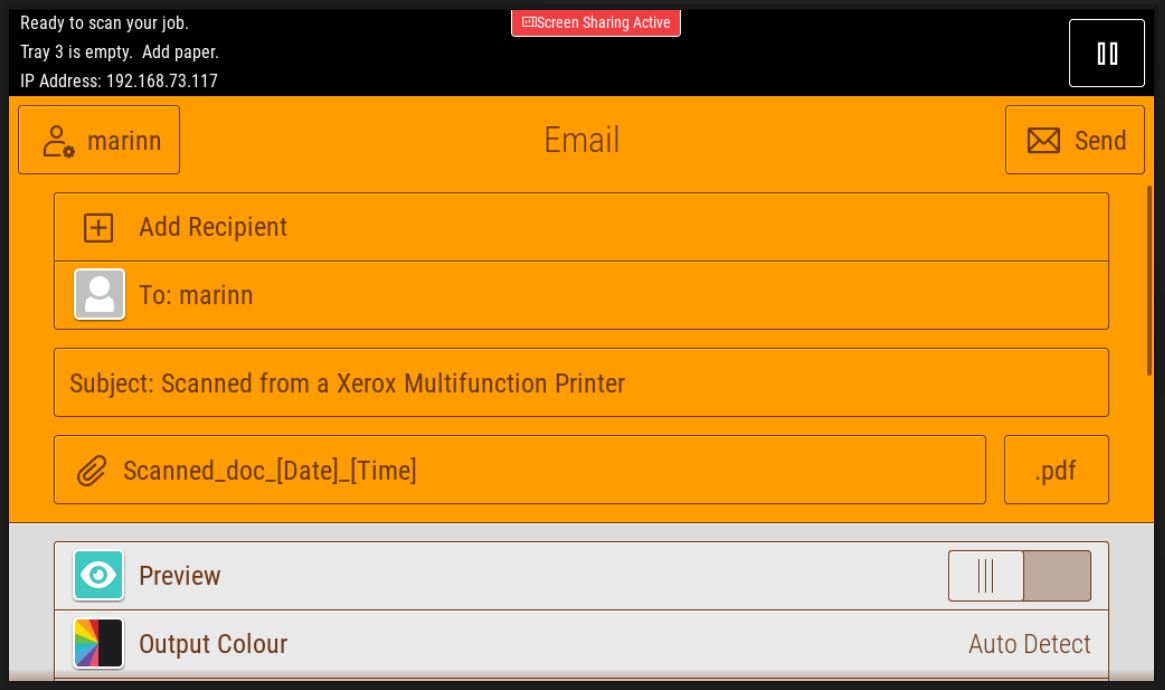
Swipe your card to log in and select the Email option. Press Send, and the Copier will scan all the pages in the ADF or the one from the glass. A PDF will be sent automatically to your email.
The 'To:' field is automatically set to your email; if you want to send the email to somebody else (it only works internally), you can add it/them to the Cc or the Bcc by pressing the 'Add Recipient' field. You can erase your email and add a different one if you click the 'To:' field. You can also change the 'Subject:' with something more meaningful.
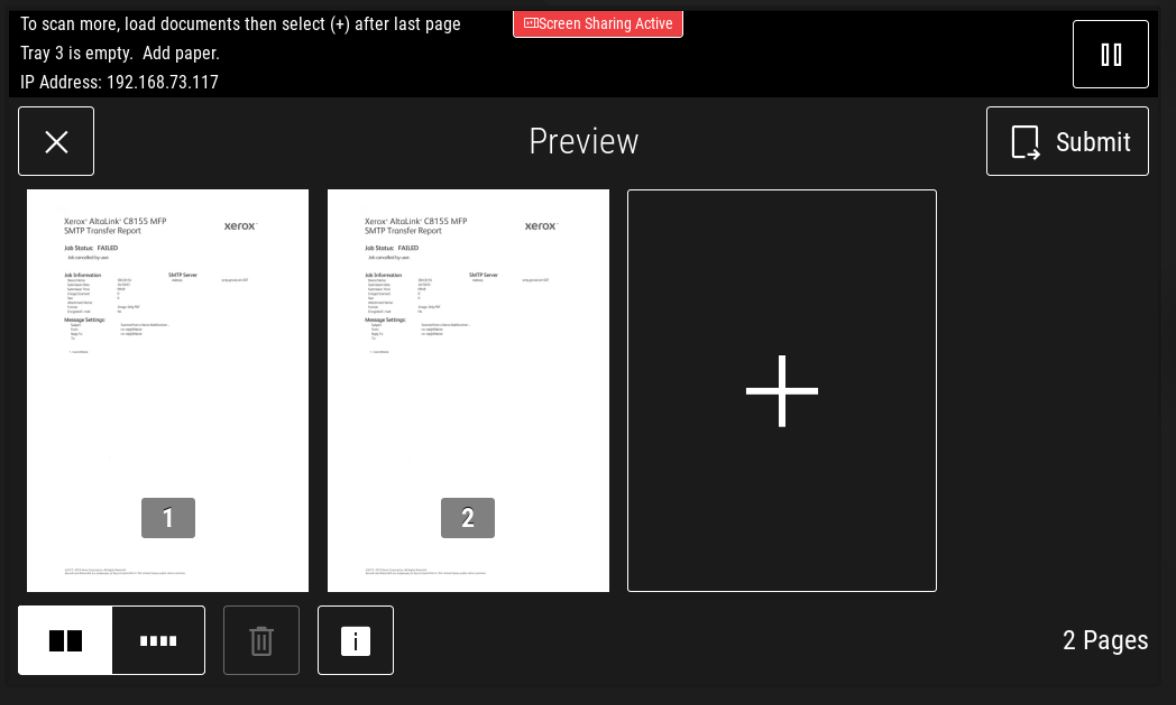
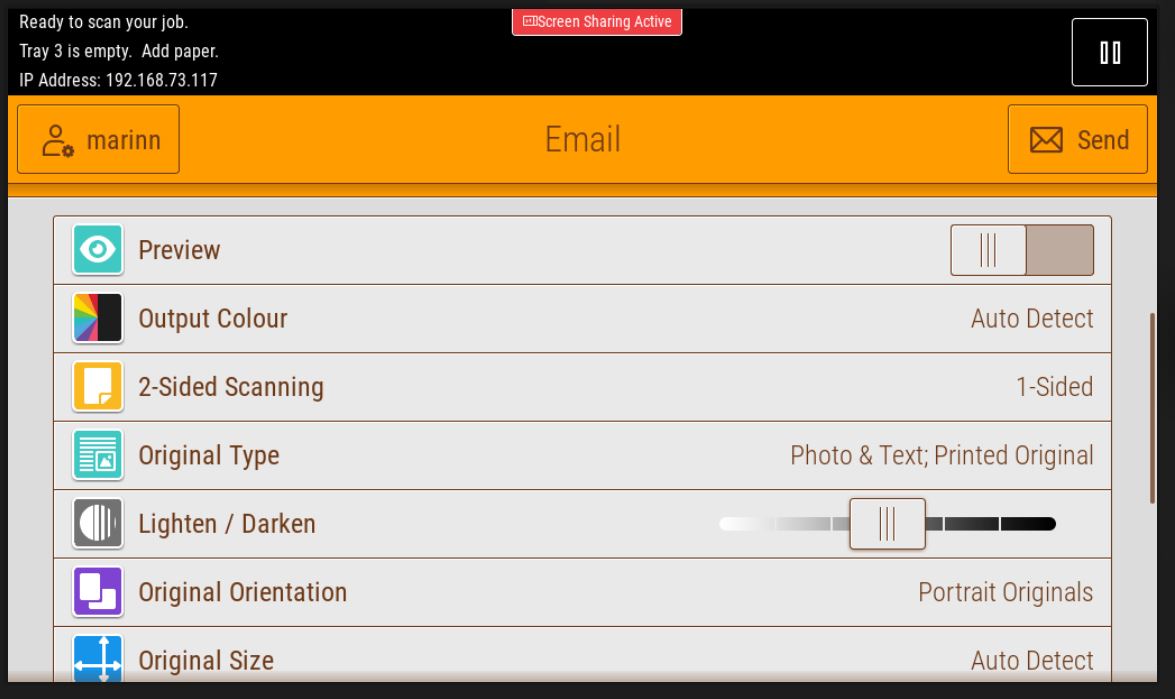
Under Options, you can find more interesting options: To scan multiple pages and create a single PDF without using the ADF, toggle the Preview Mode. The Send button will change to Preview. Press it to open the preview menu. Here, you can press on the big + to add and scan another page, reorder, or delete unwanted pages. Press Submit when ready to send the email.
If needed, you can ask the ADF to scan both sides of the documents by pressing the '2-Sided Scanning' option.
If you want to create a searchable PDF, in which you can select the text and copy-paste it, you can click on the “.pdf” button, select More, and in the File Format menu that pops up, select Searchable - Yes.
From the same menu, you can change the type of file to be attached to the email - '.jpg' is a picture and is usually smaller than a .pdf
If the copier has problems guessing the content orientation or the size, you can change it from “Original Orientation" and 'Original Size,' respectively.
To enhance the scan further, scroll down, click 'Show Additional Features' and select a bigger 'Resolution.' Do not send too many high-resolution JPEG/PDFs simultaneously; the server will block the email because of the active size limitations. ETC. |
|
Xerox Copiers - Enlarge/Reduce
From Copier:
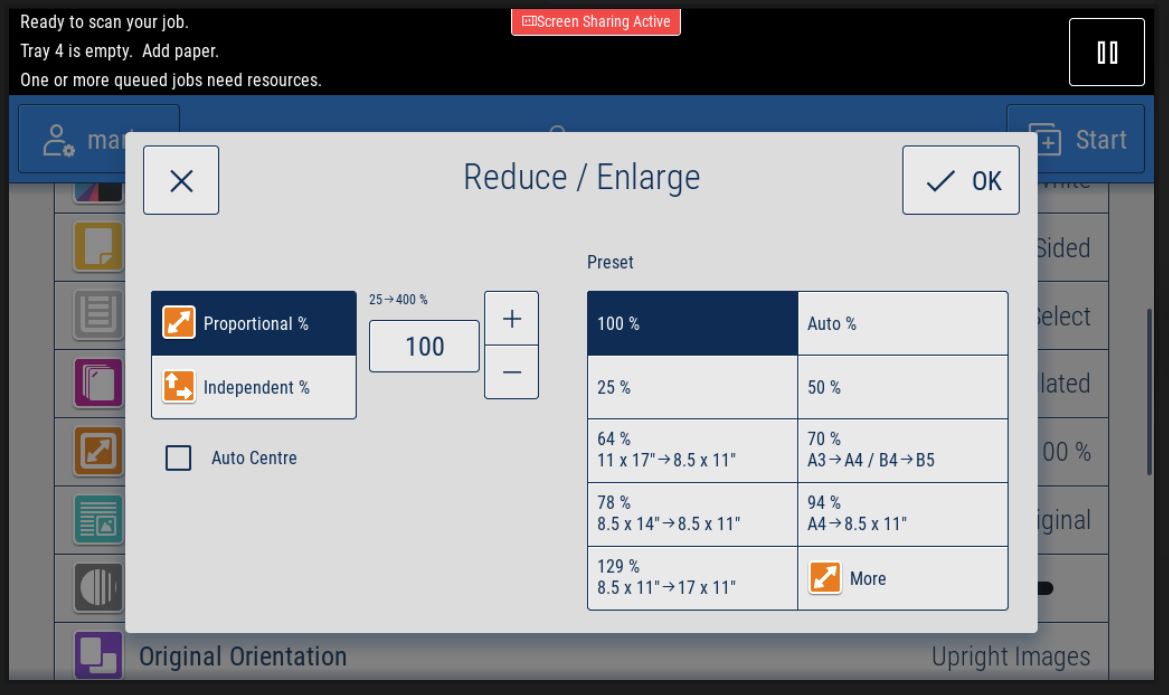
Sign in, place the originals on the glass, and choose Copy. Scroll to 'Reduce / Enlarge' and select 'Auto' from the pop-up menu.
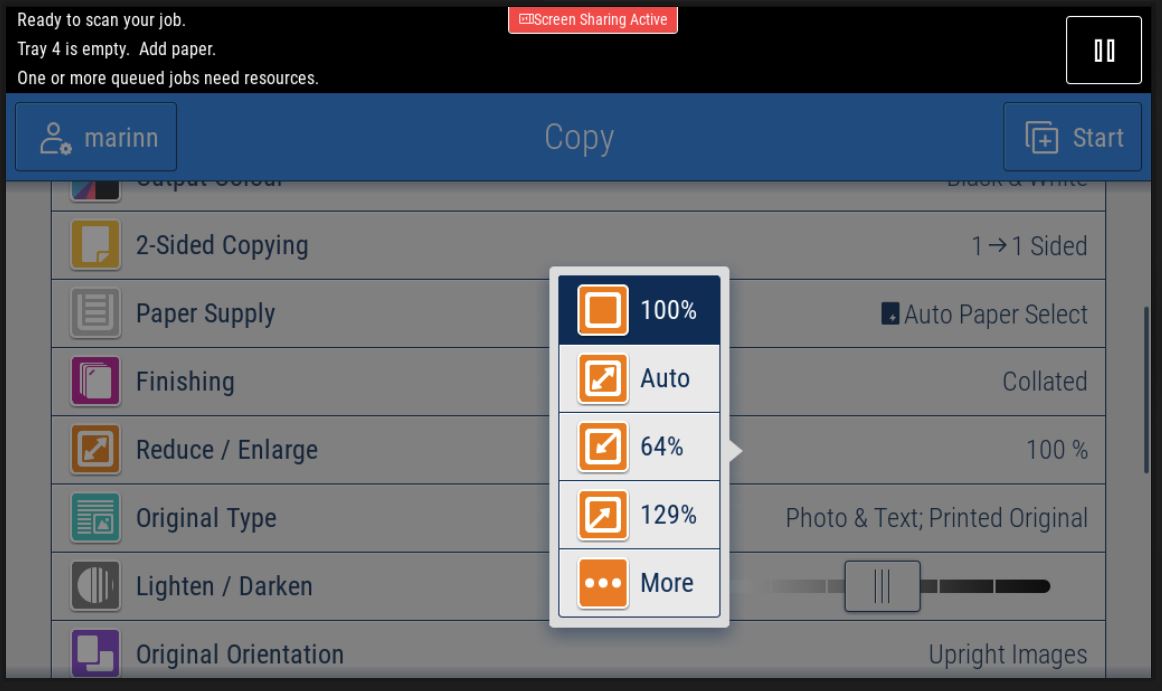
Select the needed size from the following menu - usually A4 or A3 - press OK and Start.
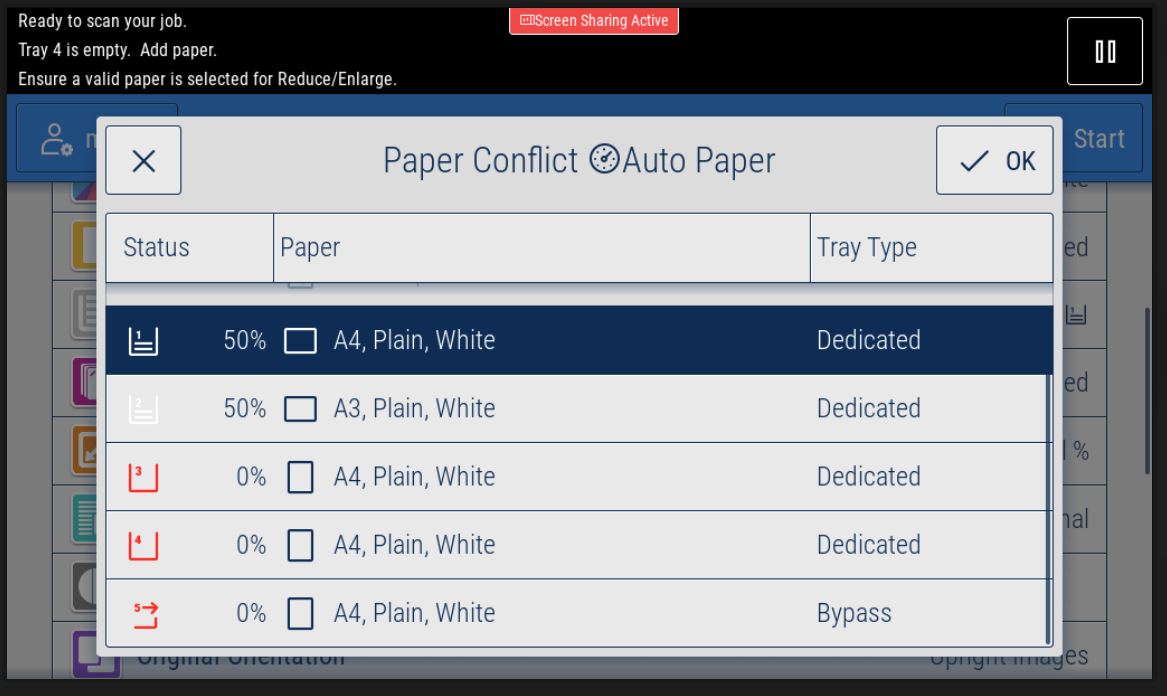
If you need a different size than the copier usually has in one of its trays, for example, A5, you will have to open the side tray and place A5 paper in it (not the X one, the one underneath). The copier will try to guess what type of paper you added - correct it if it chooses wrong.
In the rare cases when the copier does not recognize the size of the original, or you want to extend/reduce the scanning area, please select 'More' instead of 'Auto' after selecting the 'Reduce / Enlarge' options. In the occurring menu, you can play with the percentages or select a premade preset - for example, from A3 to A4 or from A4 to letter (8.5x11).
From Windows: (If you print from a Mac, please jump to the next section)
Most apps cannot interact with the copier's menu directly. After pressing print, we must find the Xerox settings in the print menu. In Adobe Acrobat, for example, we need to press on 'Properties...'; in Chrome, 'More settings' and 'Print using system dialog...'; in Word, 'Printer Properties.'
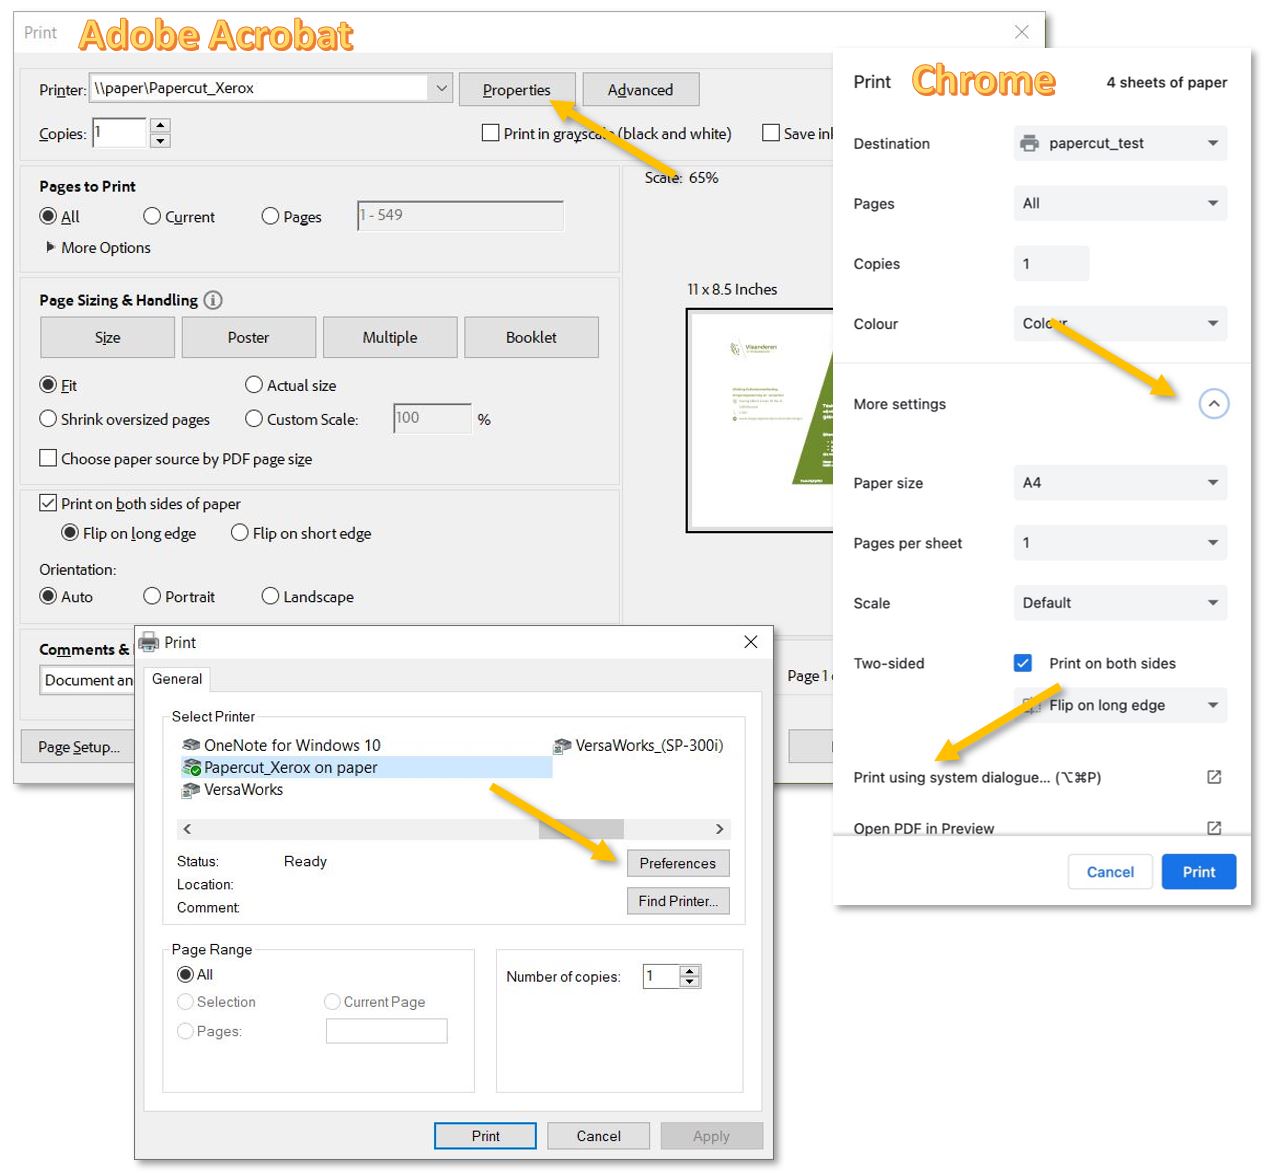
If the Windows Print menu pops up á make sure that Papercut_Xerox is selected and click on Preferences.
In the Xerox print menu, go to the Printing Options tab, extend the Paper menu, and from 'Other Size' - 'Fit to New Paper Size,' select the needed size. OK - Print - Print.
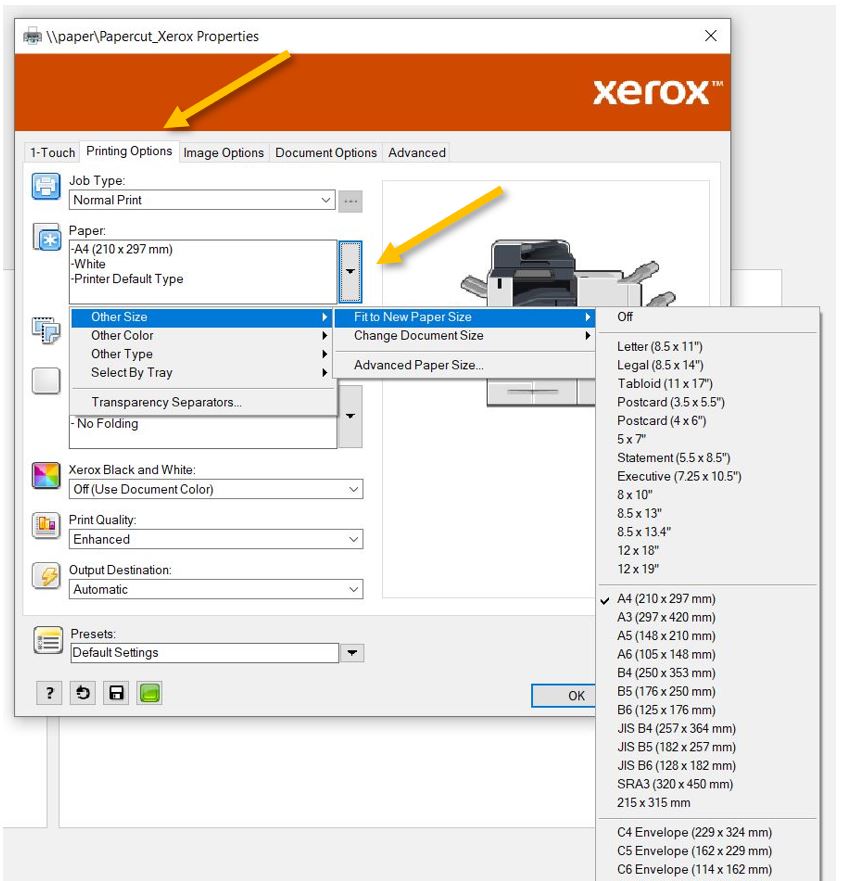
If you need a different size than the copier usually has in one of its trays, for example, A5, you will have to open the side tray and place A5 paper in it (not the X one, the one underneath). The copier will try to guess what type of paper you added - correct it if it chooses wrong.
From Mac:
Most apps cannot interact with the copier's menu directly. After pressing print, we must find the printer settings in the print menu. In Adobe Acrobat, for example, we need to press on 'Printer...'; in Chrome, 'More settings' and 'Print using system dialog'.
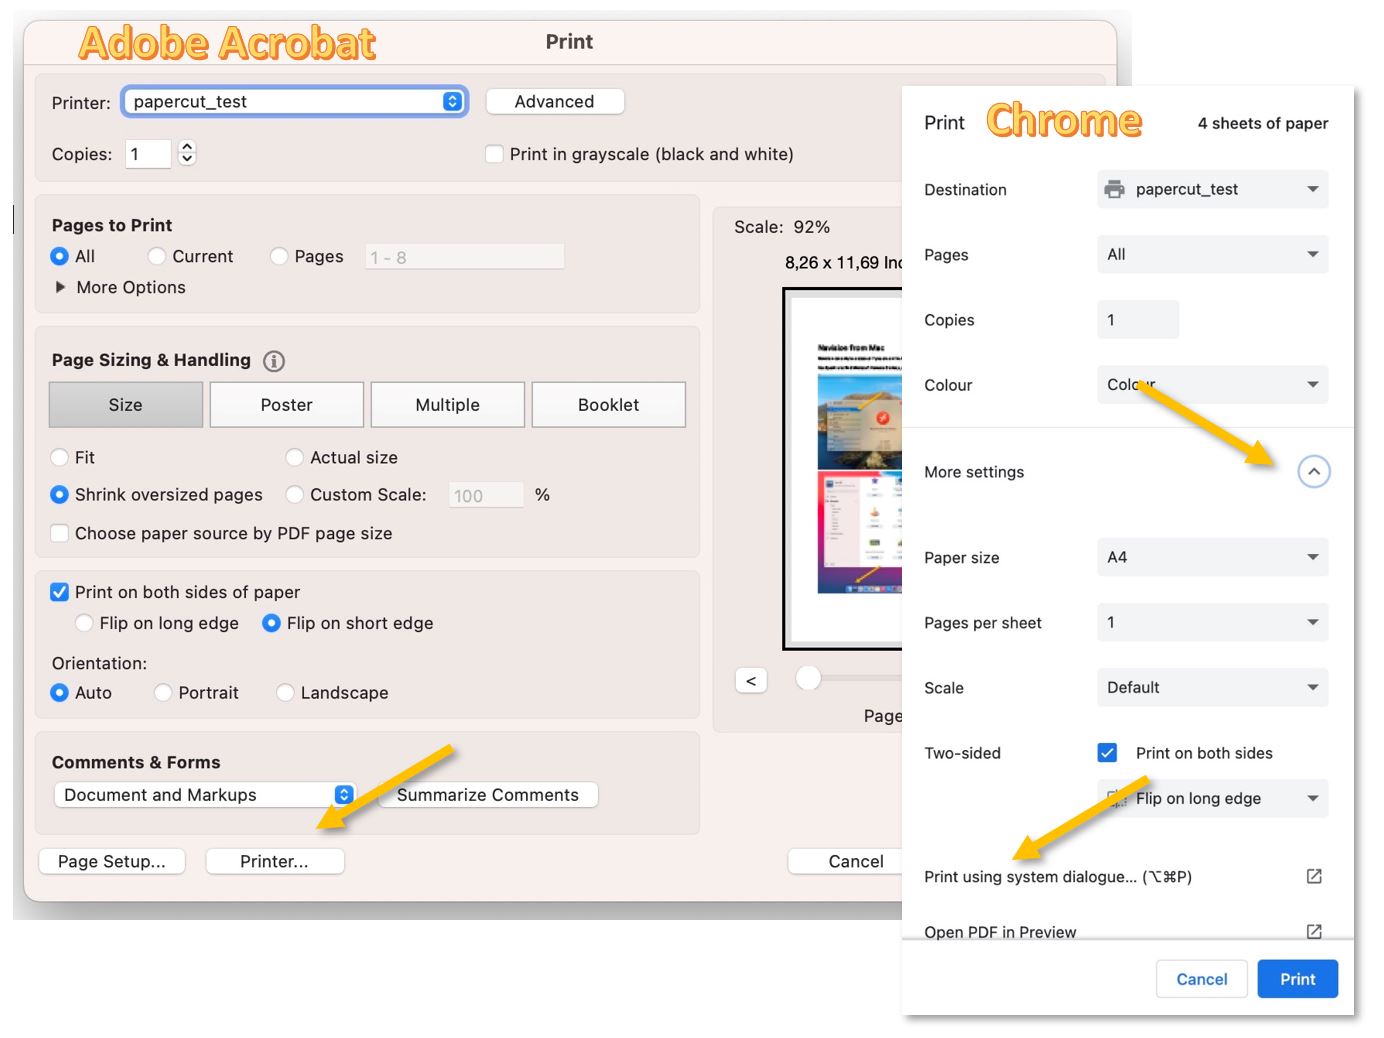
In the new pop-up window, scroll down to 'Paper Handling,' extend it, and turn on 'Scale to Fit.' Under 'Destination Paper Size,' select the needed size.
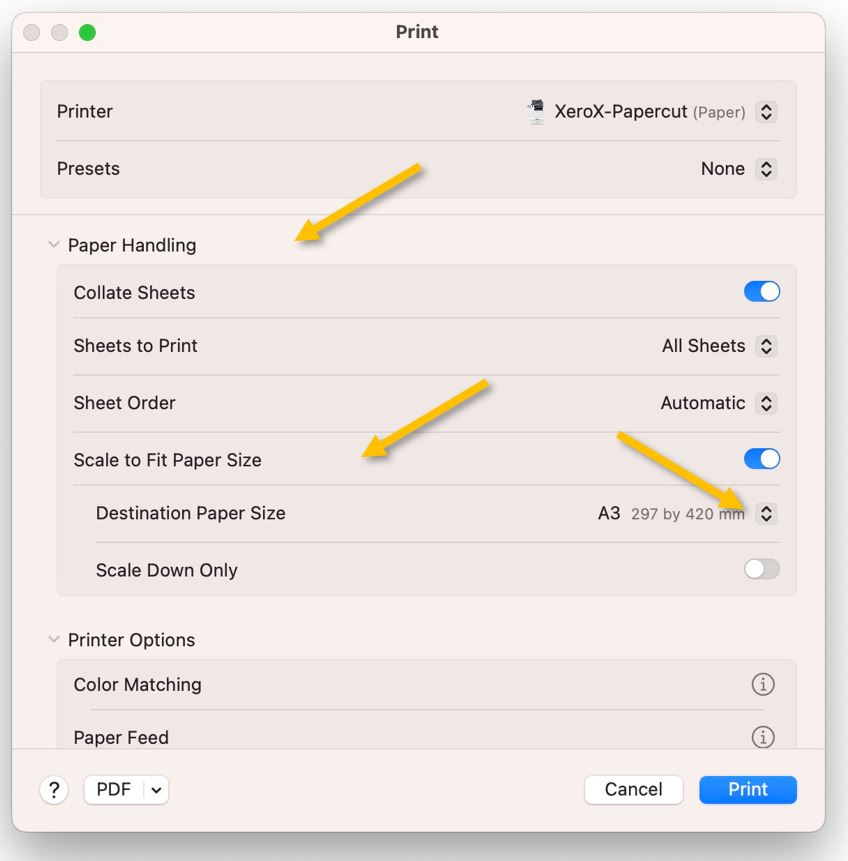
If you need a different size than the copier usually has in one of its trays, for example, A5, you will have to open the side tray and place A5 paper in it (not the X one, the one underneath). The copier will try to guess what type of paper you added - correct it if it chooses wrong.
Xerox Copiers - Booklets
Please keep in mind that not all copiers are created equal; only some of them can make a booklet, perforate, staple, or fold your print/copy job. However, if the nearest copier cannot do what you have in mind, do not fret. Print the job and find the closest copier with the capabilities you need. No matter where you print, the job will be visible on any of the school's copiers when you log in:
|
Location |
Hole Punch |
Staple |
Folding / Booklet* |
|
Annex 2nd Floor |
no |
yes |
no |
|
Blue Gim GO |
no |
yes |
no |
|
Chateau 1st Floor |
yes |
yes |
no |
|
Chateau Comm. Off. |
no |
no |
no |
|
ECC Ground Floor |
yes |
yes |
yes |
|
ES Ground Floor |
yes |
yes |
yes |
|
ES Second Floor |
no |
yes |
no |
|
HS Ground Floor |
yes |
yes |
yes |
|
ICC Ground Floor |
yes |
yes |
yes |
|
Metairie Ground Floor |
no |
yes |
no |
|
MHS Lib. 1 |
yes |
yes |
yes |
|
MHS Lib. 2 |
no |
no |
no |
|
Chalet |
no |
yes |
no |
*Almost all the copiers in the school can print or create a booklet, but only a few can fold it and staple it.
** If you need to create more than 10 booklets, please use the copiers outside the MHS library or plan your printing with the schools' GOs. When creating booklets, the copiers must print on both sides, fold, and staple. This could take a long time, and nobody else would be able to use them.
How to Create Booklets from the:
Copier:
Sign in, place the originals in the Automatic Document Feeder, choose Copy, and scroll down to see the options. The default copy mode is black and white; if needed, please change it to Color from the Output Colour option.
Select the Booklet Creation option and More. In the pop-up window - On and OK. Then, choose the paper size that you want to use. If A4 is chosen the resulting booklets will be A5. With A3, the booklets will be A4. Press OK again.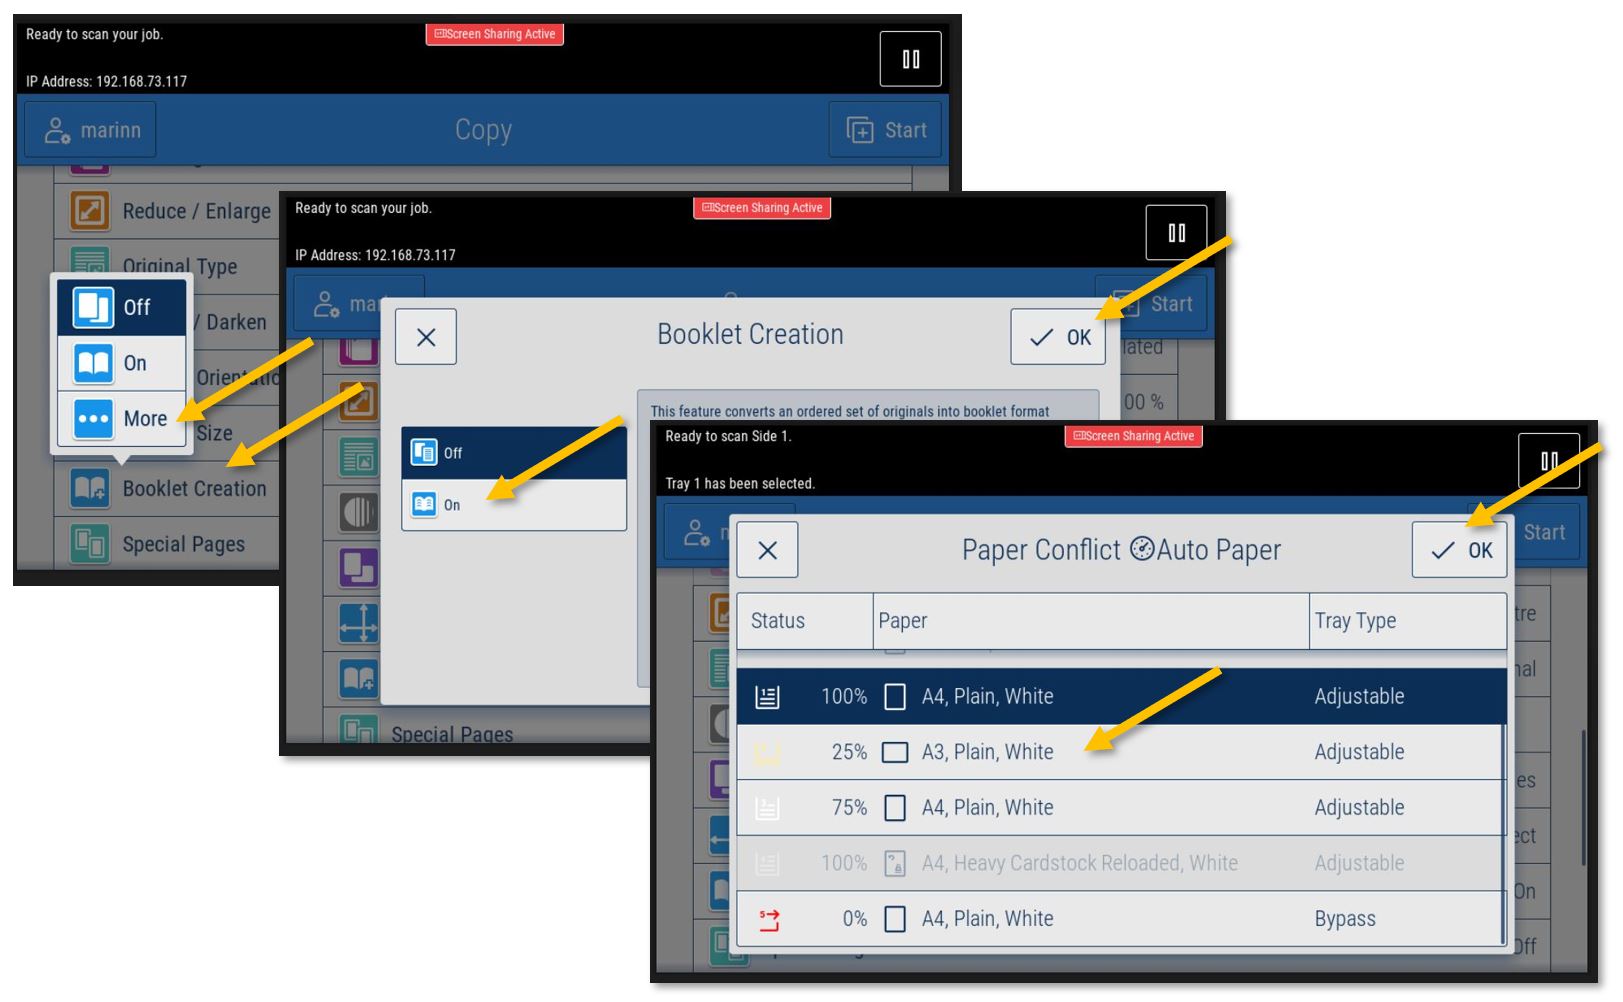
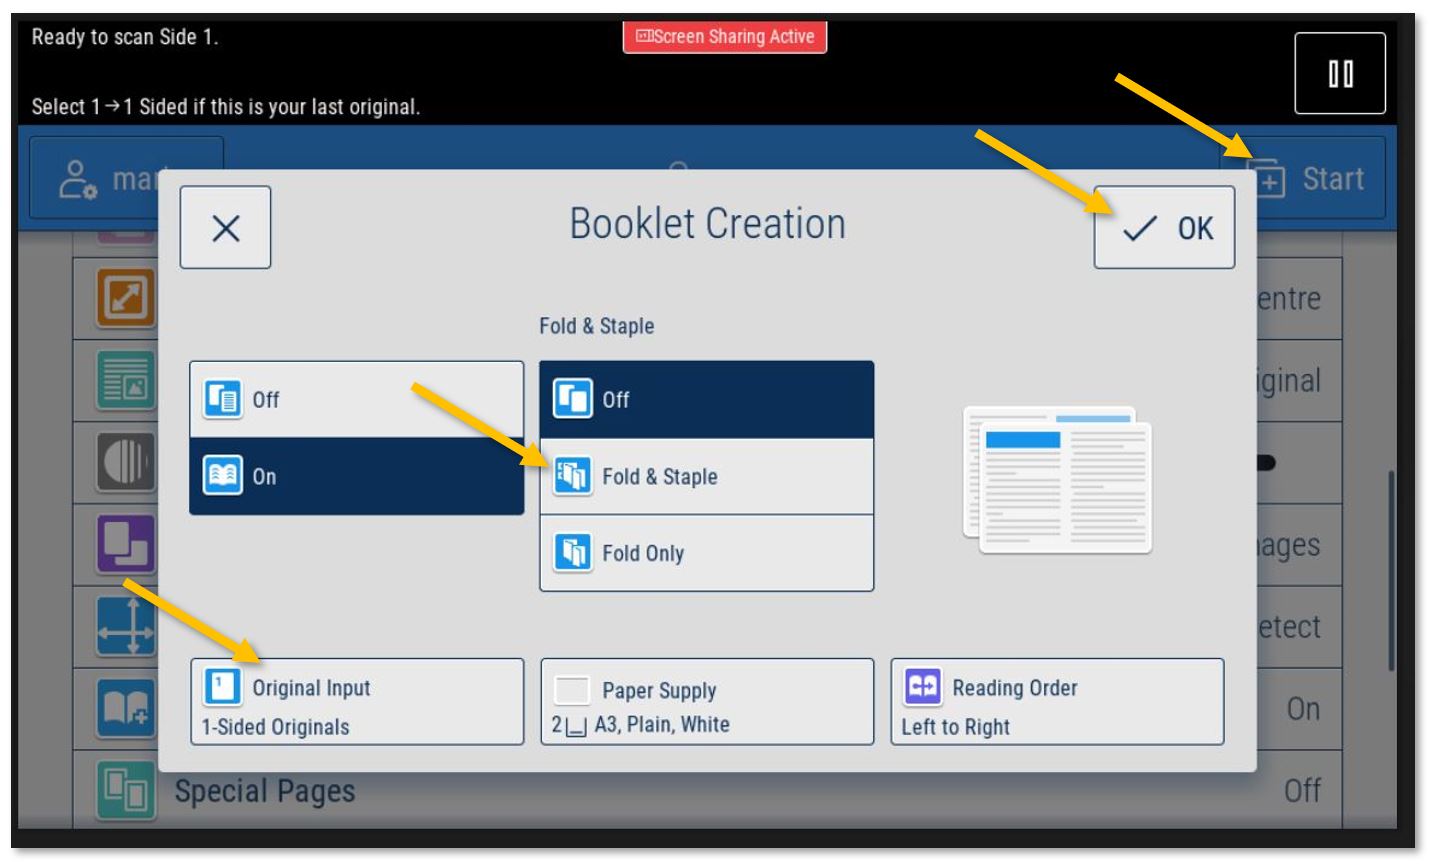
Mac:
(If you print from a Windows machine, please jump to the next section.)
Most apps cannot access the booklet menu directly. After pressing print, we must find the printer settings in the print menu. In Adobe Acrobat, for example, we need to press on 'Printer...'; in Chrome, 'More settings' and 'Print using system dialog'.
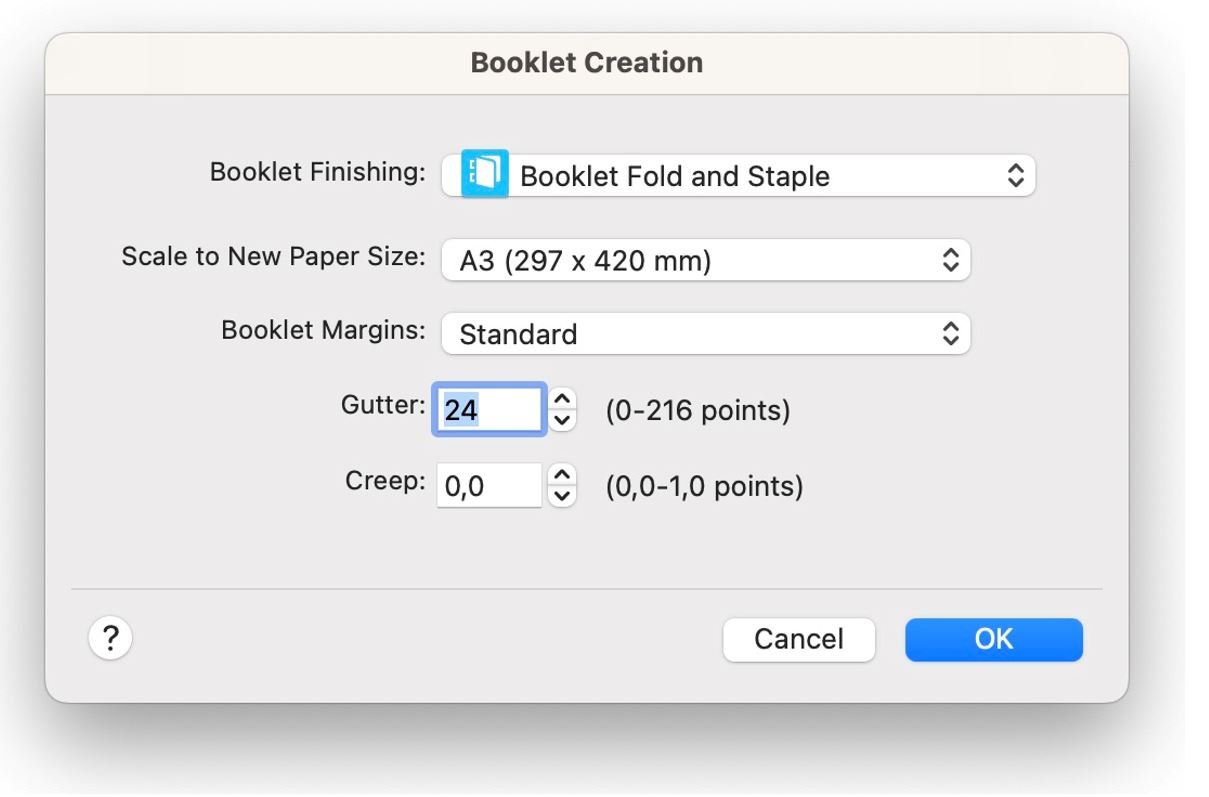
In the new pop-up window, scroll down to 'Printer Options', extend it, and select Xerox Features. Click on the 'Finishing' box and select from the drop-down list 'Booklet Creation...'
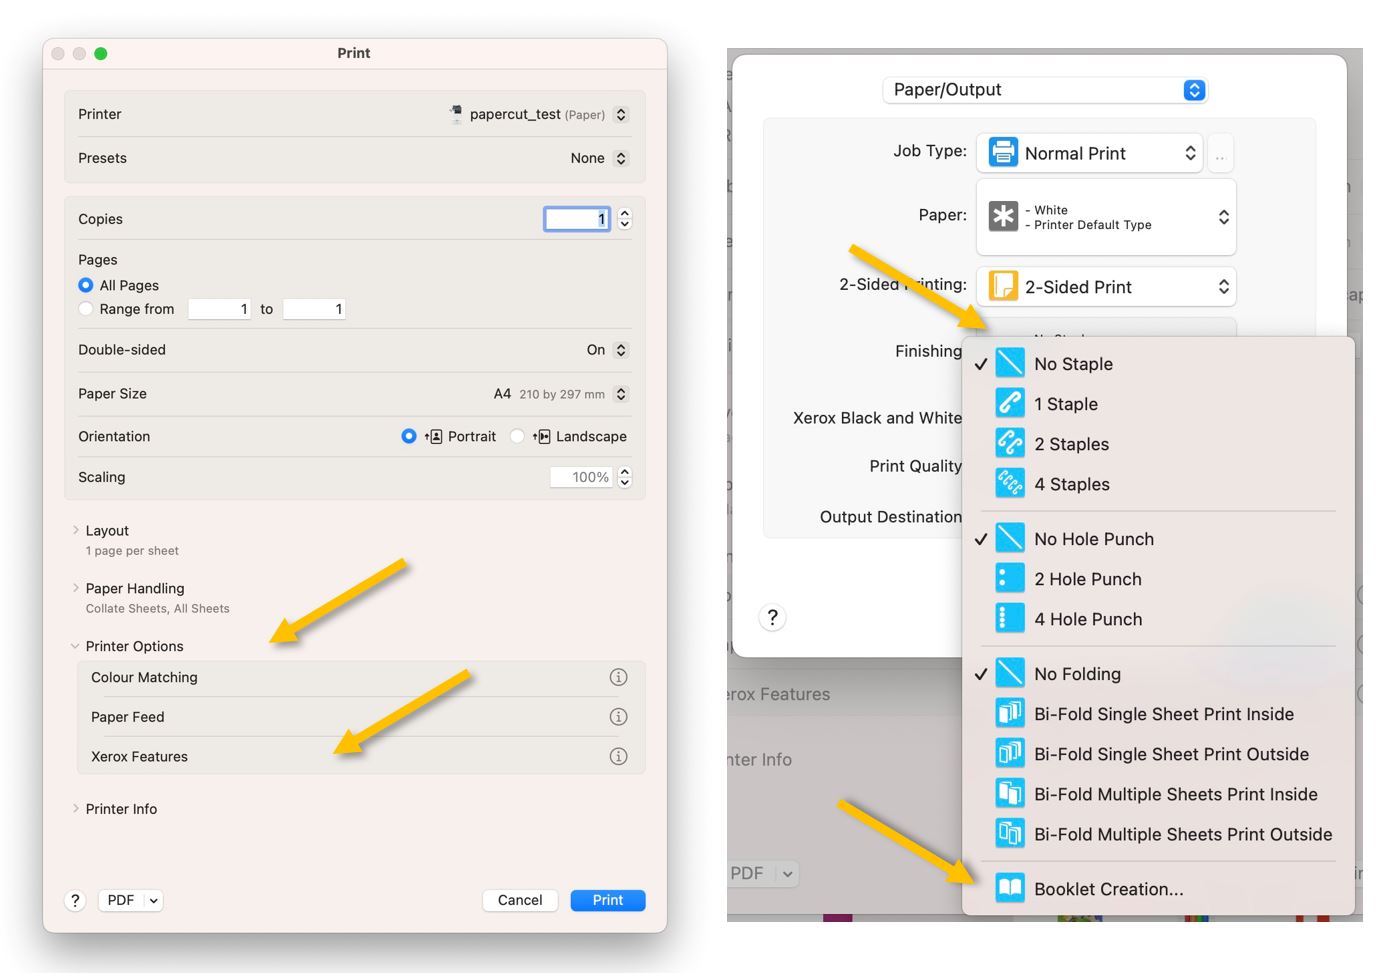
In the 'Booklet Creation' menu, select the appropriate 'Booklet Finishing' for your case, usually 'Booklet Fold and Staple' and, from 'Scale to New Paper Size:' the paper size to be used. Usually A3 (for A4 booklets). A4 (for A5 booklets).
Press 'OK', then 'Print' and 'Print' again to send the job to the copier.
Windows:
Most apps cannot access the booklet menu directly. After pressing print, we must find the printer settings in the print menu. In Adobe Acrobat, for example, we need to press on 'Printer...'; in Chrome, 'More settings' and 'Print using system dialog...'; in Word, 'Printer Properties.'
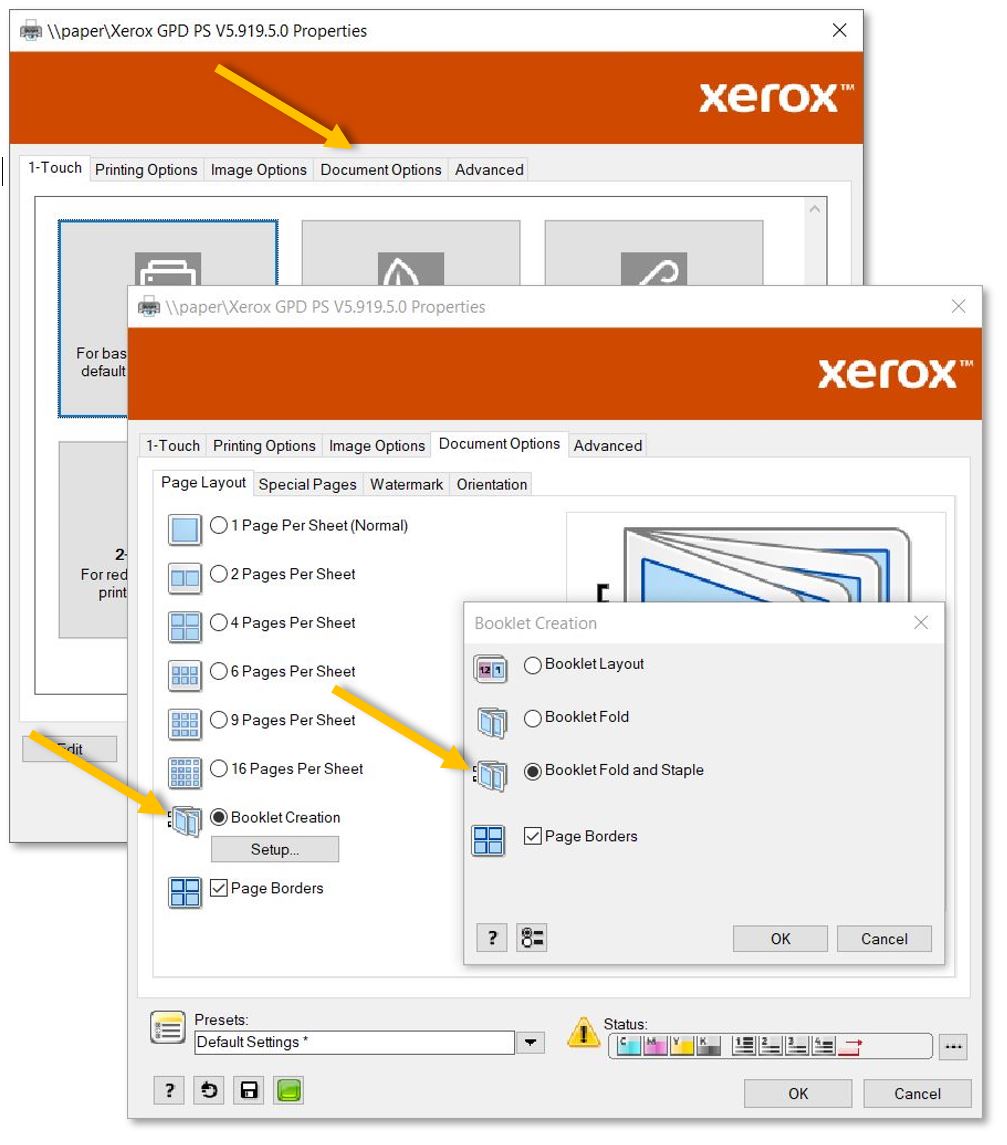
Press 'OK', 'OK' again, and 'Print' to send the job to the copier.
XeroX-Paparcut Missing on Mac? Install it from Self-Service
If XeroX-Papercut is not in your list of printers, please install it from the Self-Service portal.
If Self-Service (the icon with the ISB logo) is not present in the dock, please search for and open it using the magnifying glass (Spotlight) in the upper-right corner. In the window that opens up, scroll down to find the XeroX-Papercut printer in the list and click on Install.
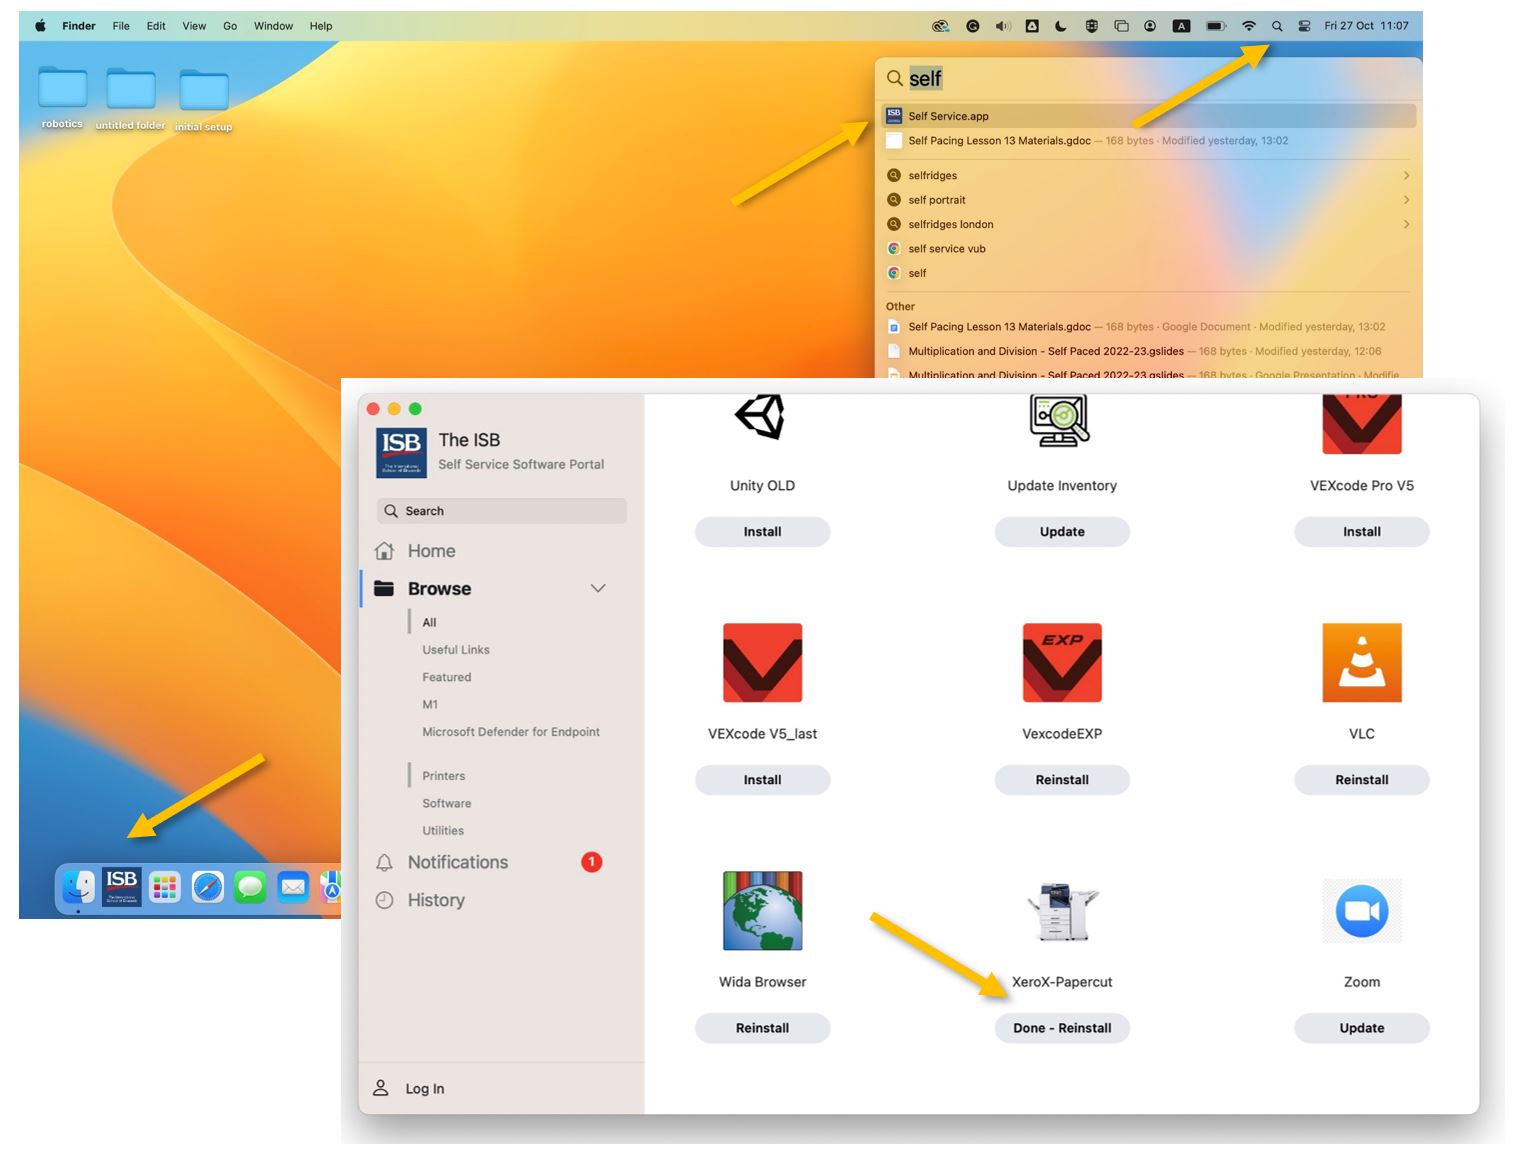
The first time you print to the new copiers will require your password. Do not forget to mark 'Remember this password.'
If the password window does not pop up or your print jobs are stuck saying 'Hold for Authentication,' click the reload sign (screenshot on the right) and insert your email password in the new pop-up window.
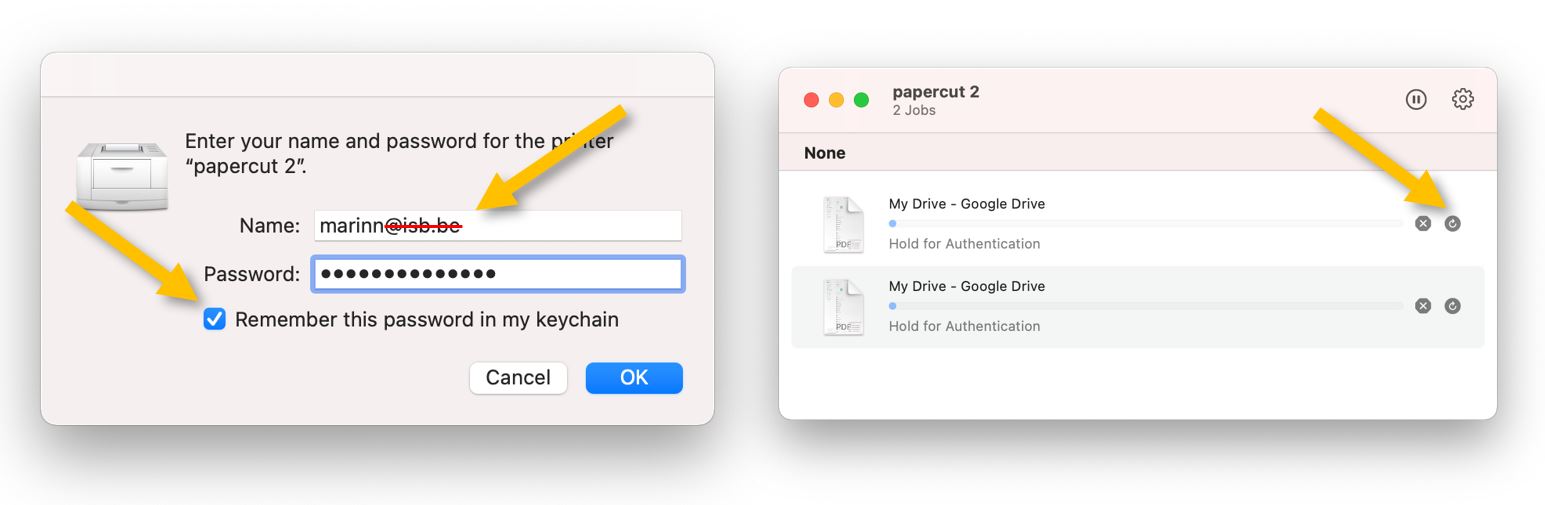
Good to know: In rare cases, the operating system could prefill your username (Name) with your email. Please erase @isb.be and continue as above.
Once the print jobs disappear from your queue, you can find them at the copier (click here for instructions).
XeroX-Paparcut Missing on Windows? Install it from \\paper
If you cannot find the new XeroX-Papercut printer in your list of printers, please open a folder and copy-paste \\paper into the location field. Press enter and double-click Papercut_Xerox from the list of printers to install it.
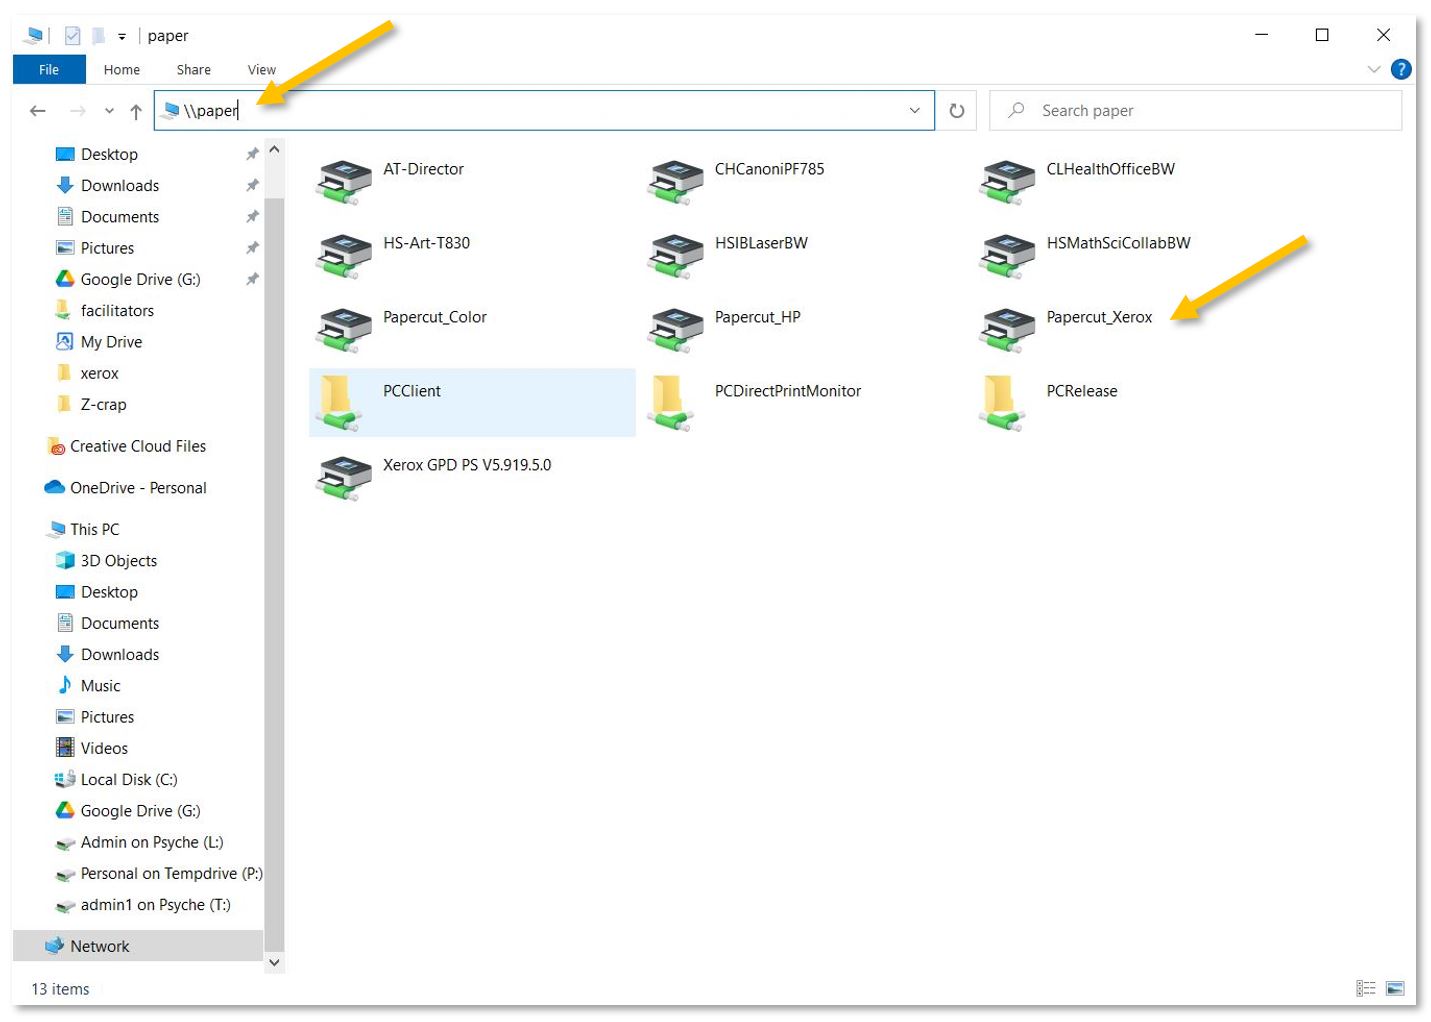
Reopen the print menu and select Papercut_Xerox from the list of printers.
Xerox Printing - Jobs Stuck in the Queue - Fixes
If you cannot find your queue, please open it from System Properties (settings) - scroll down to Printers and Scanners - and double-click on XeroX-Papercut.
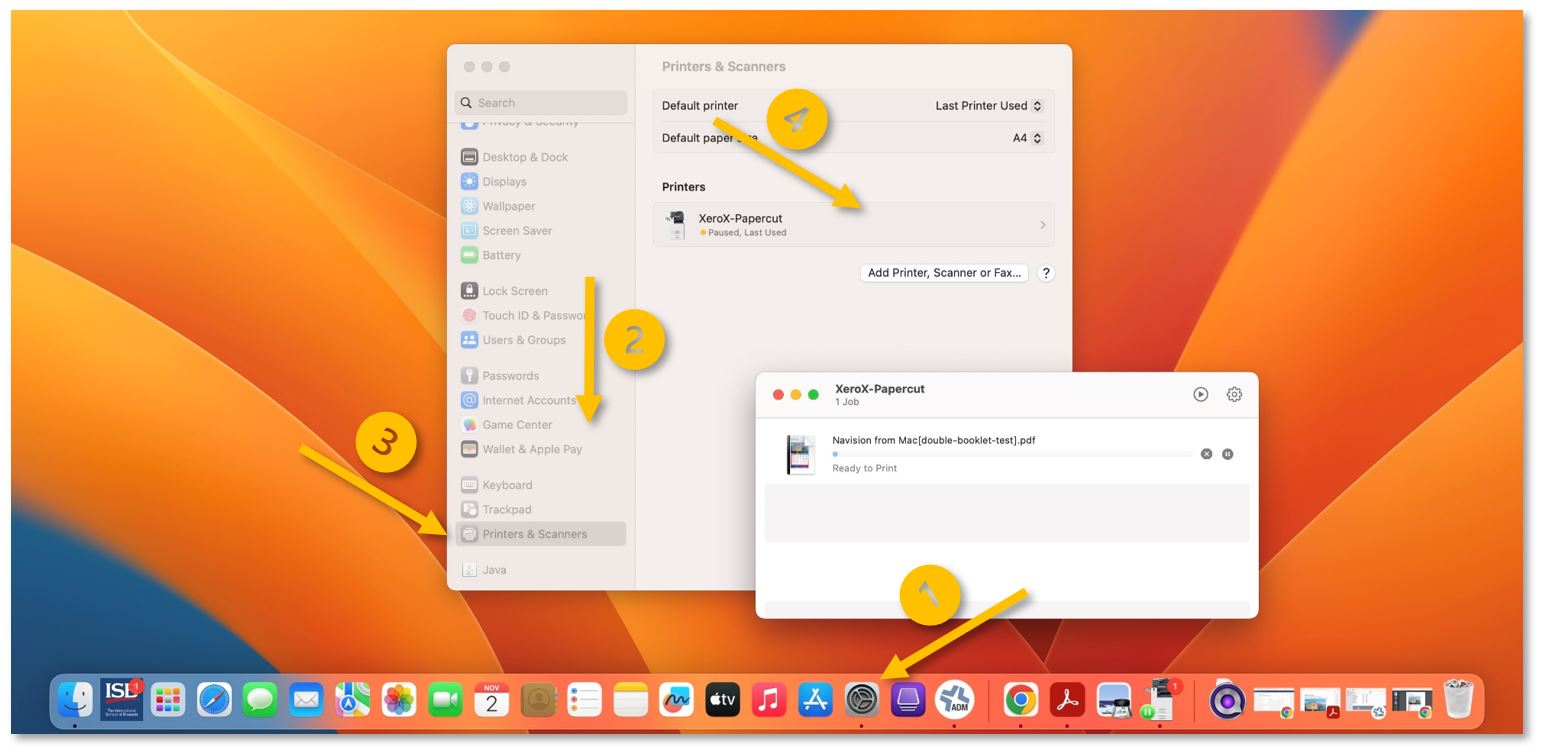
Hold for Authentication fix:
Usually, when your print jobs get stuck in your queue with the message Hold for Authentication, you need to input your username and password to convince them to leave.
Click the reload sign (right panel) and insert your email password in the new pop-up window. Mark 'Remember this password' before pressing OK.
Once the print jobs disappear from your queue, you can find them at the copier level.

Good to know: In rare cases, the operating system could prefill your username (Name) with your email. Please erase @isb.be and continue as above.
Hold for Authentication usually shows its ugly head the first time you installed or reinstalled the printer, when you change your email/system password, after logging in on a new computer, or after a reimage.
Ready to Print fix:
If your print jobs stay in your queue with the message Ready to Print, the usual fix is to make sure that you are connected to ISB and then press the Play button in the upper right corner.
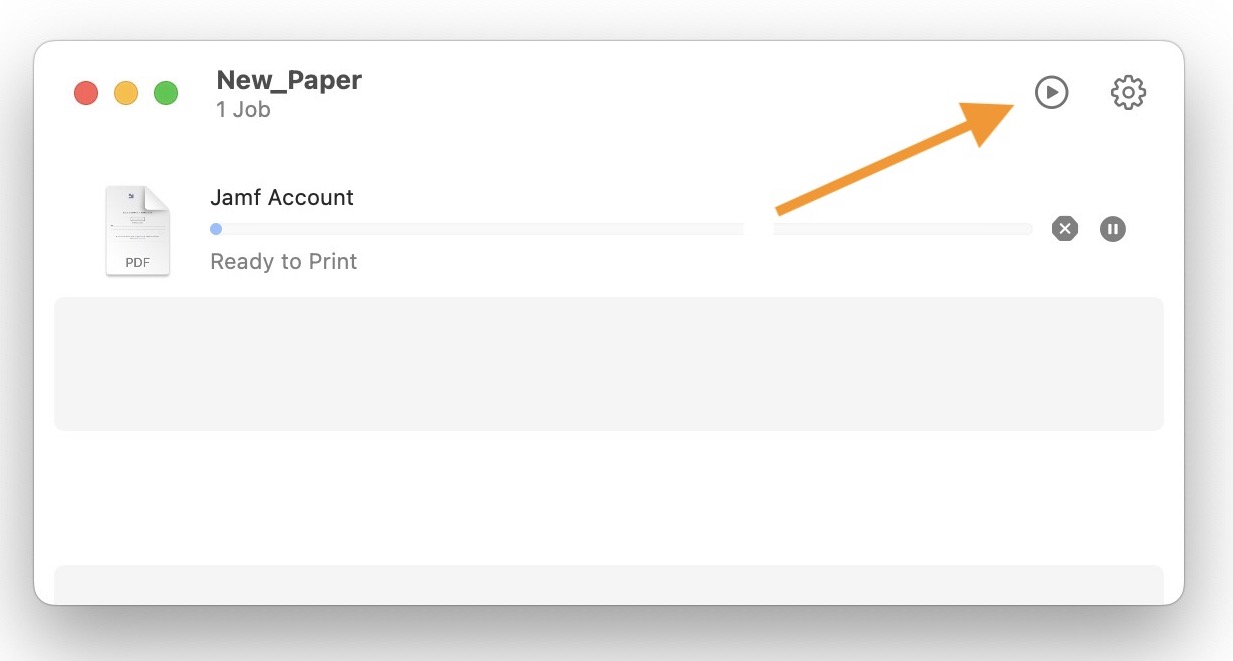
Once the print jobs disappear, you can find them in the copier queue.
Good to know: printing only works if connected to the ISB network.
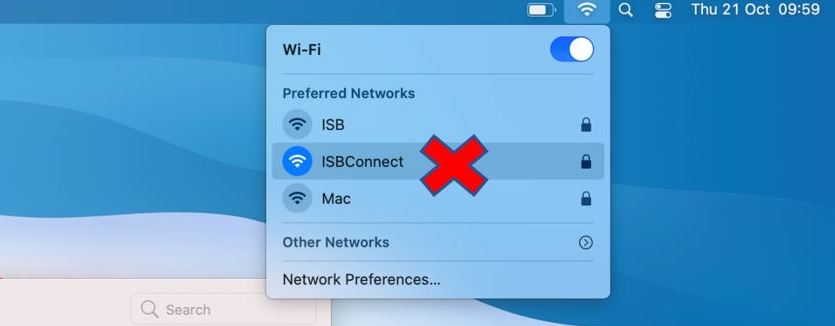
If you print and the Mac cannot communicate with the printer, it automatically pauses the process.
It could happen if you are not on the ISB network. For example, if you do not want to forget and print something from home.
Unfortunately, the Macs do not resume printing when the communication is reestablished, not even when you print something new.
LS Student Printer - iPad - how to
To print from an iPad to the Lower School student printer, find and click Share (1). Then, tap View More (2) and Print (3)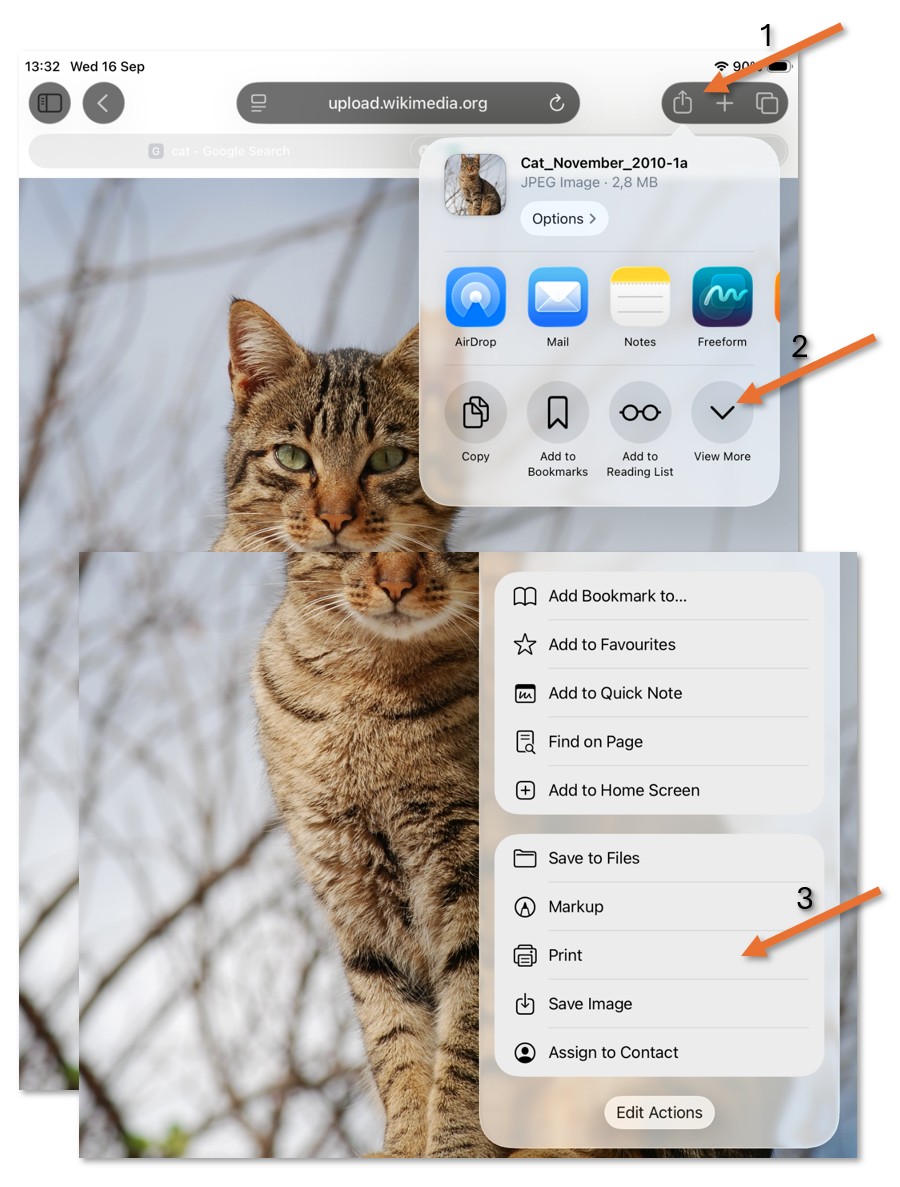
Make sure that the ls student printer is selected (1), and check the settings. How many Copies do you need? Do you need to print all the pages or only some (Range)? Disable Print in Color if you don't need it; the black toner is much cheaper. Save paper by leaving Double-sided On when possible. Make sure that the selected Paper Size is A4. If you print a different size, the printer will present an error - it only has A4 paper in its trays. If you think the data will fit better in landscape, change the Orientation. Sometimes a photo is too big; adjust the Scaling so it will fit on only one page.
When ready, press the Print button (3) 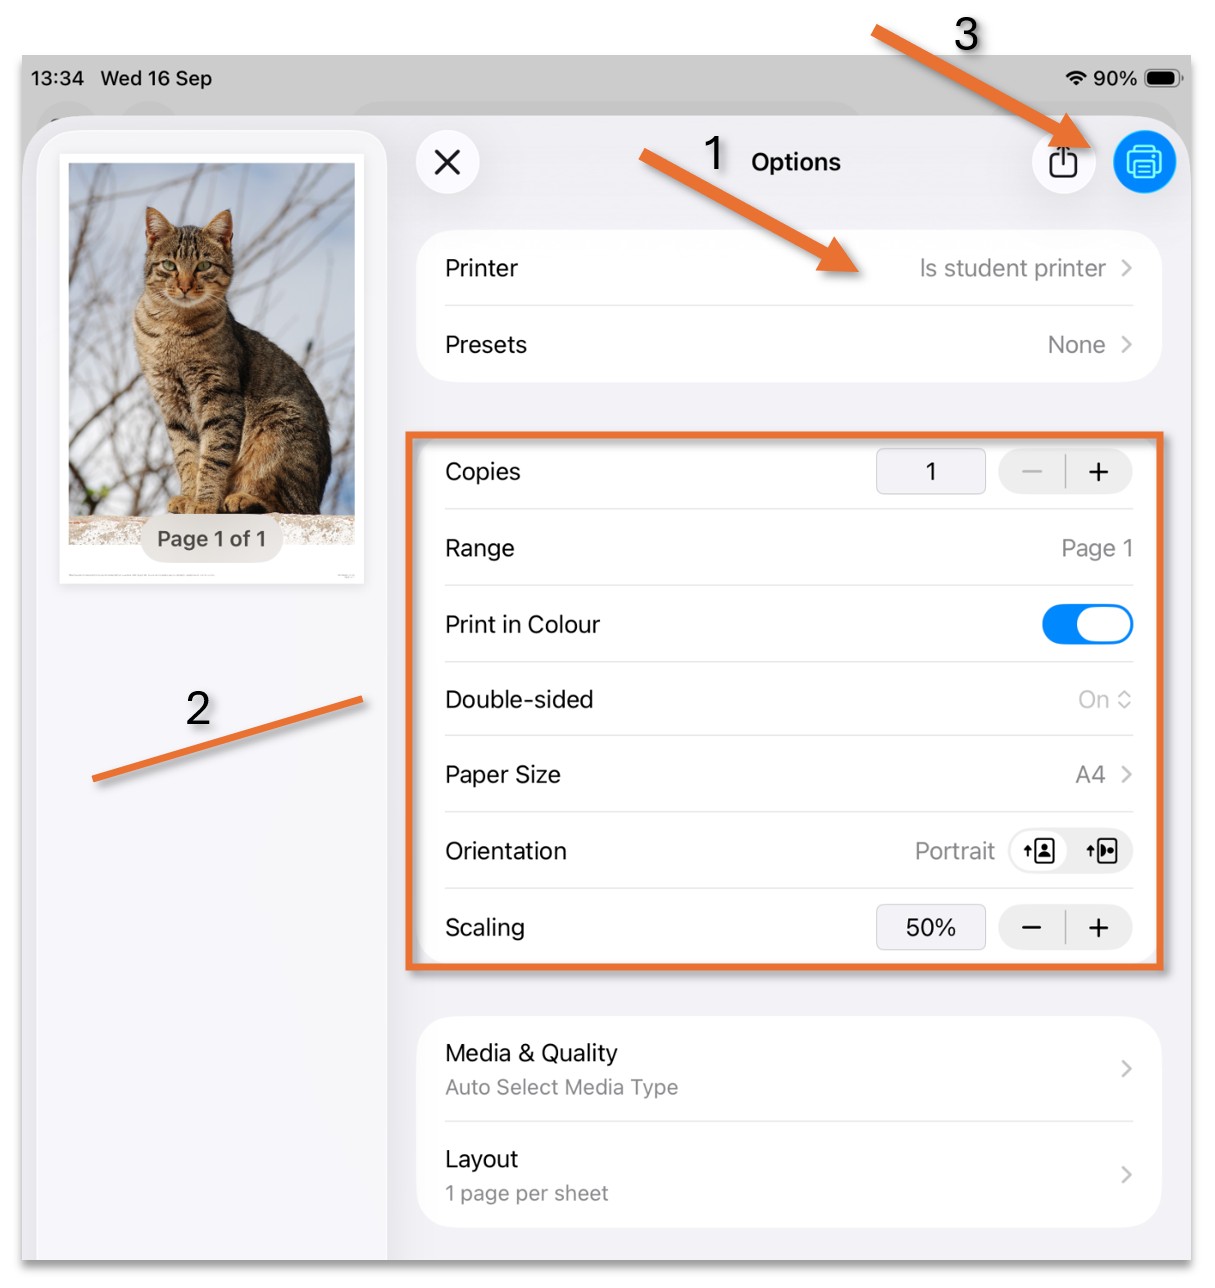
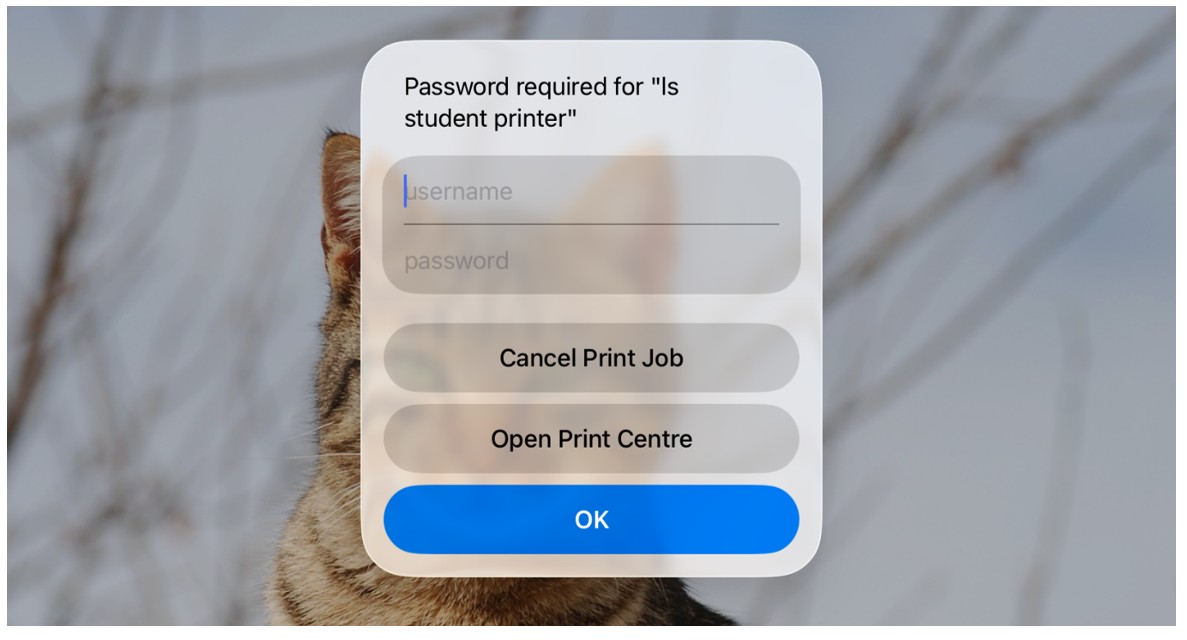
The first time you print, you will be asked to enter a user and a password.
The username is: student
The password is: printprint
LS Student Printer - Mac - installation and tips
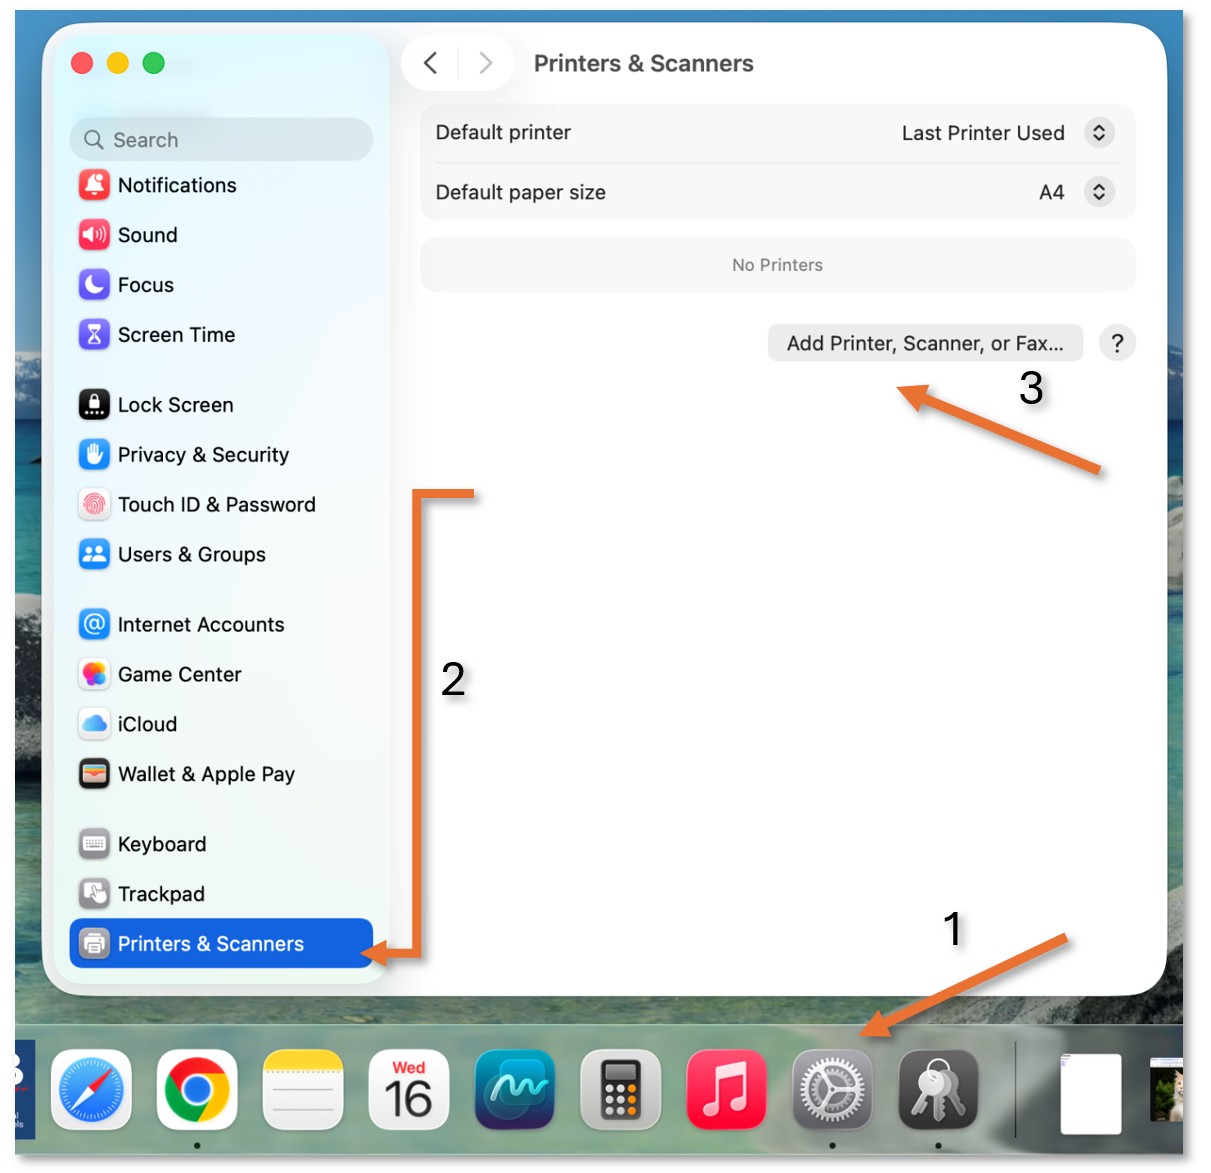
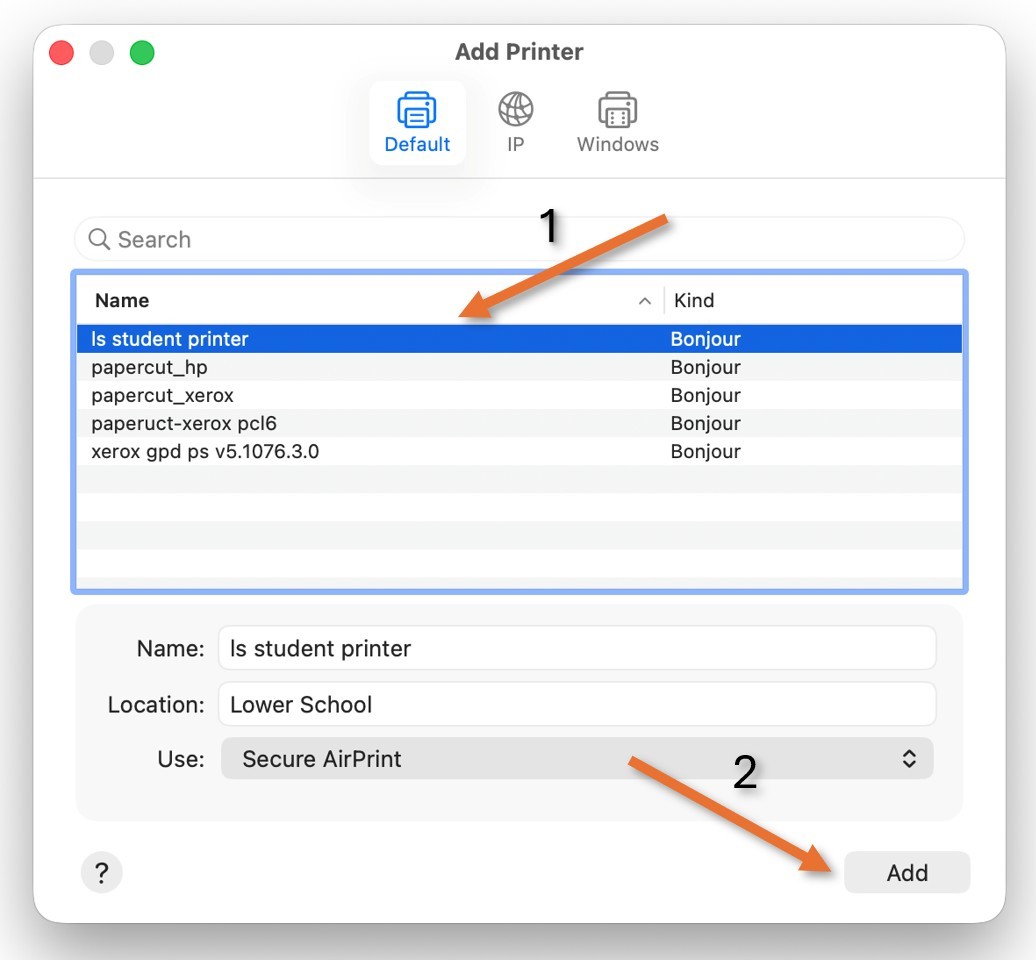
To print from a Mac, we first need to install the printer. Open System Settings (1), then scroll down to the end of the left option panel and select Printers & Scanners (2). Click on Add Printer (3)
Select the ls student printer (1), and then Add (2)
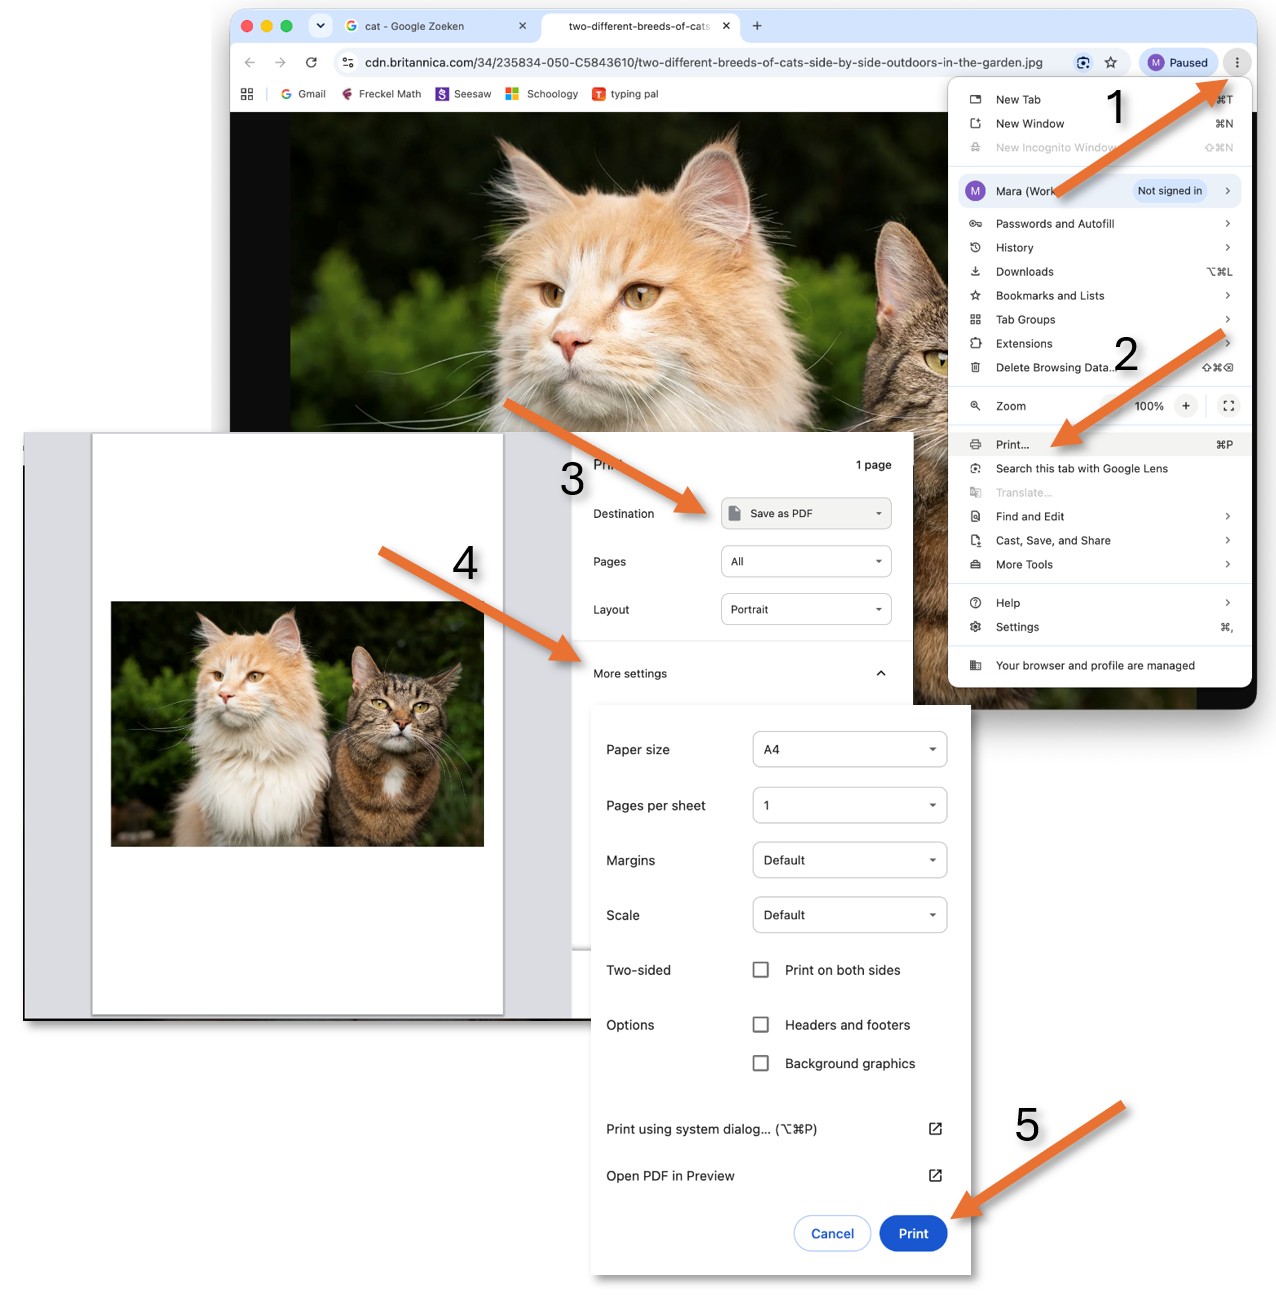
Now that the printer is installed, we can open Chrome, for example, find the Print menu (1,2), select the new printer, and print.
Under Destination (3), click on Save as PDF, then See more... and select the newly installed printer.
Before printing, make sure that all the settings are correct. Do you need to print all the Pages? If you think the data will fit better in landscape, change the Layout. Open More settings and make sure that the Paper Size is A4. If you print a different size, the printer will present an error - it only has A4 paper in its trays. Sometimes a photo or table is too big; adjust the Margins or the Scale so it fits on one page. Save paper by Printing on both sides when possible. Uncheck Headers and footers if you don't want the website details printed. Press Print (5) when done.
Chrome remembers the latest adjustments - make sure to check your settings for every print; not all prints are the same.
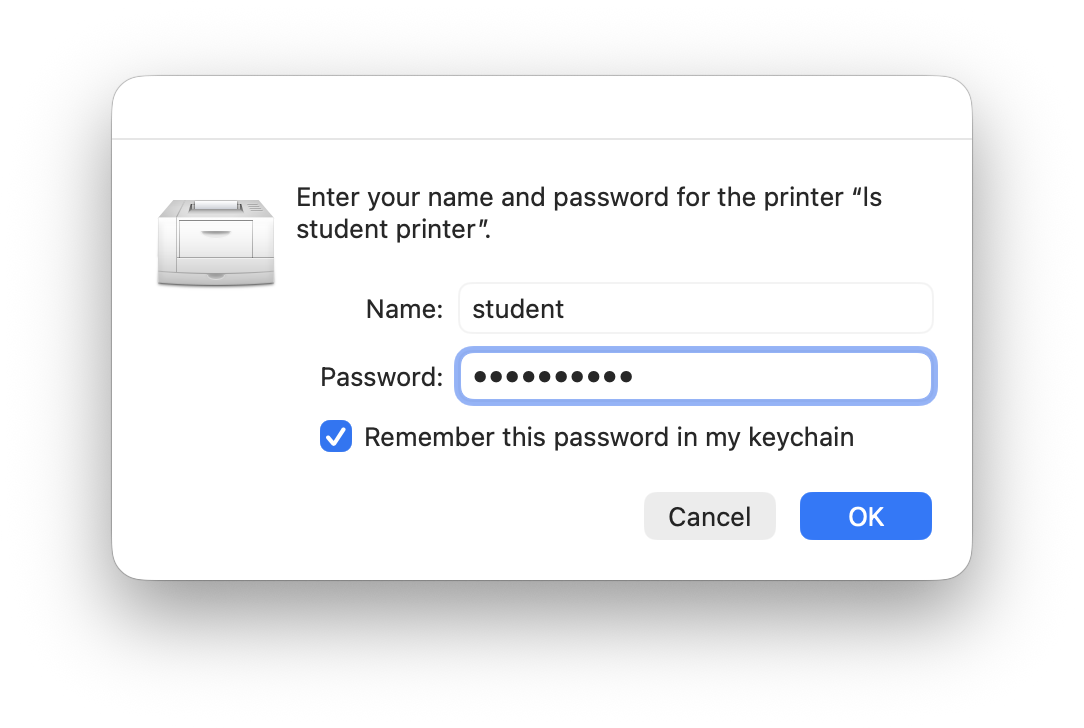
The first time you print, you will be asked to enter a Name and a Password.
The name is: student
The password is: printprint
Make sure to check "Remember password" before pressing OK.
Accounts and Security
eID - Install the Belgium eID app to access government related pages
(For AG please follow this link.)
Open the Self-Service Software Portal and install the Belgium eID app.
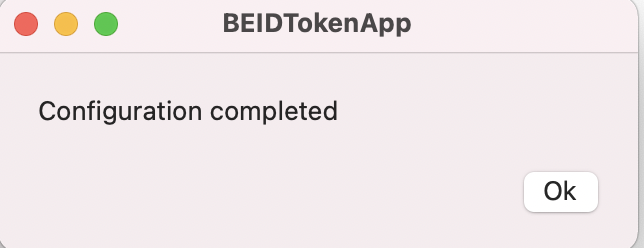
Once installed you will have 2 pop-ups:
|
|
|
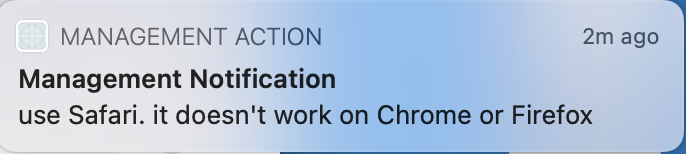
For government related pages (ex. My Minfin, Ma Sante, etc.) please use Safary and find the log-in page for your needs.
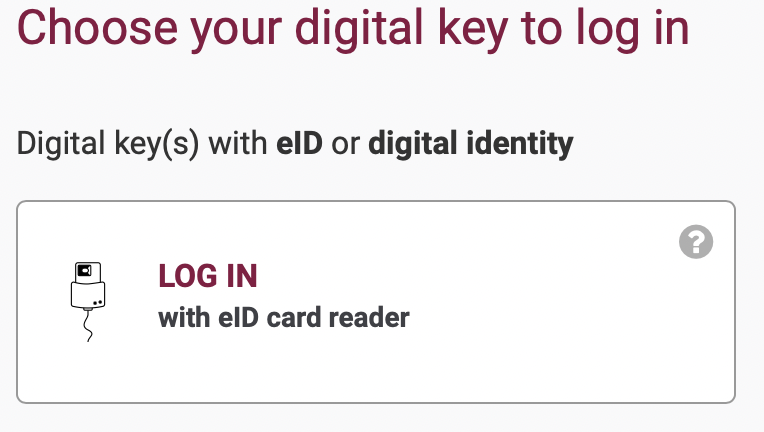 |
|
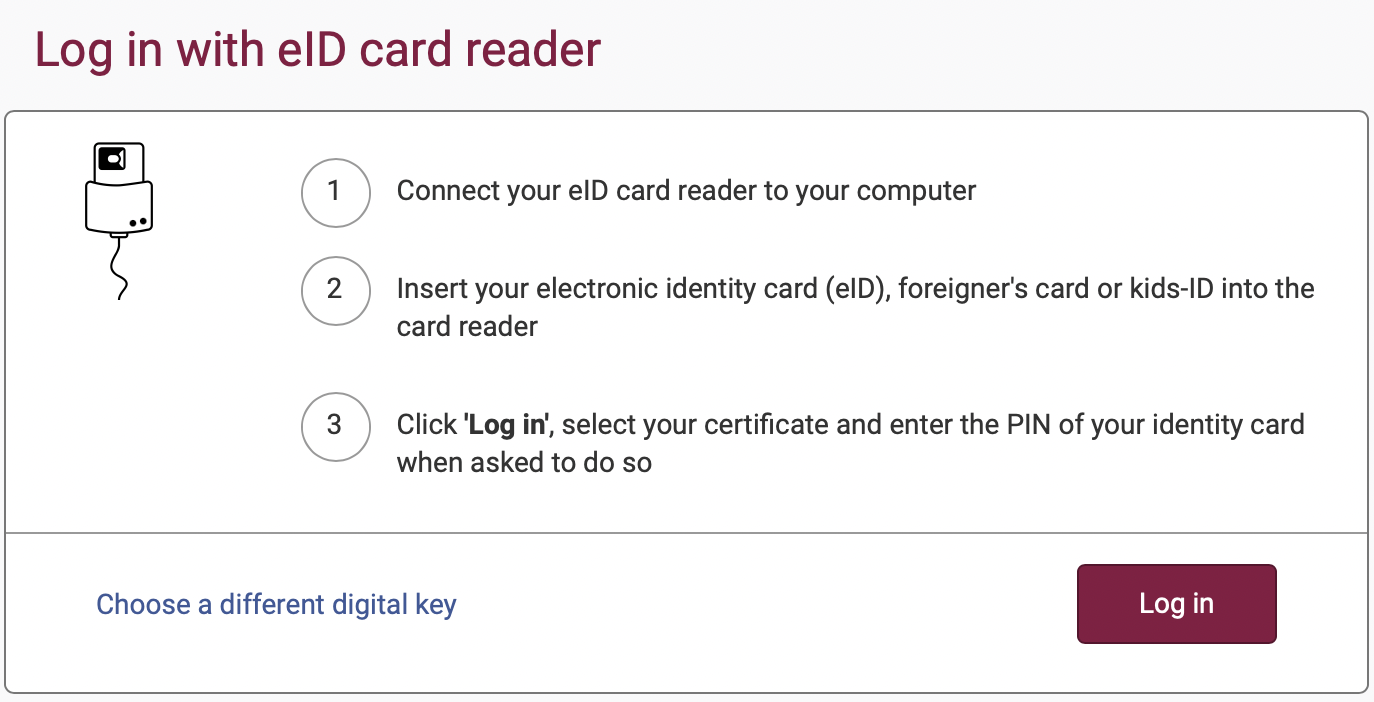
When prompted, insert your card in the card reader, log-in, select the certificate with your name in the next pop-up, click continue, and insert you ID Card pin code.
eID - Accessing the AG website using the Belgium ID - initial setup
AG only works on Chrome for now, and it requires installing an extension and an app. We are working on a more streamlined solution.
Please go to the AG login page and log in.
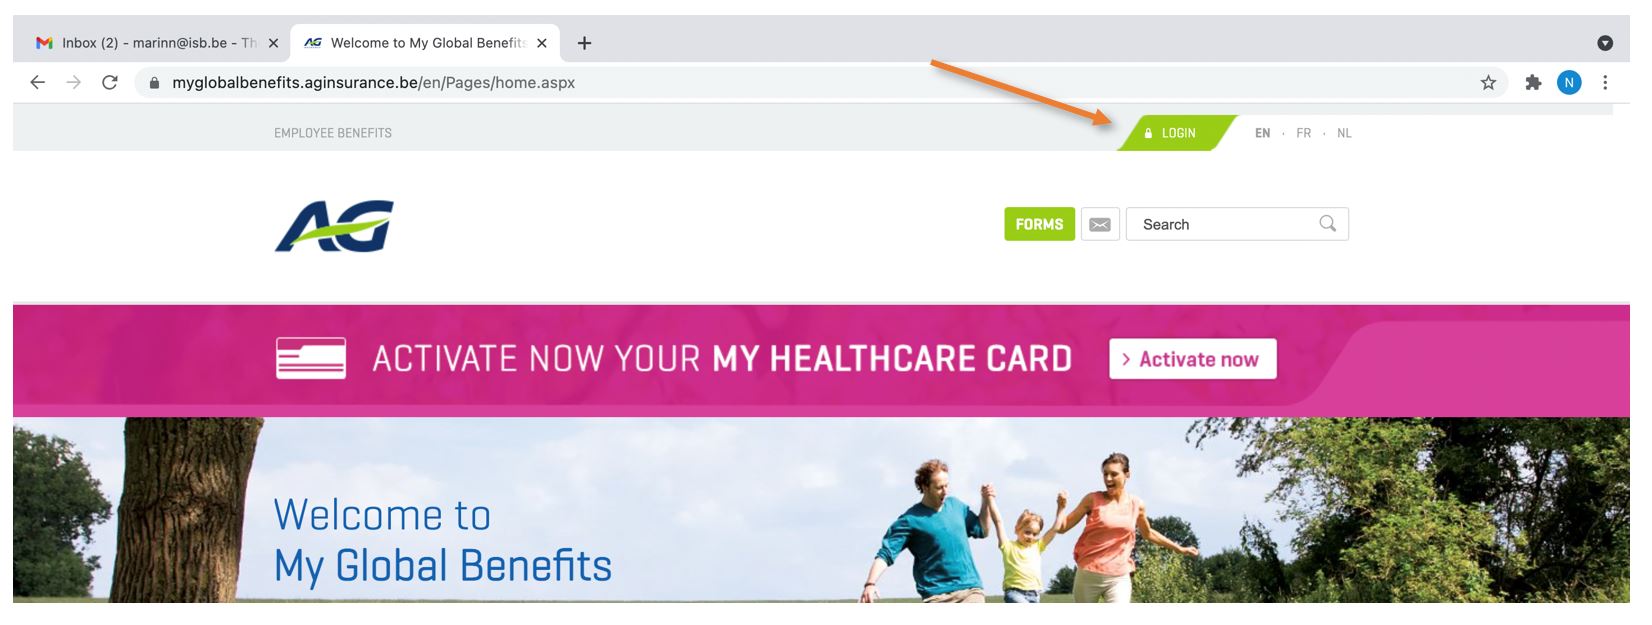
Select e-ID and agree with the terms of use.
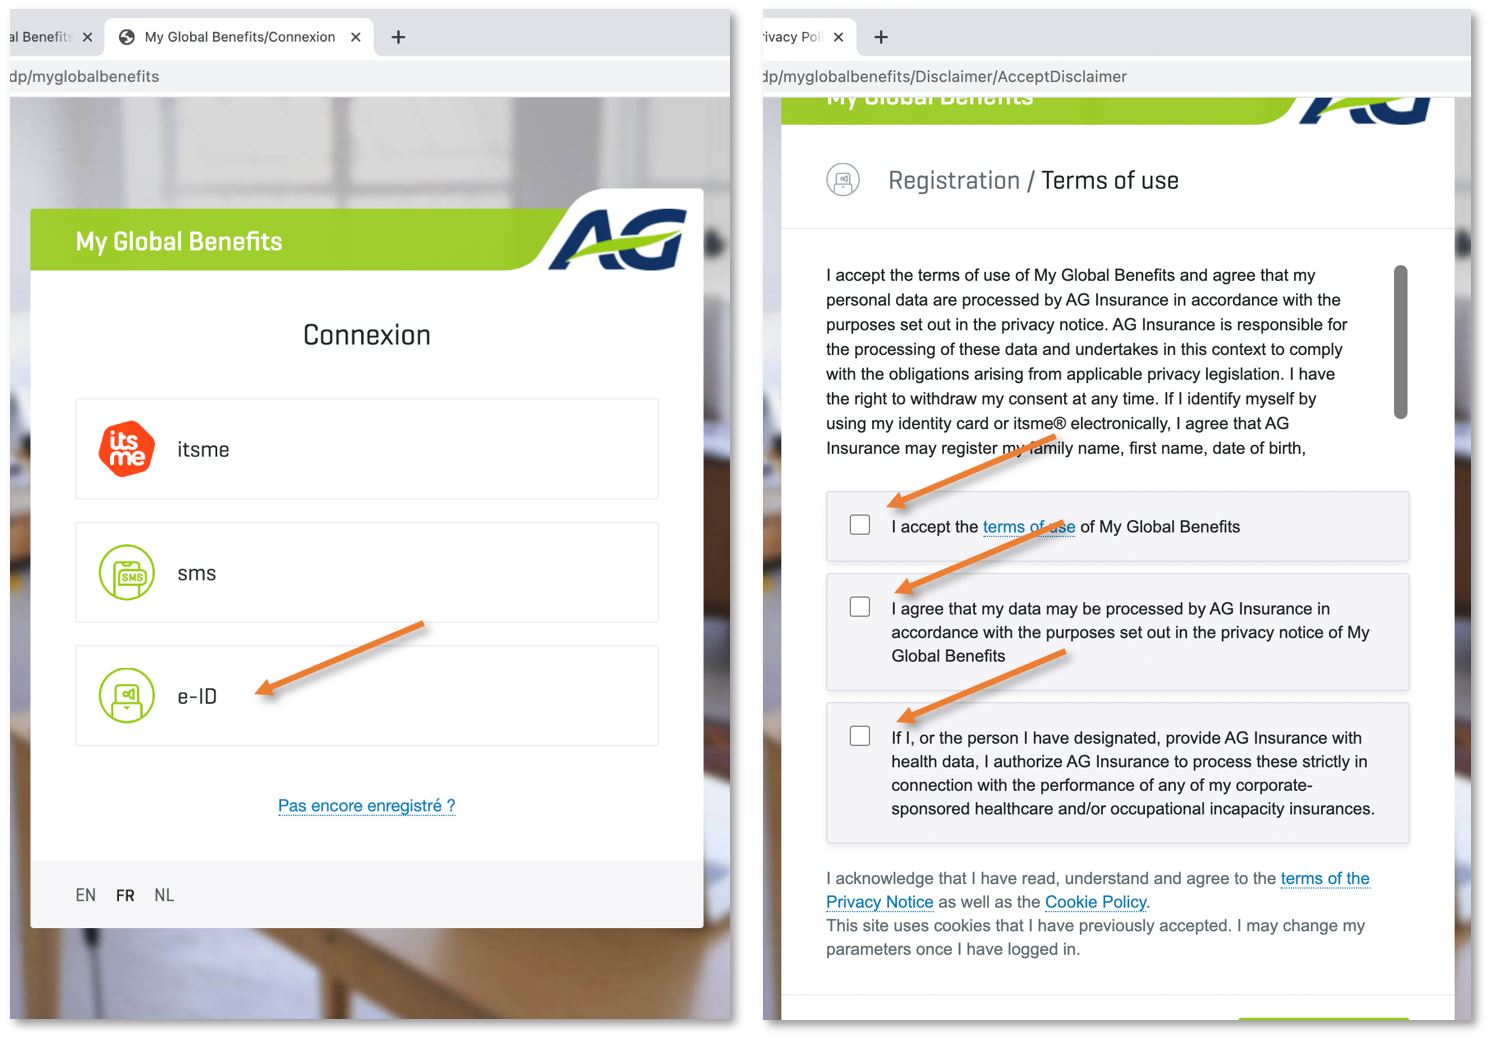
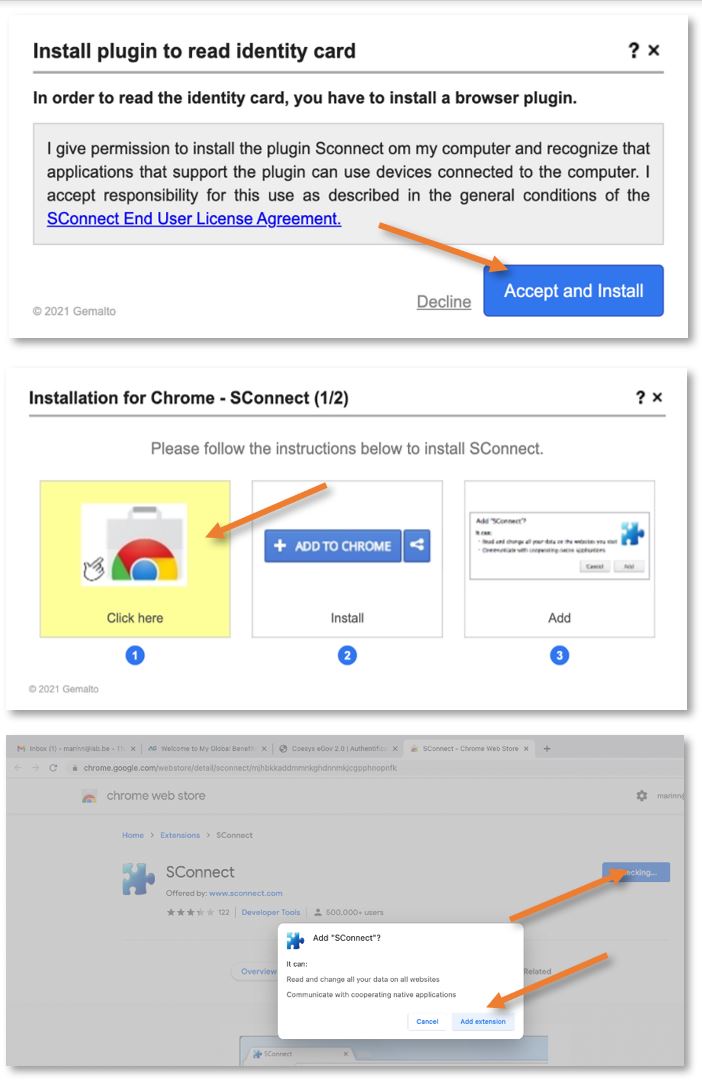
Install the Chrome extension as requested.
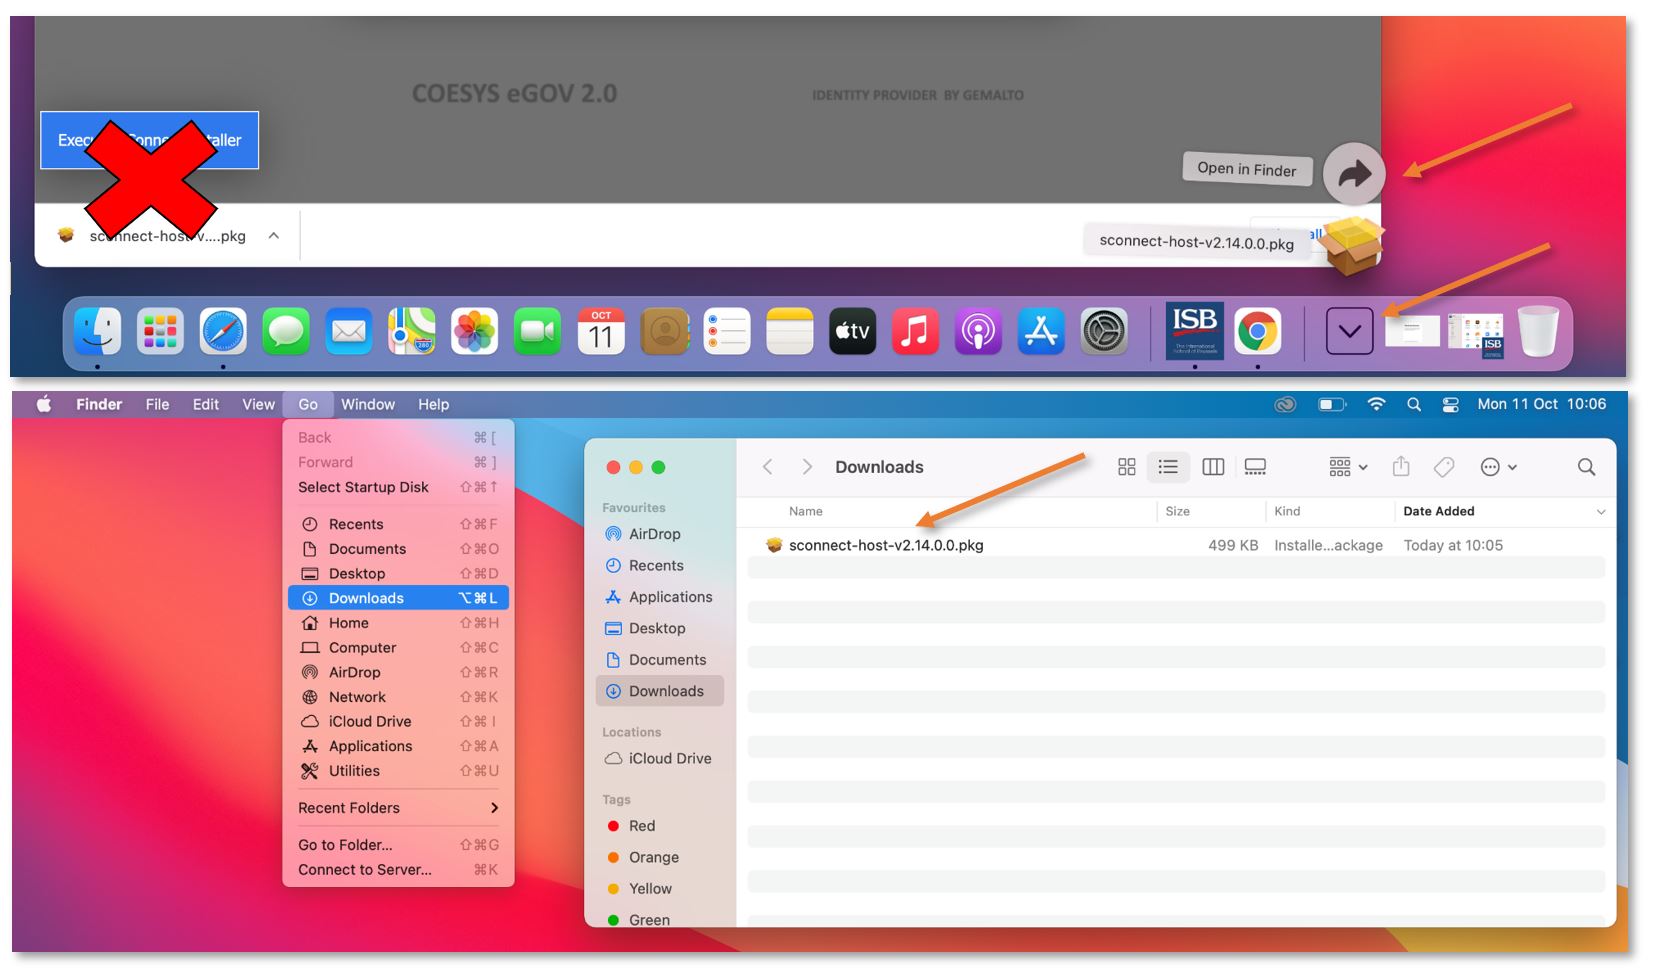
The website will also automatically download the app needed to interact with your card reader. Please do not install it from the Chrome download bar. Please open the Downloads folder and install it from there.
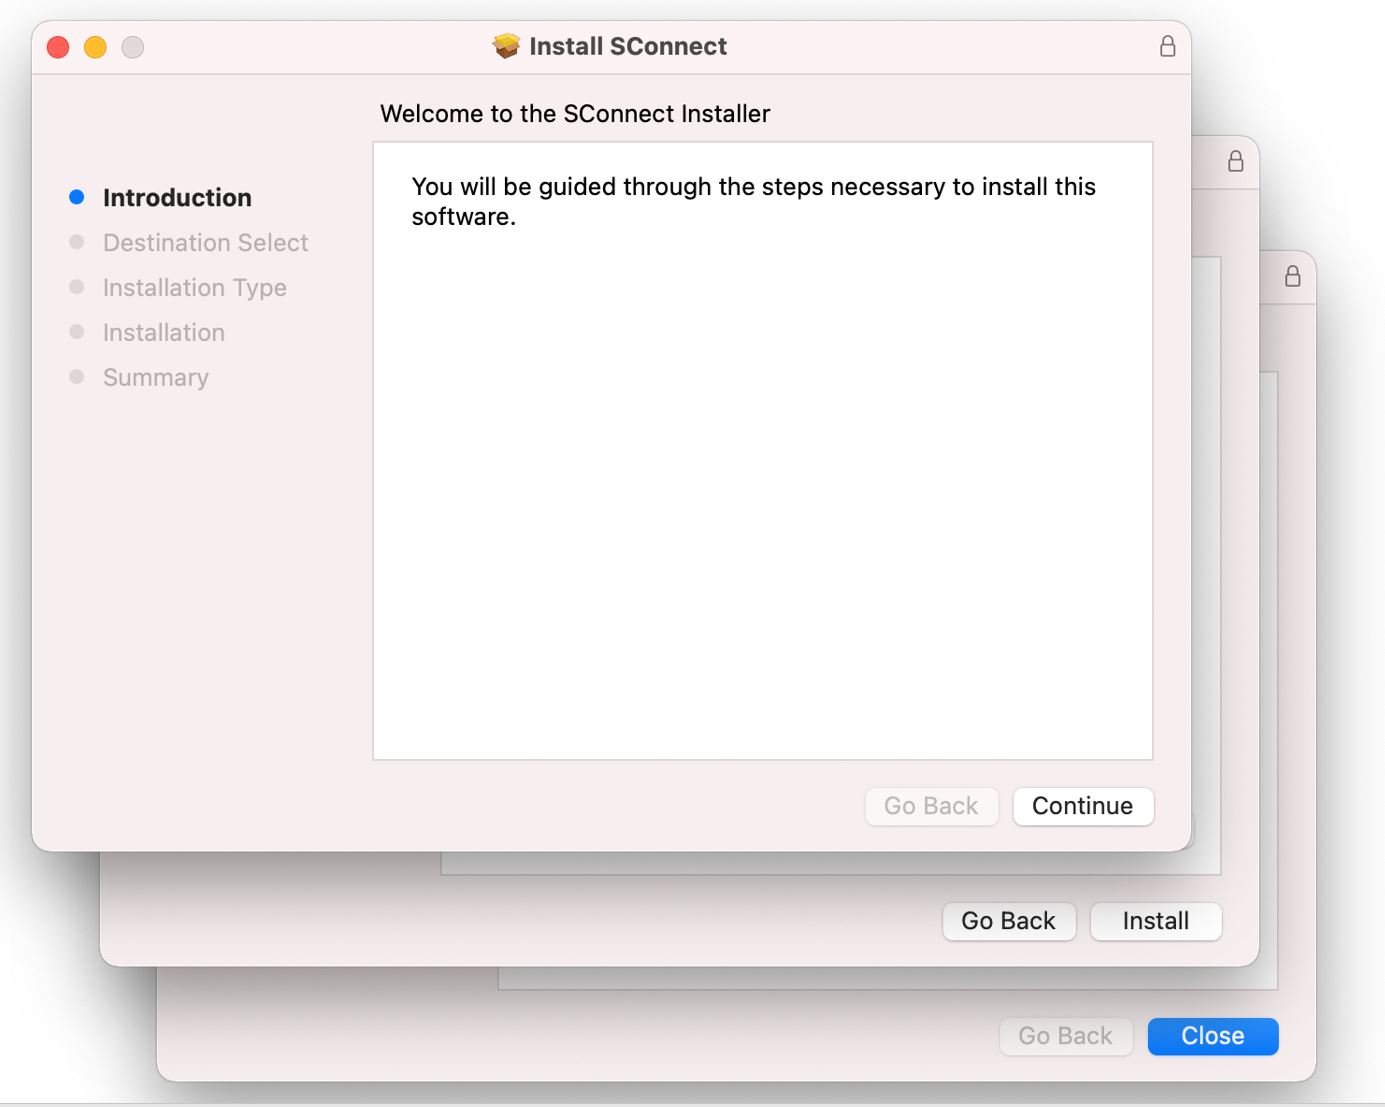
Go through the installation steps.
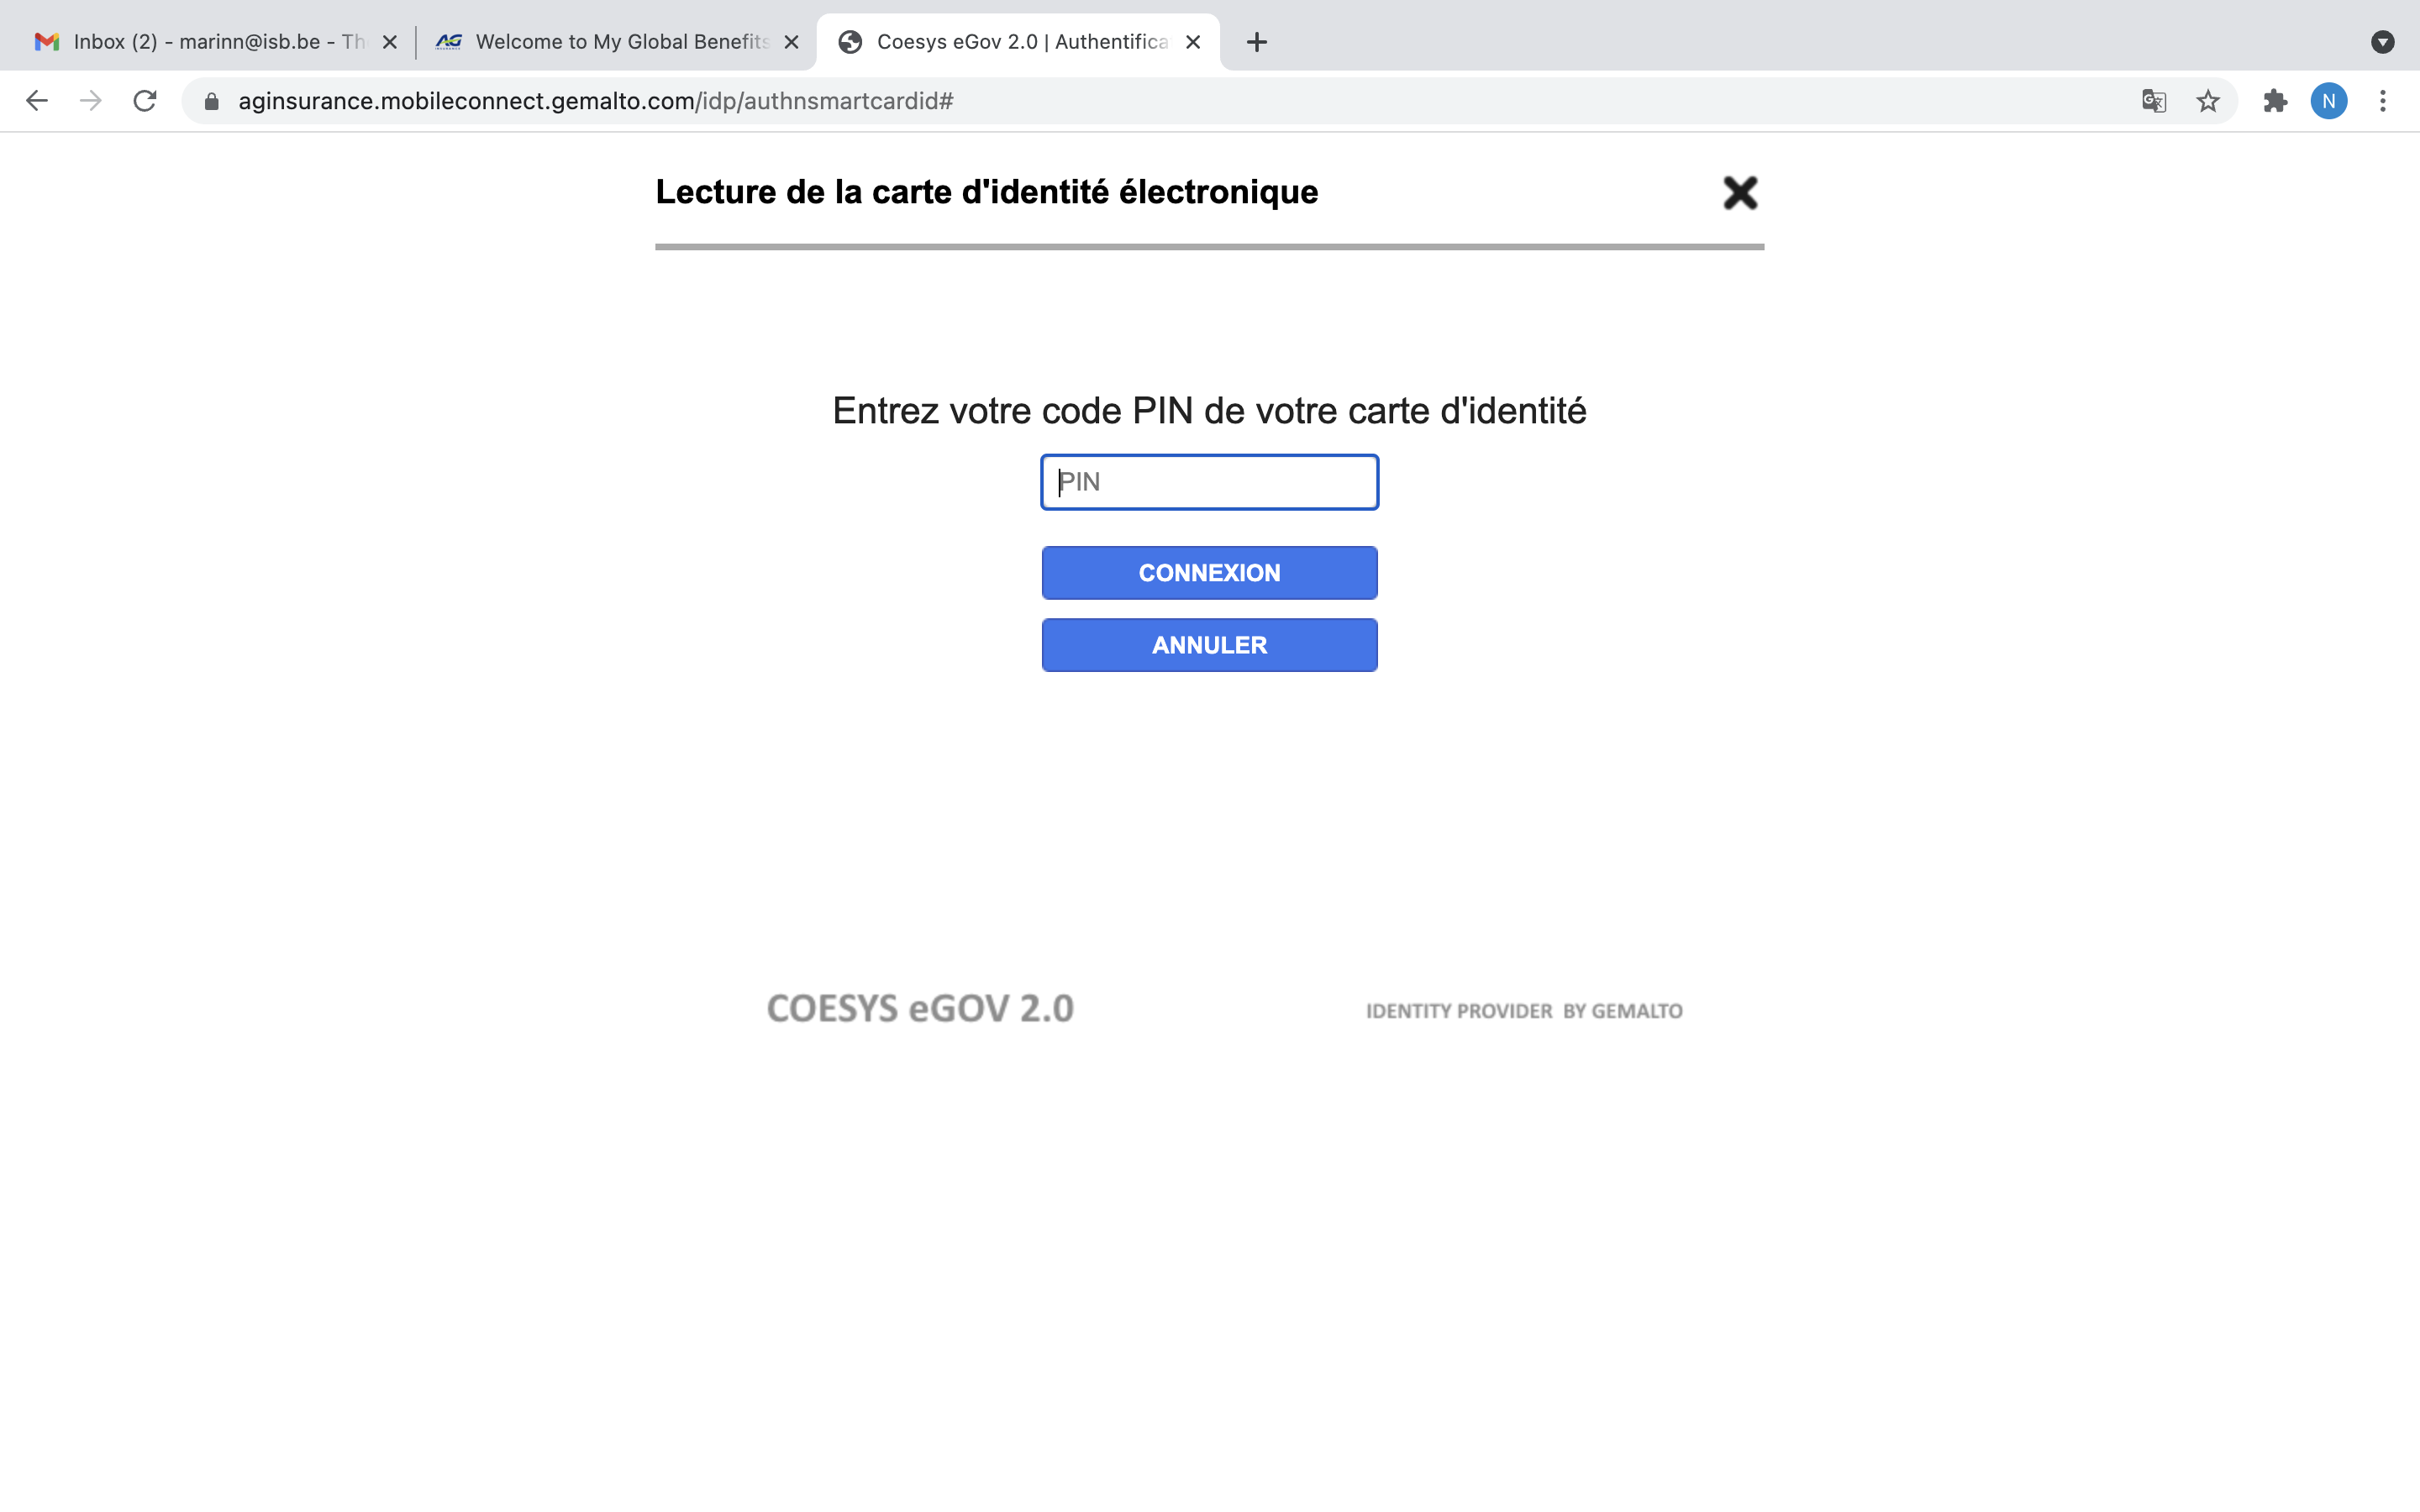
And back to the AG page in Chrome. Insert your eID pin to log in.
Microsoft Authenticator app (setup)
Using the Authenticator app instead of the phone/text system is more convenient, secure, and most importantly it will still work if you change your phone number (while on leave or vacation, for example). Here are the steps to set it up.
Scan the appropriate QR code with your Android or IOS mobile device to install the app.
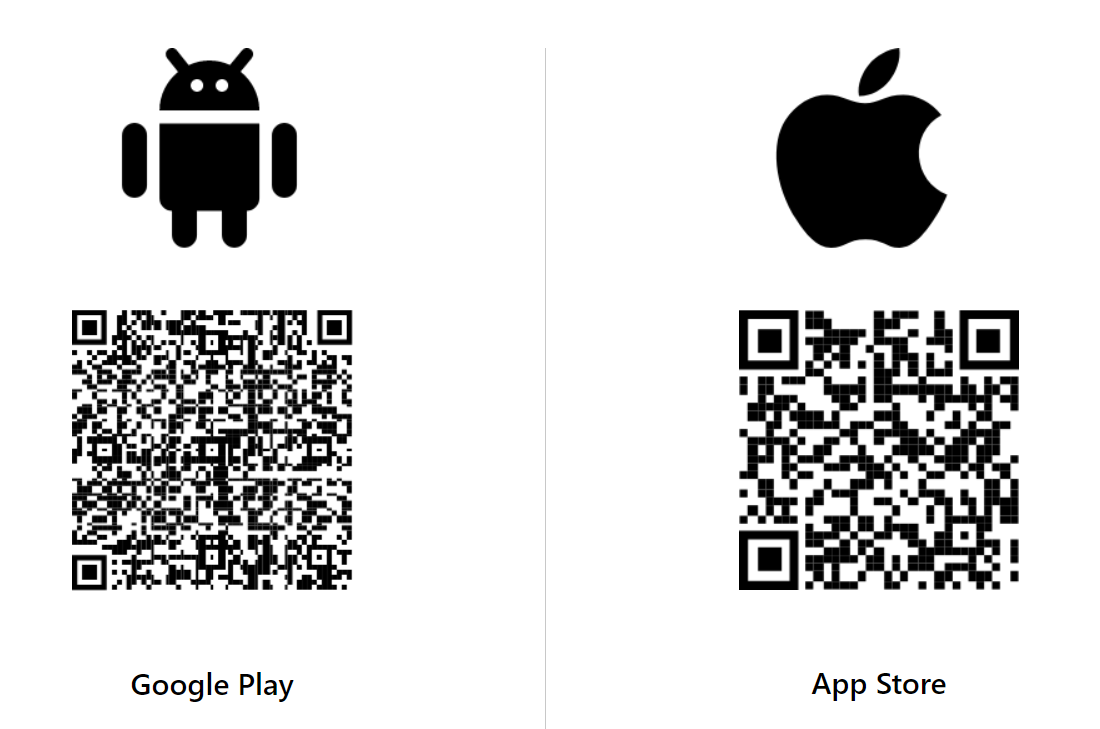
(If the QR code does not work, you can follow these links to the Google Play or App Store.)
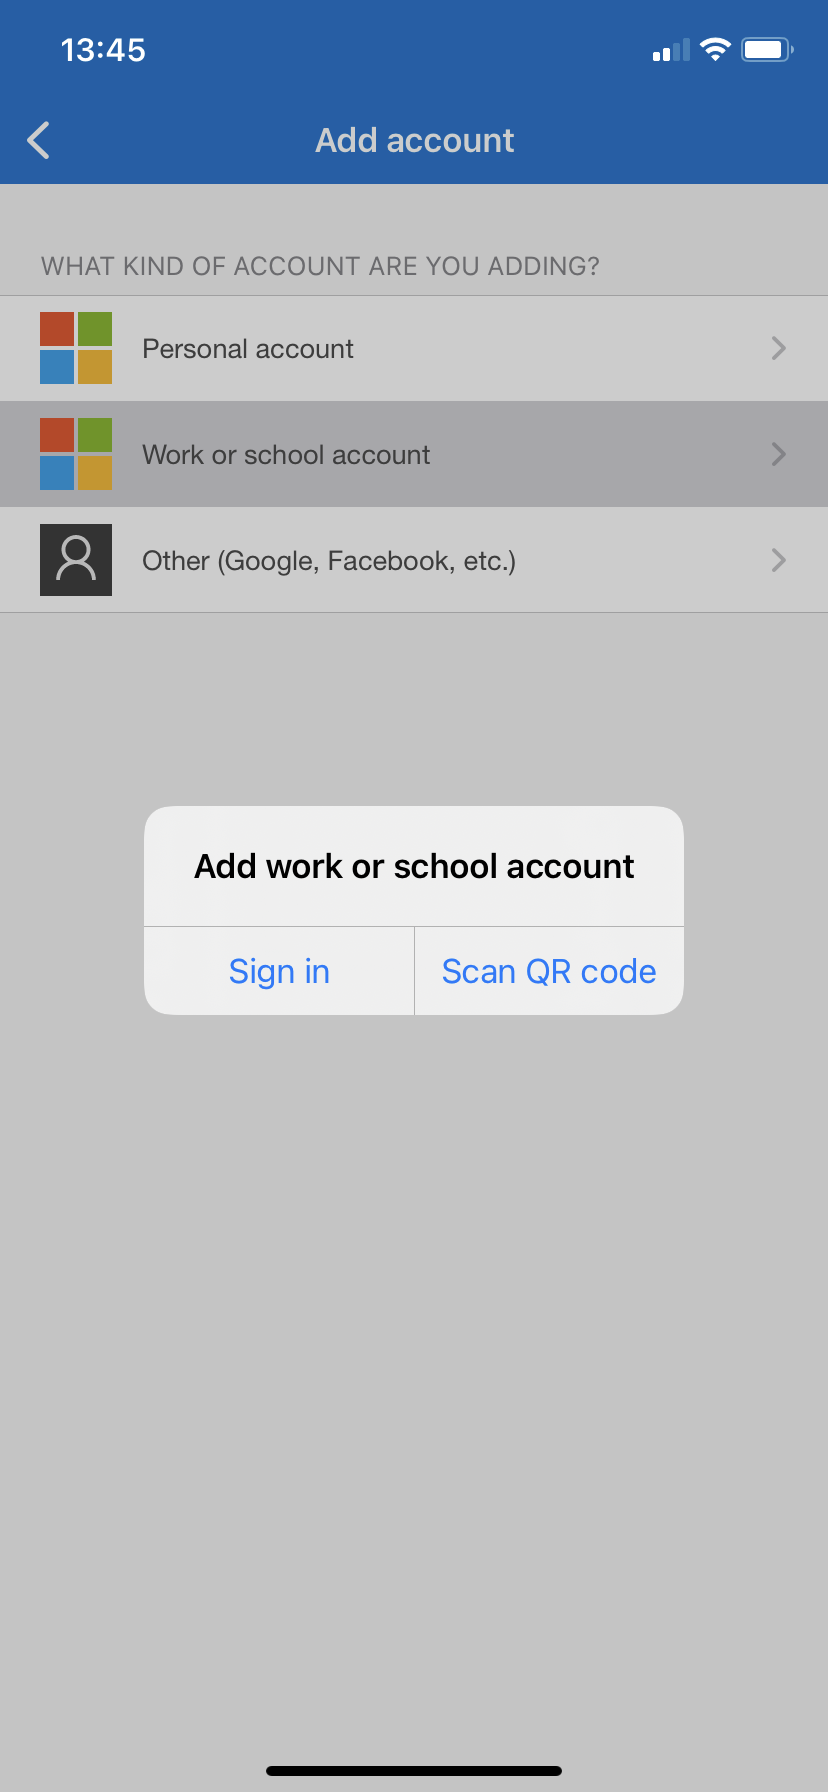
Open the Microsoft Authenticator app, allow the notifications (if prompted), select Add account from the Customize and control icon on the upper-right, and Work or school account.
Note: The first time you set up the Microsoft Authenticator app, you might receive a prompt asking whether to allow the app to access your camera (iOS) or to allow the app to take pictures and record video (Android). You must select Allow so the authenticator app can access your camera to take a picture of the QR code in the next step. If you don't allow the camera, you can still set up the authenticator app, but you'll need to add the code information manually.
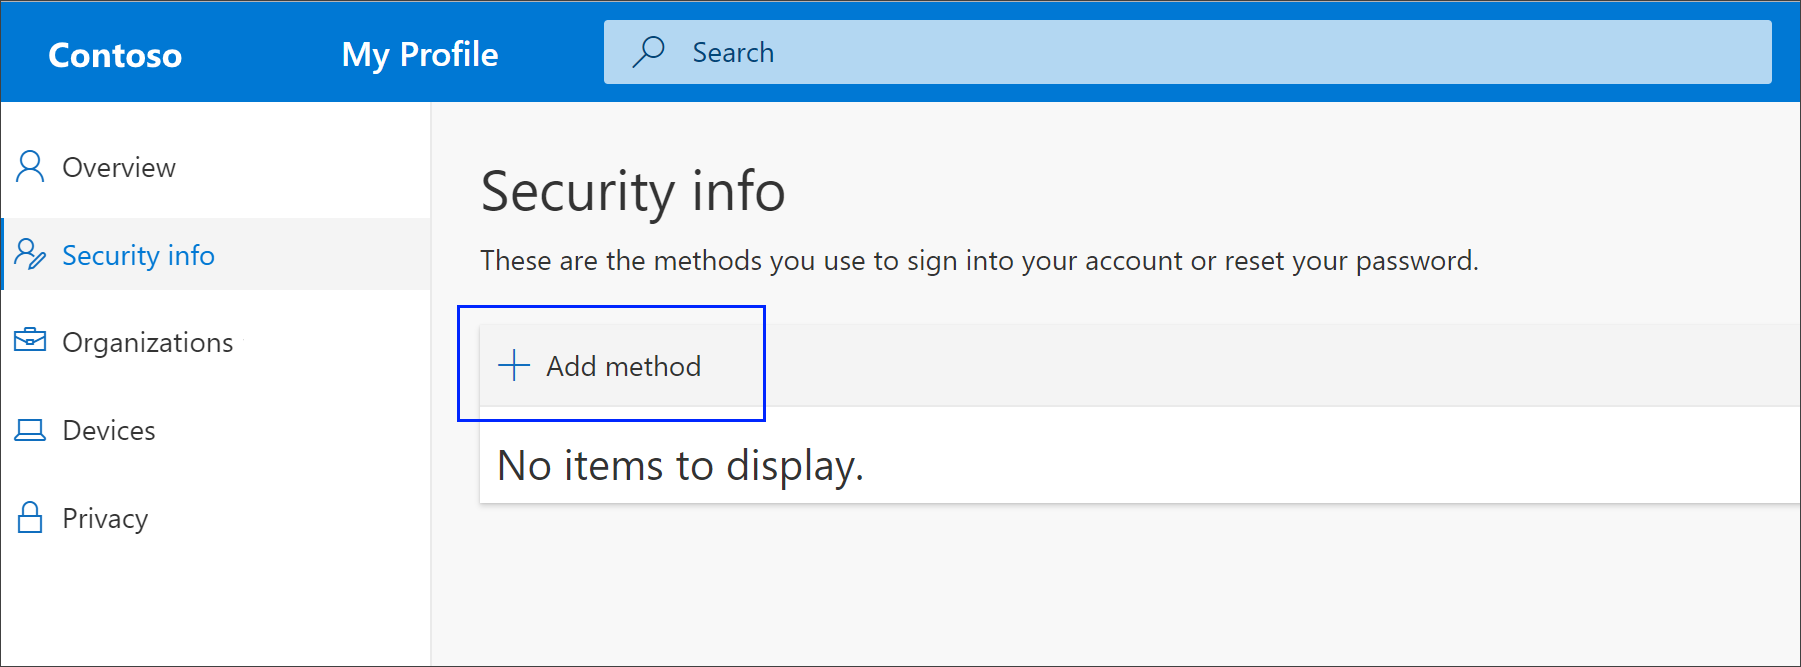
Go to https://mysignins.microsoft.com/security-info on your computer and log in with your ISB email and password. Most of the time, the portal will automatically log you in.
On the Add a method page, select the Authenticator app from the list and choose Add.
Select Next, and Scan the QR code page appears. Scan the provided code with the Microsoft Authenticator app QR code reader, which appeared on your mobile device.
(This one is an example)
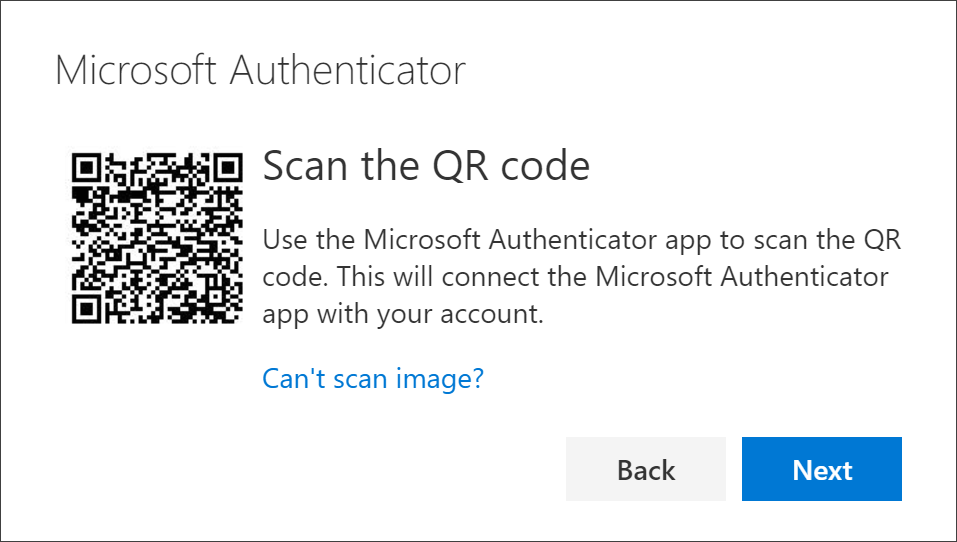
The authenticator app should successfully add your work or school account without requiring any additional information from you. However, if the QR code reader can't read the code, you can select Can't scan the QR code and manually enter the code and URL into the Microsoft Authenticator app.
Select Next on the Scan the QR code page on your computer. A notification is sent to the Microsoft Authenticator app on your mobile device, to test your account.
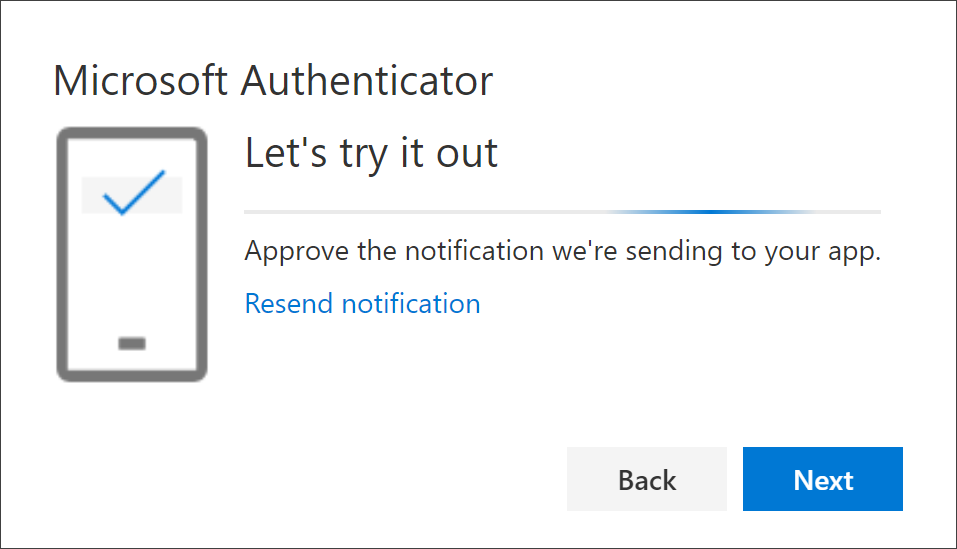
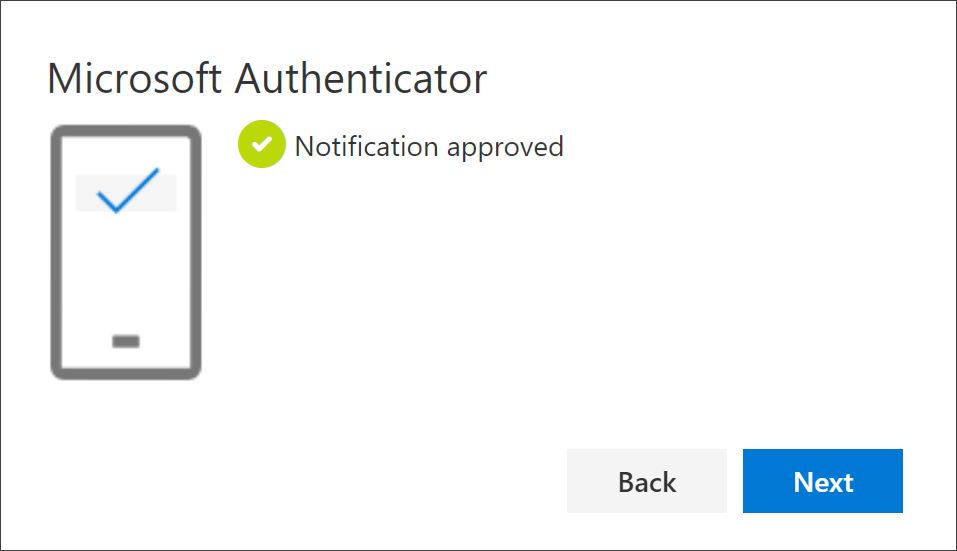
Approve the notification in the Microsoft Authenticator app, and then select Next. Your security info is updated to use the Microsoft Authenticator app by default to verify your identity when using a two-step verification or password reset.
iPads and Apple Classroom
Apple Classroom
Apple Classroom
Classroom is installed on all teacher's iPads. If you need Classroom on a different iPad please send an email to ithelpdesk.
The student iPads do not need the app installed.
Before you ask the students to connect to your classroom please make sure that all the iPads, including the one that you use, are on the same network (ISB), and that the Bluetooth is on. The devices need to be near each other for this step, 1-2 meters.
To learn how to set up a class (0.14), how to invite and add students (1.05), how to use the options, check on, and manage the students' iPads (3.15), please watch the underneath 8-minute video.
Shared iPads ES
Initial setup and other essential things that you need to know.
Please assign an iPad to each student and ask them to try to use the same one every time.
We numbered them 1 to 15 on the left and 1 to 15 on the right:
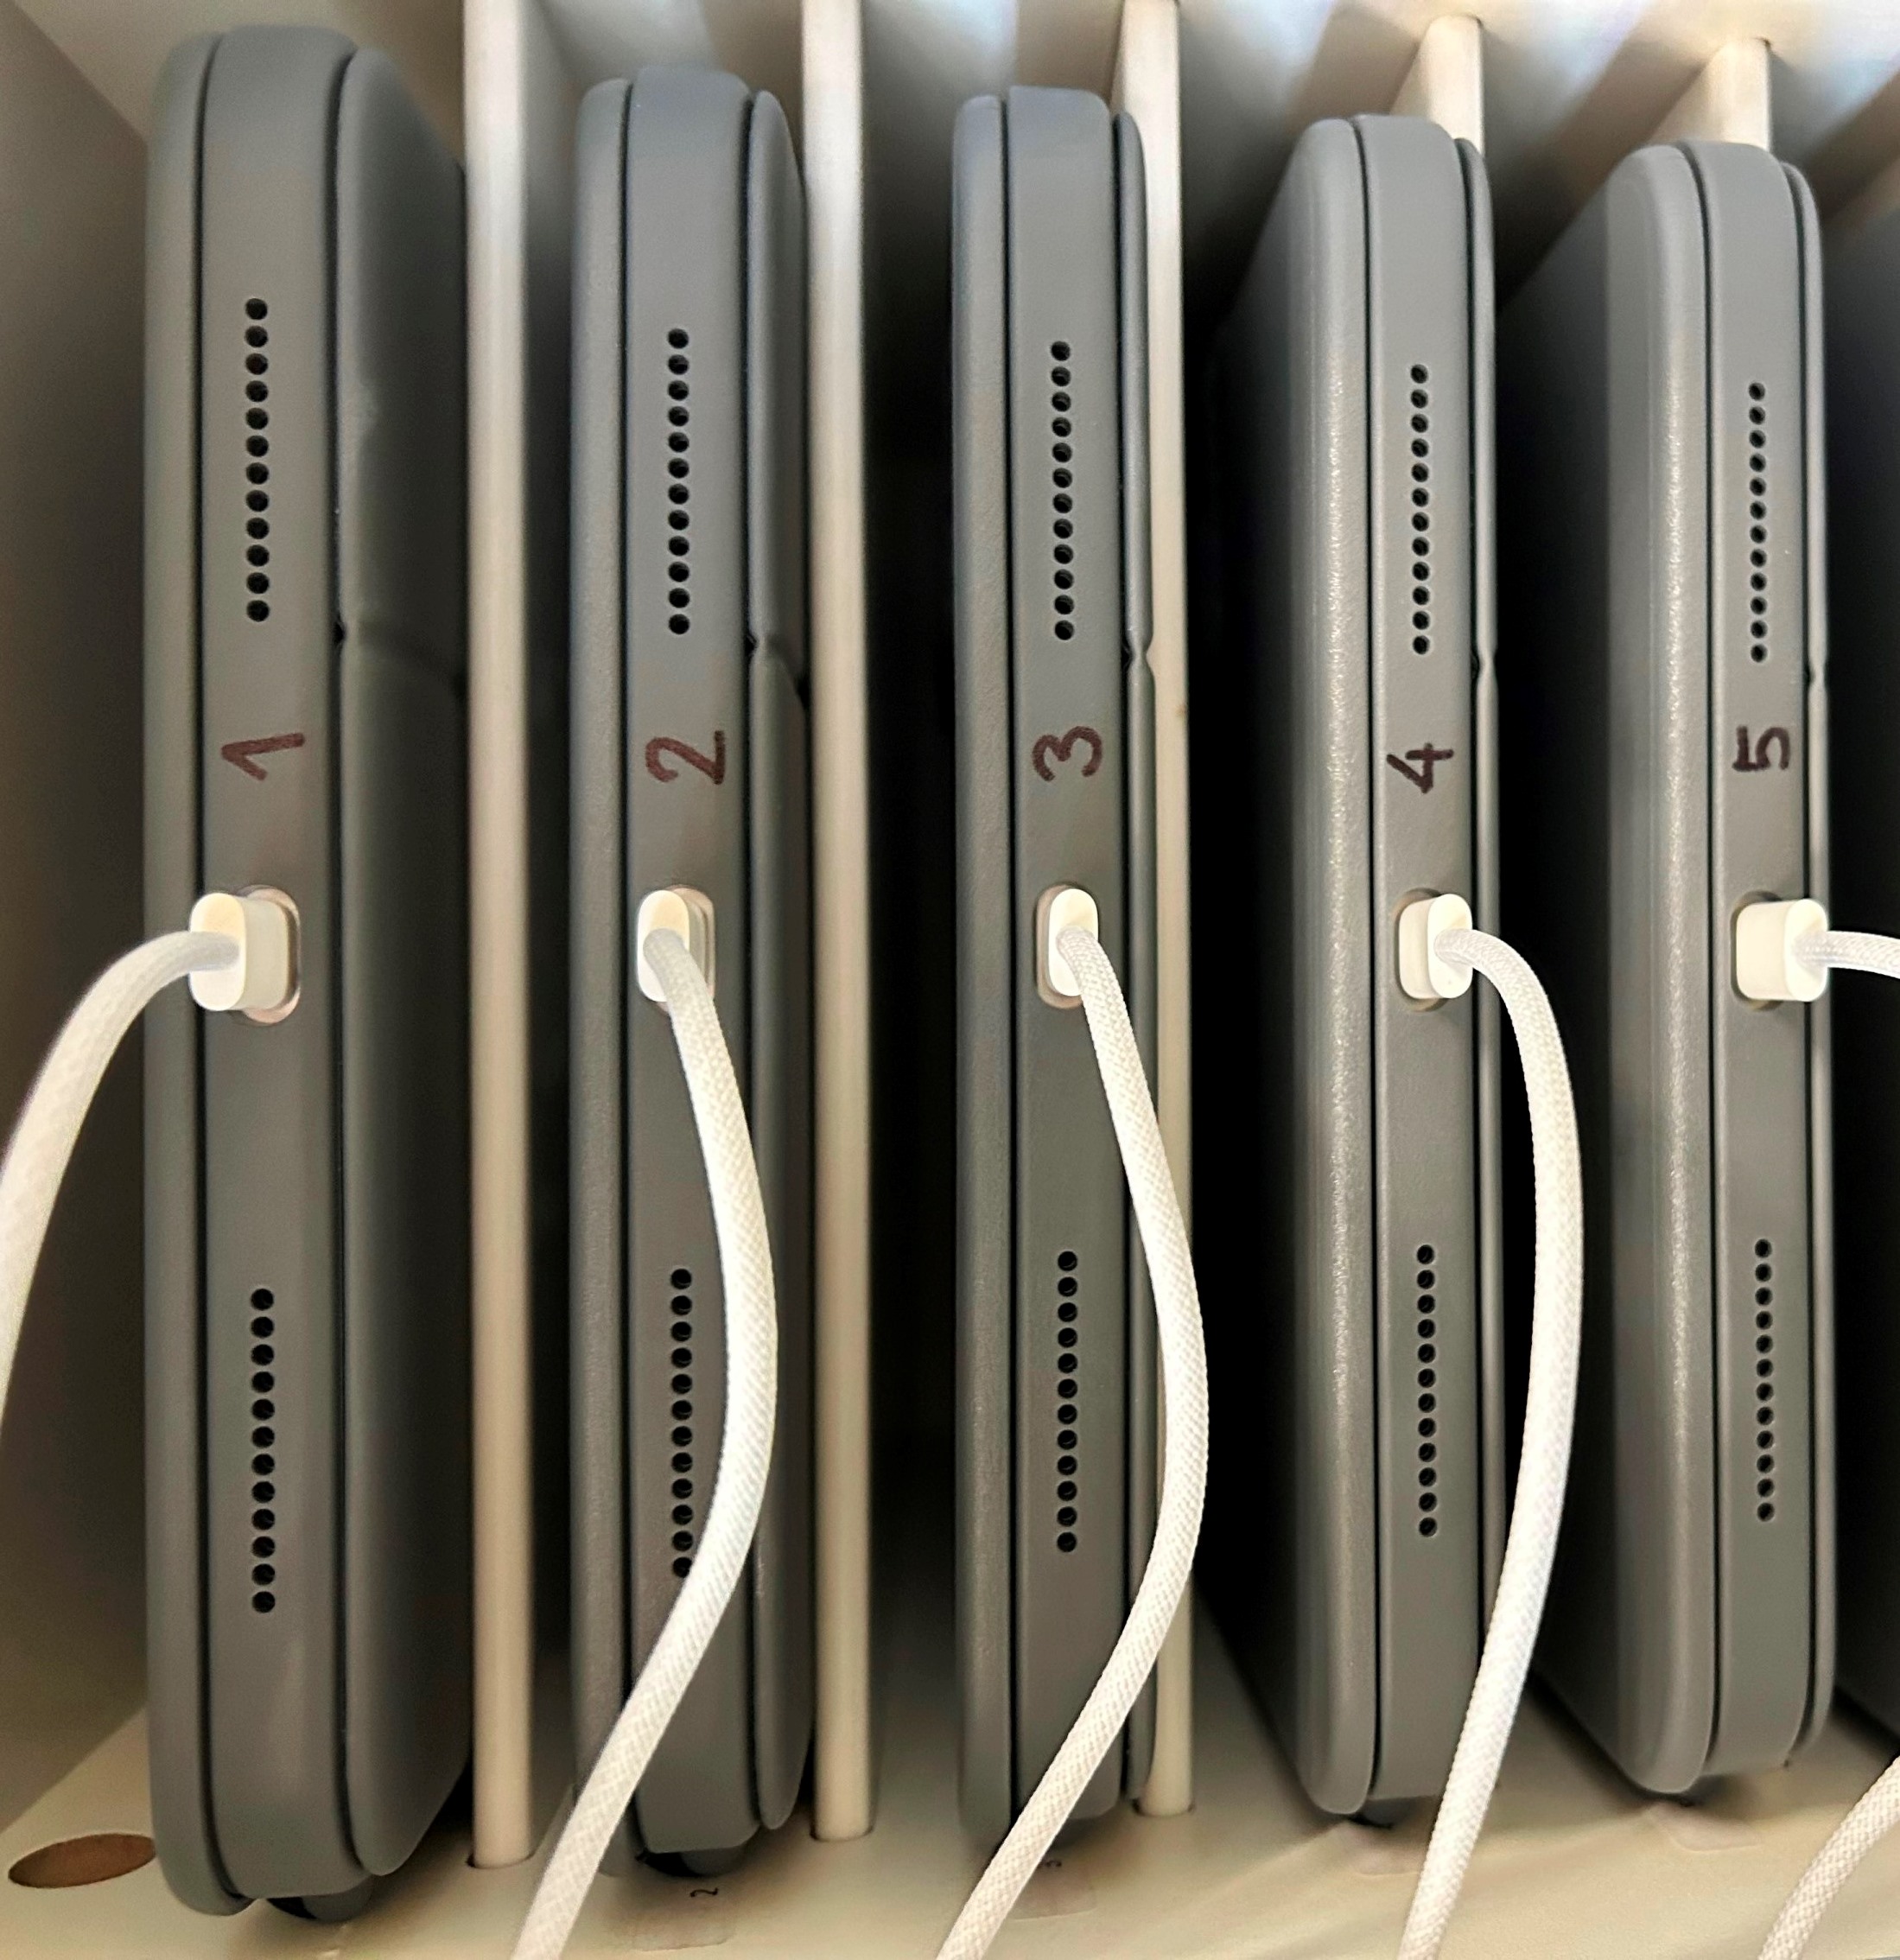
The benefits of using the same iPad are:
- Fast login. Instead of going through the initial setup on a new iPad, the students can select their names from the list and enter their passwords.
- After logging in, they will not have to wait for the server to move and apply all their photos, documents, and settings from their last iPad.
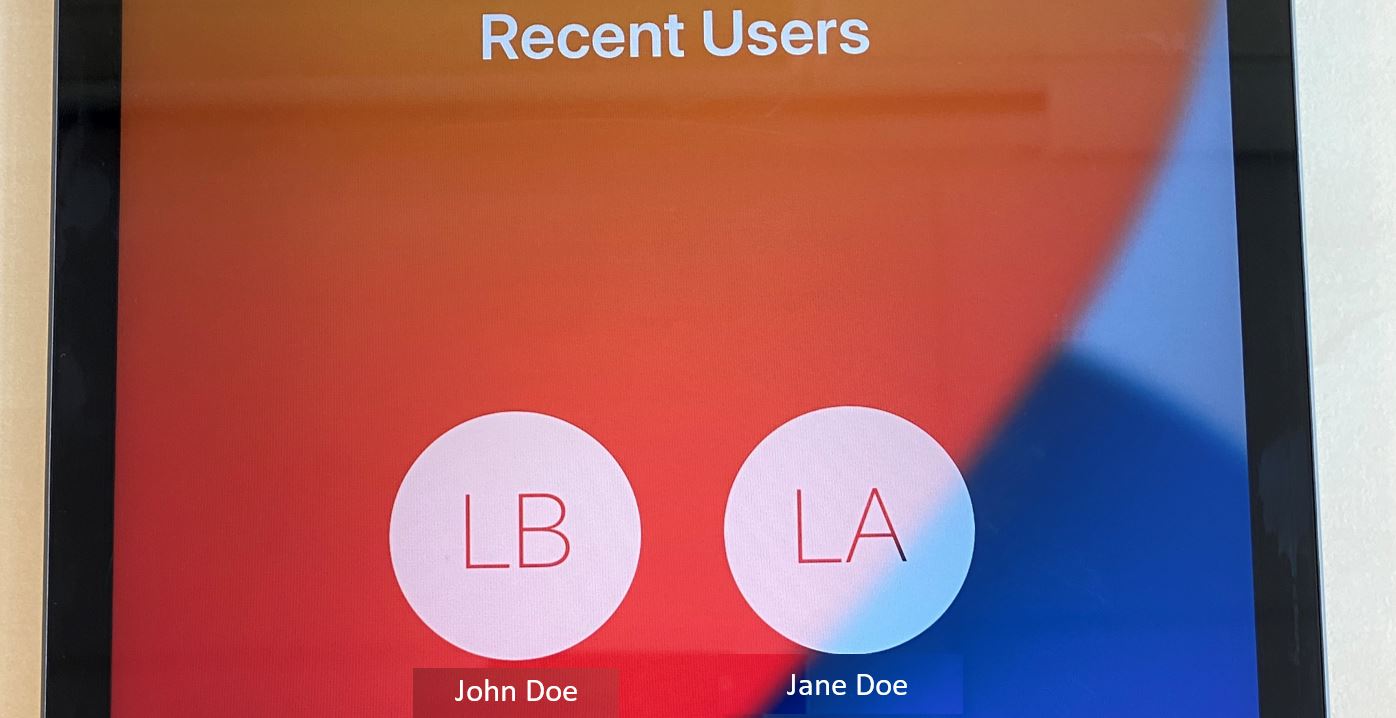
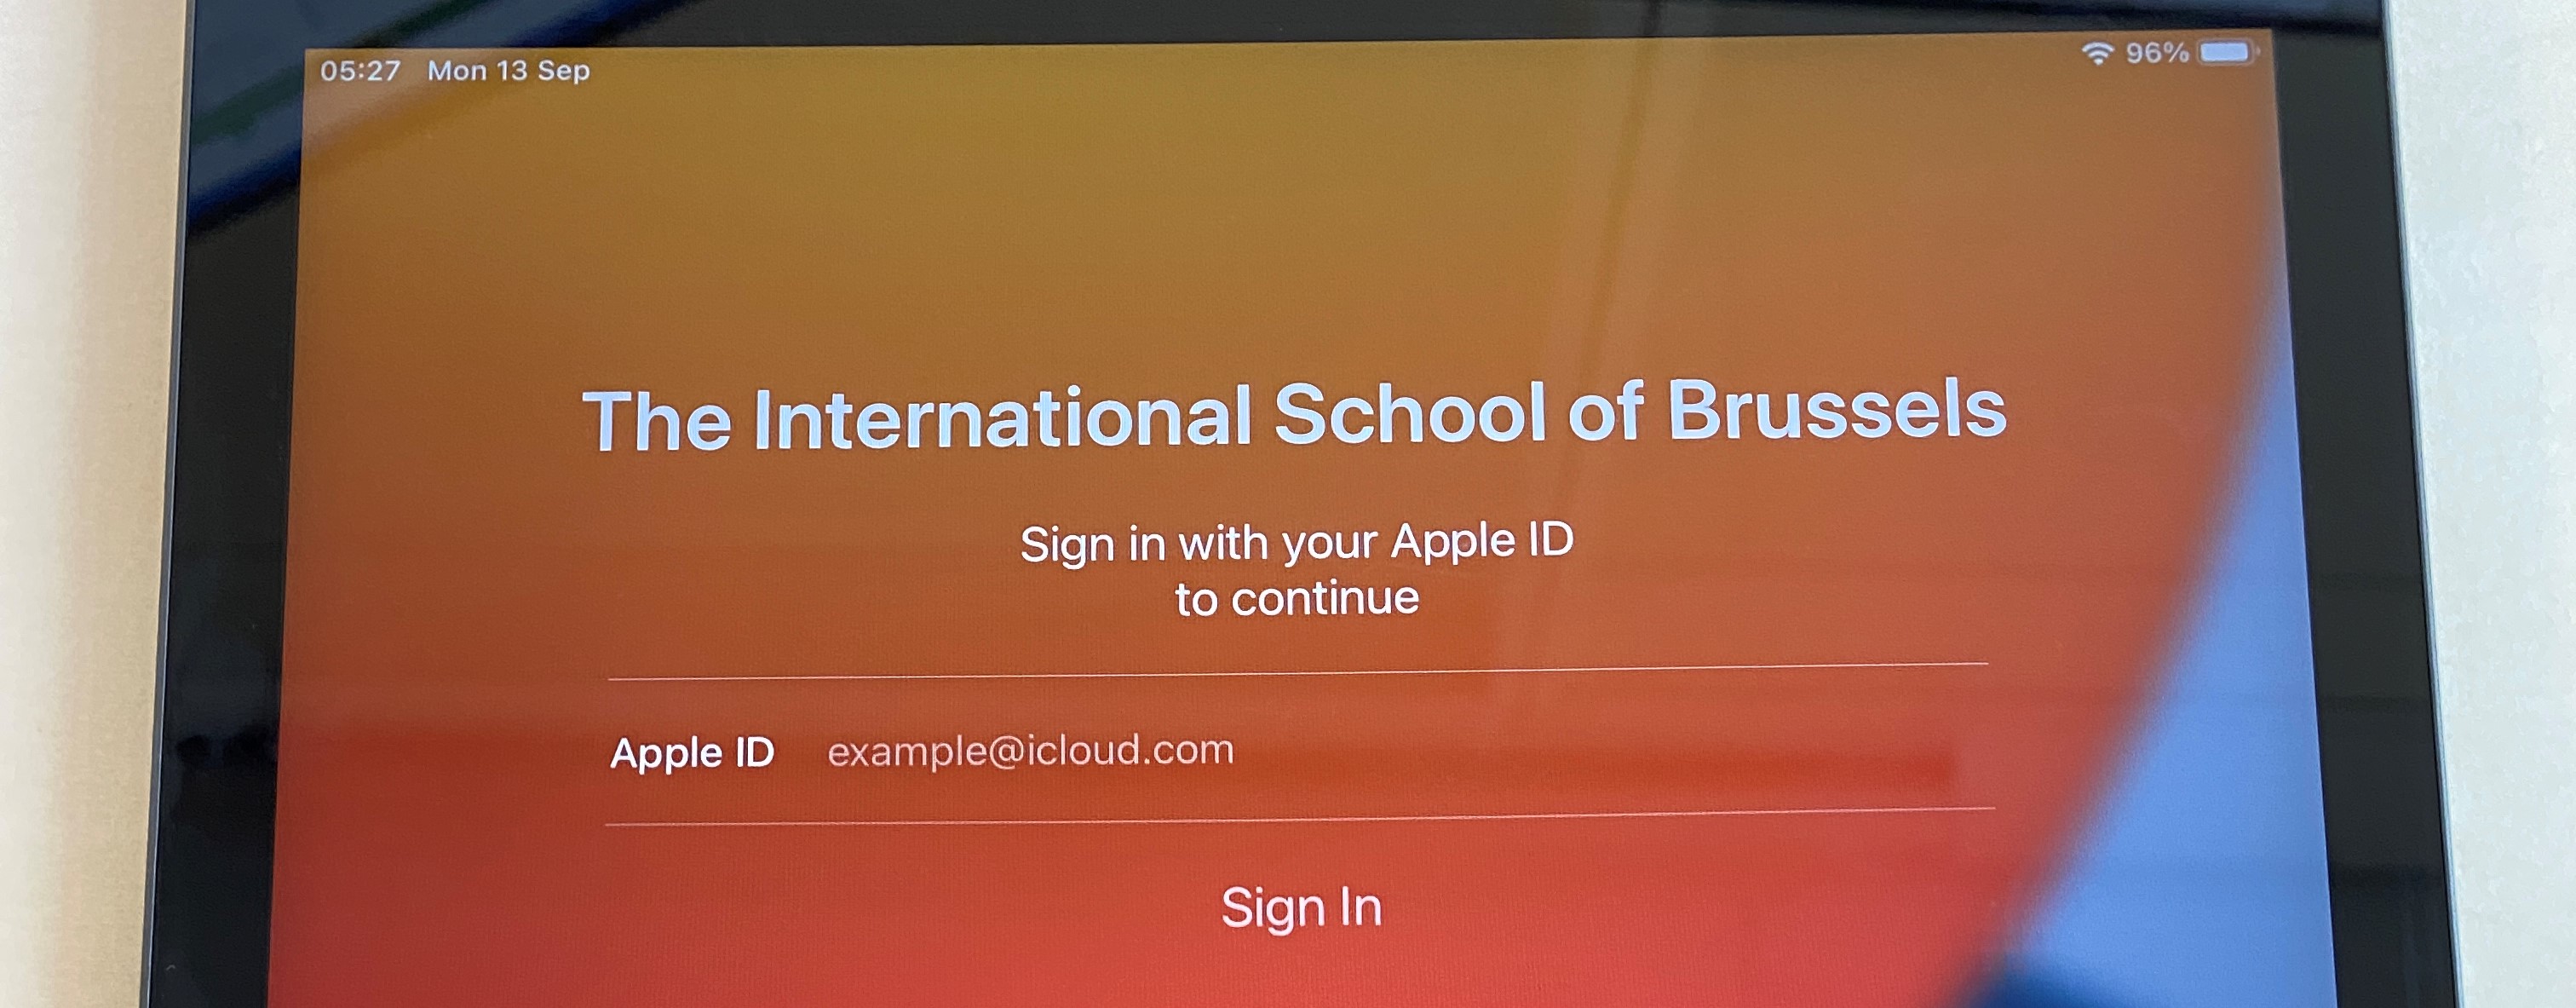
First, Sign in.
- Please ask the students to enter their email address and press Sign in. example@isb.be
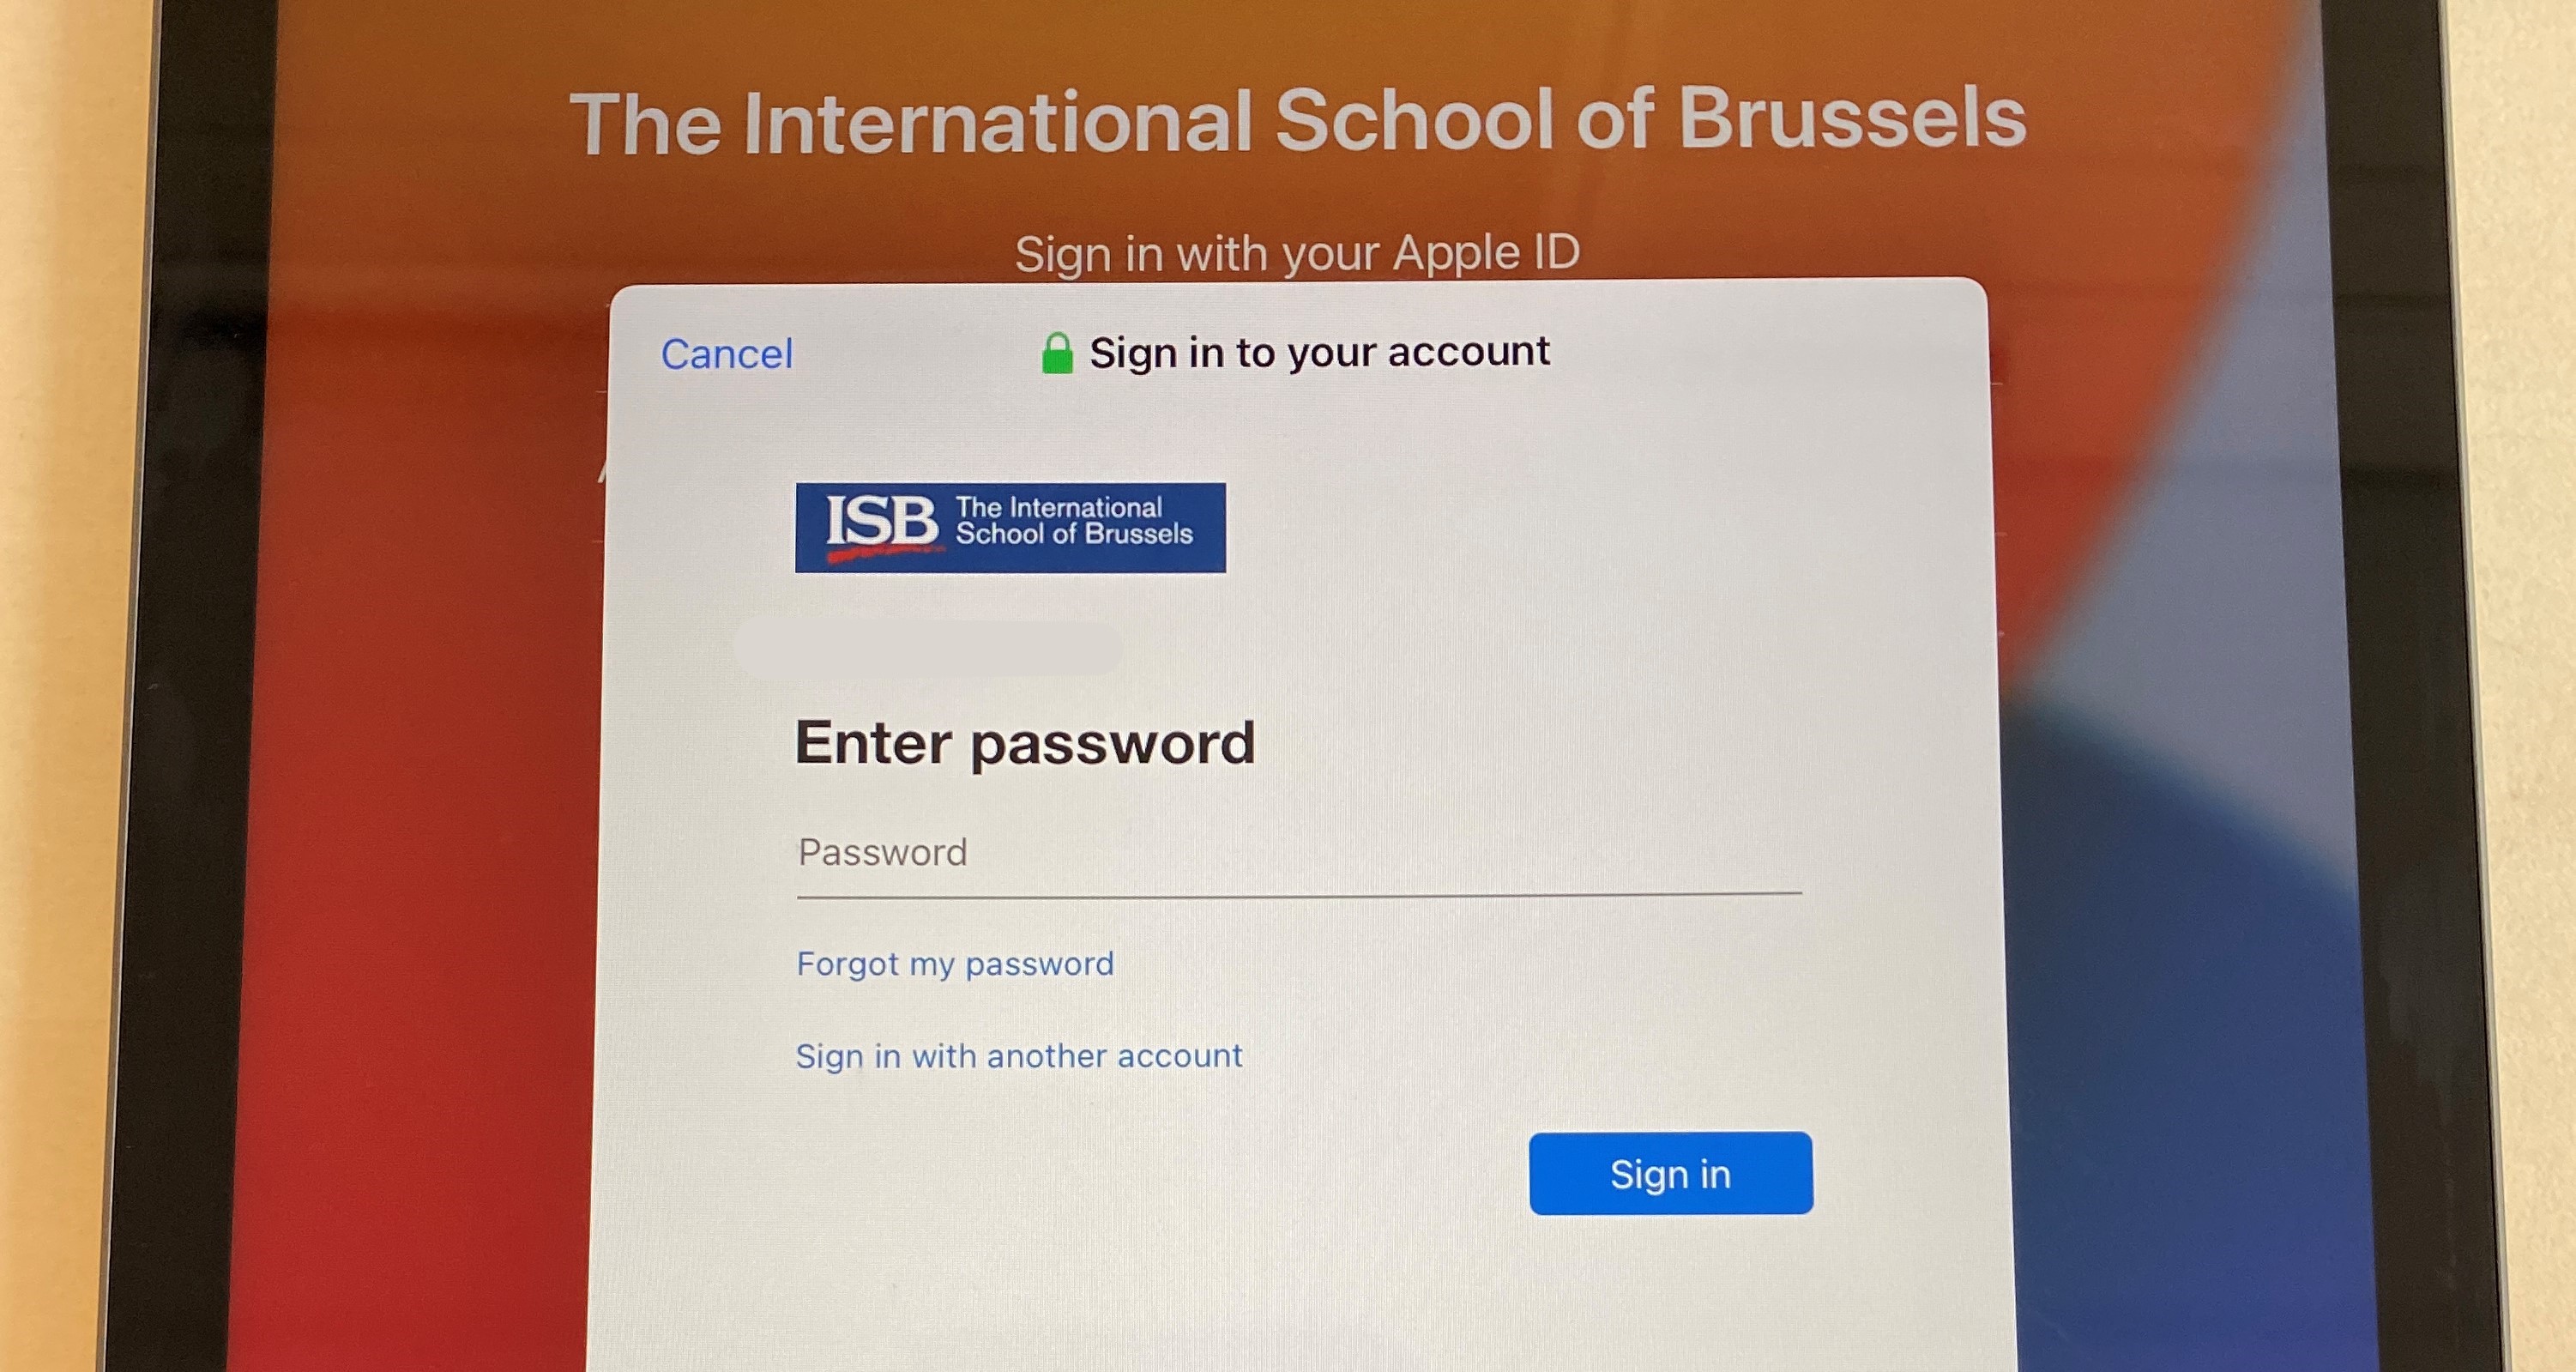
- Enter the email password.
- Ask them to select their preferred language in the next window – usually English- and the location – Belgium.
- Press Continue when asked to change the settings for Written and Spoken languages.
- The iPad will then ask the students to create a password. Please ask them to use the same password that they use to log in to their laptops, but capitalize the first letter and add a 0 at the end if not present. (The password requirements ask for a capital letter and a number)
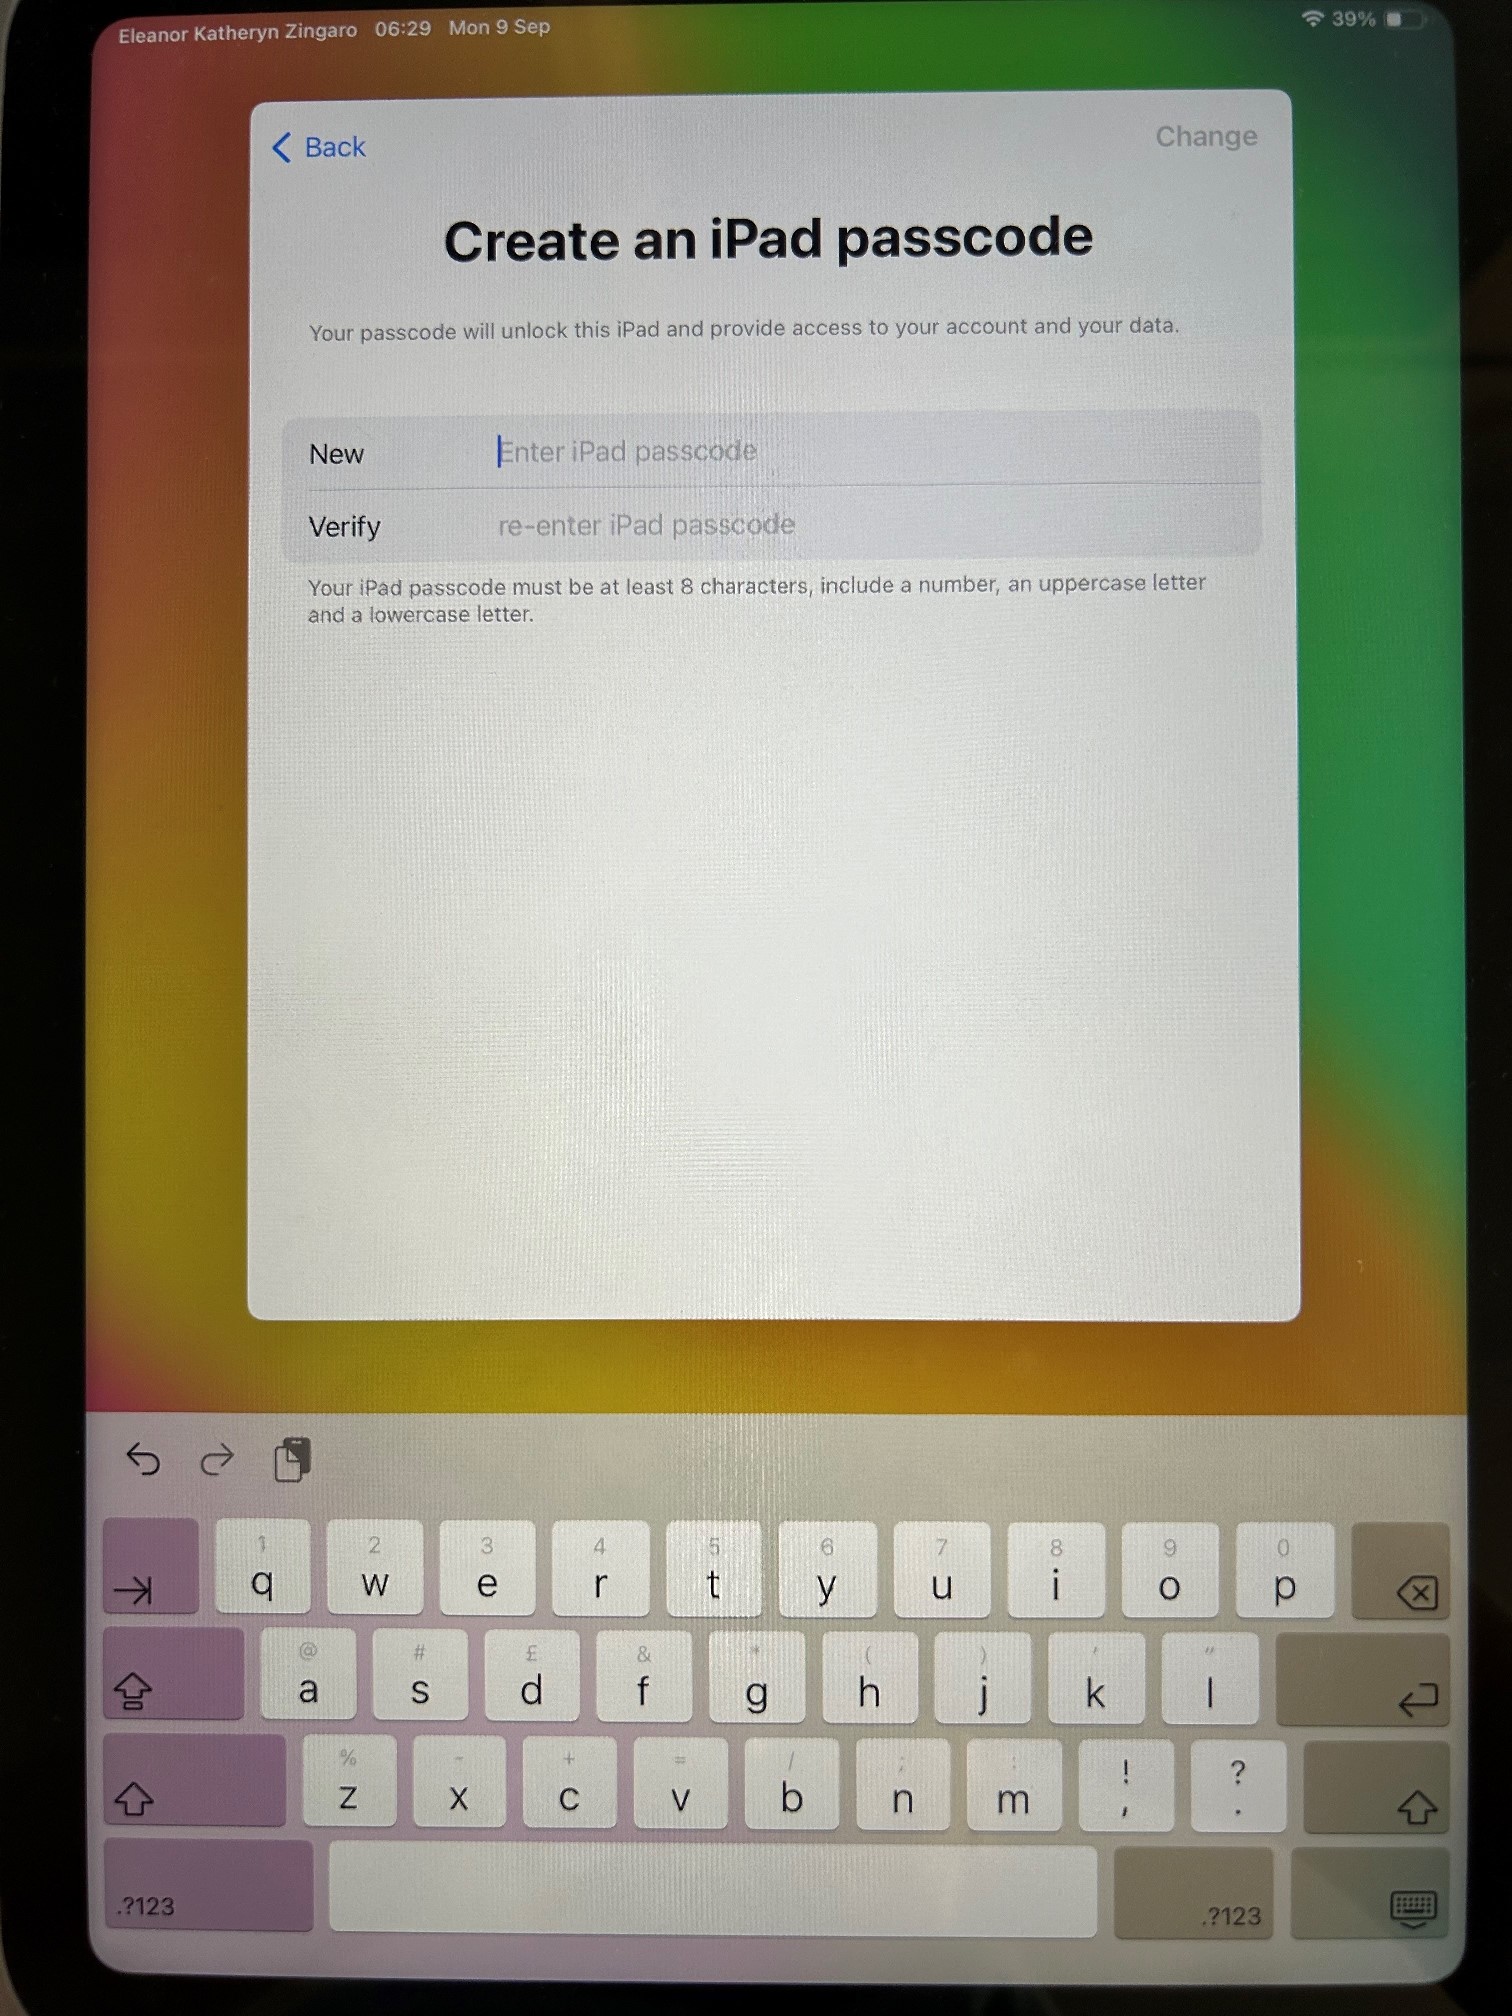
- In a few seconds, the iPads will create their accounts and log them in.
- Important step – when they are done working on the iPad, please ask the students to log out.
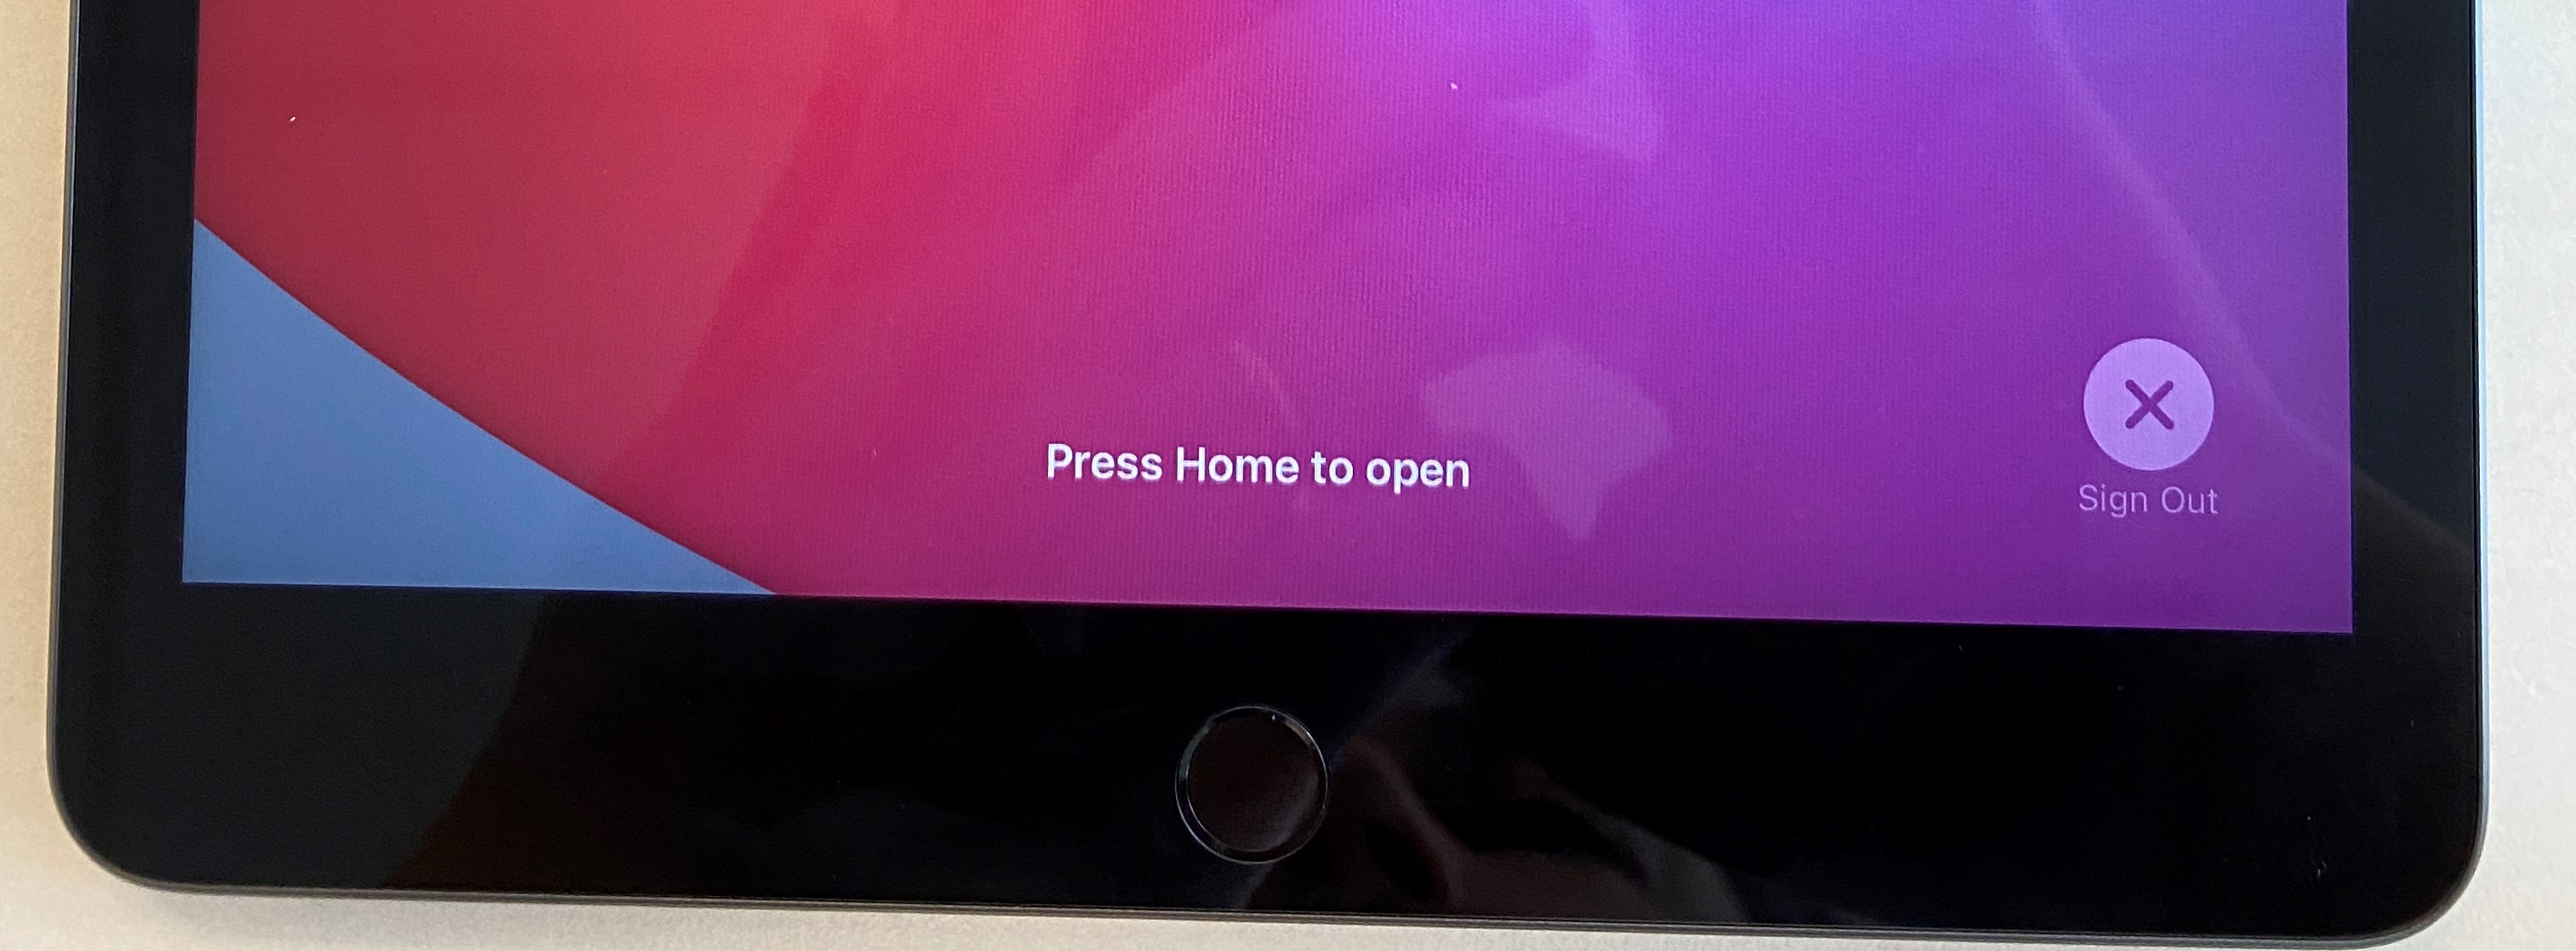
- Press the power button twice; the screen will go into standby and come back. Press Sign out in the lower-right corner.
Shared iPads HS Art
Initial setup and other essential things that you need to know.
Please assign an iPad to the students and ask them to try to use the same one every time.
I put a sticker on all of them.

The benefits of using the same iPad are:
- Fast log in. Instead of going through the initial setup on a new iPad, the students can select their name from the list and insert their passcode.
- After they log in, they will not have to wait for the server to move and apply all their photos, documents, and settings from the last iPad that they used.
First Sign in:
- Please ask the students to insert their email address and press Sign in. The email address format is as follows: example@isb.be
- Insert the email password
- Ask them to select their preferred language in the next window – usually English; and the location – Belgium.
- Press continue when asked to change the settings for Written and Spoken languages.
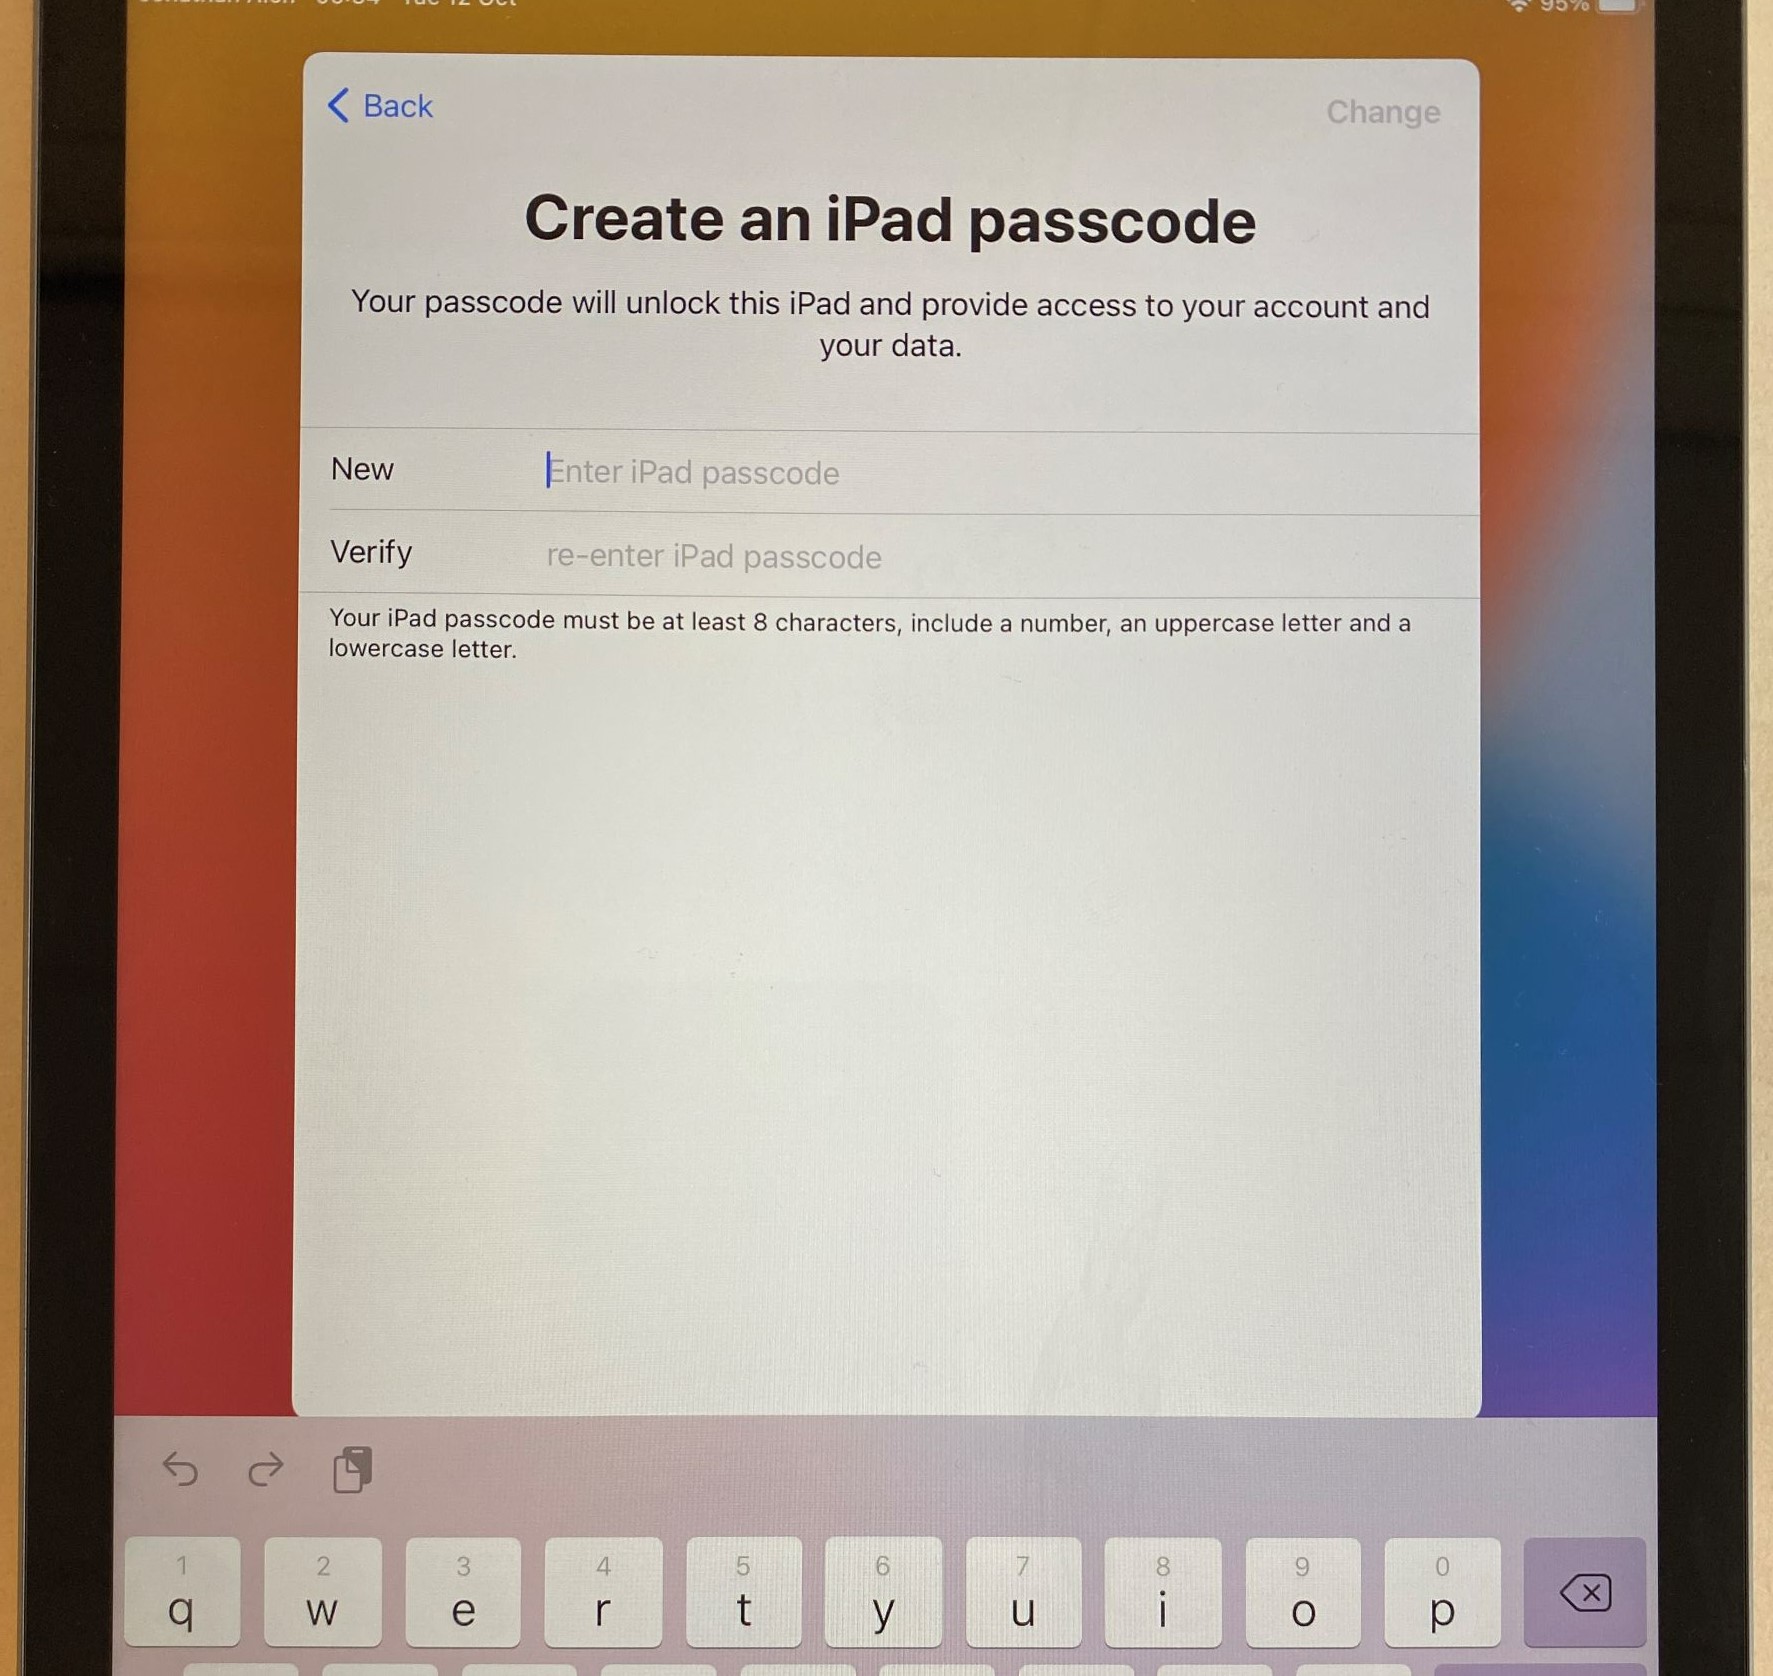
- The iPad will then ask the students to create a password. They can use the same one that they have, but because the requirements imposed by Apple are stronger, they'll have to add a number and a capital letter. They can add Q1 at the end of their regular school password if they want, or they can use something else entirely, but it needs to be at least eight characters long, have a capital letter, a symbol, and a number.
-
Please ask the students to write down their passcodes – it is going to be the same regardless of what iPad they pick, but because they are not using them daily, they are very likely to forget them.
- In a few seconds, the iPads will create their accounts and log them in.
- Important step – when they are done working on the iPad, please ask the students to log out.
- Press the power button once, then a second time; the screen will go into standby and come back.
- Press Sign Out in the lower-right corner.
Wifi and Network Access
ISB Connect, ISB, How, Where, What.
Connect to ISB
Connect to the Network on macOS 15.1../26
-
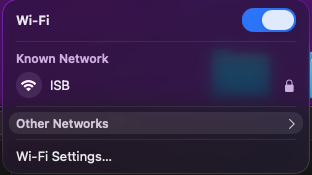
Click the Wi-Fi icon in the top-right corner of the screen.

-
Click the network named "ISB"

-
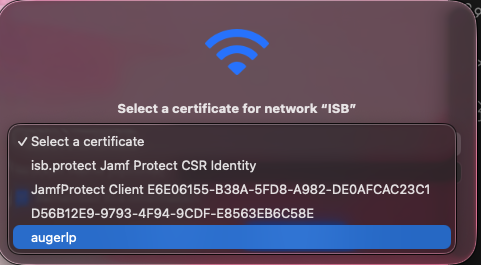
When the connection window appears:
-
Click on "Select a Certificate"
-
Select the one that resembles your username

-
-
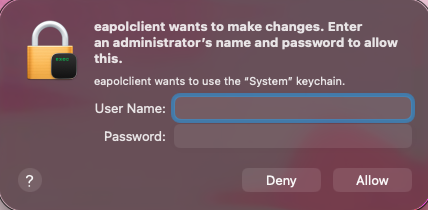
Click Deny

Wait a few seconds until Wi-Fi shows Connected.

Connect to ISBConnect
ISBConnect is our guest WiFi network and can be accessed by anybody.
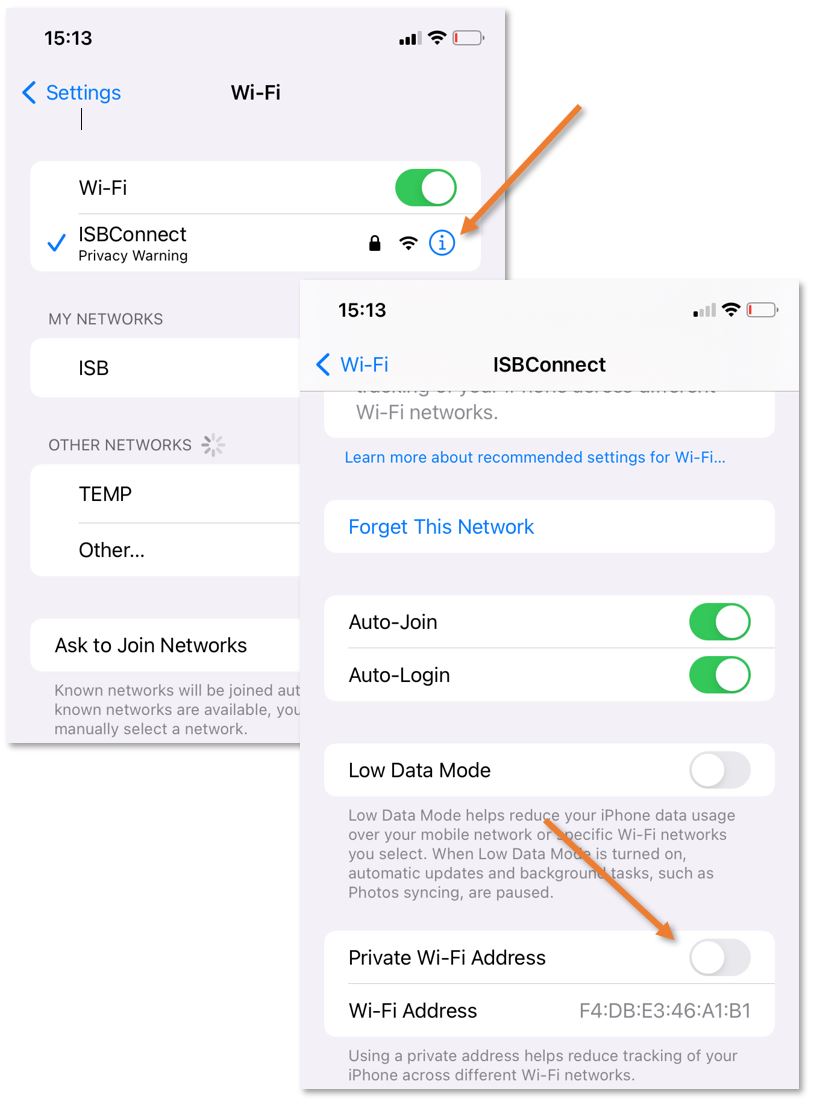
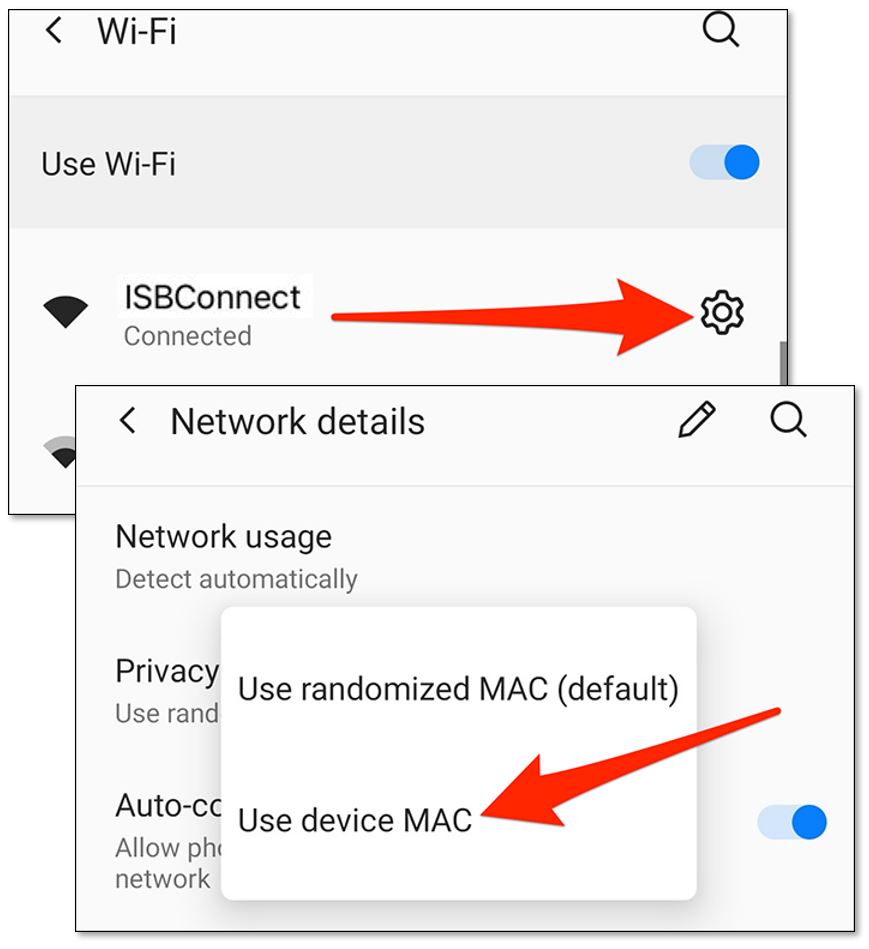
Before connecting, please ensure that the MAC randomizer of your device is off for ISBConnect.
For iPhones and iPads, click the info bubble next to ISBConnect, scroll down, and make sure that "Private Wi-Fi Address" is turned off.
For modern Android phones, click on the cogwheel next to ISBConnect and change "Use randomized MAC" to "Use device MAC." (If the option is missing, you can continue connecting.)
The password for ISBConnect is:
19kattenberg1170bxl
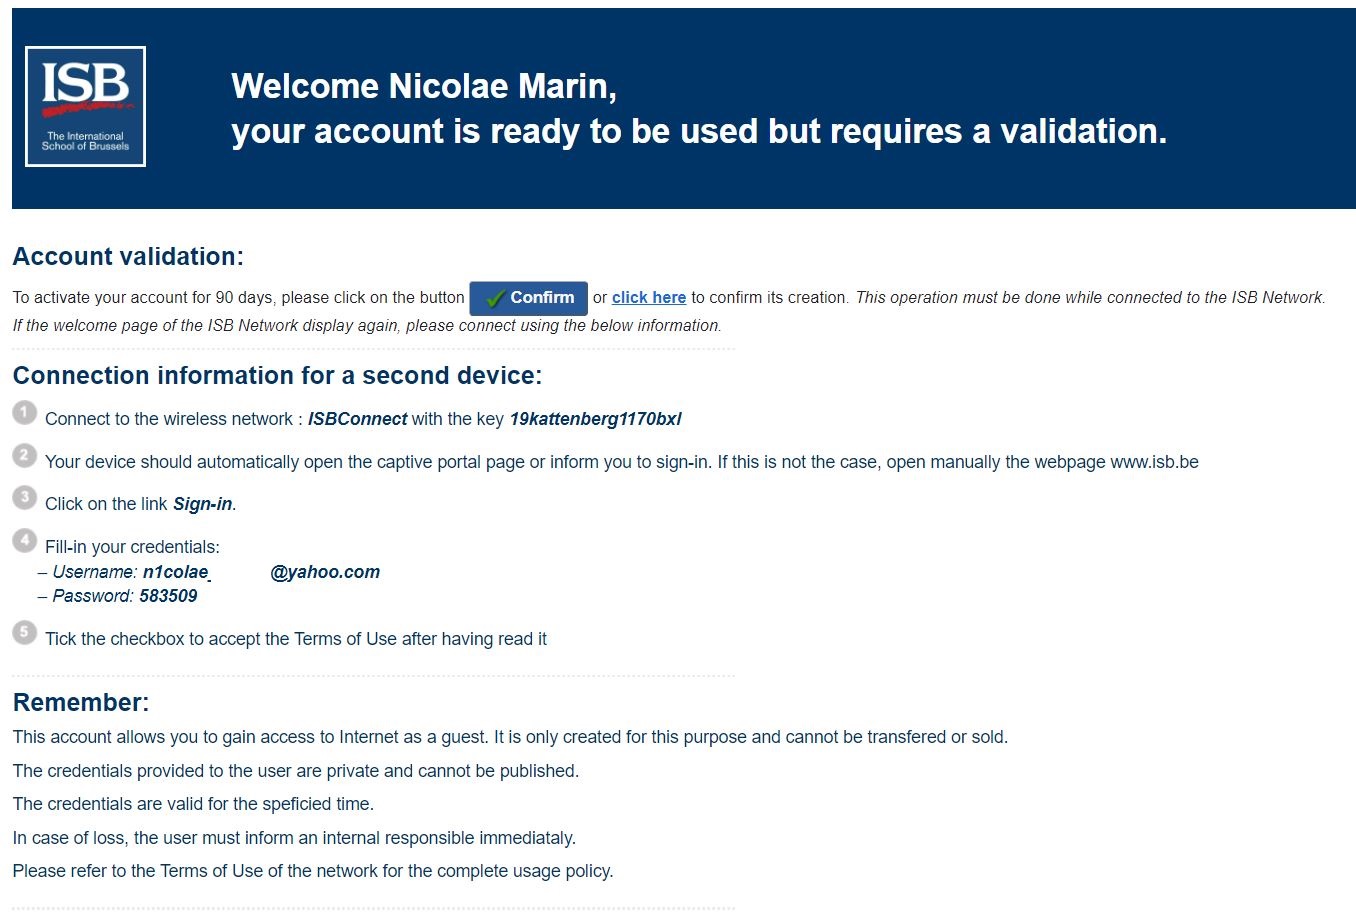
After inserting the above password, the underneath window will pop up. Please fill in your First, Last Name and your Email (preferably one that you can access fast). Accept the terms of use and press Register. (more underneath)
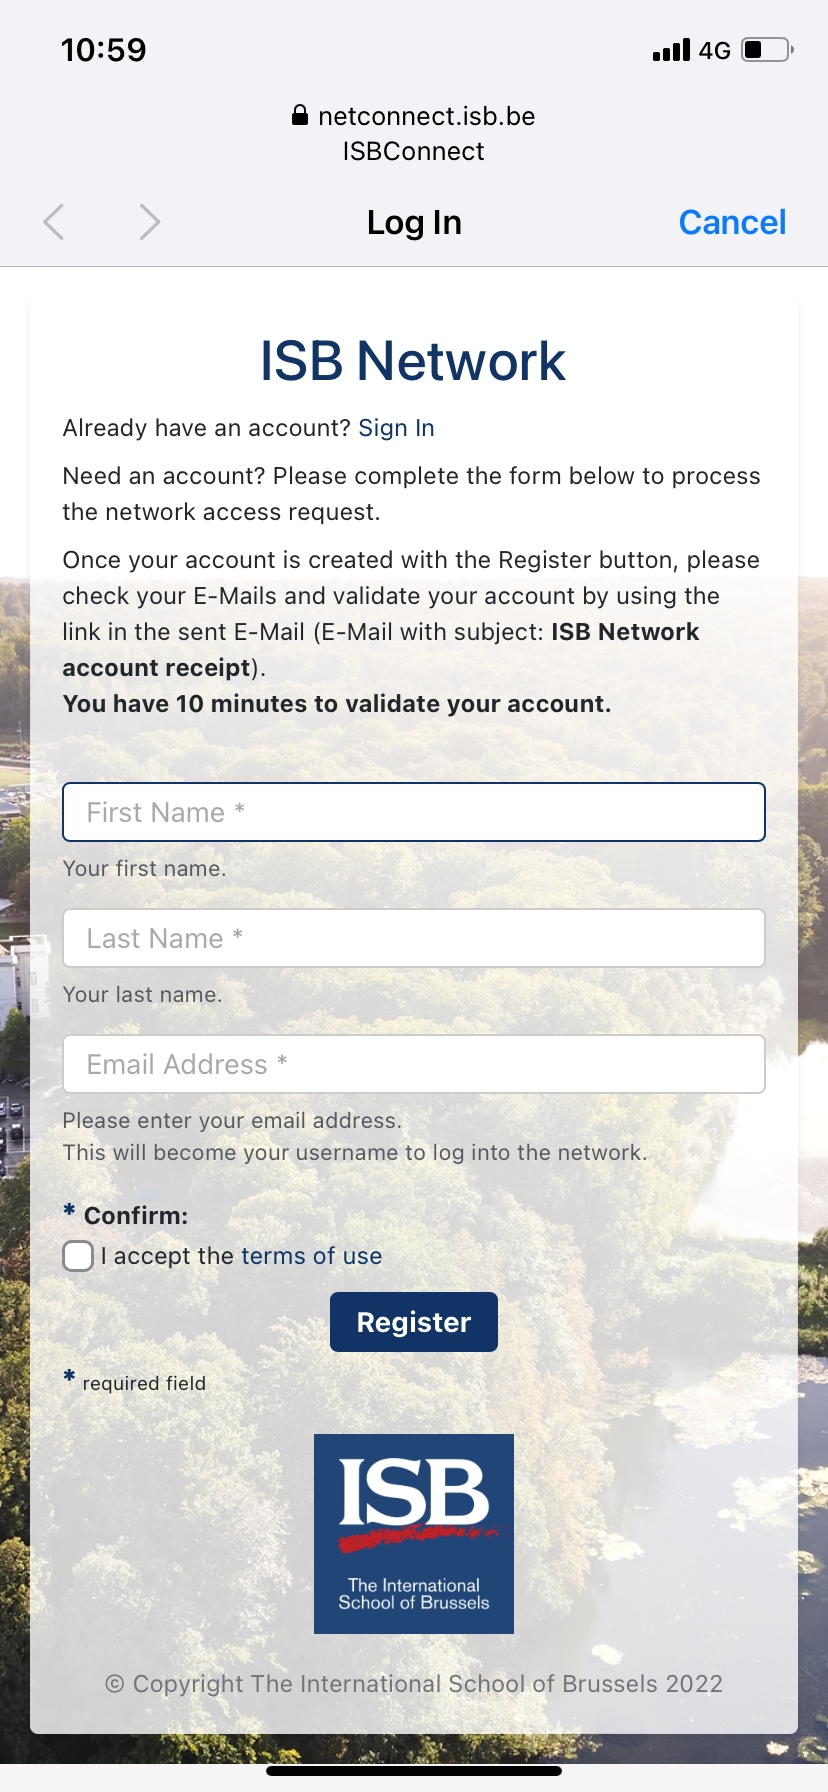
Once you press Register, you will have internet for 10 minutes. Please check your email for a message similar to the one underneath. Click Confirm to extend the duration to 90 days.
If it doesn't work, connect to ISBConnect again and click on Sign In instead of filling in your First and Last Name. Use the username and password that you received in your email to finish connecting. You should be ready to go now.
Wireless – ISB Connect, ISB, How, What, Where
This information can only be viewed by ISB employees. Please Log In (upper-right corner) using your account (without @isb.be) and your password and follow this link to access the document.
VPN - Initial Setup
This information can only be viewed by ISB employees. Please Log In (upper-right corner) using your account (without @isb.be) and your password and follow this link to access the document.
VPN - How to connect to the ISB network using the VPN
This information can only be viewed by ISB employees. Please Log In (upper-right corner) using your account (without @isb.be) and your password and follow this link to access the document.
Projectors
Projectors - How to Connect to the Projector in the Atrium.
| Open the cabinet and take the tablet out. (Please ask the HS’ General Office or the IT department for the Combination). | Start the system by clicking anywhere on the START SYSTEM page, or, if the Crestron app is not active, find it on the last app page and open it. |
 |
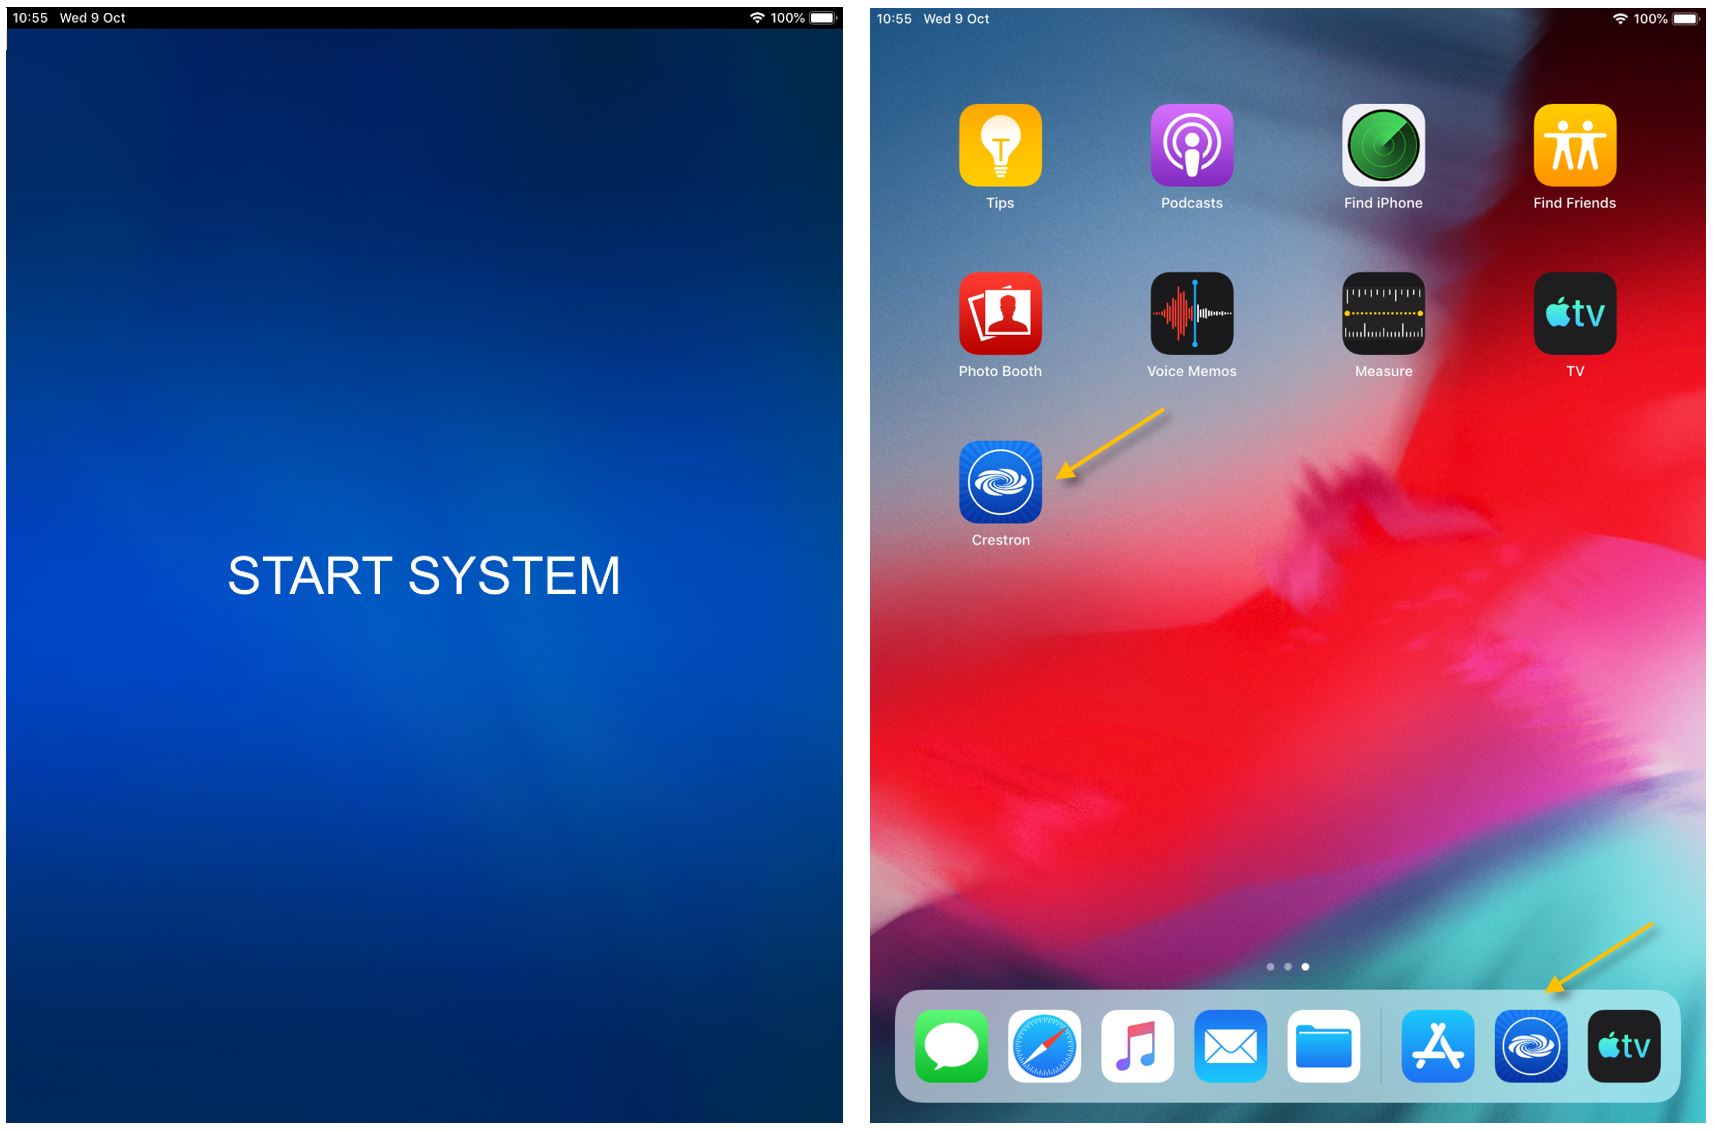 |
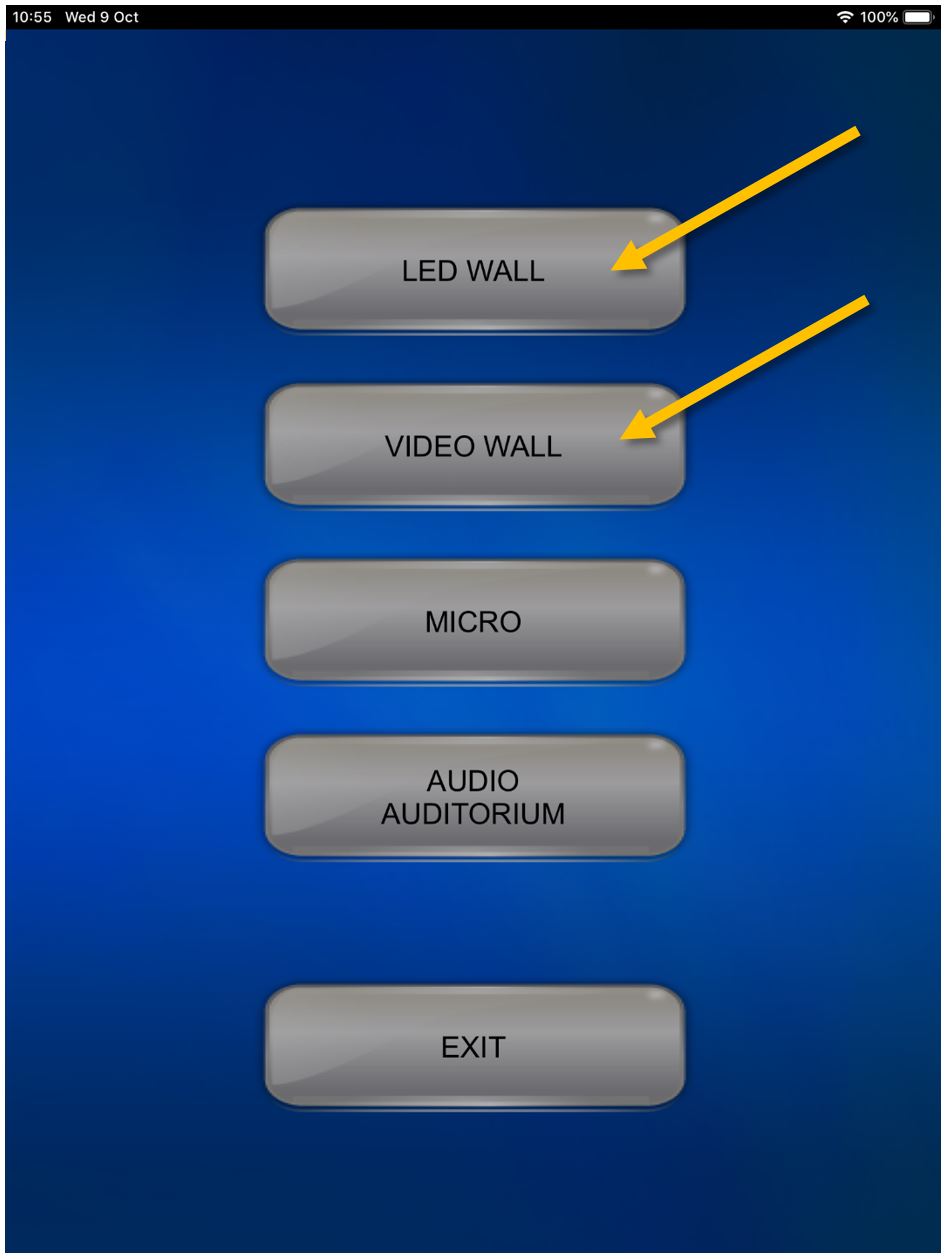
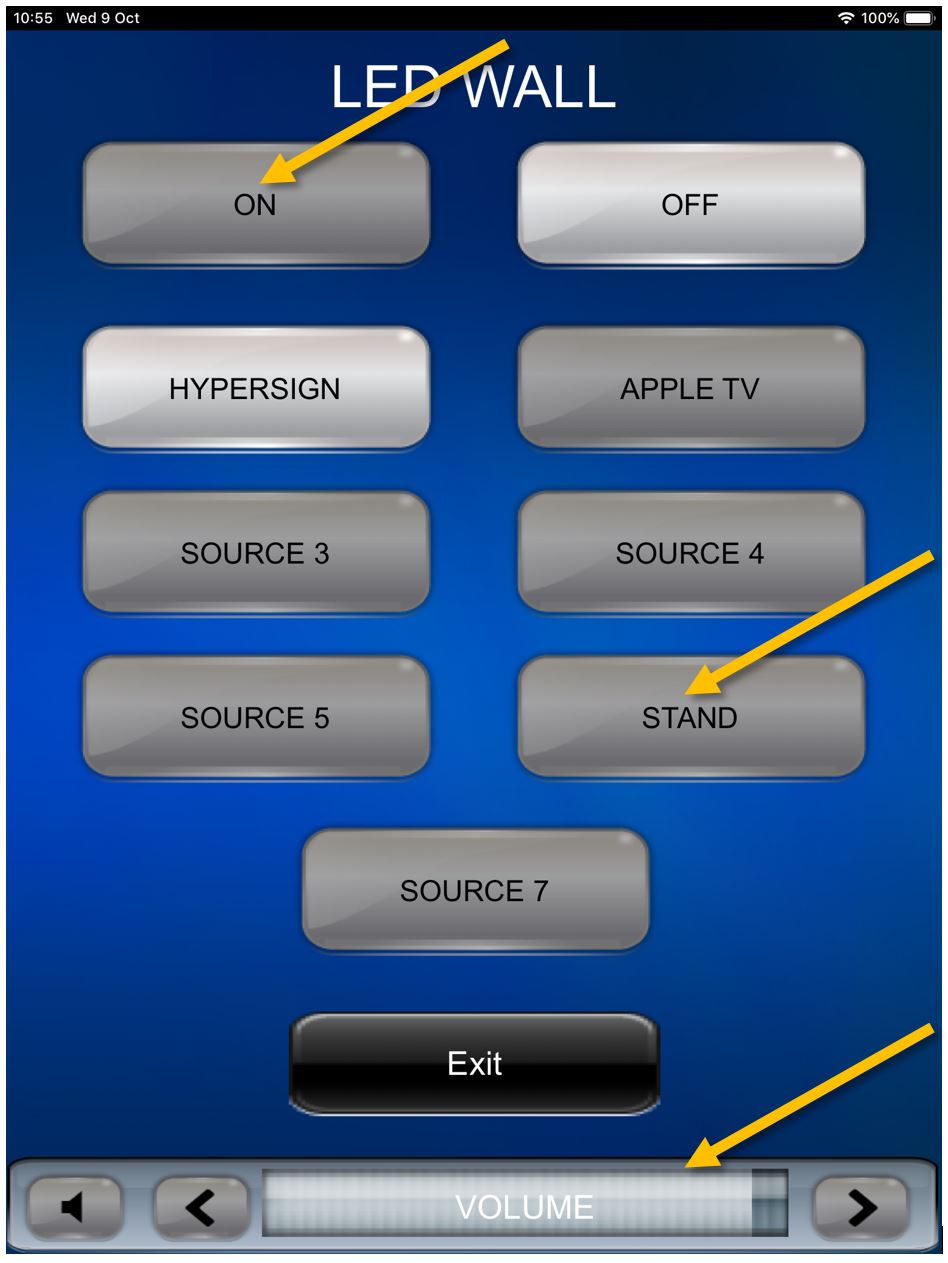
| Press LED WALL, or VIDEO WALL, and ON to turn on the LED screens. | When using the provided cables and adapters (recommended) please make sure that STAND is the selected source. You can use the slider at the bottom to adjust the sound volume. |
 |
 |
|
The LED screens can be used simultaneously. To go back to the previous menu click on Exit and select the other screen. Turn it ON and make sure STAND is the selected source. |
|
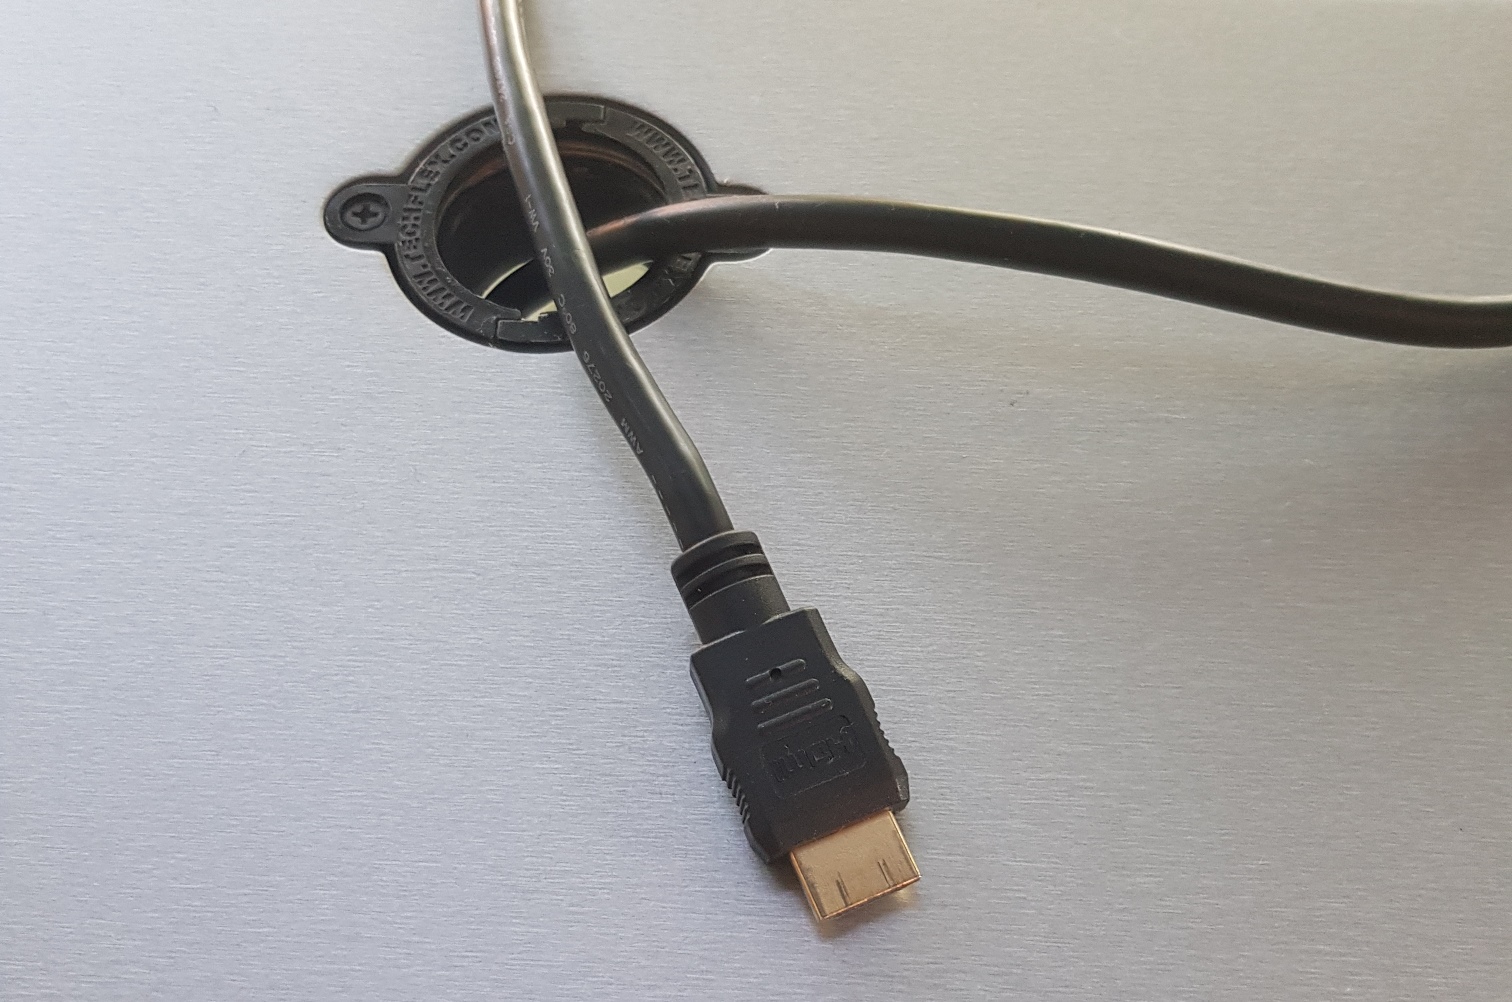
| Connect the HDMI cable that you can usually find on top of the cabinet to your device and you should be ready to go. |
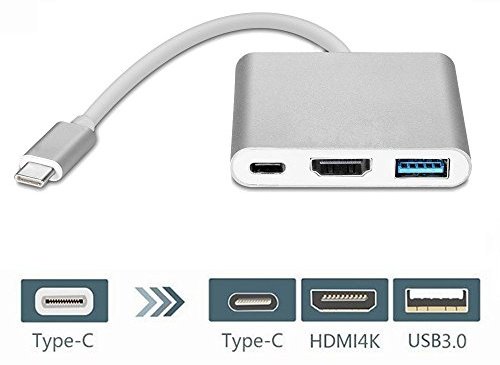
If your device does not have an HDMI port please use the adapter that you can find in the plastic box inside the cabinet to transform the HDMI cable into a USB-C one (for newer Macs, Windows based laptops, Android phones etc.). |
|
|
|
|
If you need a different type of adapter, please tell the IT department in advance what you need or the exact model of your device and the team will find a solution for you. ithelpdesk@isb.be |
|
|
Almost all Apple devices can wirelessly connect the Atrium System using the attached AppleTV (not recommended for videos stored on Google Drive or for high resolution local stored or Youtube clips). |
|
|
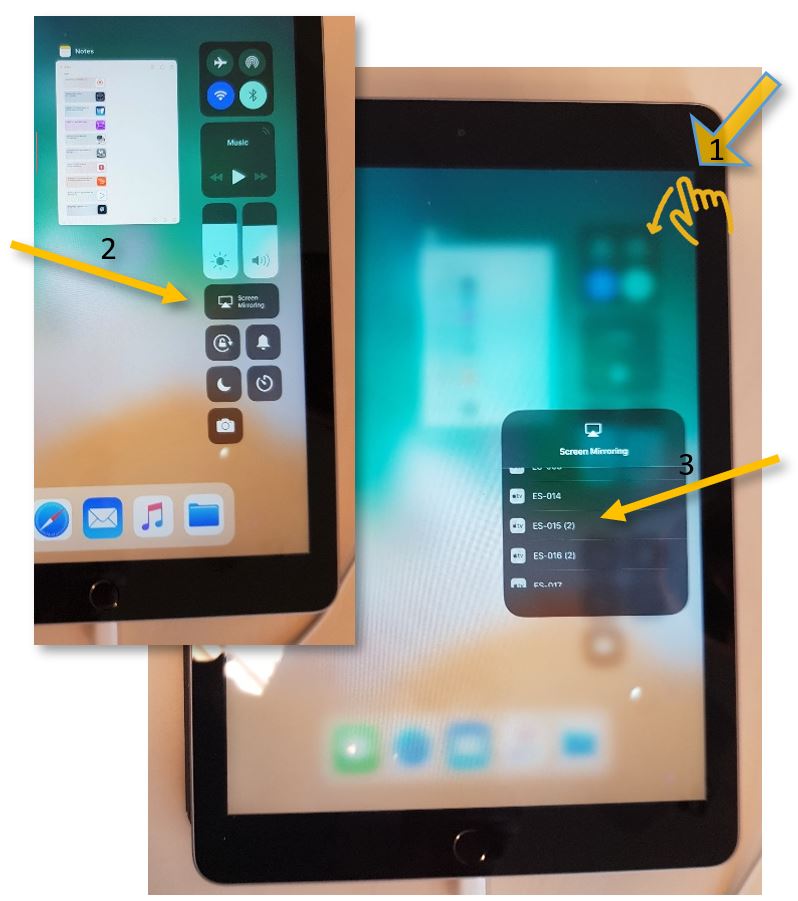
Change the LED or the VIDEO walls inputs to APPLE TV and use the Screen Mirroring function of your device to find and select the "HS-Atrium AppleTV". If needed, insert the code present on the screen/s and you should be ready to go.
|
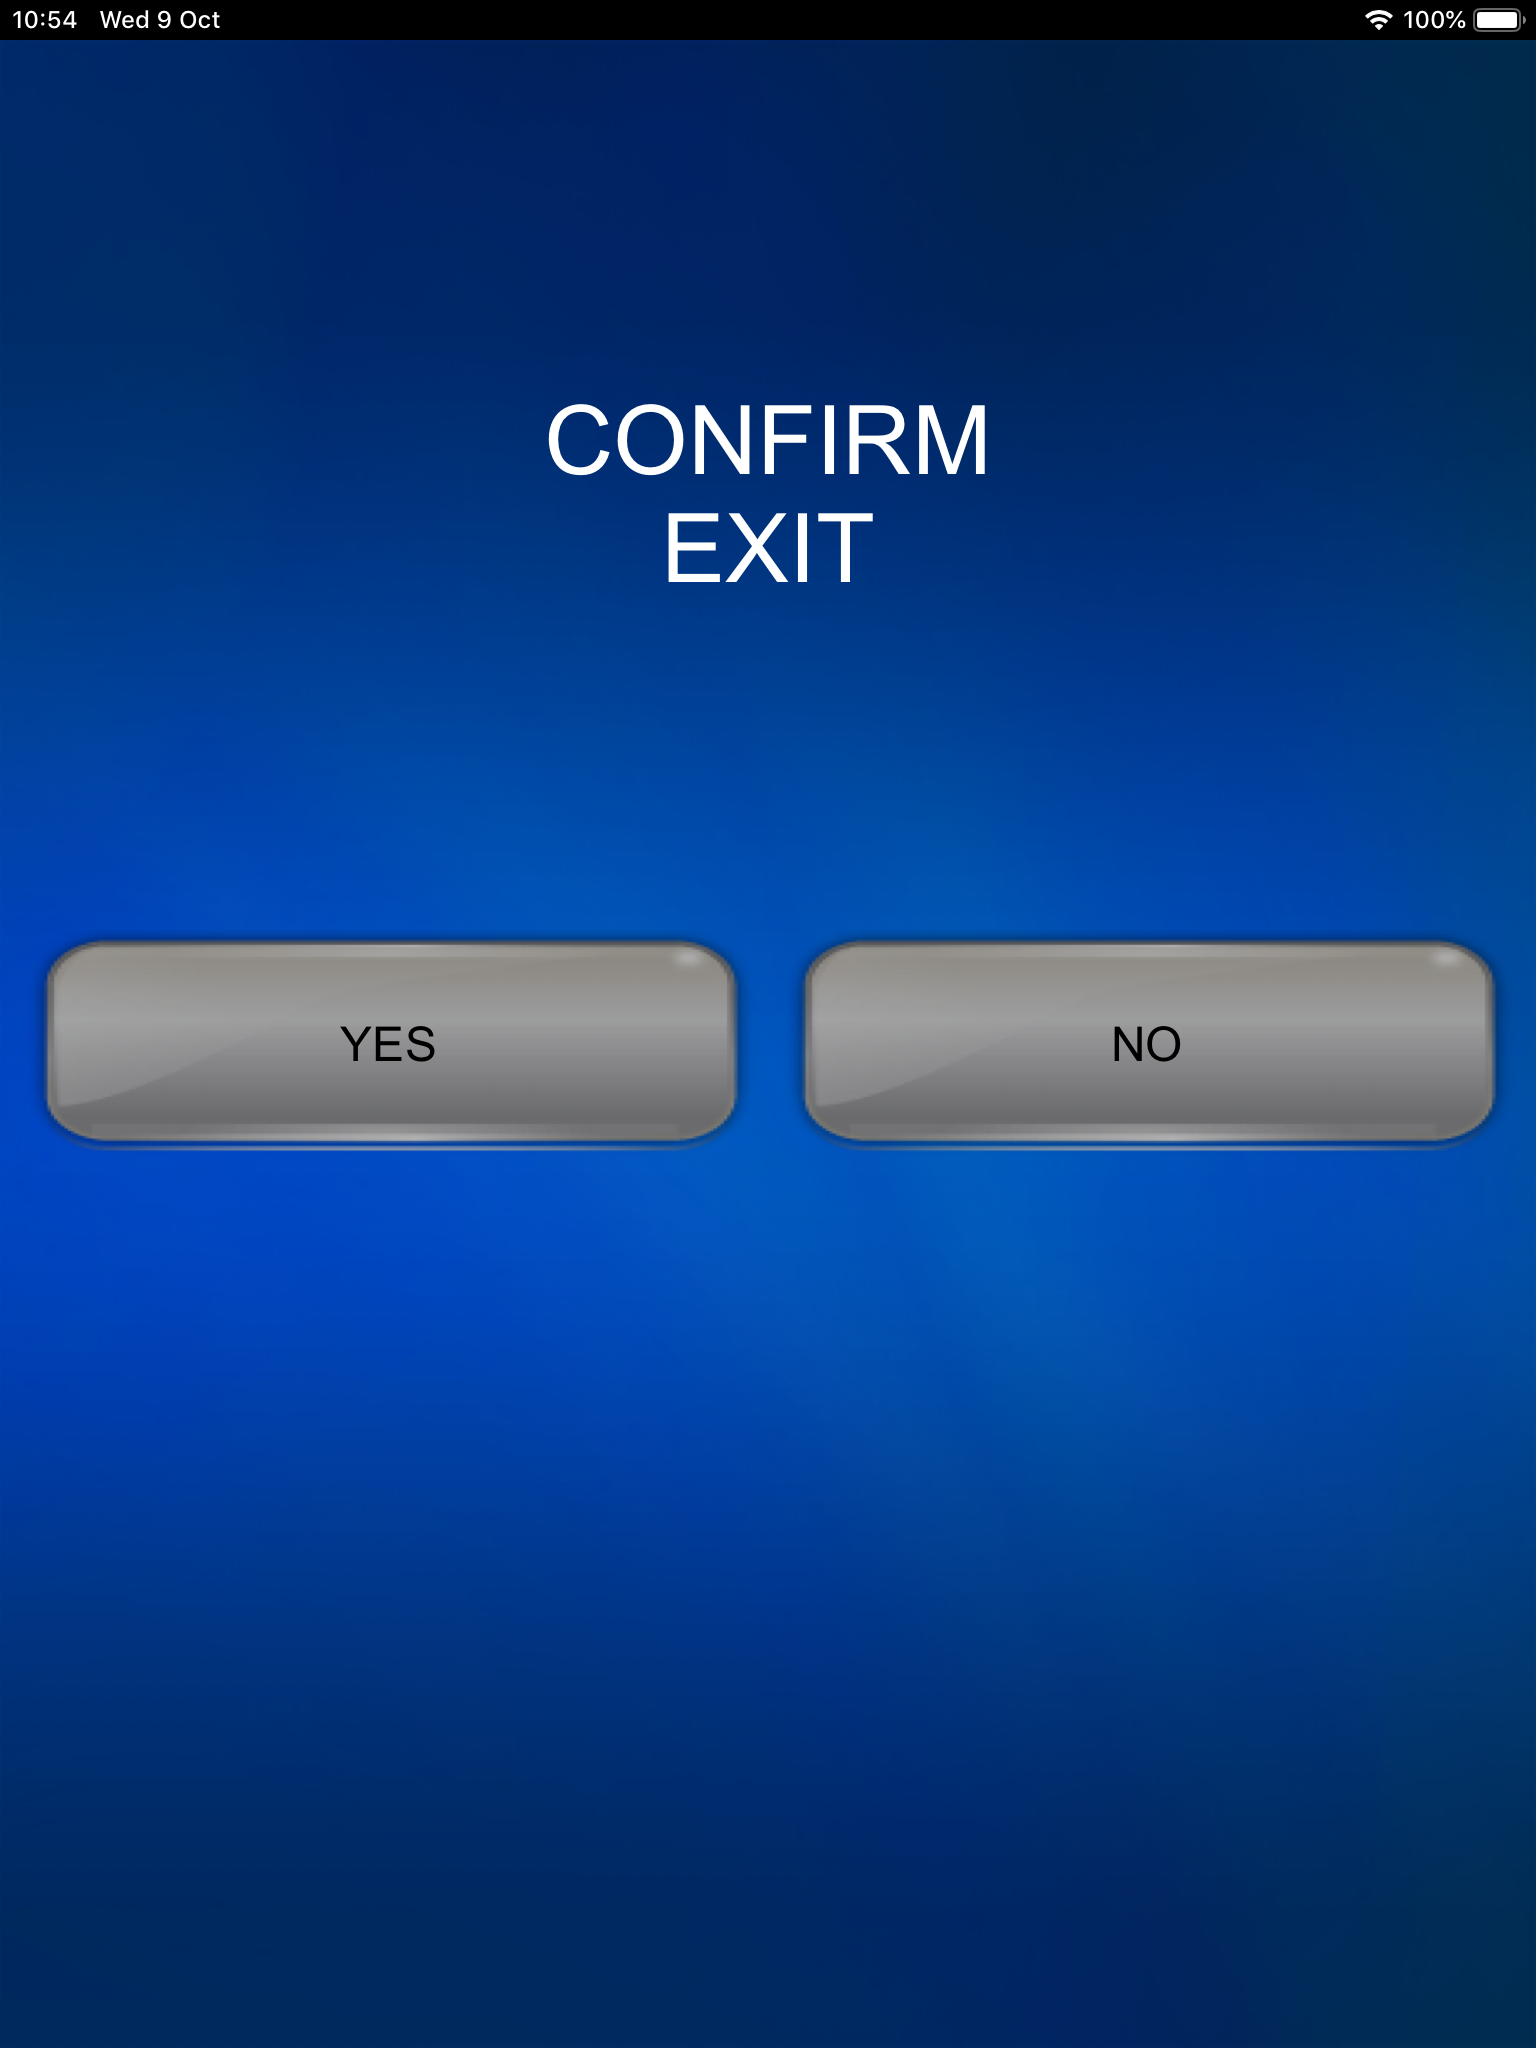
When done please remember to shut down the system. Press EXIT on the initial menu on the tablet and confirm it. Thank you! |
|
|
Projectors - How to Connect to the Projector in the Annex
|
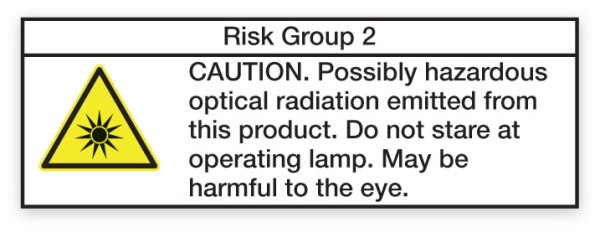
Safety first: This projector uses a laser beam; please avoid looking at the operating lamp.
|
|
|
The projector's remote is stored in the white cabinet on your left when you enter the Lounge. |
|
|
Windows: You can wirelessly connect to the projector with a Windows machine – like the Lenovo X1 laptop, Ensure the device is connected to the ISB or the ISBConnect wireless network.
ISBConnect is our guest network, and anybody can access it. Password - While at ISB, please ask one of the staff members for the Password.
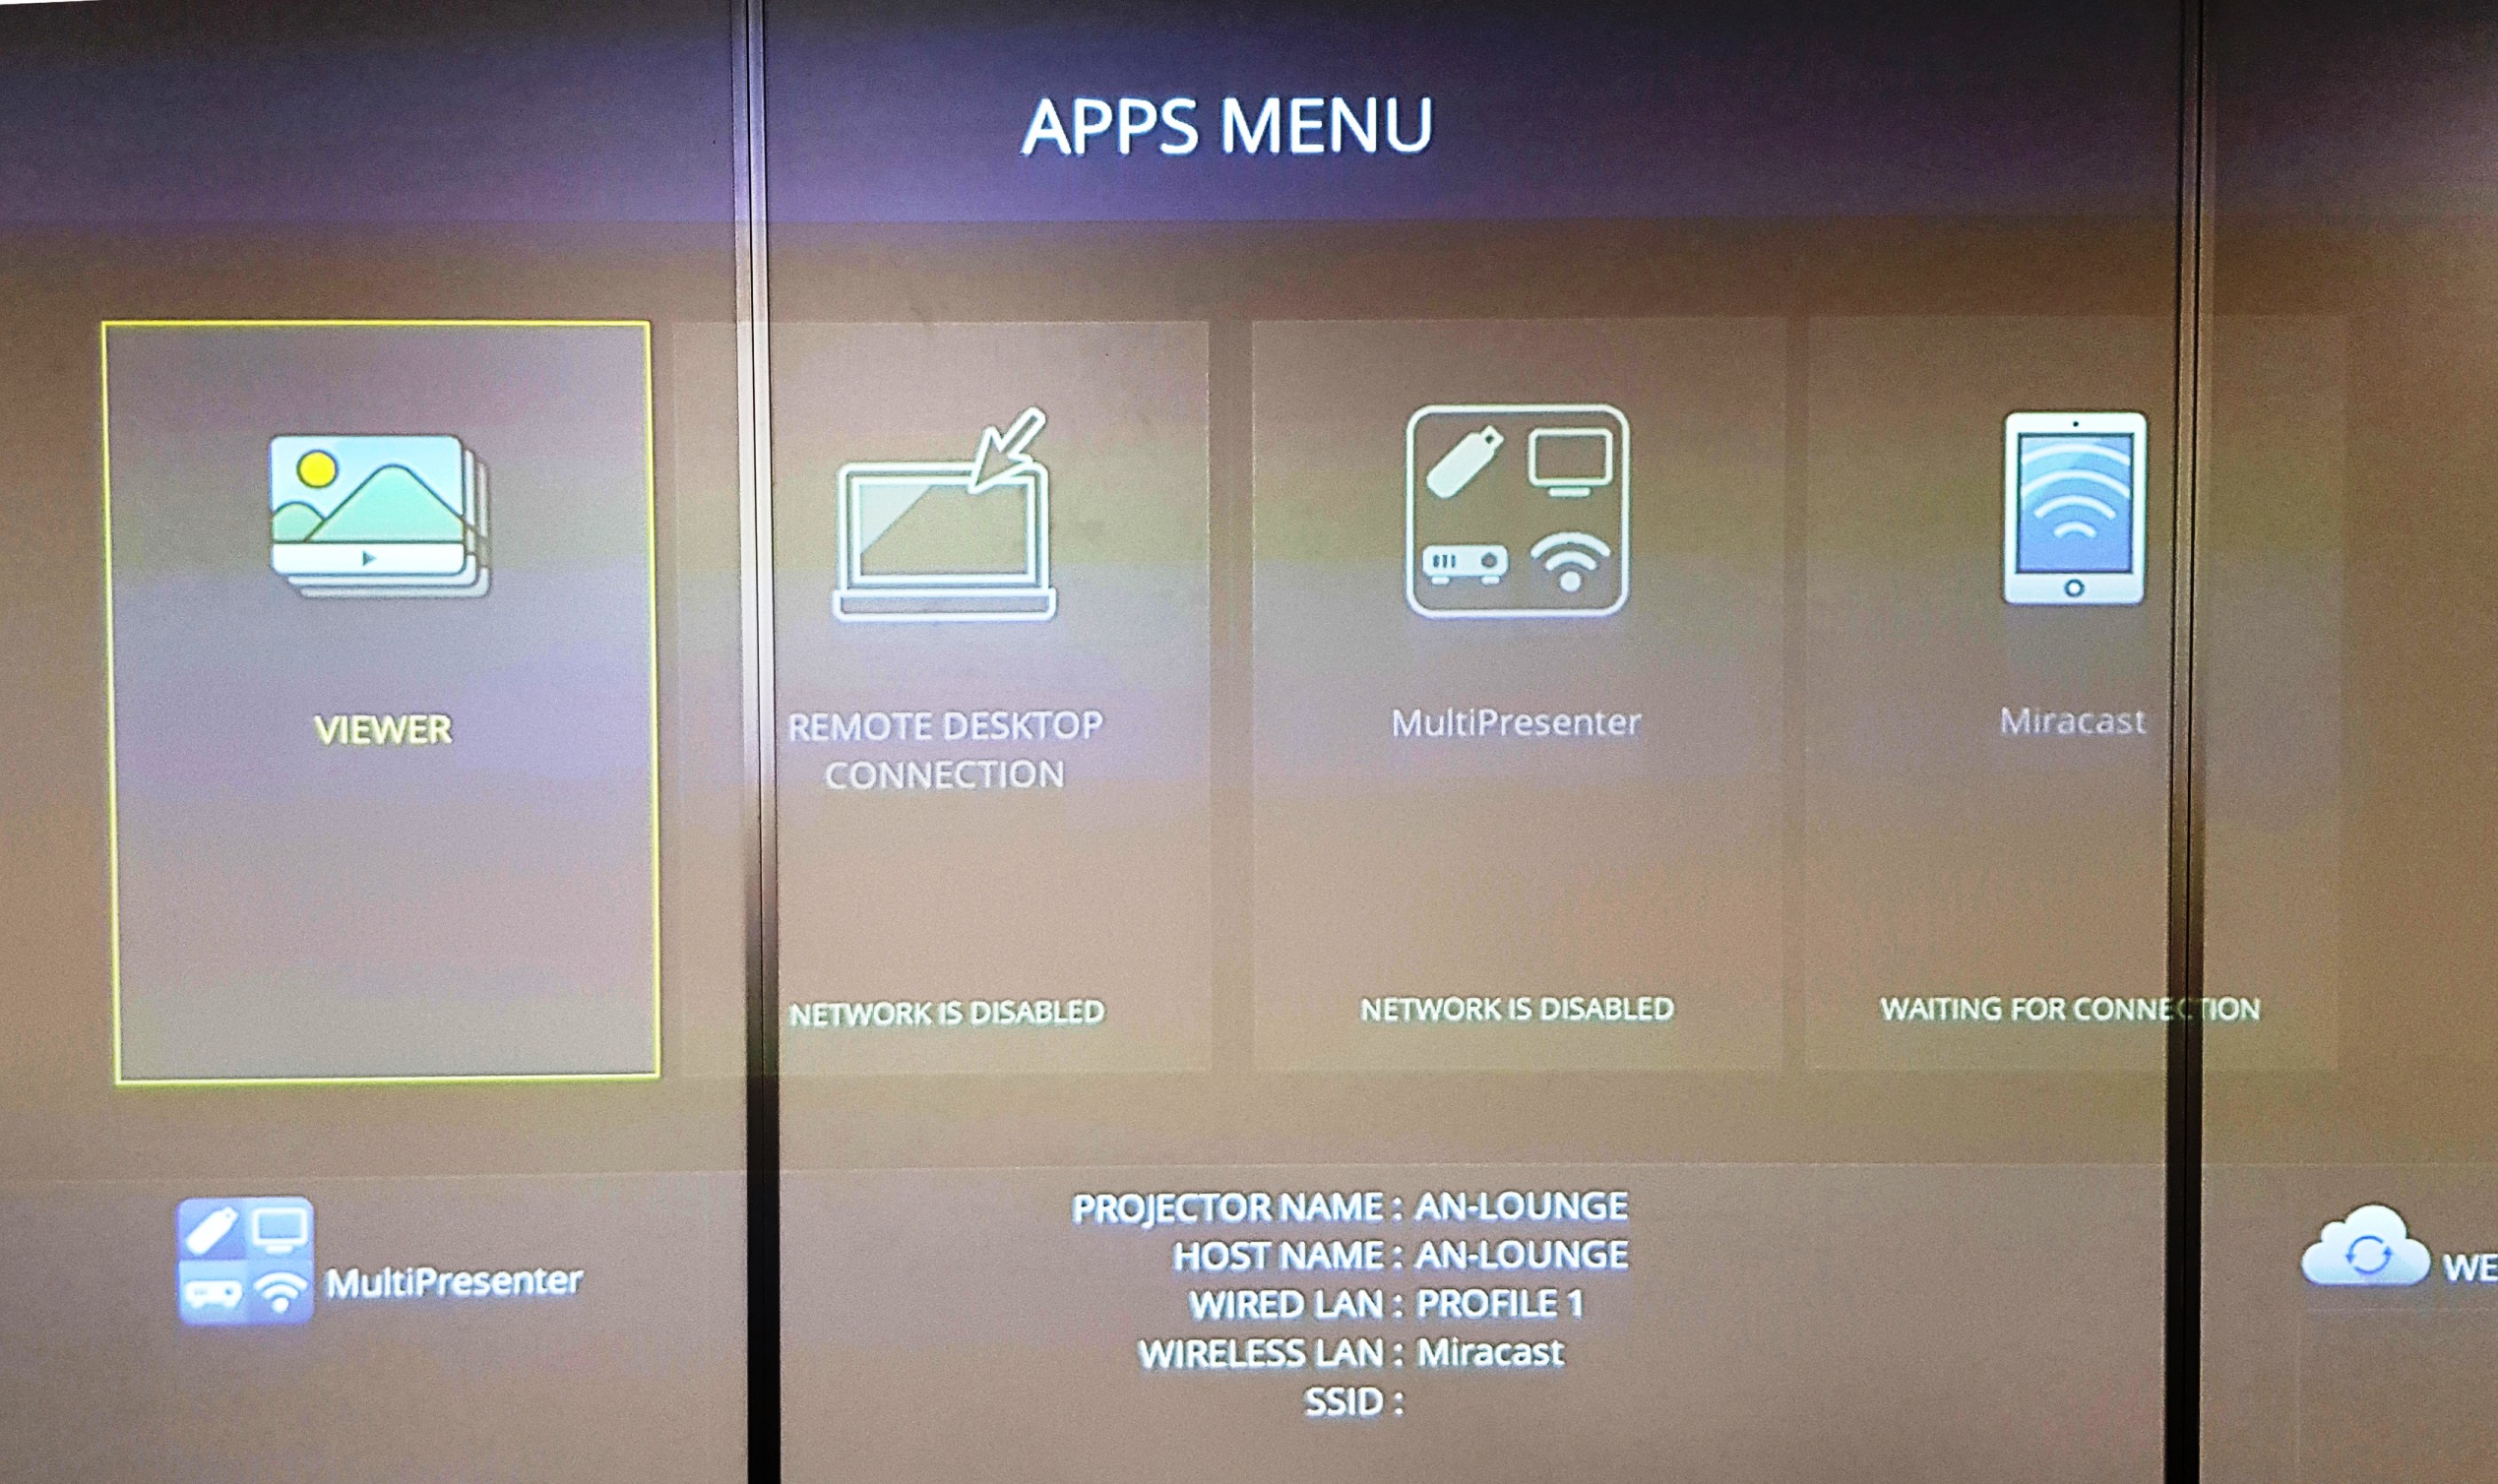
Turn on the projector and wait for 2-3 minutes. If you do not see the screen on the right, please press Menu on the remote and change the source to APPS. |
|
|
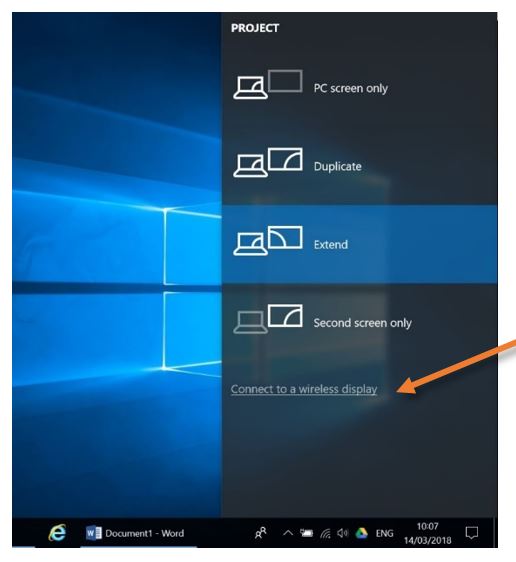
Press the ⊞ Windows button and P simultaneously on the Windows machine; the “Project” panel will pop up. Click on “Connect to a wireless display".
|
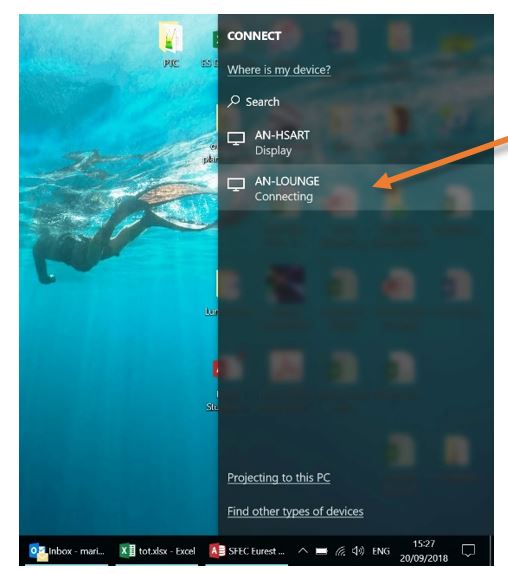
Find the correct device (in this example, AN-LOUNGE) and click on it to connect. You should be ready to go.
|
|
Apple: You can wirelessly connect to the projector with an Apple device – like a MacBook Pro or an iPad.
Make sure that the device is connected to the ISB or the ISBConnect wireless network.
ISBConnect is our guest network, and anybody can access it. Password - While at ISB, please ask one of the staff members for the Password.
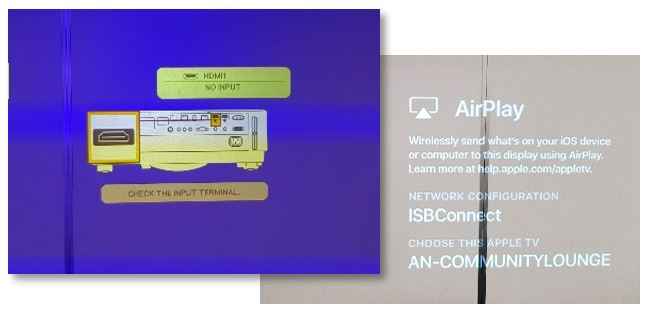
Turn on the projector and wait for 2-3 minutes. If you do not see the screens on the right, please press Menu on the remote and change the source to HDMI1. |
|
|
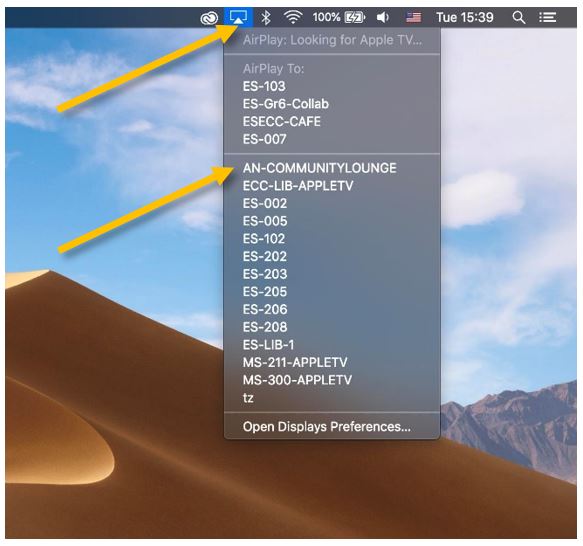
On a MacBook, click the Screen Mirroring icon on the upper right side of the menubar and select the correct projector from the rolling list, usually named after the room number. In this example: AN-COMMUNITYLOUNGE.
|
On an iPad, swipe up diagonally from the upper right corner onto the screen to bring up Control Center. Press the Screen Mirroring button and select the correct projector on the menu – usually named after the room number. In this example: AN-COMMUNITYLOUNGE.
|
|
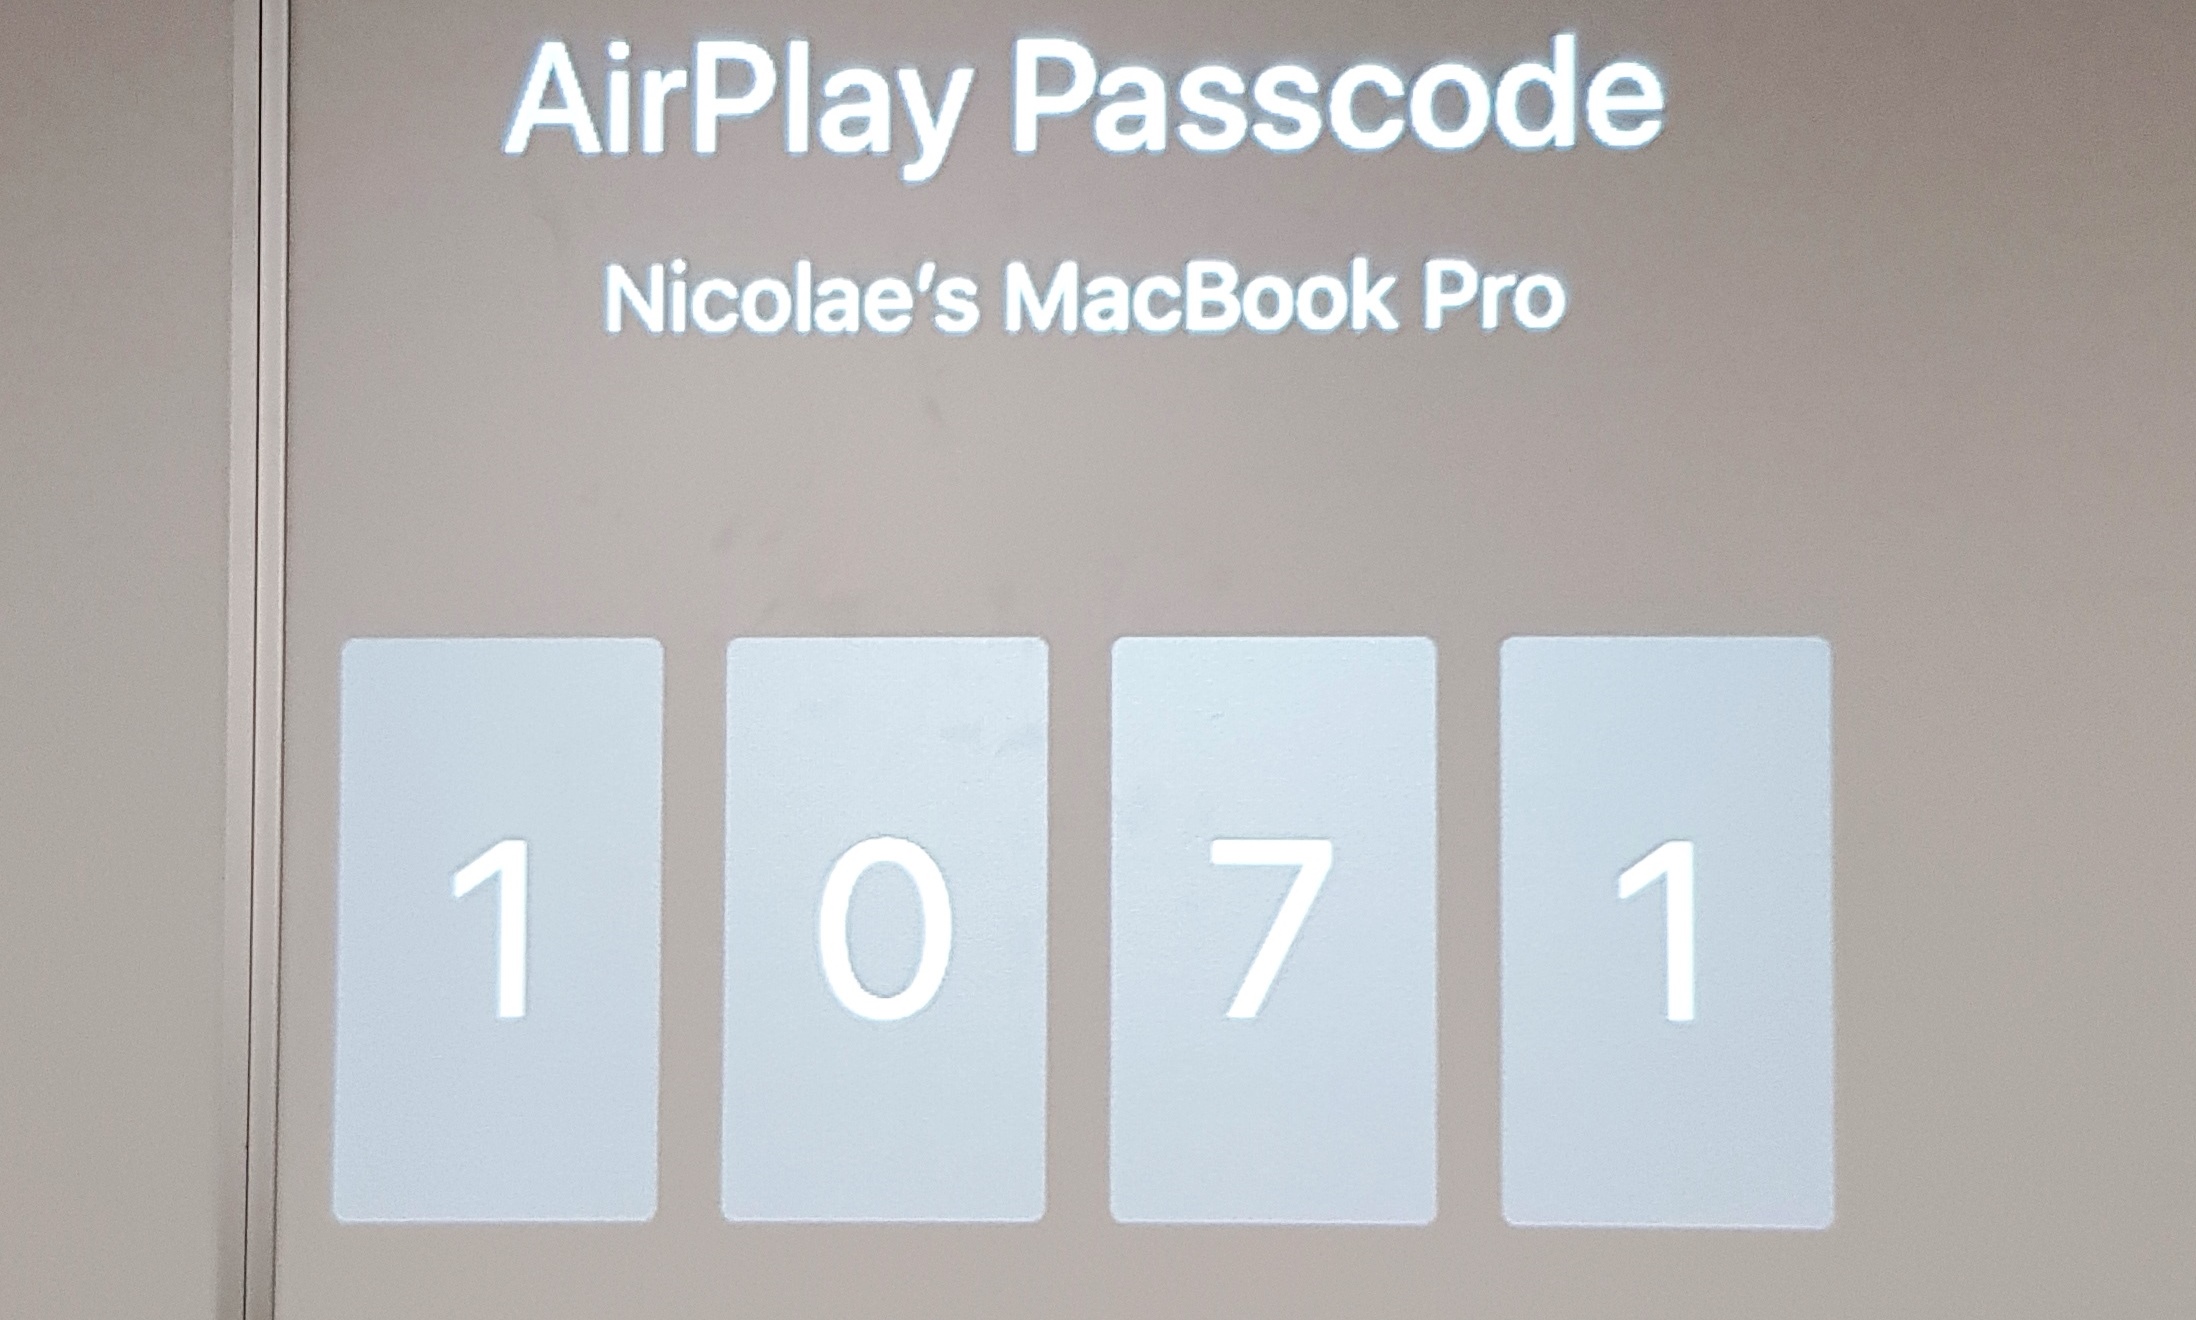
If it's the first time you connect this particular device to the projector, you will be asked to pair the devices – please insert the number that you can see projected, and you should be ready to go. |
|
|
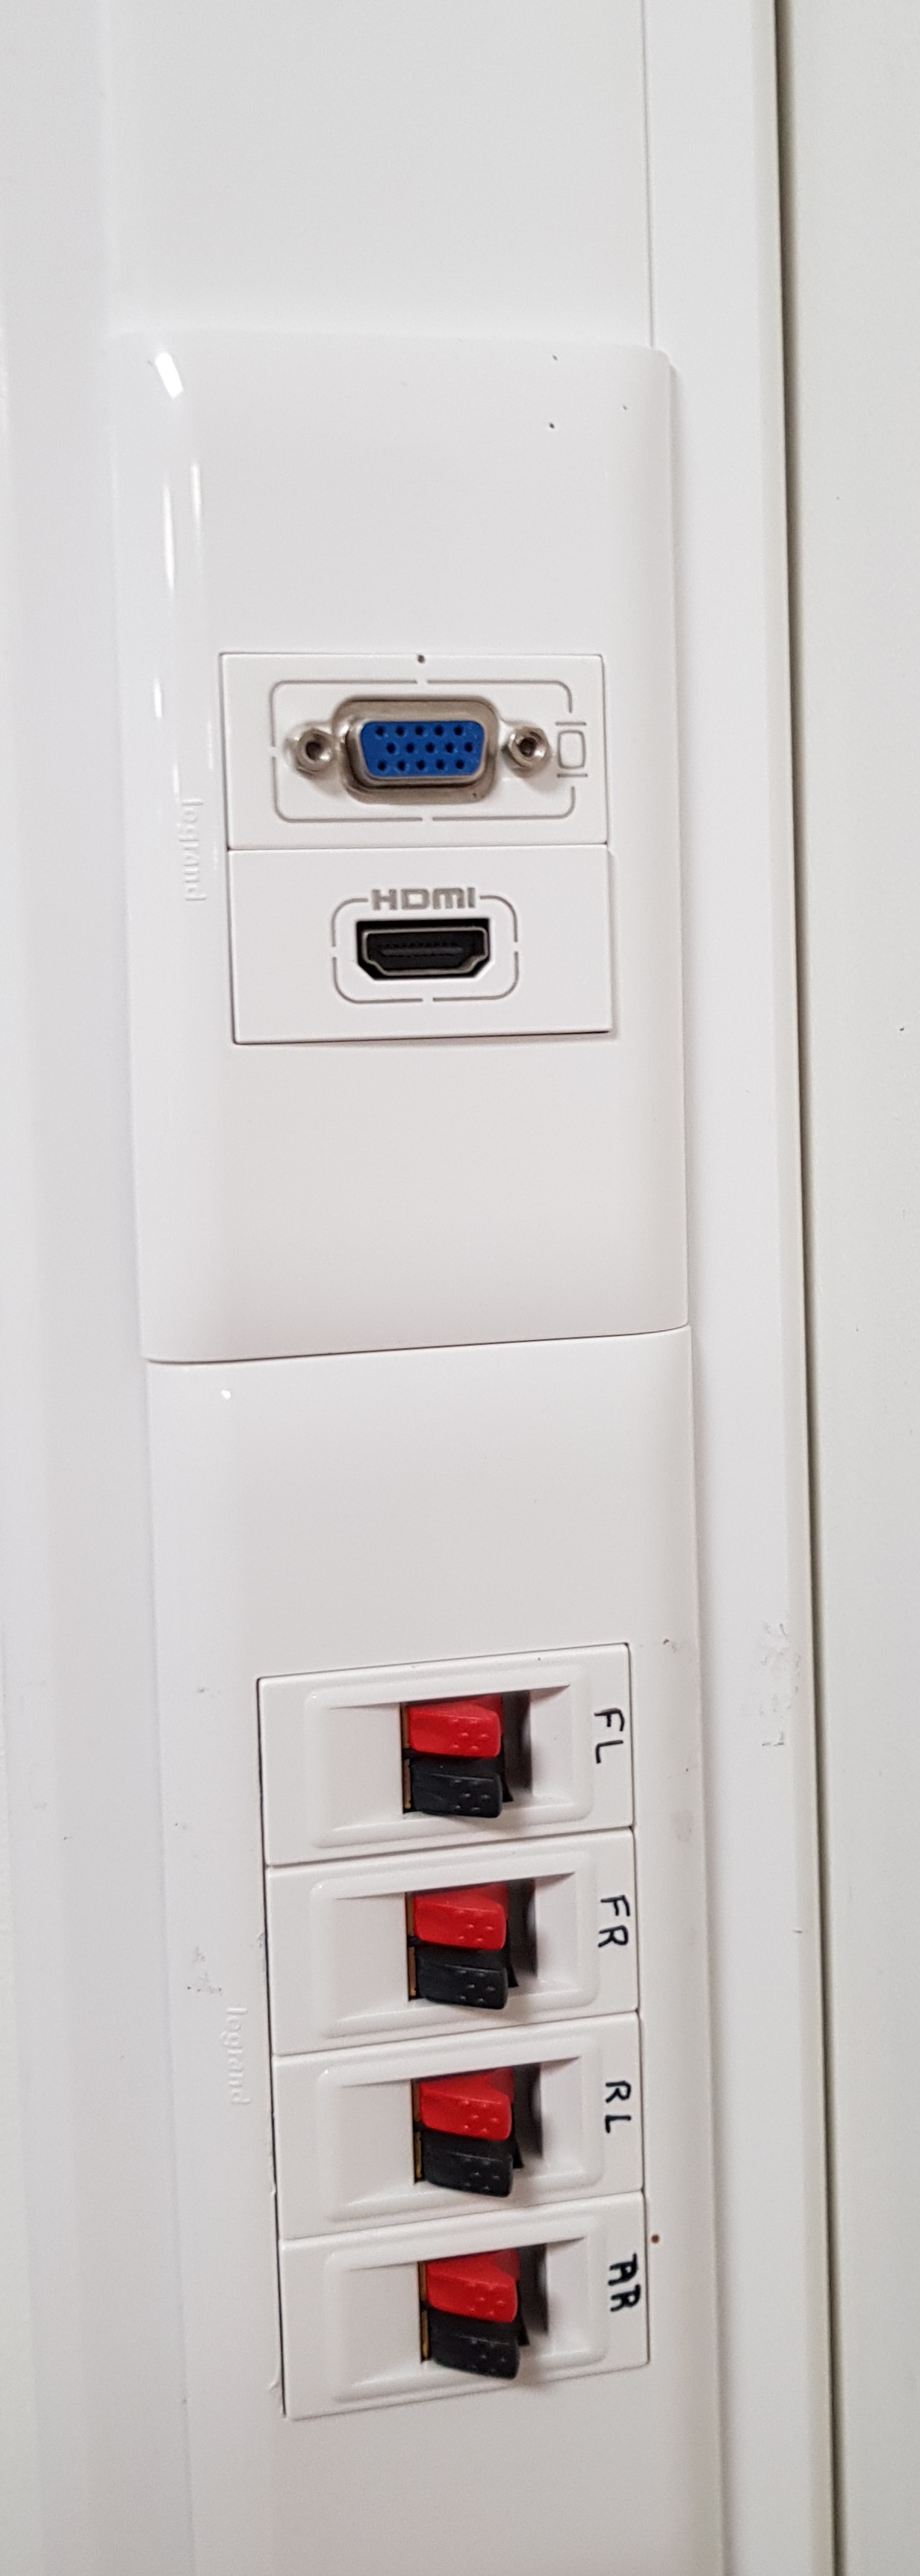
Other devices: If you have a device that does not have wireless capabilities, please use the wall connection and the HDMI cable you can find in the cupboard.
If you need an adapter or a different type of cable, please contact the IT team: Ext. 303.
Turn on the projector and wait for 2-3 minutes. Press Menu on the remote and change the source to HDMI2. You should be ready to go. |
|
|
Sound: If you discover that the sound is too low or too high, please use the volume buttons on the remote to adjust it. |
|
Software and Applications
How to install the most requested software yourself.
Adobe Acrobat Sign
(click on the chapter to fast jump to it)
How to:
Sign in to use Acrobat Sign: Acrobat Sign is a web-based application.
Configure your user account: verify and edit your profile information; choose a default signature and style; set up your events and/or notifications.
Prepare and send a document for signature: select a document, add fields for signatures, names, date, etc., and send it.
Supported files that can be edited, sent, and signed - DOC, DOCX, RTF, XLS, XLSX, PPT, PPTX, TXT, CSV, HTML, HTM, TIFF, TIF, BMP, GIF, JPG, JPEG, and PNG. Adobe Sign can also read and use your Google docs.
Complete and Sign a document using Fill and Sign: use Adobe Sign to fill in a document and sign it.
Manage and track documents sent for signature: find a document, view their status, and print or export as PDFs. Send a reminder, or cancel the transaction.
Sign an agreement: how to sign a document received over email. No additional software is required.
Sign in to use Acrobat Sign
- Please open https://secure.echosign.com/public/login to sign in.
- Use your ISB email; click on the password field and wait a few seconds for Adobe to recognize the account. When asked what type of account it is, please select Company or School Account.
- If not automatically logged in, use your ISB email password to sign in.
Configure your user account:
- In the video below, you can learn how to verify and edit your profile (important), choose a default signature and style, and set up your events and email notifications. Note: most alerts are unavailable in our environment because Adobe cannot check when or if somebody opened an agreement.
Prepare and send a document for signature:
- Select a document, then add fields for signatures, names, date, etc., and send it for signage.
- Supported files: DOC, DOCX, RTF, XLS, XLSX, PPT, PPTX, TXT, CSV, HTML, HTM, TIFF, TIF, BMP, GIF, JPG, JPEG, and PNG.
- Adobe Sign can also read your Google docs. When first accessing it, please allow the pop-up to open, reload the page, and give Adobe permission to read your Google Drive. It will read the selected document, transform it into a PDF and send it.
- Password protect the document if needed
- Some of the options presented here are not available because Adobe doesn't have control over our environment.
- A quick look at what the signer will receive
Complete and Sign a document using Fill and Sign:
- Use Adobe Sign to fill in a document and sign it
Manage and track documents sent for signature:
- Select the Manage tab and find the document you want to manage by using the search field or the Status panel on the left. You can view documents and their status and print or export them as PDFs. For the ones In Progress, you can also send a reminder or cancel the transaction.
Sign an agreement:
- How to sign a document received over email.
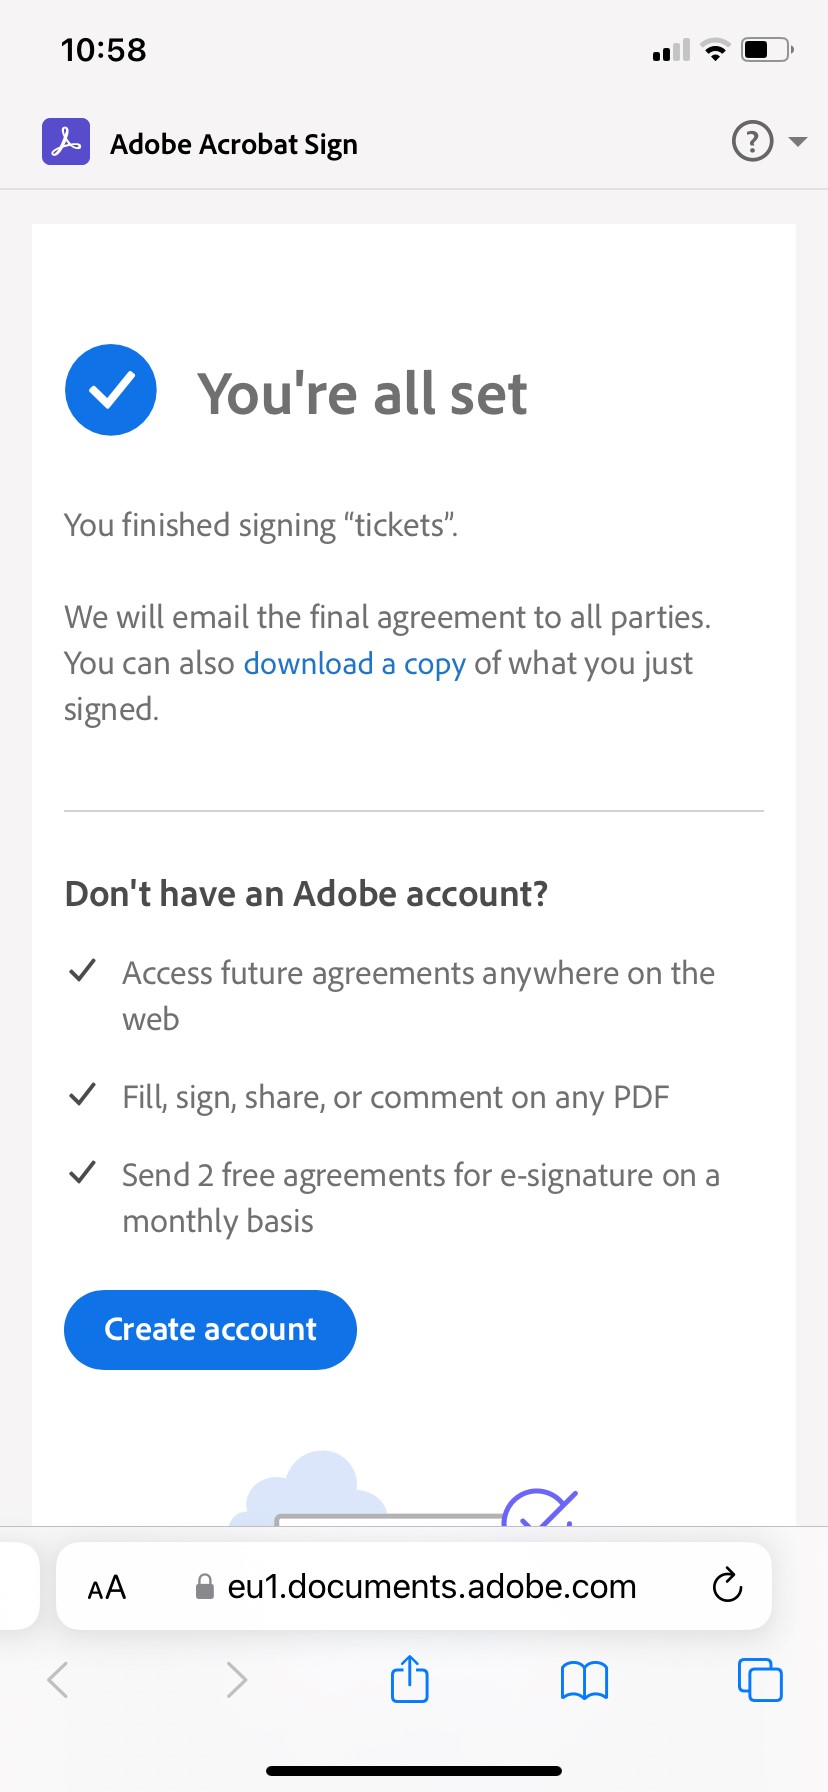
- No additional software is required to sign documents, but Adobe will try to convince you (see underneath) to log in or create an account with them at the end. Please ignore this and close the page; no other actions are needed.
How to install Adobe software
How to install the newest version of Photoshop, Illustrator, Premiere, Acrobat, Lightroom, etc. on your computer.
(First, please check with the IT office to make sure that your ISB Adobe account is active and merged with your email account.)
|
Windows version.
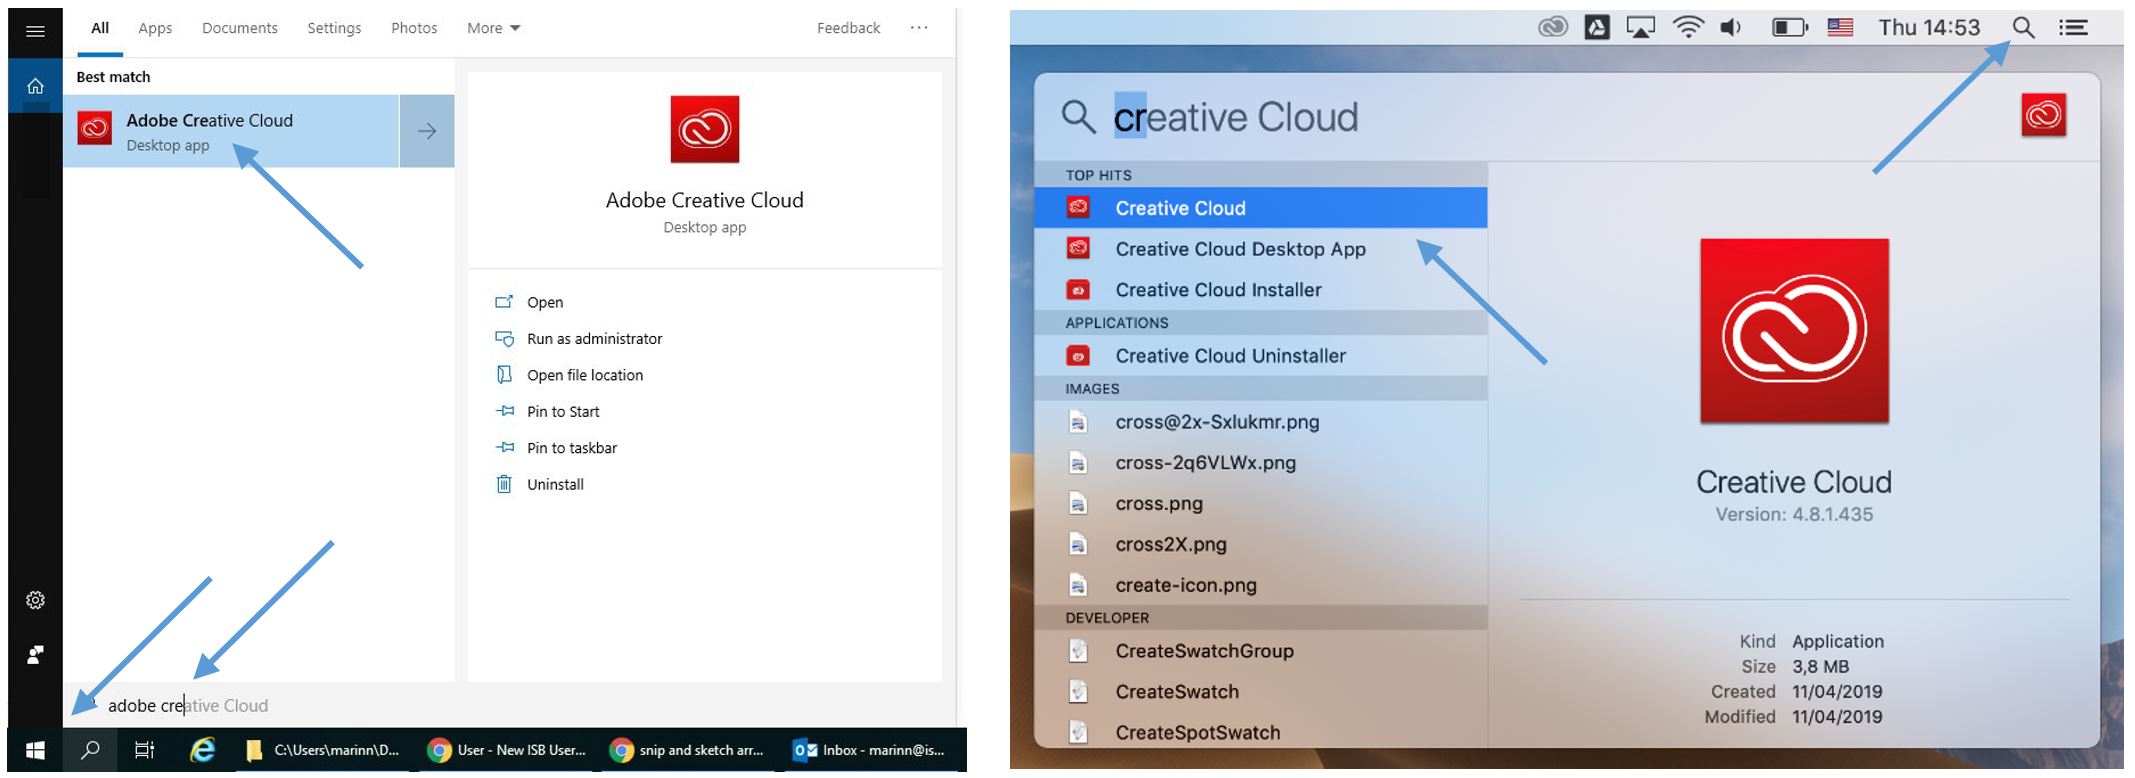
Press the Start button and write Adobe Creative in the search field. Open the Adobe Creative Cloud app. |
Mac version.
Press the Spotlight button and write Creative Cloud in the search field. Open the Creative Cloud app. |
In the window that pops up Sign in using your email and click on Continue. If it asks you to choose an account chose the Company or School Account one. If not, please insert the password that you use to log in to your email and click on Sign In.


In the new window that pops up insert your ISB email and click Next , your password, and click on Sign In. Insert the code that you receive on your phone or approve your sign in via the authenticator App.


After the sign-in is complete Creative Cloud will check to see what Adobe apps you have installed on your computer, this can take up to 10 minutes. When done, in the new Creative Cloud window, click on the Apps tab and update or install the ones that you need. You can always come back and install more if needed.
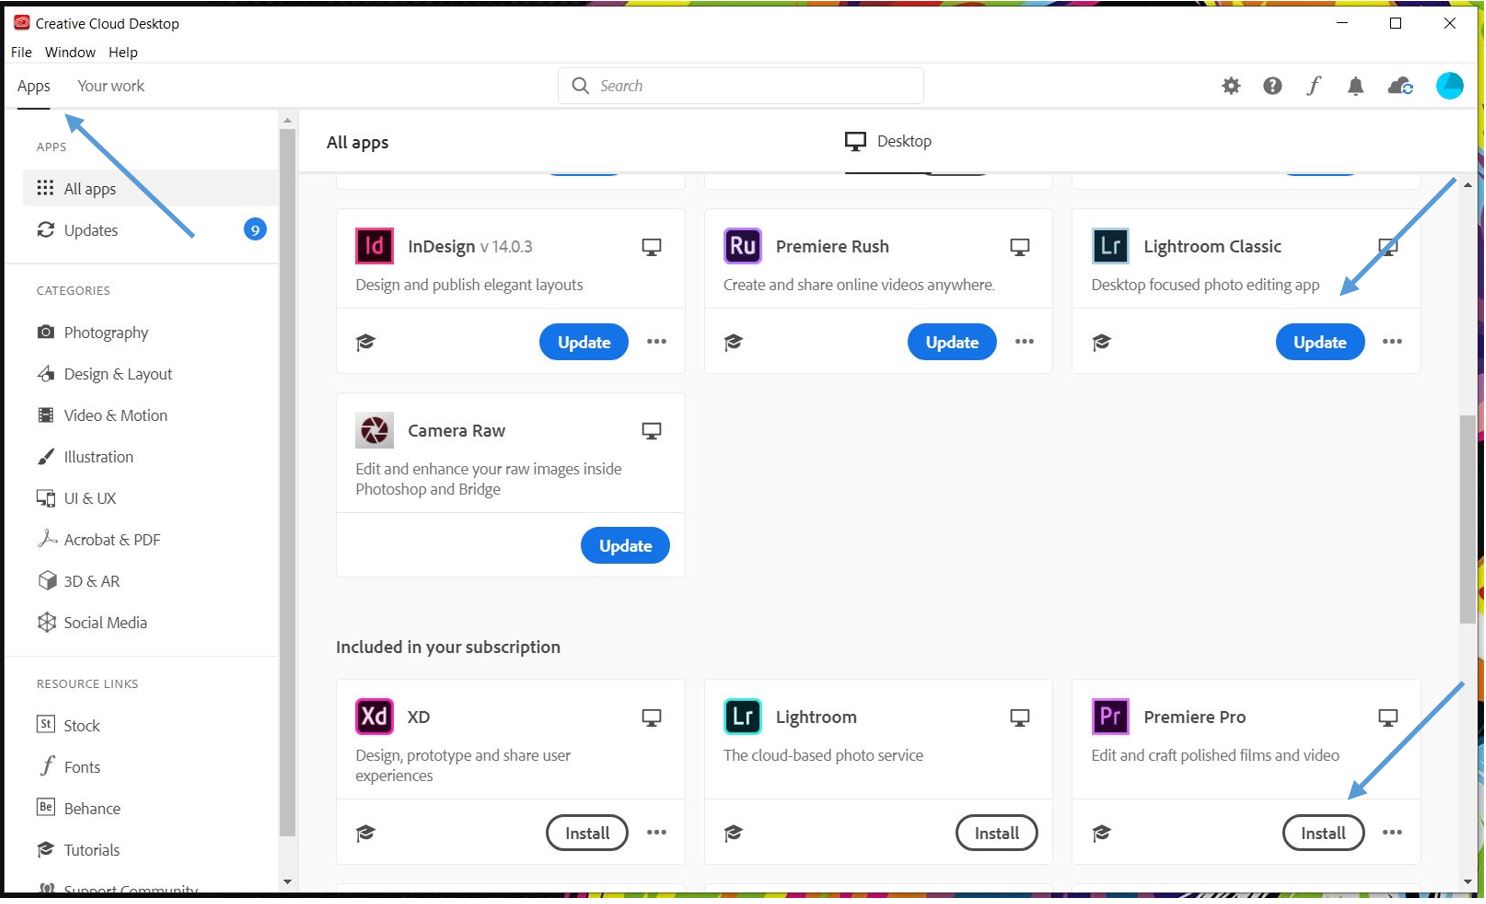
Use the same technique as in the first step to find the installed apps. If you use them often pin them to the taskbar or dock.
Office - Word, Excel, PowerPoint - No editing rights
If you discover that Word, Excel, PowerPoint, or any other Office apps, do not let you edit your documents, please follow the steps underneath to fix the problem.
- If the problem persists, please let the IT department know at ithelpdesk@isb.be
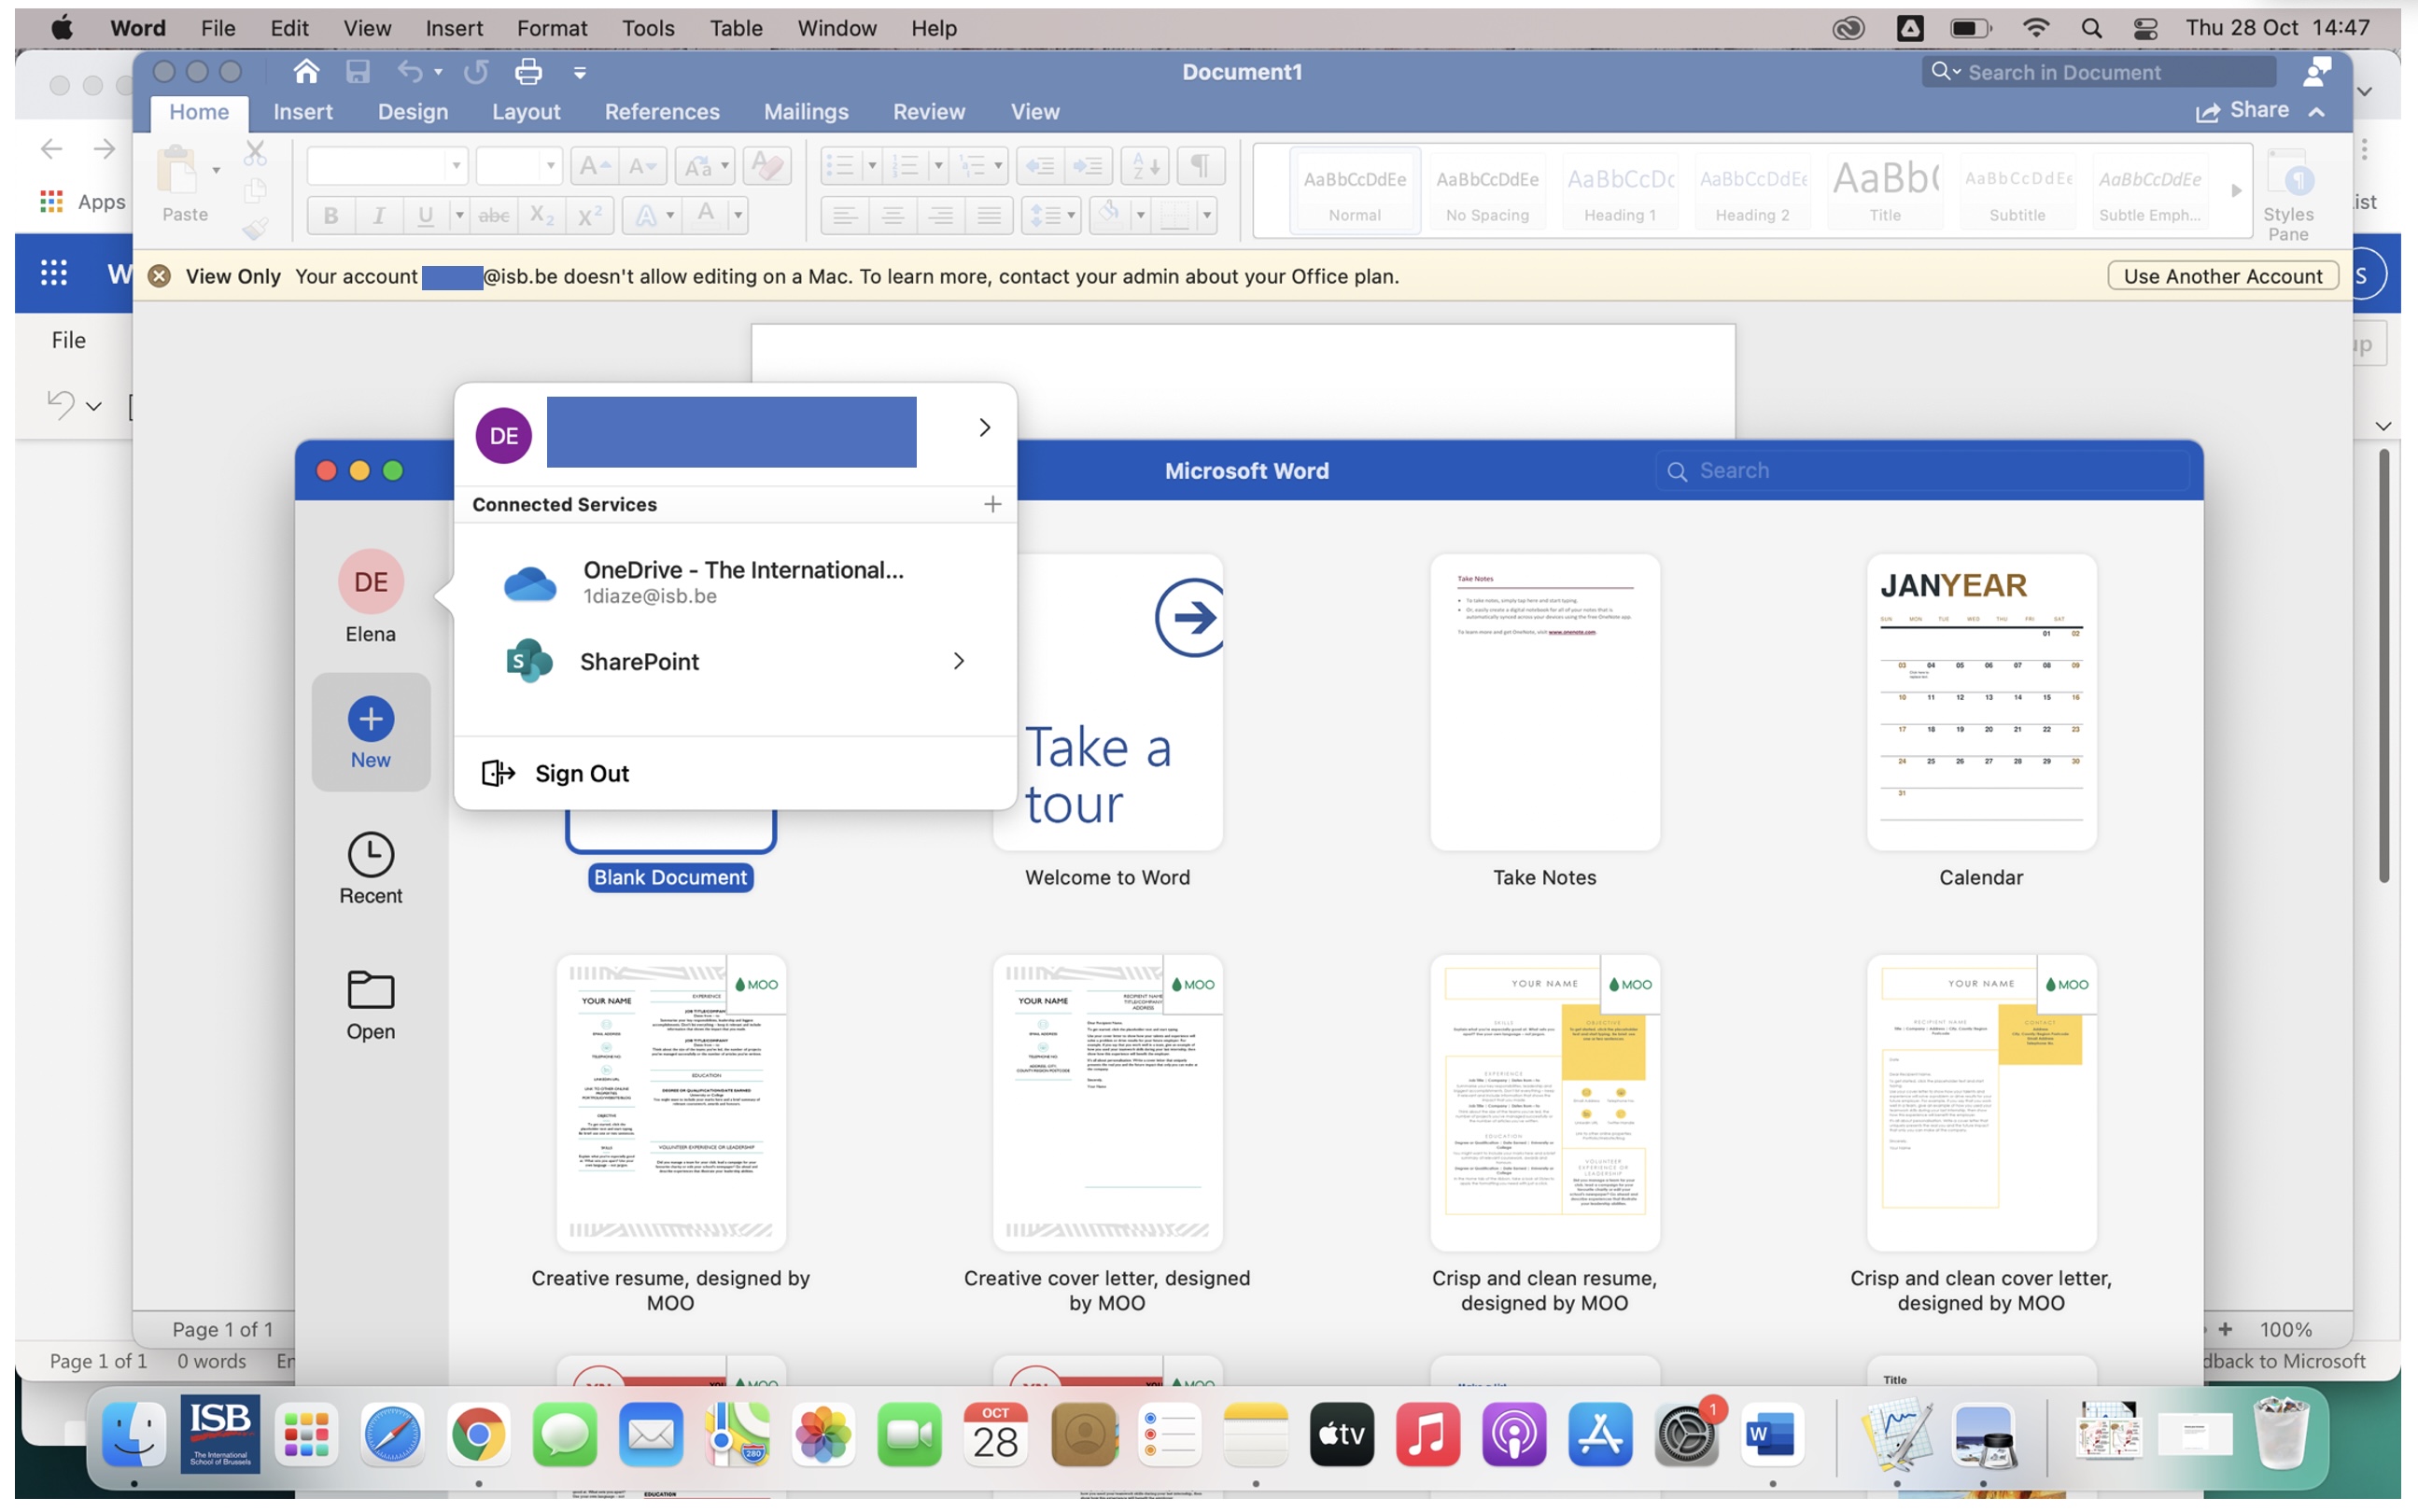
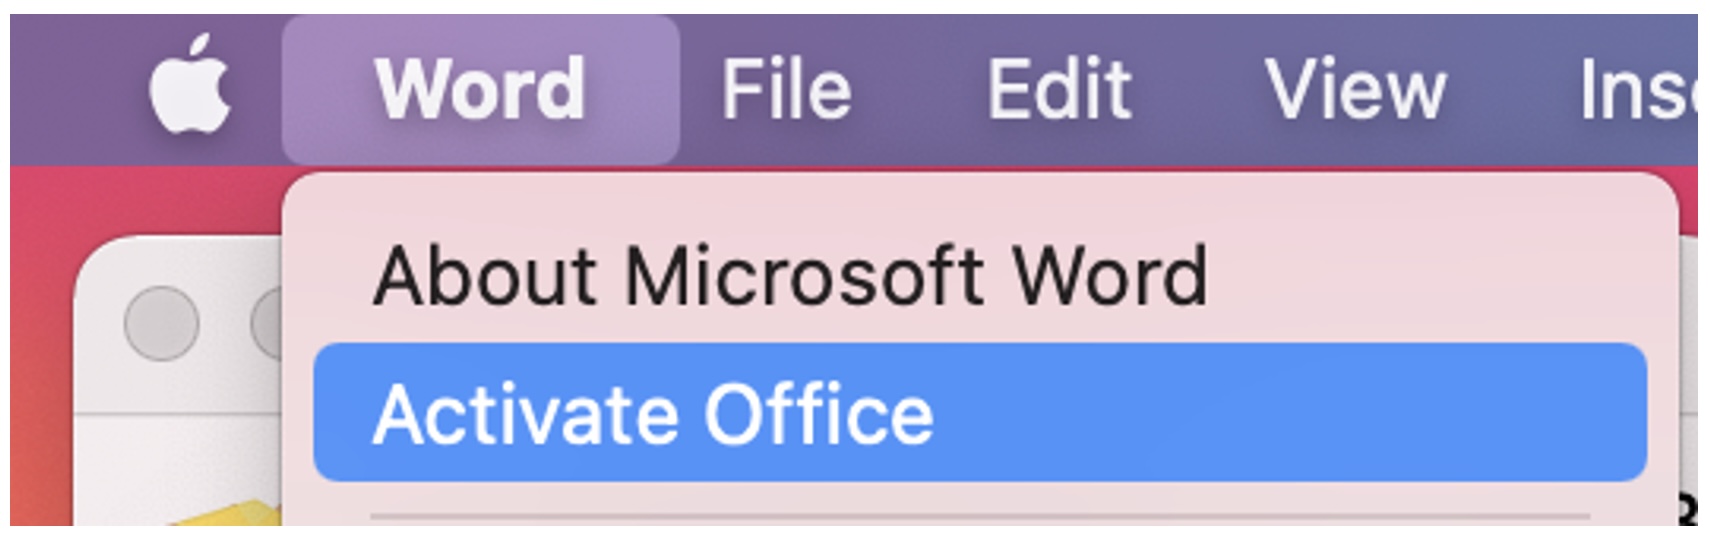
Bring the app into focus, and click on its name on the top bar (in our example Word); from the drop-down list, select Activate Office.
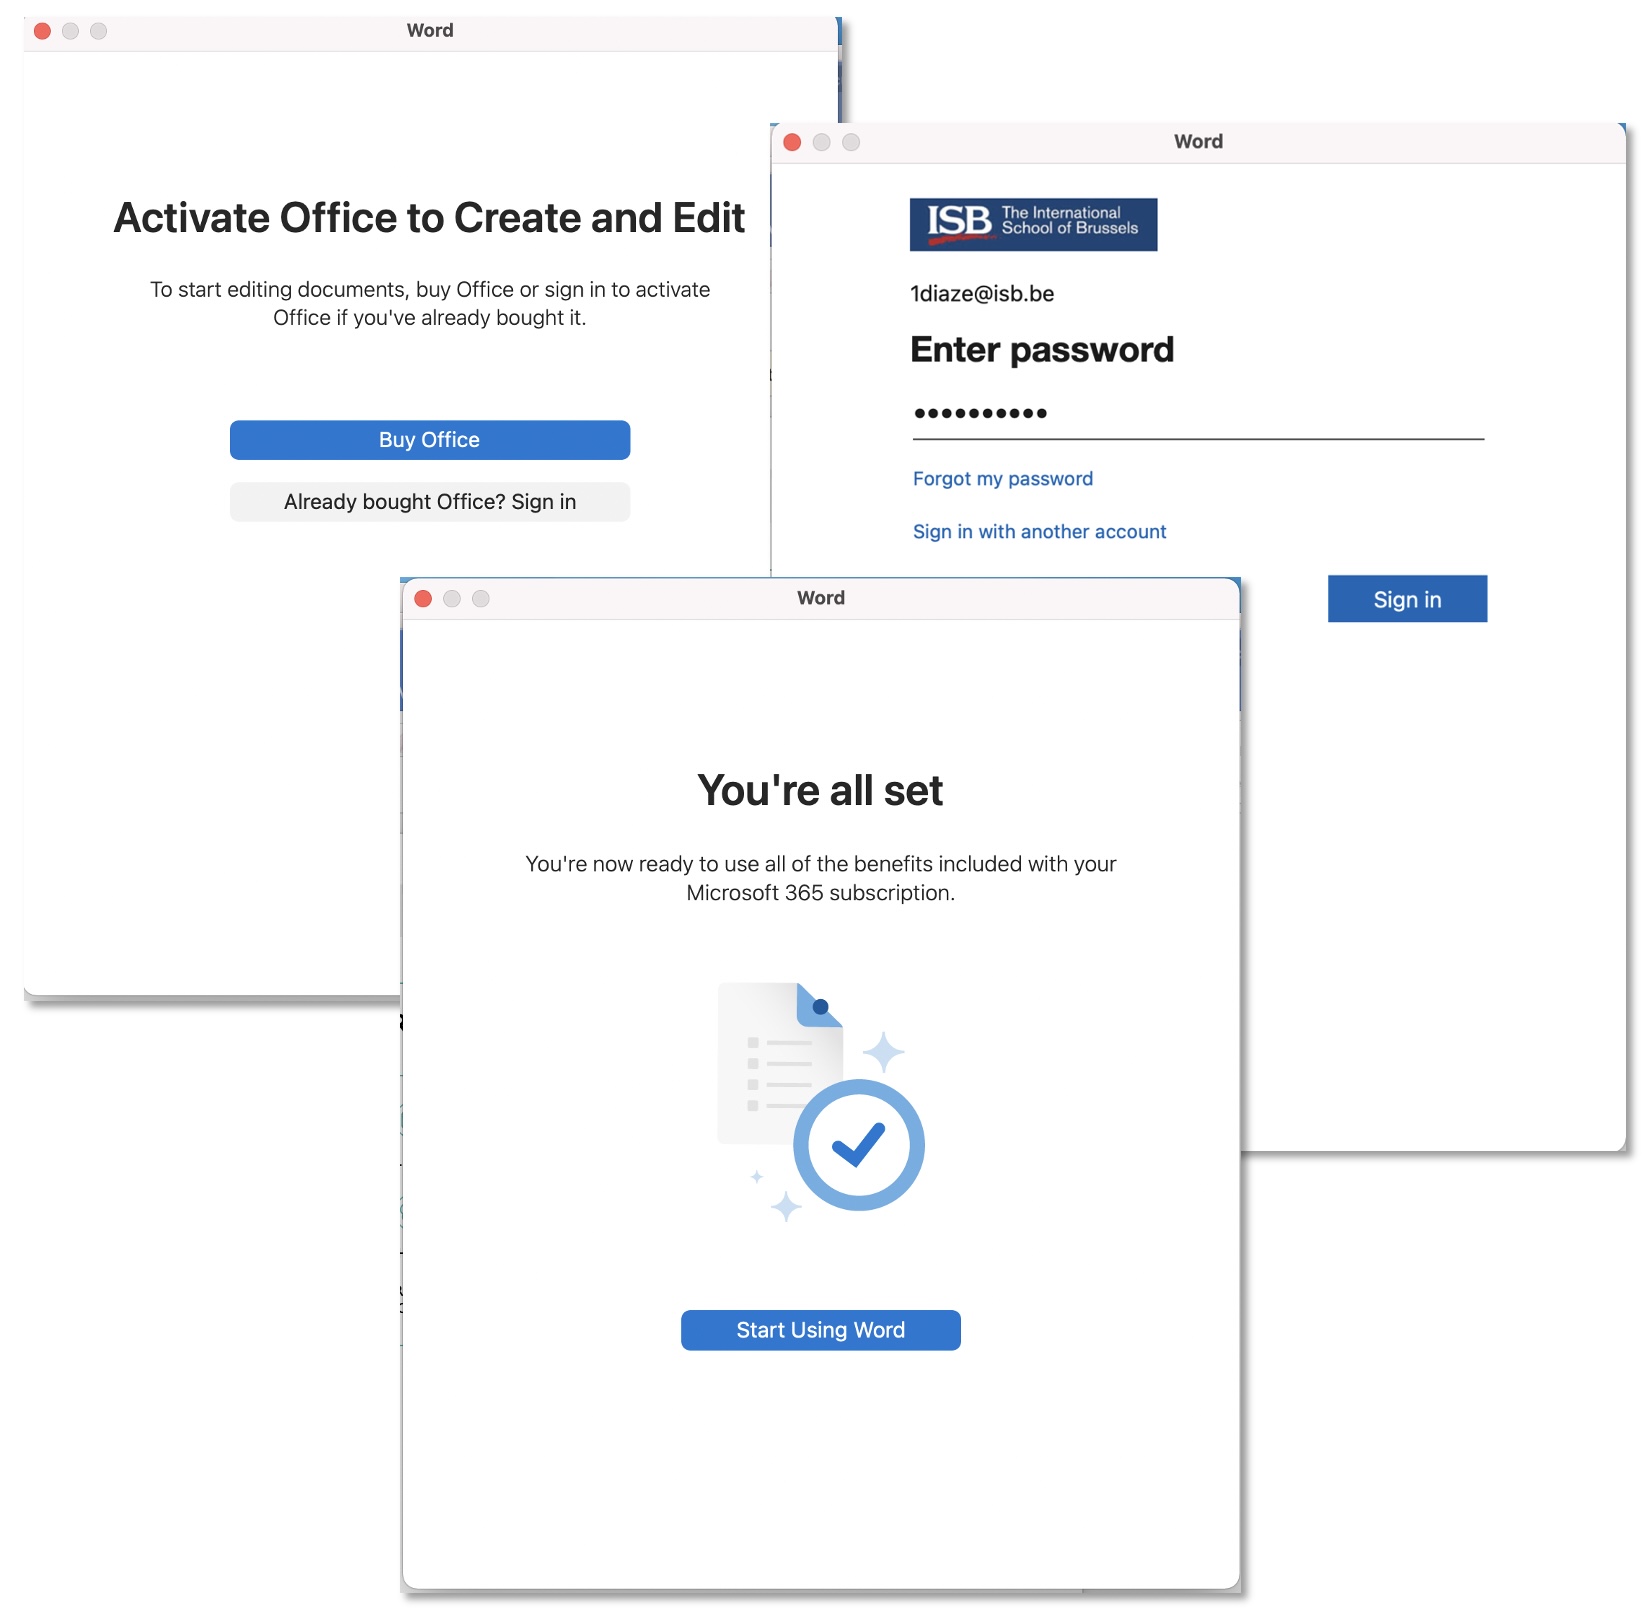
In the window that pops up, select Already bought Office? Enter your password and Sign in. Start Using Word.
Powerschool v21.11 - New Features
ADMIN
New Top Navbar, Manage Profile and Quick Data

Users can personally disable the Quick Data boxes on right by clicking
the cog and unticking the two checkboxes

New Search
Student / Staff / Parents tabs replaced by a single drop-down menu.

Direct field search on commonly used fields

Search term building - search terms build as you enter them and can be removed individually or a new search started with Clear All.

NOTE: this makes the search more like spreadsheet filtering than the previous search behaviour, where a new search would be performed.
Quick Search alphabet is turned off by default - users can enable it
personally via Manage Profile

Live Smart Search - as you type, provides all possible solutions which you can add individually to the current selection or select all by clicking Return

Note: Smart Search is enabled by default - a user can disable it via Manage Profile
Advanced Search moved to drawer on right to separate it and make it easier to see the impact on the current selection
For more information, click the Help ? icon to the right of the search bar.
Parents -> Contacts
Instead of each student having mother/father information ( repeated for each sibling ), parent Contacts are now their own entity. They also have their own Portal accounts ( rather than sharing between a family ), but only if they have specified a valid email address. SSO will be implemented for these Parent Contacts during the summer of 2022.
Now to view the parents of a student, Admin users should not use the
Parents pages, but should instead use the Contacts
screen. This displays the name, email, relationship, main phone number,
address and whether or not the child lives with them ( main/secondary
family ). If the Contact has a Portal account associated with them, Data
Access will be ticked.

POWERTEACHER
Changes in PowerTeacher are just cosmetic and there are no changes in PowerTeacher Pro
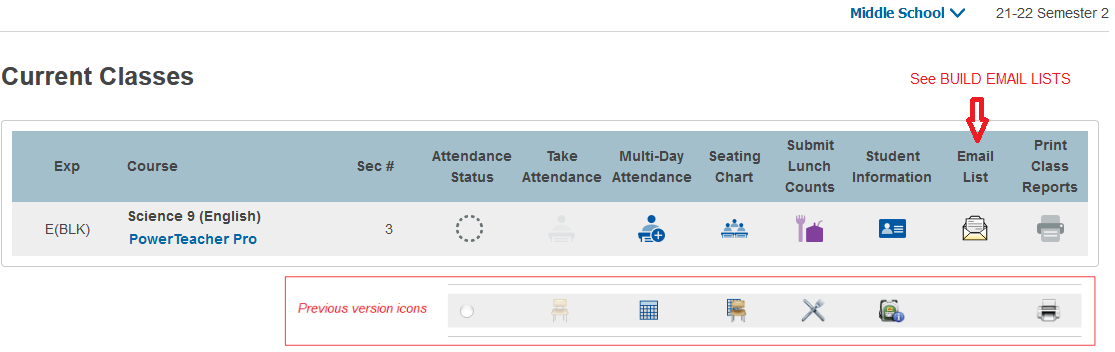
Start Page icons
Manage Profile
There is a new option in Manage Profile to show the course section
number on the Start Page

If set to yes, the section number column appears in the Current Classes list

BUILD EMAIL LISTS
There is a slight change to the way you can build email lists of
students and/or parents to copy/paste into an email.
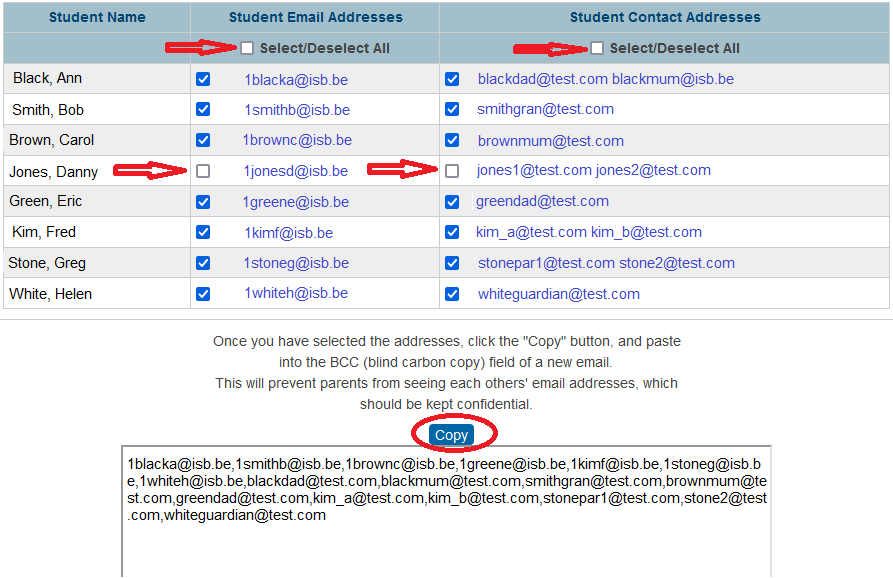
First use the Select/Deselect toggle to select all students and/or Student Contact Addresses (parents). Optionally, you can then remove any single email items you don't require in the list. The list at the bottom will change dynamically depending on your selections. Once complete, click the Copy button to copy to your clipboard for pasting into your email.
In the Admin Portal, this can be invoked as before, using group function Build Email Lists.
In the Teacher Portal, it can be invoked directly from the new Email List icon on the Start Page - all students in all your classes will be available to select from. Alternatively you can select Student Information for a single class and select the Email Addresses menu link.
It is not currently possible to generate these email lists from PowerTeacher Pro.
Mac - Install Software - Self Service
Self Service is a software distribution platform from where you can install apps on Mac machines.
Please search and open the Self Service portal using the Magnifying Glass in the upper-right corner. Find the app that you need in the list, and click on install.
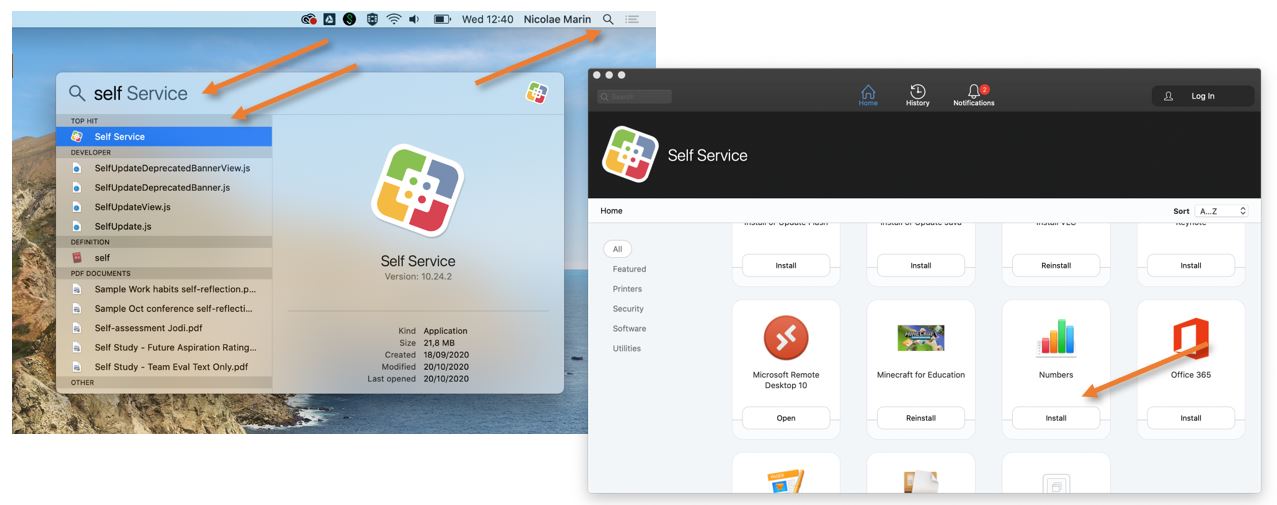
The list of applications is constantly being updated. We are trying to add all the usually requested apps. If what you want/need to install is missing from the list, please let us know by sending an email @ IThelpdesk@isb.be, and, if possible, we will make it available for you in the Self Service portal.
Depending on the application, the installation can take between one and 30 minutes. When done, the Install button usually changes to Reinstall. To start the installed application, search for it as you did with the Self Service.
Advanced Math/Equations symbols
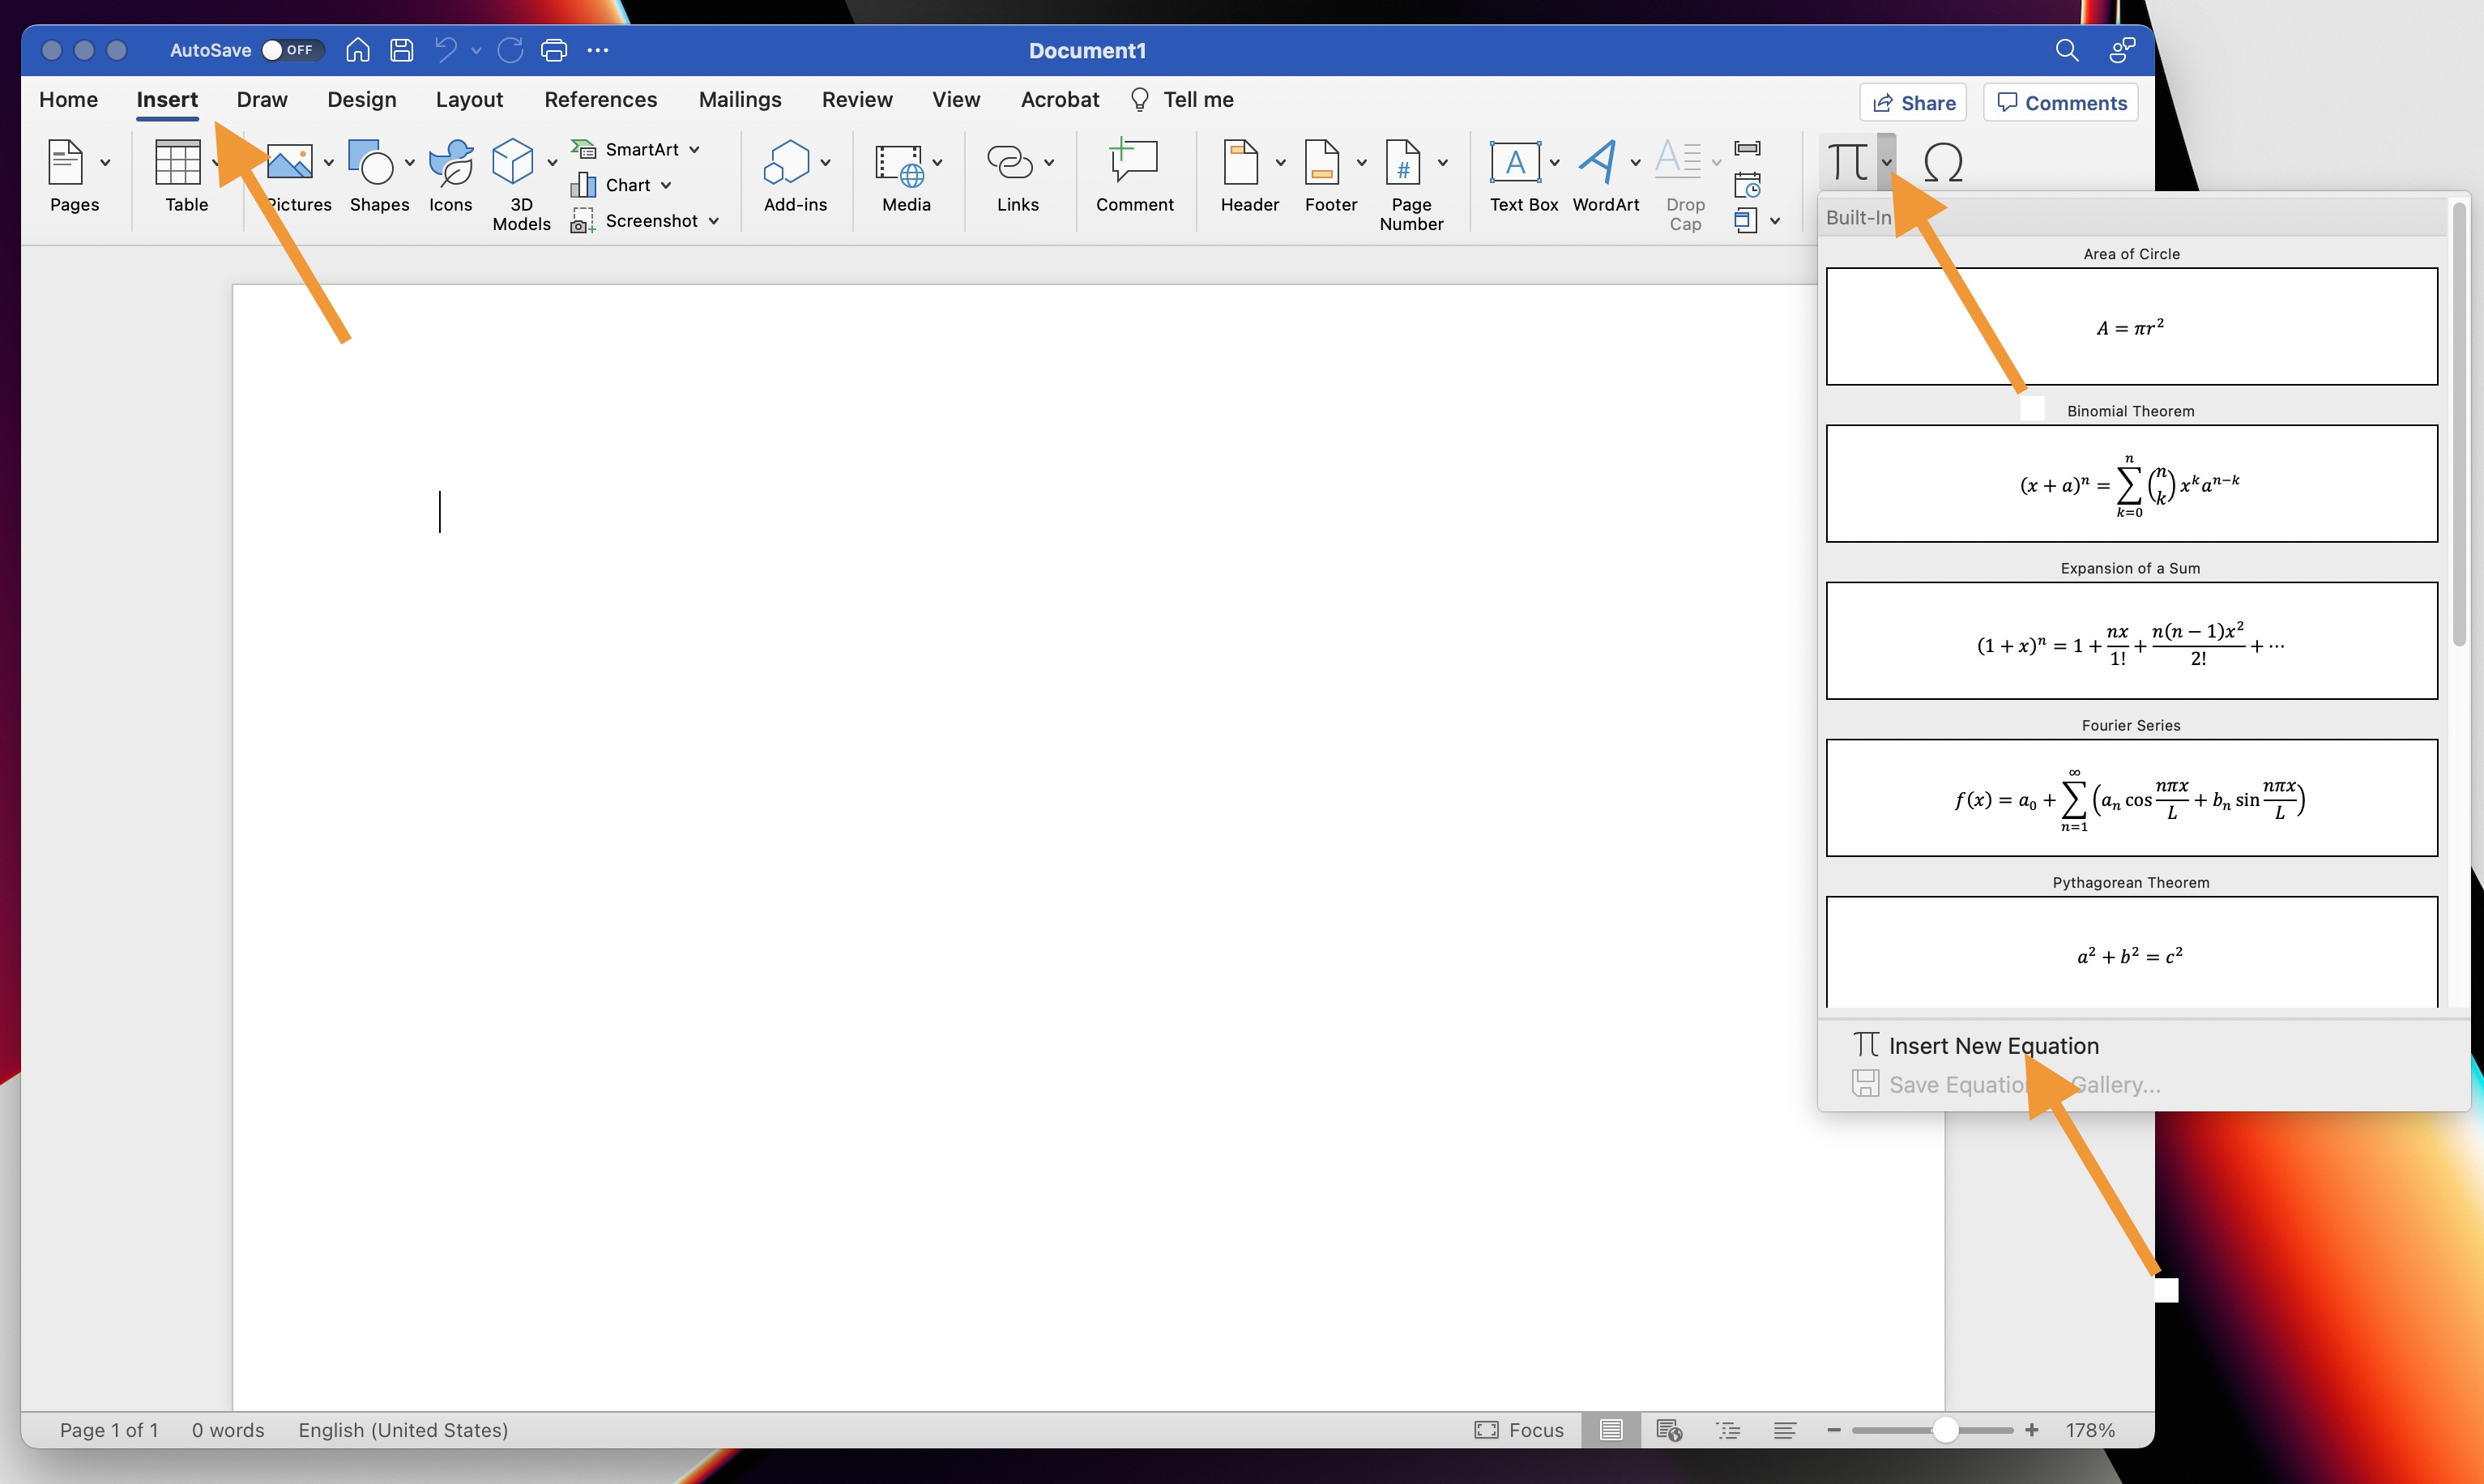
For now, Math Type cannot be activated on Macs, but Word has its own equation creator/editor.
Windows - Install Software - Company Portal
The company portal is a distribution platform from where you can install software on Windows machines yourself.
To install an app, please open company portal, find and select the software you need in the Store or Available Everywhere category, and click on install.
The list of applications is constantly being updated. We are trying to add all the usually requested apps. If what you want/need to install is missing from the list, please let us know by sending an email @ IThelpdesk@isb.be, and, if possible, we will either make it available for you in Software Center or install it remotely.
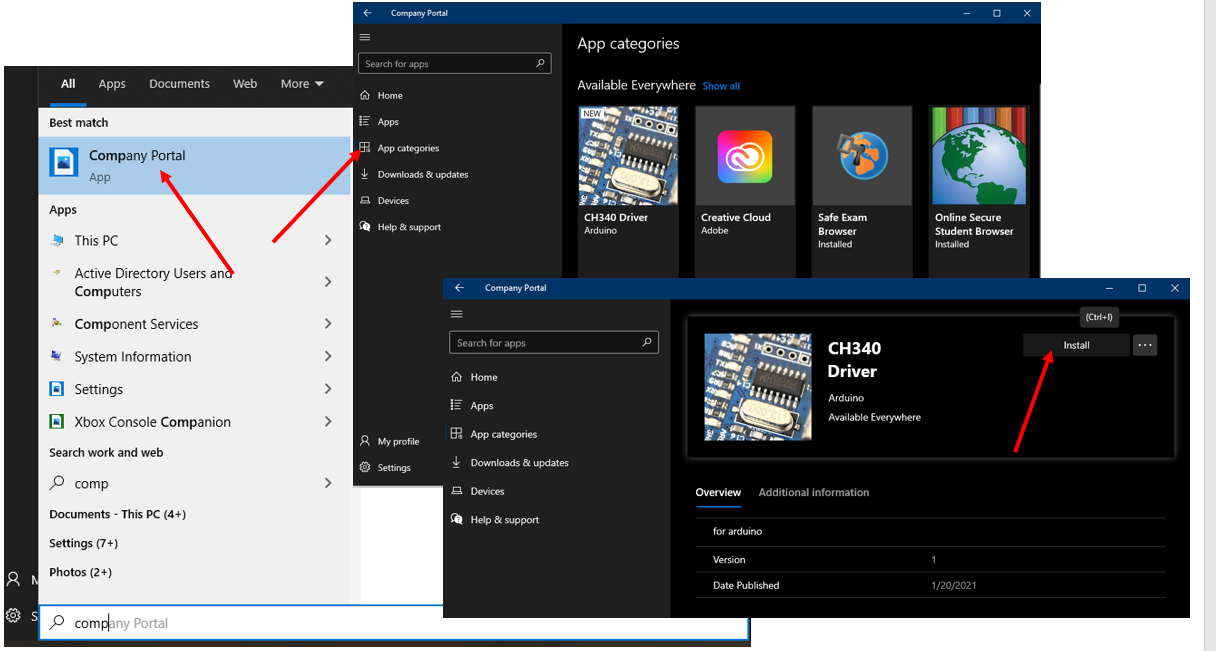
Depending on the application, the installation can take between one and 30 minutes. When done, the Install button usually changes to Reinstall. To start the installed application, search for it as you did with the Company Portal.
Phones and Voicemail
Wildix Chrome Extension and Portal Login
To access, set up, and manage the extra capabilities of our phone system, please start by installing the Wildix Collaboration Chrome Extension and log in.
(While logged in, you can answer all your extension calls from your PC.)
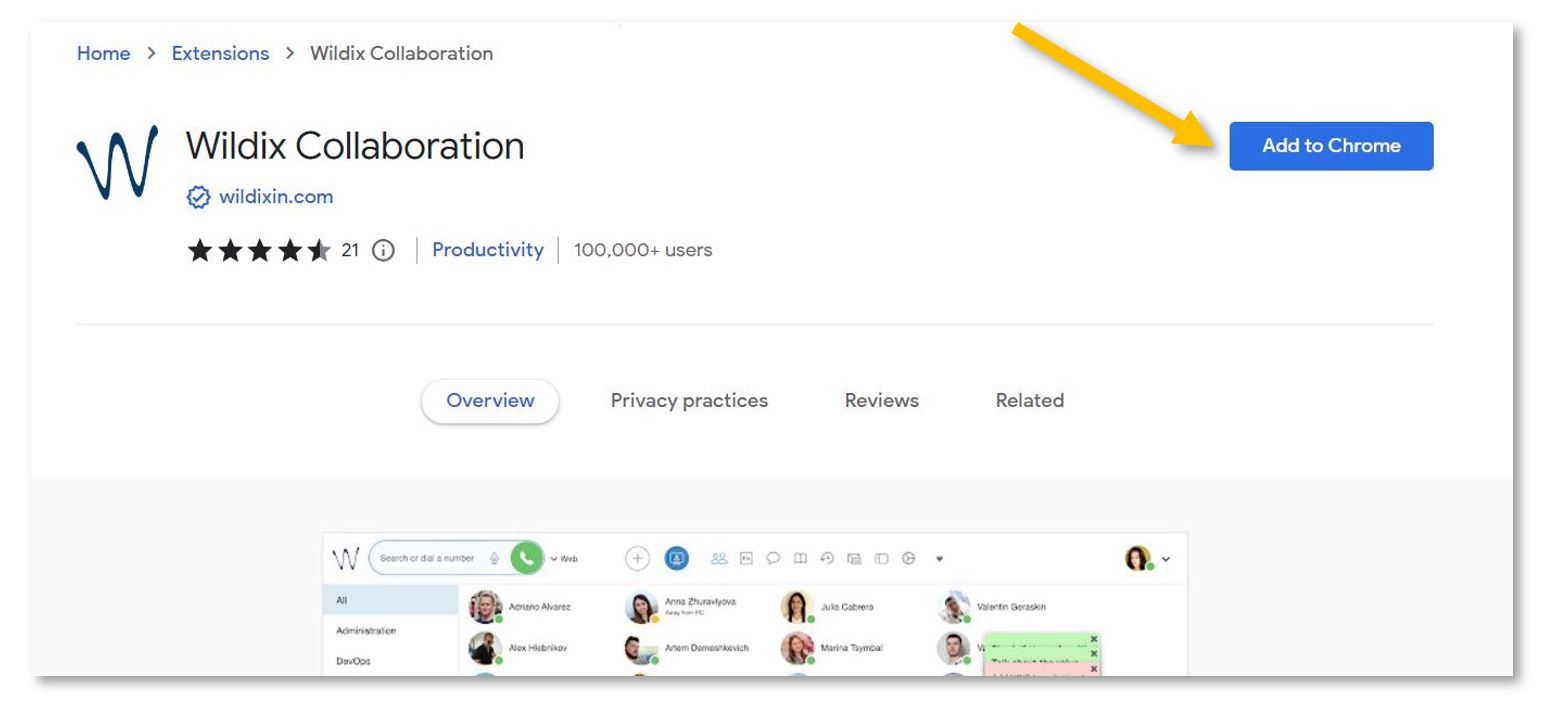
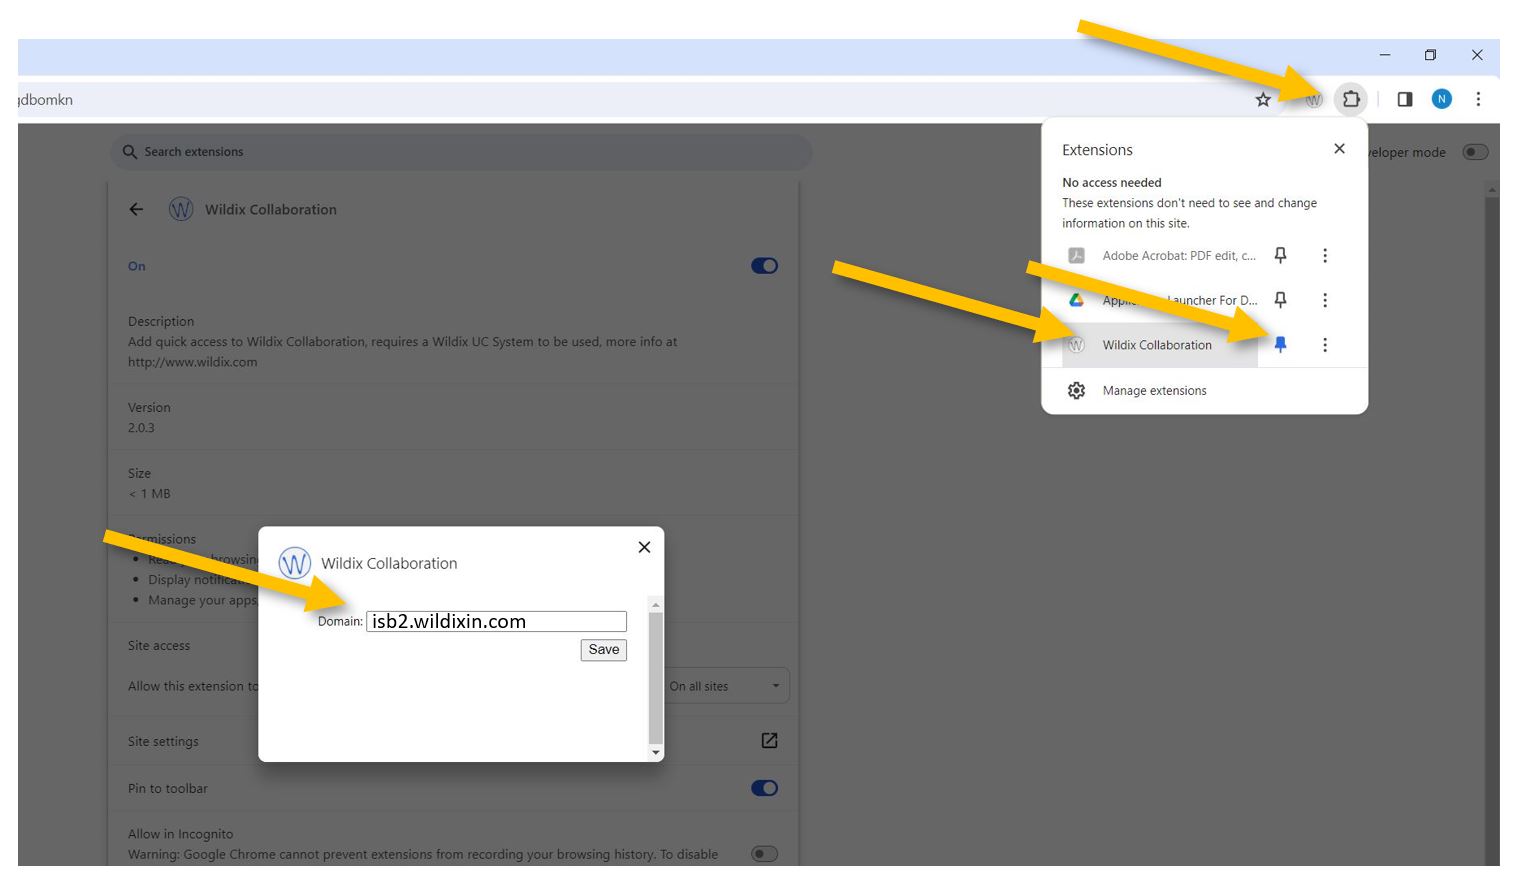
Next, click on the puzzle piece in the upper-right Chrome corner, pin, and select the Wildix extension. In the new pop-up window, under Domain, please insert isb2.wildixin.com and Save.
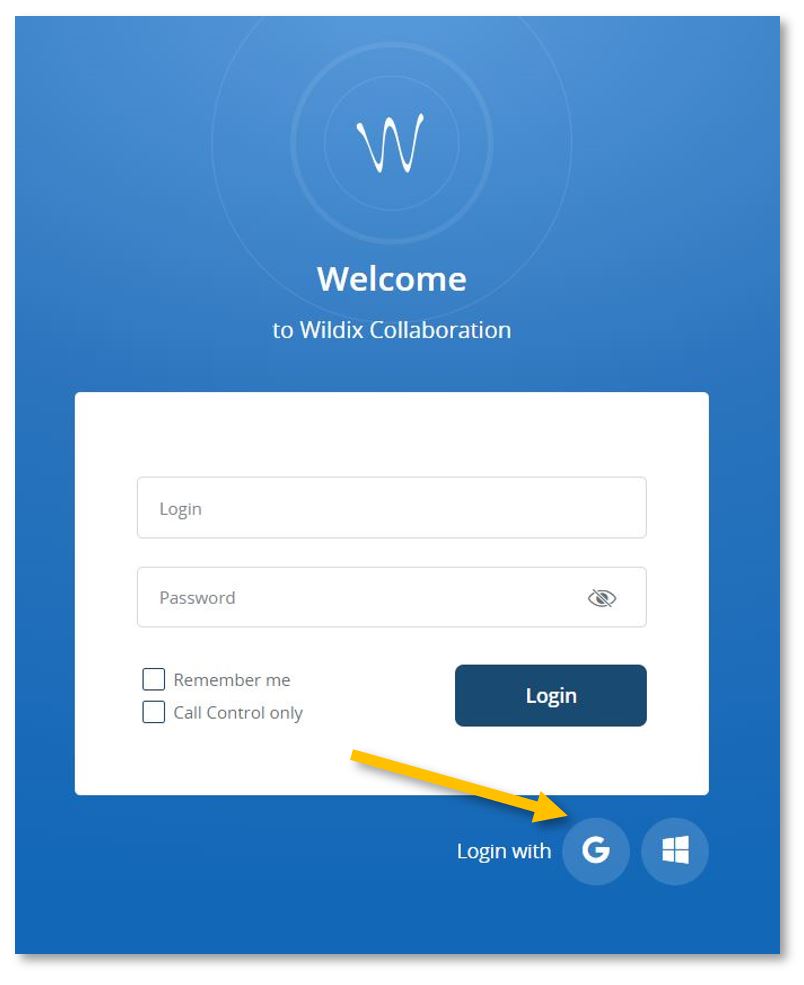
Chrome will automatically open https://isb2.wildixin.com/authorization/. Please log in using the Google or Microsoft buttons.
You are now ready to go. While logged in, you can answer your extension calls from your computer - a pop-up will appear on the screen.
If your microphone or sound does not work correctly, you can test and change the options by going into Settings and the Web Phone menu that can be found in the left panel.
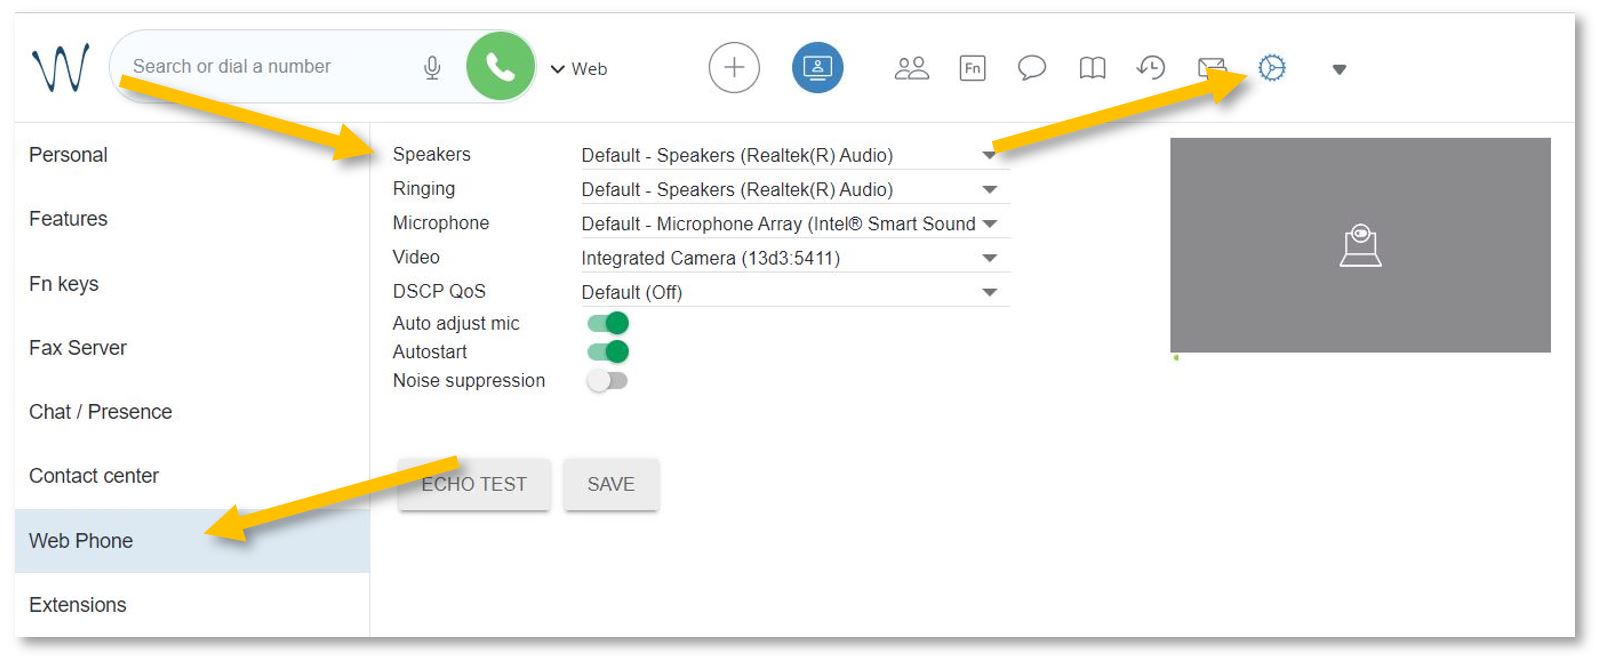
If you close the portal, you can reopen it by clicking on the Wildix extension or by following this link.
From the portal, you can:
-
- Forward calls to your mobile phone – immediately, after a while, etc.
- Forward calls to your replacement – when on leave or at a different desk.
- Redirect calls to your voicemail when you cannot answer, in a meeting, etc.
- Setup the function keys (speed dial) for fast calling.
- Send a fax.
- See the ISB telephone list (phonebook) – search for and call any of the users/extensions.
- See the history of your calls / missed calls.
- Listen/manage/download your voicemails.
- Call any of the ISB extensions from your mobile phone. Check your missed calls, voicemails, and the ISB telephone list.
Forward calls to your mobile
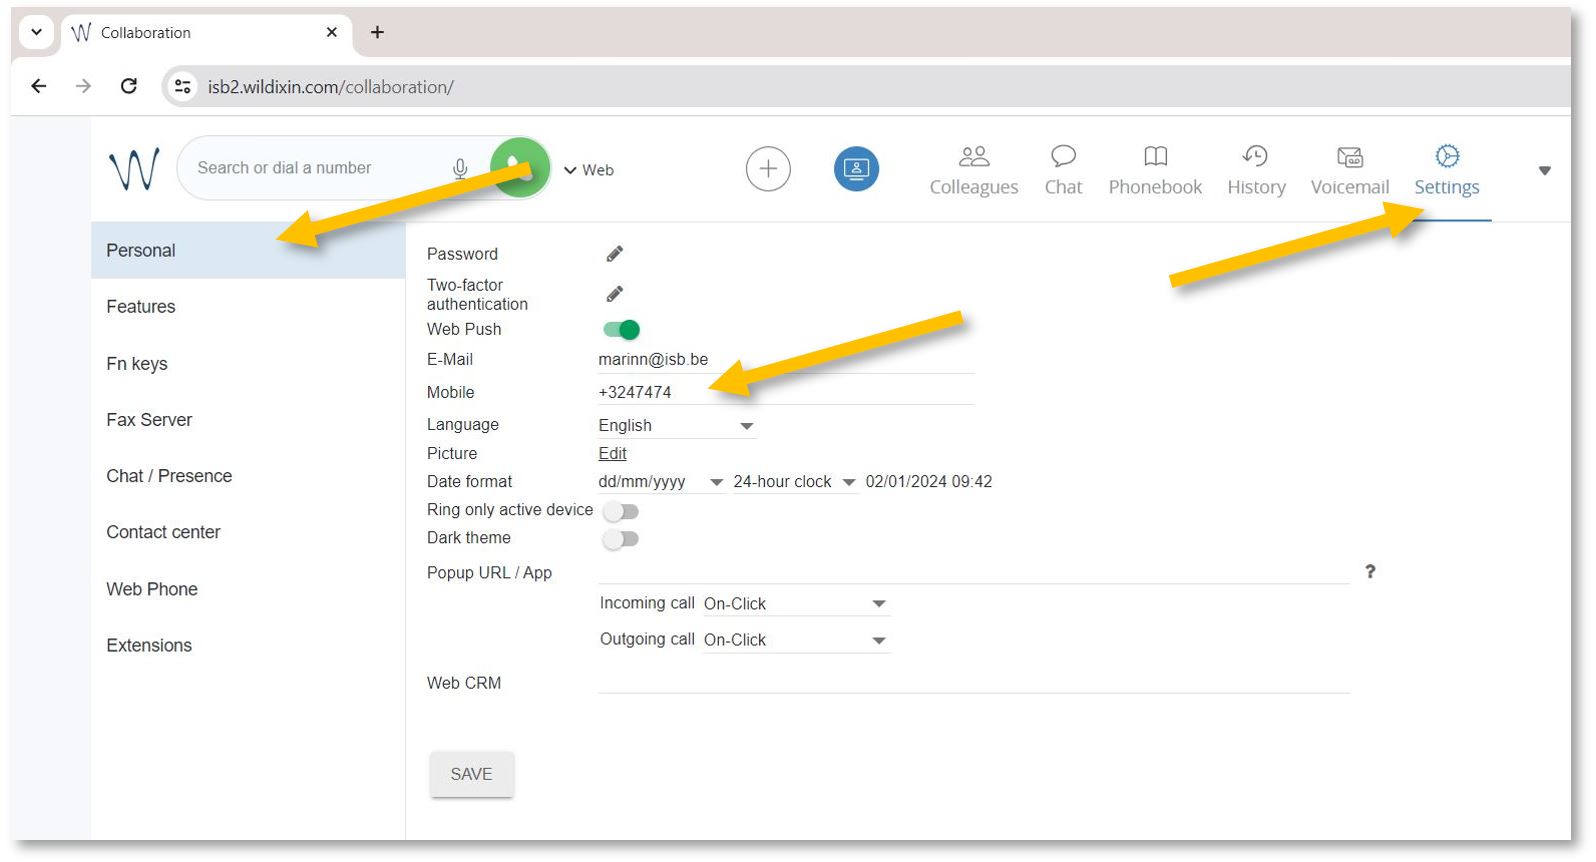
To activate the forwarding function, open https://isb2.wildixin.com/collaboration/ login and go to Settings.
Under Personal, add your mobile phone. +32 format
Then select the Features tab and activate the Enable mobility with timeout. In the example underneath, the default (10) was changed to 2, meaning that after 2 seconds, the mobile phone and the computer (if logged in to Wildix) will also ring.
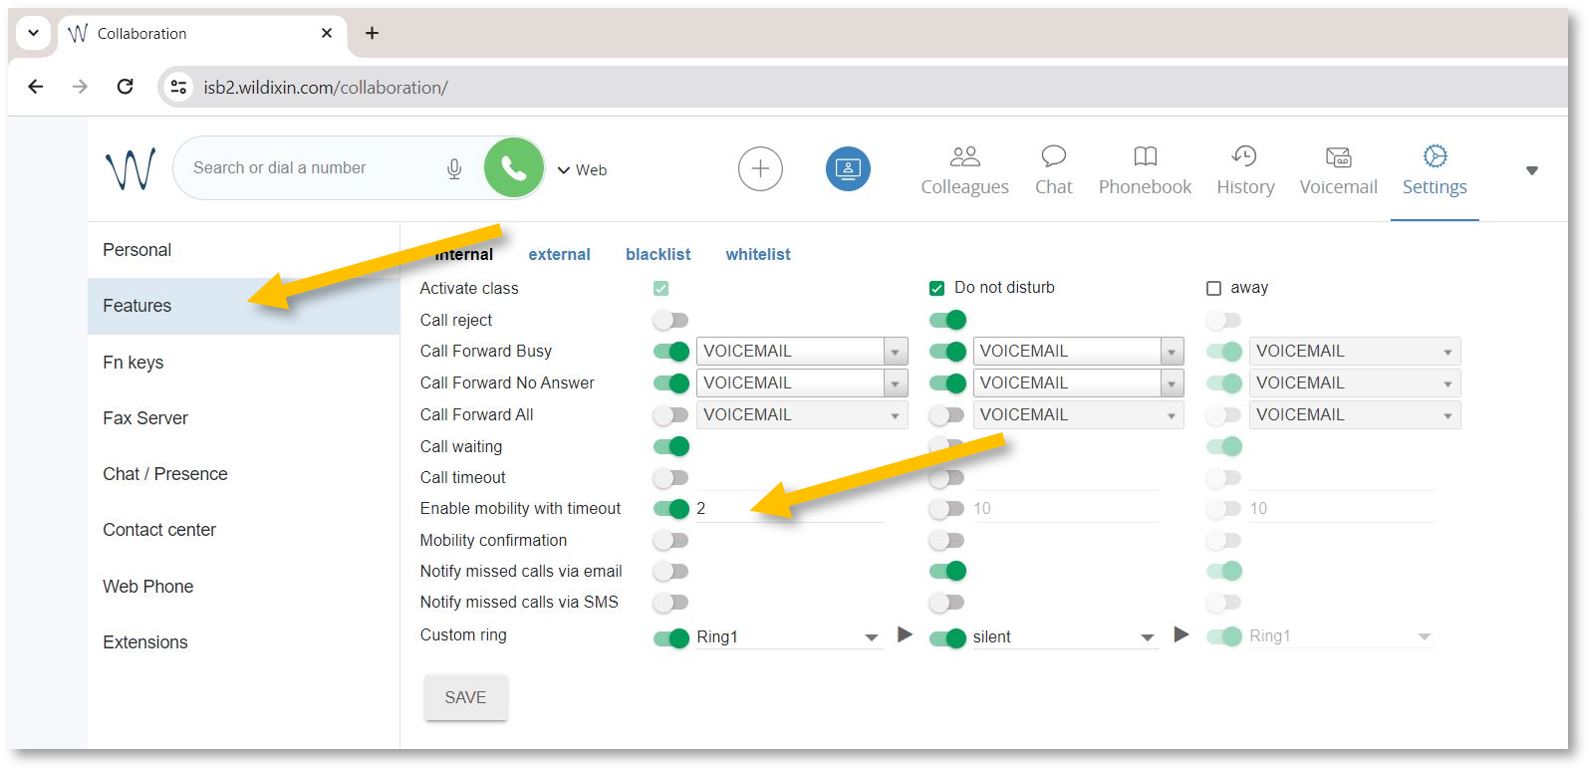
If you want to forward external calls - please click on external, Activate calls, and Enable mobility as above - or as needed.

You are now ready to go.
Forward calls when away
To forward calls to another extension, your mobile phone, or your voicemail.
To activate the forwarding function while away from your office or on vacation, open https://isb2.wildixin.com/collaboration/ login and go to settings.
Select the Features tab and activate the away class. Make sure that Call reject is off, turn on Call Forward All, and choose the destination. If Voicemail is selected, everybody who calls will be redirected to your voicemail; input an extension or even your mobile phone, and all your calls will be forwarded to it. Do not forget to press Save.
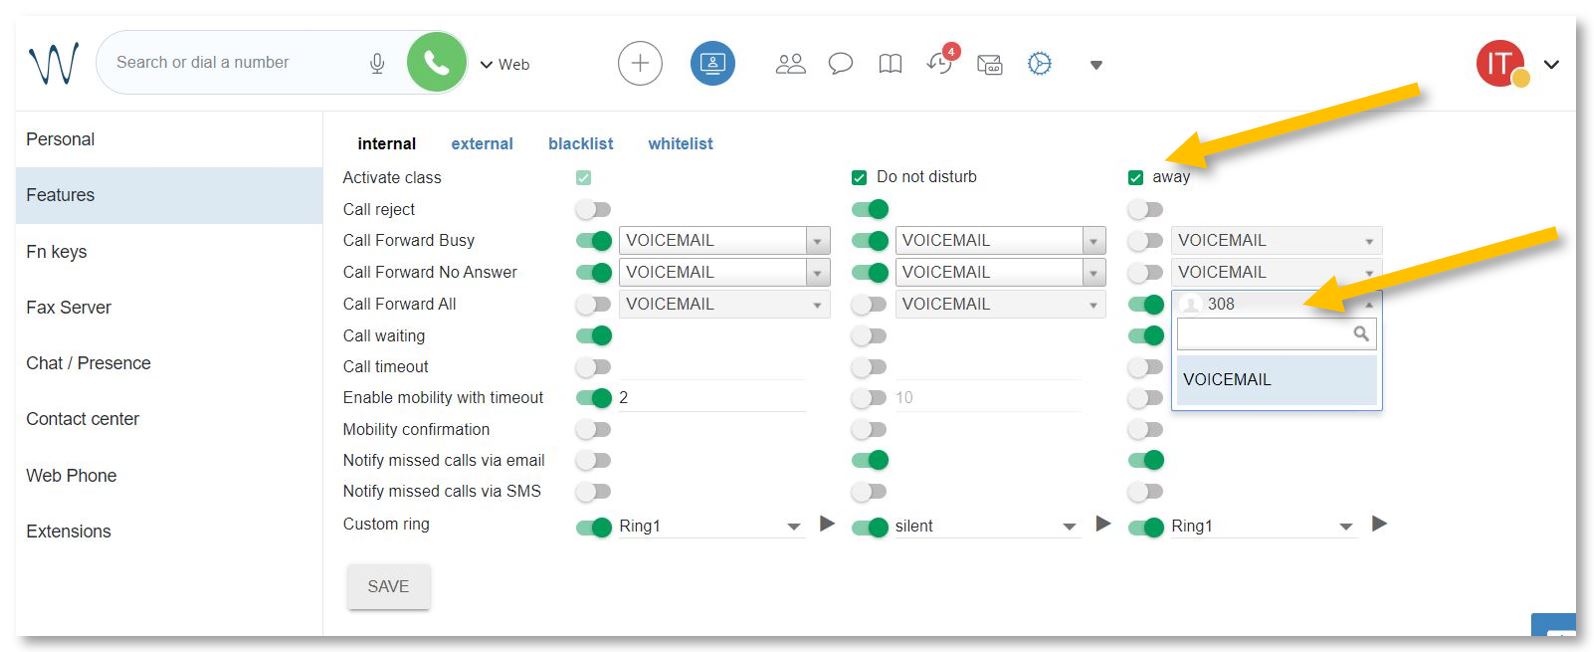
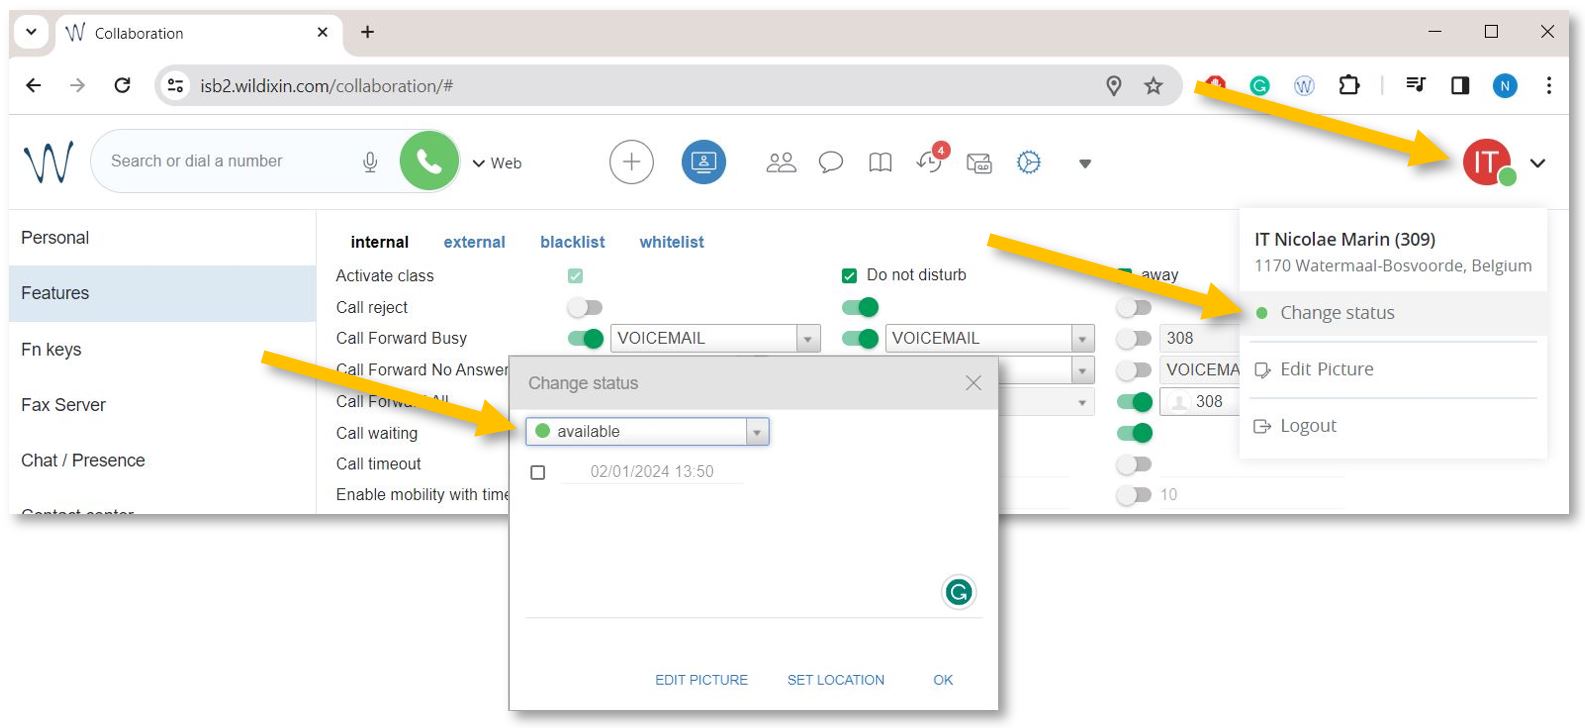
Important step. Change your status to away to activate the new settings.
Click on your account bubble in the upper right and select Change Status. In the pop-up window, change your status to away. Press OK. You can also set up the end date and your status and settings will change automatically back to available.
Redirect calls to your voicemail
To activate the forwarding function while away from your office or on vacation, open https://isb2.wildixin.com/collaboration/ login and go to settings.
Select the Features tab on the left and activate the Do not disturb class. Make sure that Call reject is off and turn on Call Forward All - Voicemail should be the default destination. Do not forget to press Save.
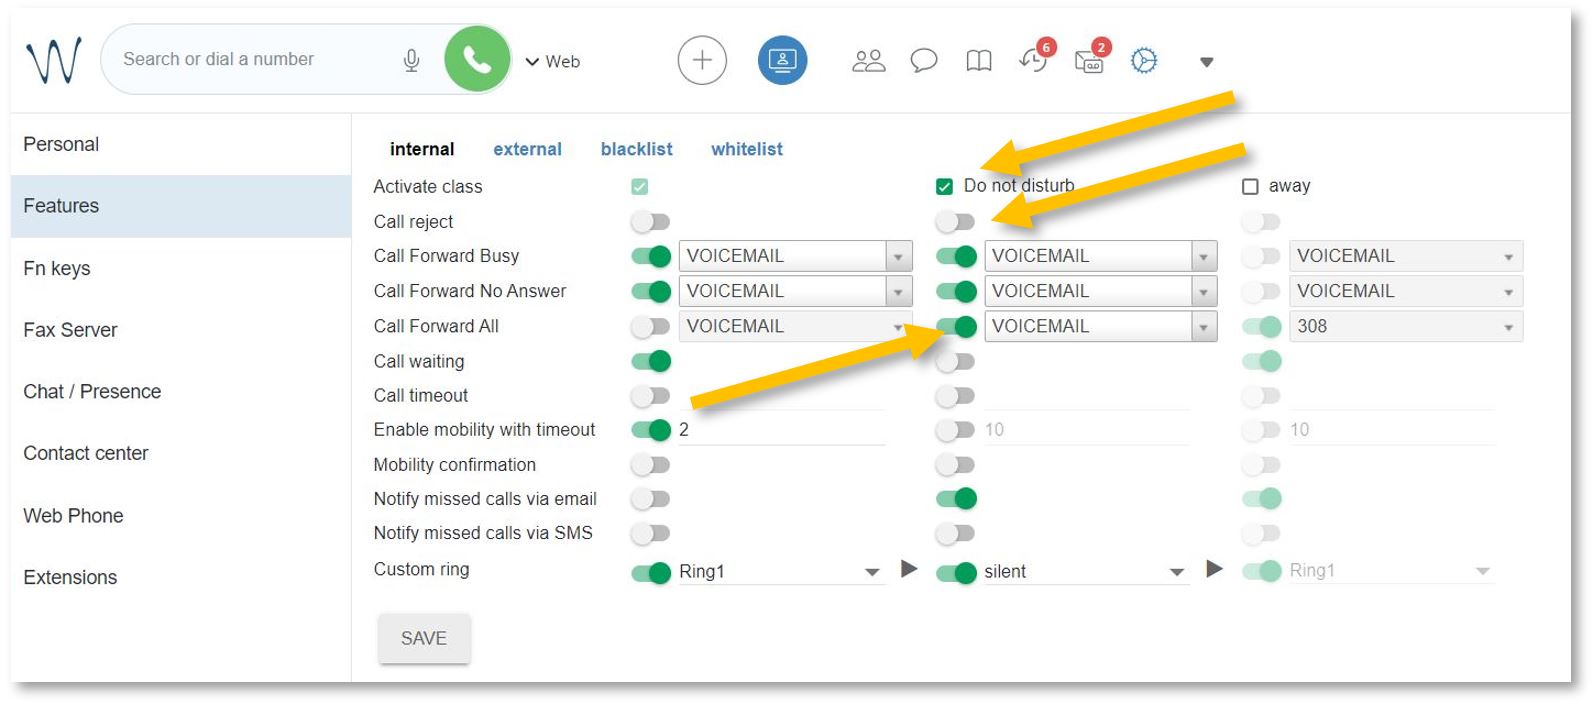
Important step. Change your status to Do not disturb to activate the new settings.
Click on your account bubble in the upper right and select Change status. In the pop-up window, change your status to do not disturb. Press OK.
Click here to learn how to listen to, manage, and/or set up your voicemail.
Voicemail (listen, delete, save, etc.)
You can listen to, delete, sort, save, and forward your voicemails by logging into https://isb2.wildixin.com/collaboration/ and accessing the Voicemail tab or using the landline phone. Recording your unavailable or busy message is only possible using the landline.
(Please scroll down if you want to manage your voicemail via the web interface.)
On the phone, dial *81 to reach the Voicemail menu.
1. Press 1 to listen to your messages.
After listening to your messages, you can press 1 again to reply or
You can press 2 to hear the phone number that left the message and the time and date the message was left.
Press 3 for advanced options.
Press 5 to repeat the current message.
Press 6 to listen to the next message.
Press 7 to delete the current message.
Press 8 to forward the message to another user.
Press 9 to save the message.
Press # to exit.
2. Press 2 to move the saved messages into folders
3. Press 3 for advanced options
Press 5 to send a voicemail message
4. Press 0 for mailbox options
Press 1 to record your unavailable message - what people hear when you do not answer the phone before the bip.
Press 2 to record your busy message - what people hear when you are on the phone and cannot pick up before the bip.
Press 3 to record your name - if you do not want to record an unavailable or busy message, the operator can add your name to the automated greetings.
______________________________________________________________
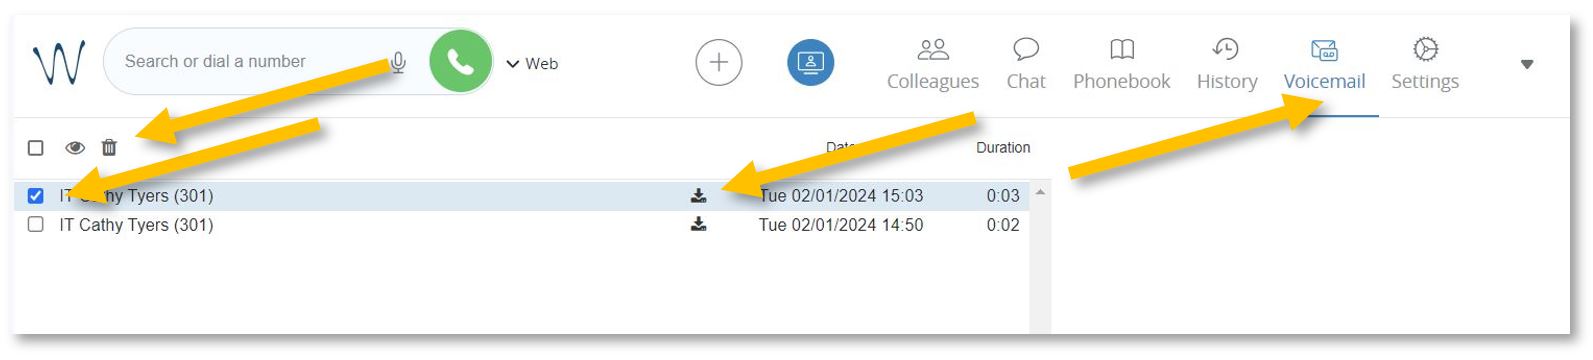
If you want to use the web interface to manage, listen to, delete, or forward your voicemails, please go to https://isb2.wildixin.com/collaboration/, log in, and select the Voicemail tab.
You can select a message to delete it or download it to listen to it, archive it, or forward it to an email.
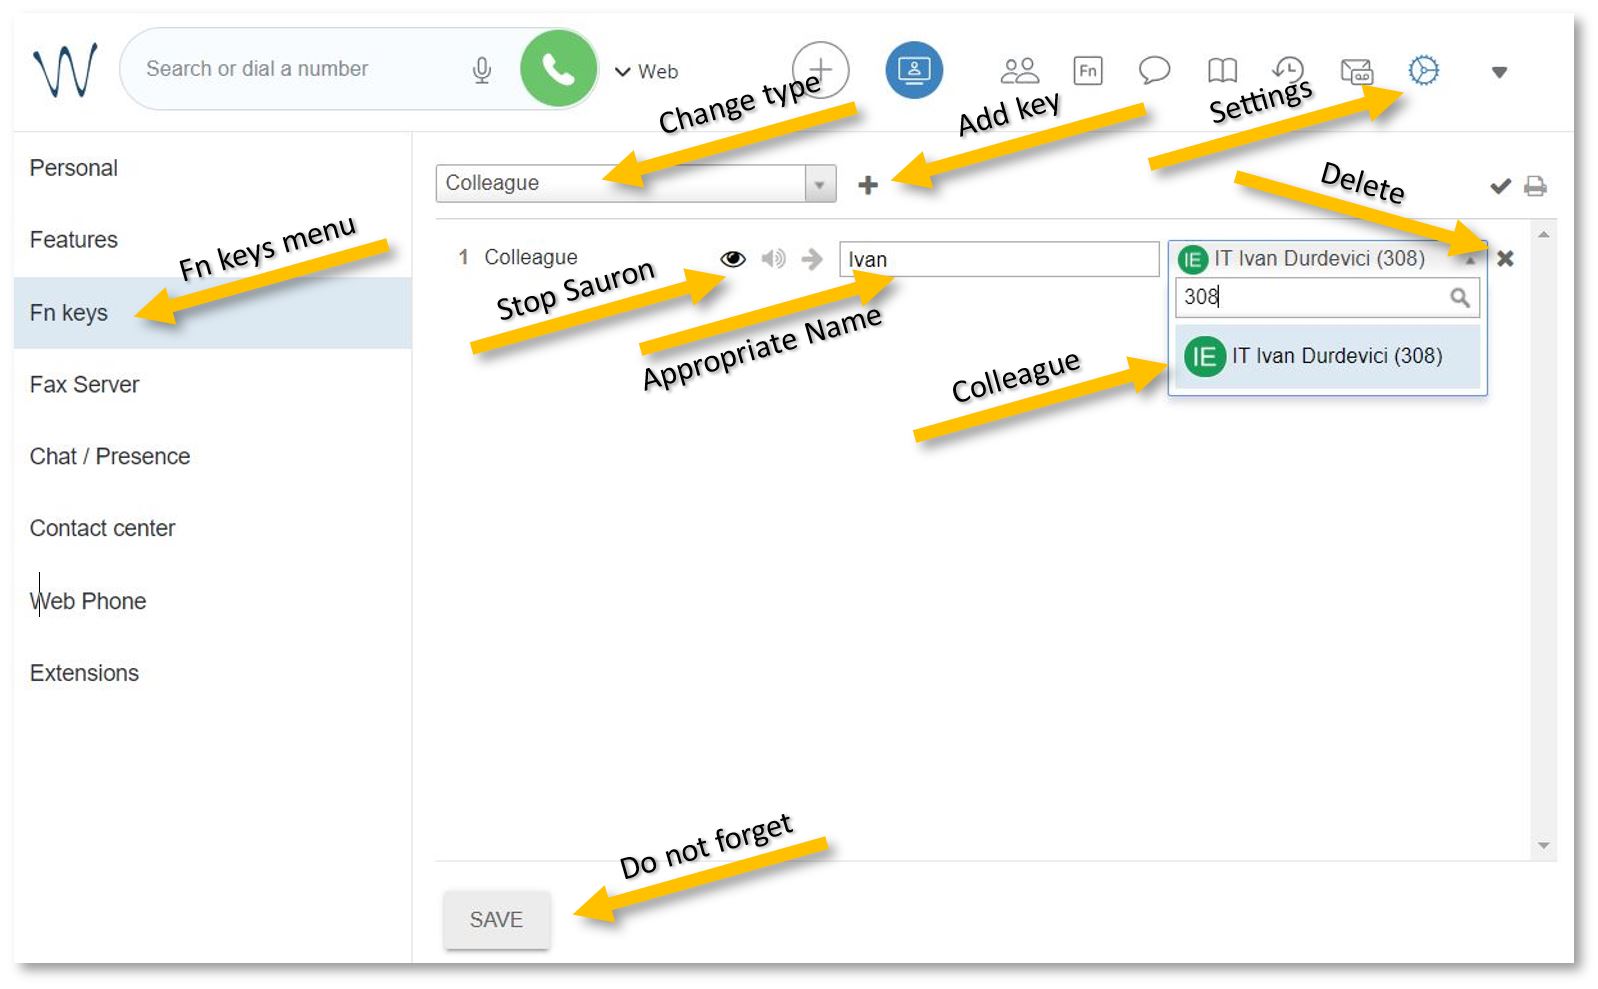
Setup the function keys (speed dial)
To configure the white buttons adjacent to the phone screen, open https://isb2.wildixin.com/collaboration/ login and go to Settings. Select the Fn keys menu from the left-hand side.
You can remove Lines 1 and 2 - the default setup - and add a Colleague.
Change the type of function to Colleague, add an appropriate name (it will be visible on the phone), and search by name or input the extension. Do not forget to click on the eye to stop the notifications from popping up whenever your colleague is on a call and press Save at the end.
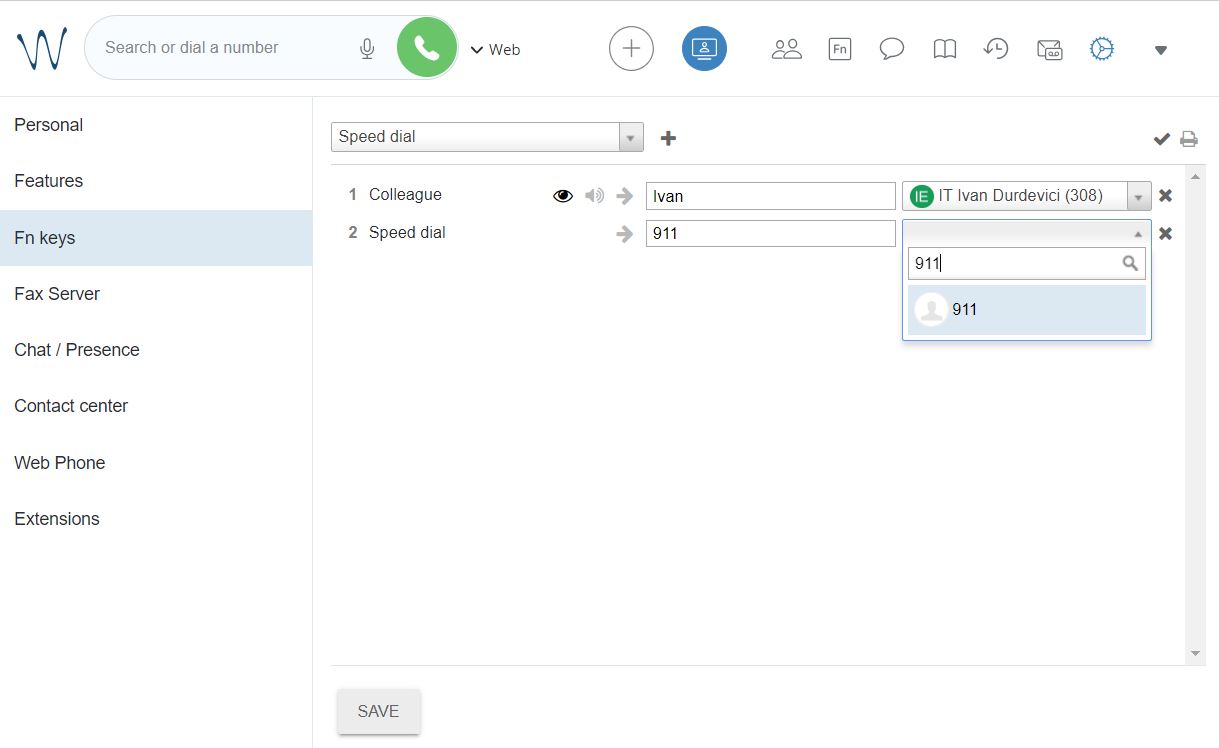
If you want to add a non-colleague phone number, change the type to Speed dial and add an appropriate name and the number. Do not forget to press Save.
Send a fax
If you need to send a fax, open https://isb2.wildixin.com/collaboration/ login and click on the big + bubble. Select Send Fax.
In the pop-up window, insert the fax number in +32 format, choose the file you want to send (pdf format), and press the send icon.
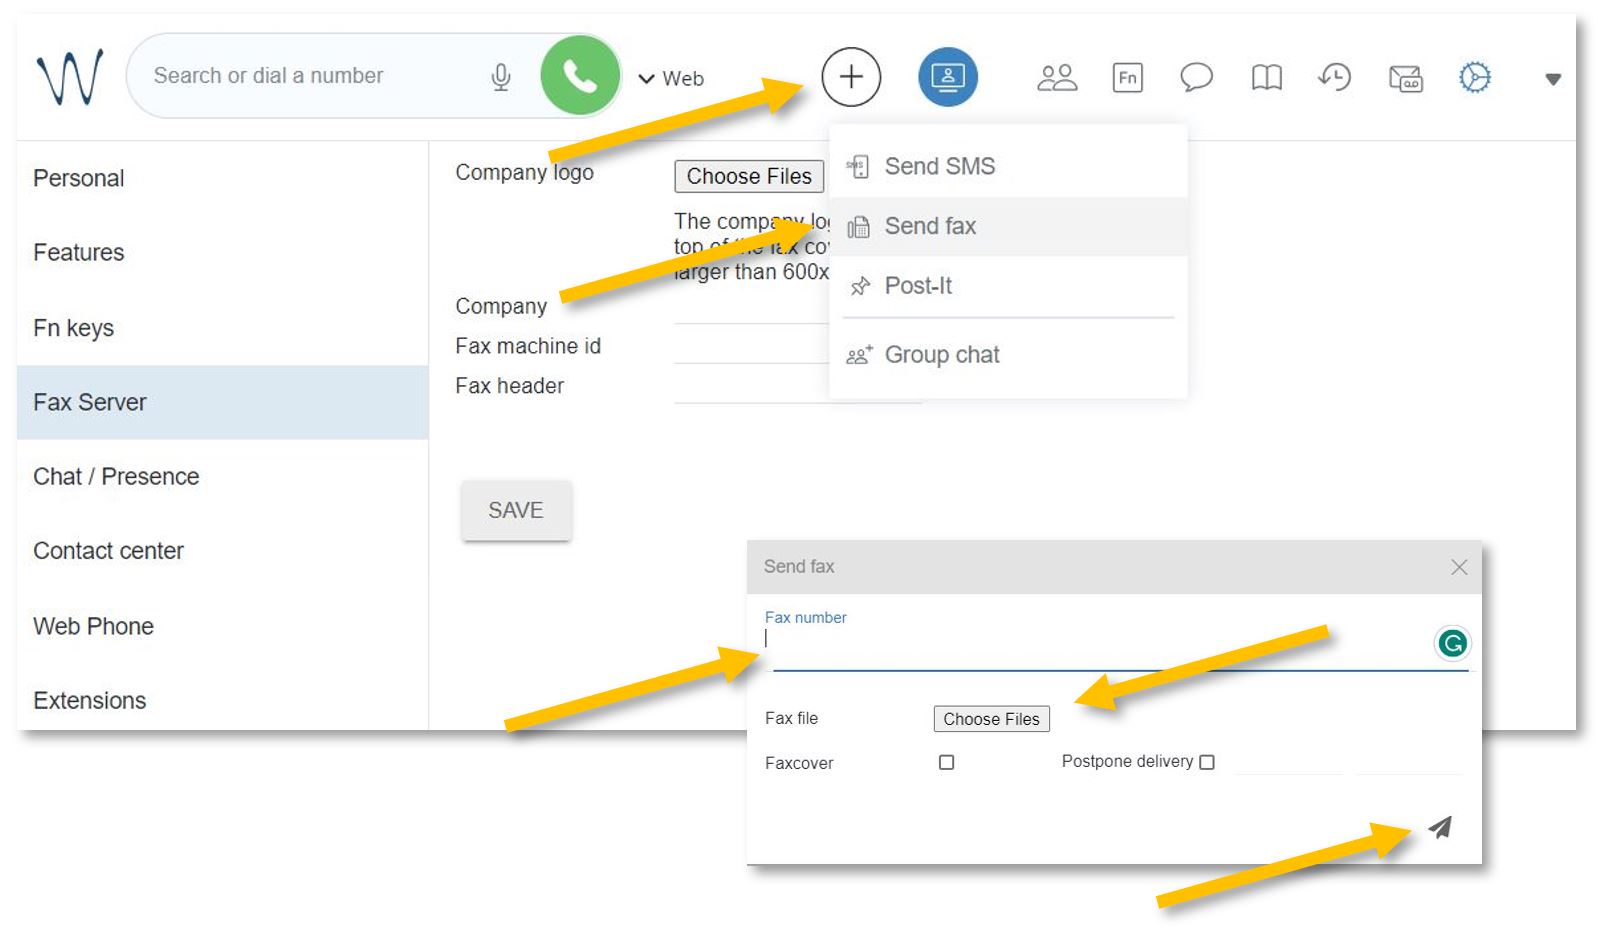
You will receive a confirmation email with your attachment and a full report.
_____________________________________
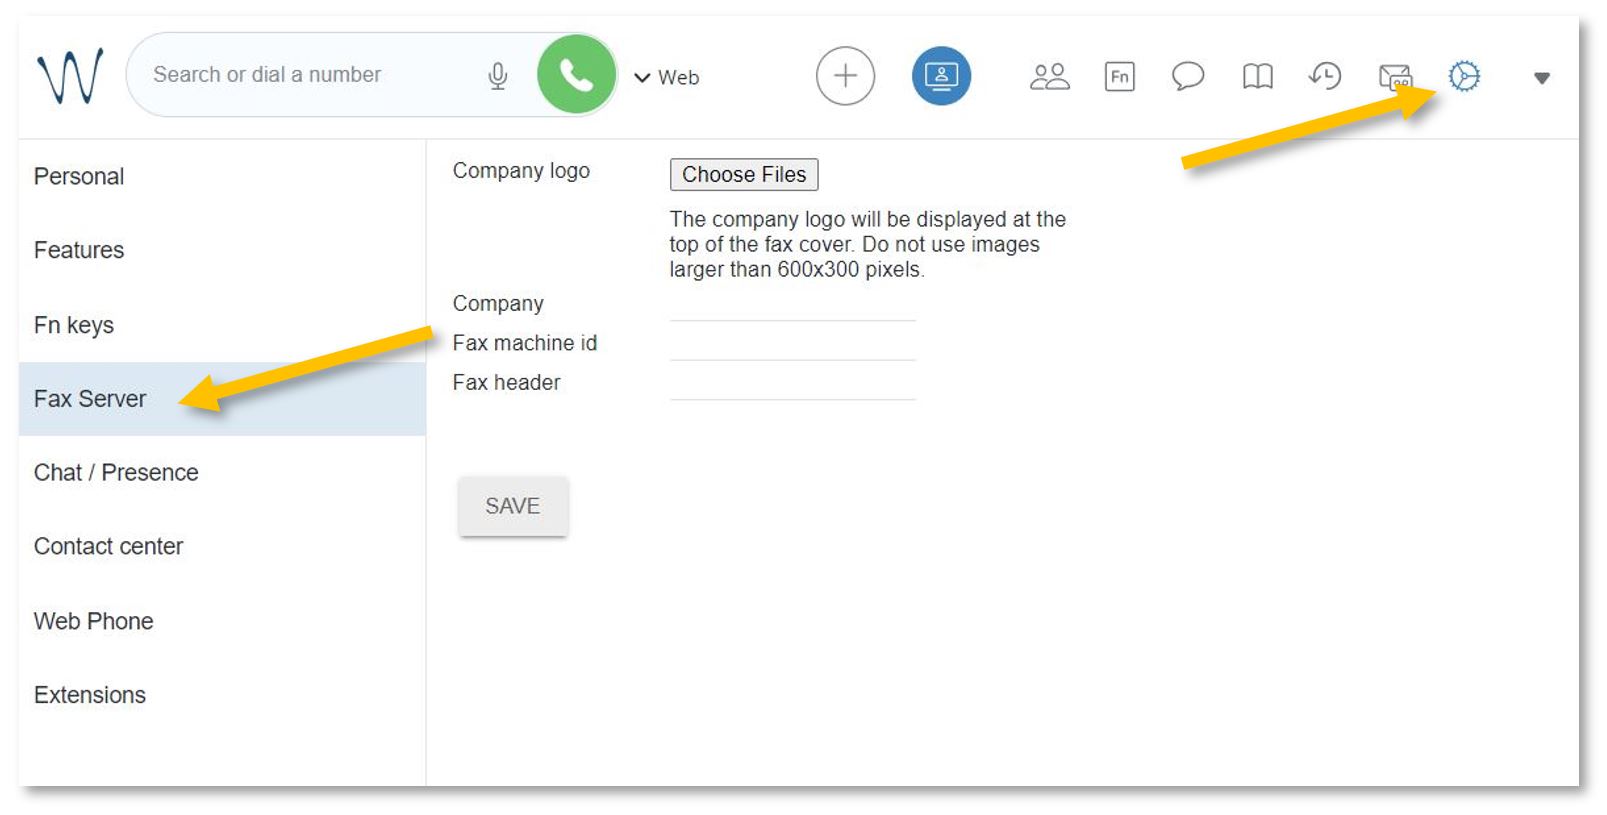
To set up a Faxcover, please go to Settings and select the Fax Server menu from the left panel.
Add the ISB logo and name;
Under Fax machine id, you can add the school's fax number, +3226614200;
Under Fax header, you can add your name or other important data relevant to the receiver.
Do not forget to press Save.
See the ISB telephone list
To search for and call any of the users/extensions.
Open https://isb2.wildixin.com/collaboration/ login and click on the Phonebook icon.
You can search by family name, title, or extension number or select the phone from the list for more details. You can also call any of our extensions directly from this menu. If Web is selected next to the green call button/bubble, your call will be made using the browser - from your computer. If you change it to WorkForce, your phone will dial the selected number. 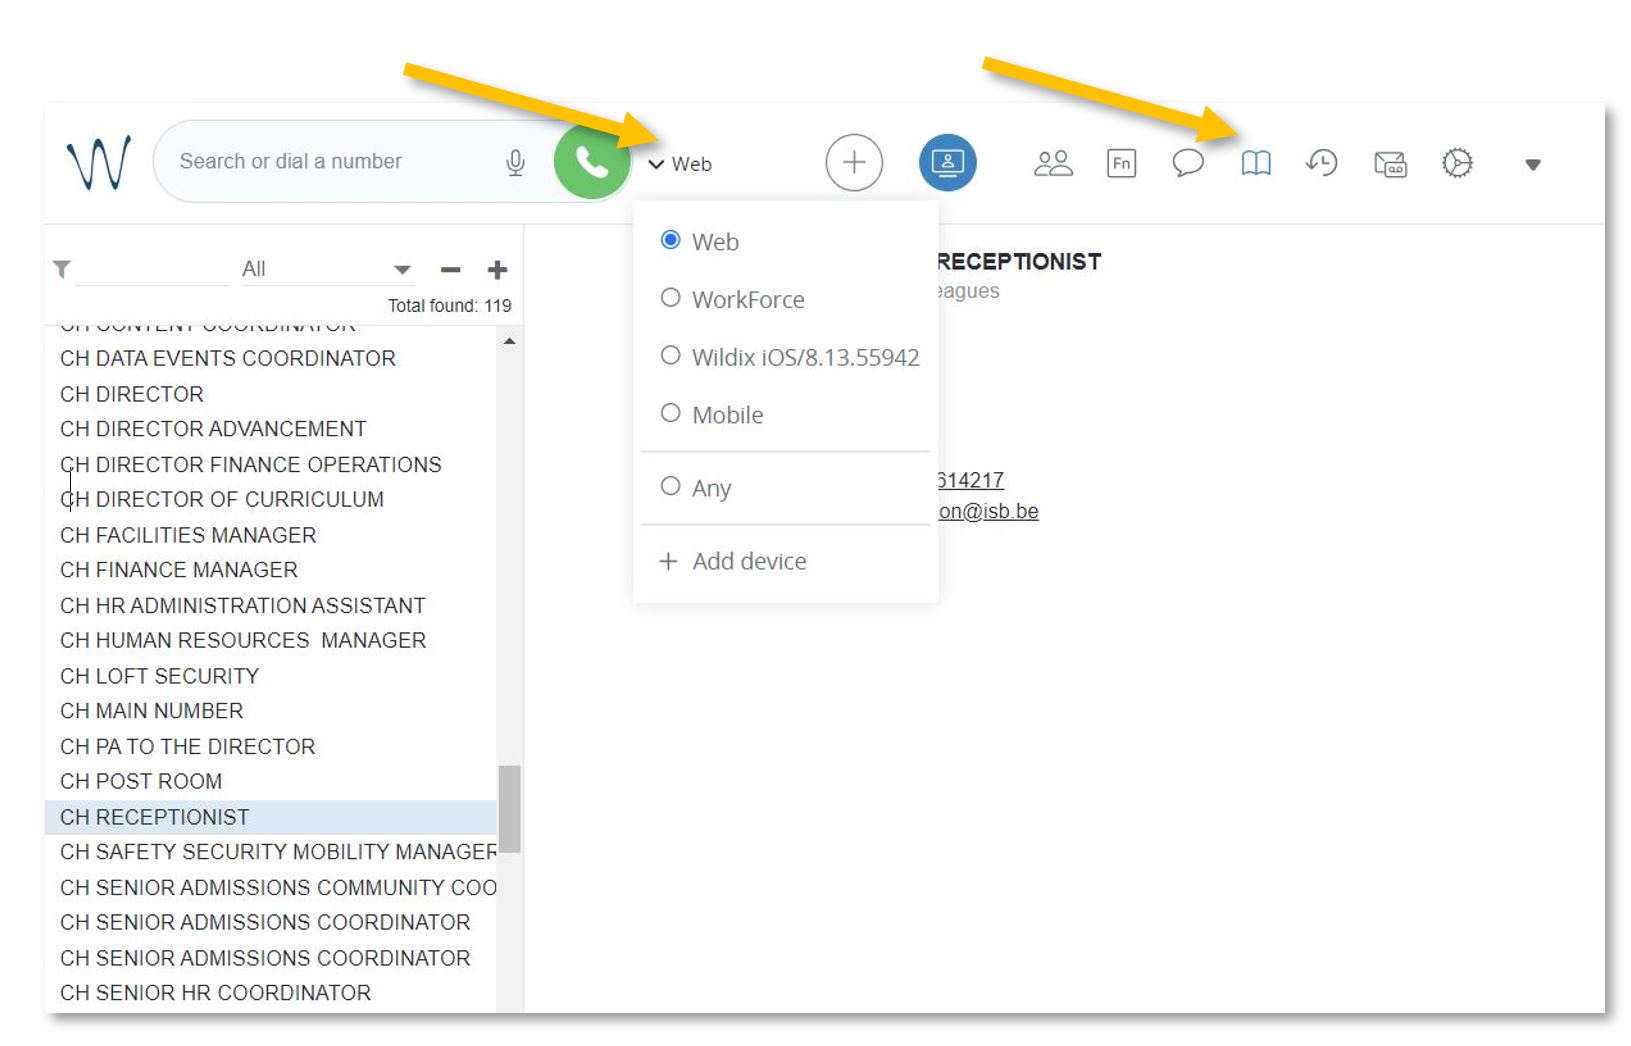
The Mobile and Wildix functions, if visible, do not work, but if you install the Wildix Collaboration app on your mobile and sign in, you can call any of the ISB extensions from the app. You can also check your missed calls, voicemails, and the ISB telephone list.
Wildix Collaboration Mobile - for Android
Wildix Collaboration Mobile - for Apple
Open the app, add isb2.wildixin.com under Domain, and use Google or Office to sign in using your school credentials.
See the history of your calls.
Missed calls / received / rejected / etc.
Open https://isb2.wildixin.com/collaboration/ login and click on the History icon.
If you want to sort the calls, you can change All to Incoming, Outgoing, Missed, Etc. You can select any of the numbers and call back. If Web is selected next to the green call button/bubble, your call will be made using the browser from your computer. If you change it to WorkForce, your landline will dial the selected number.
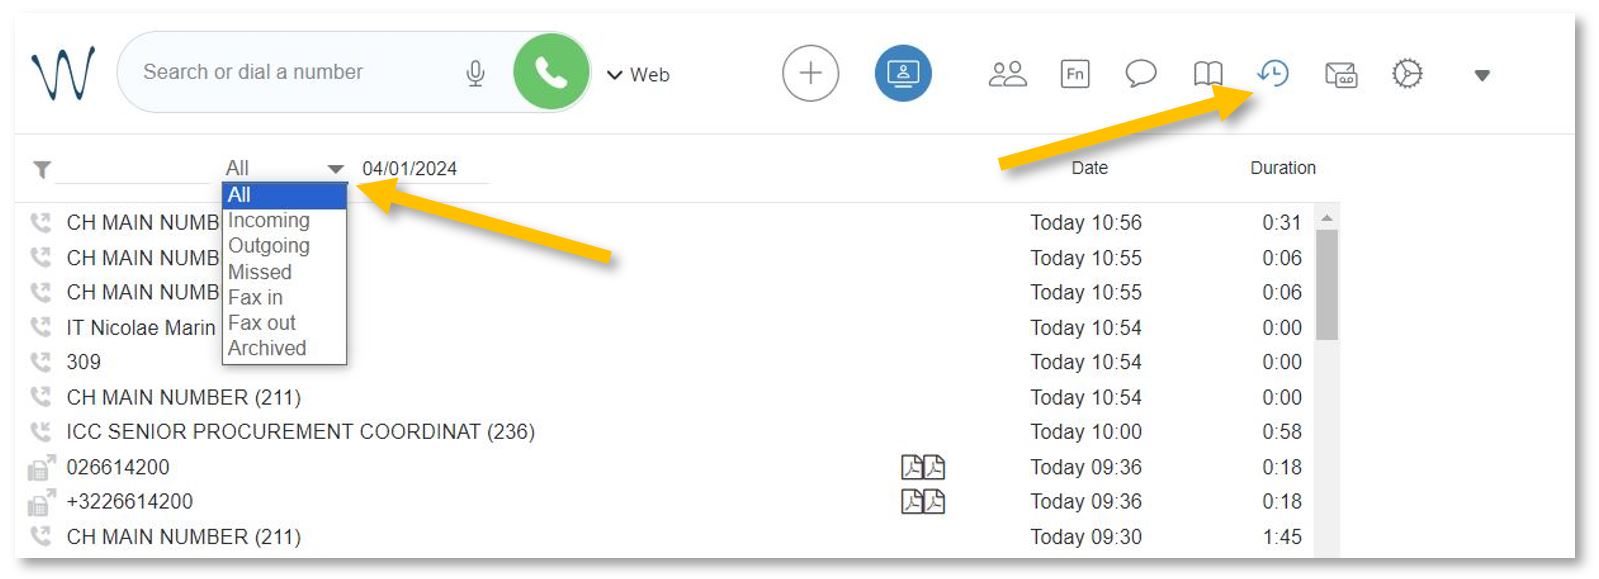
Wildix on your mobile
Call any of the ISB extensions from your mobile phone. Check your missed calls, voicemails, and the ISB telephone list.
Install the:
Wildix Collaboration Mobile - for Android
Wildix Collaboration Mobile - for Apple
Open the app, add isb2.wildixin.com under Domain, and select Google or Office to sign in using your school credentials.