Copiers and Printers
- Xerox Copiers - First Log in - New users
- Xerox Copiers - Copy, Print, Scan (work in progress)
- Xerox Copiers - Enlarge/Reduce
- Xerox Copiers - Booklets
- XeroX-Paparcut Missing on Mac? Install it from Self-Service
- XeroX-Paparcut Missing on Windows? Install it from \\paper
- Xerox Printing - Jobs Stuck in the Queue - Fixes
Xerox Copiers - First Log in - New users
|
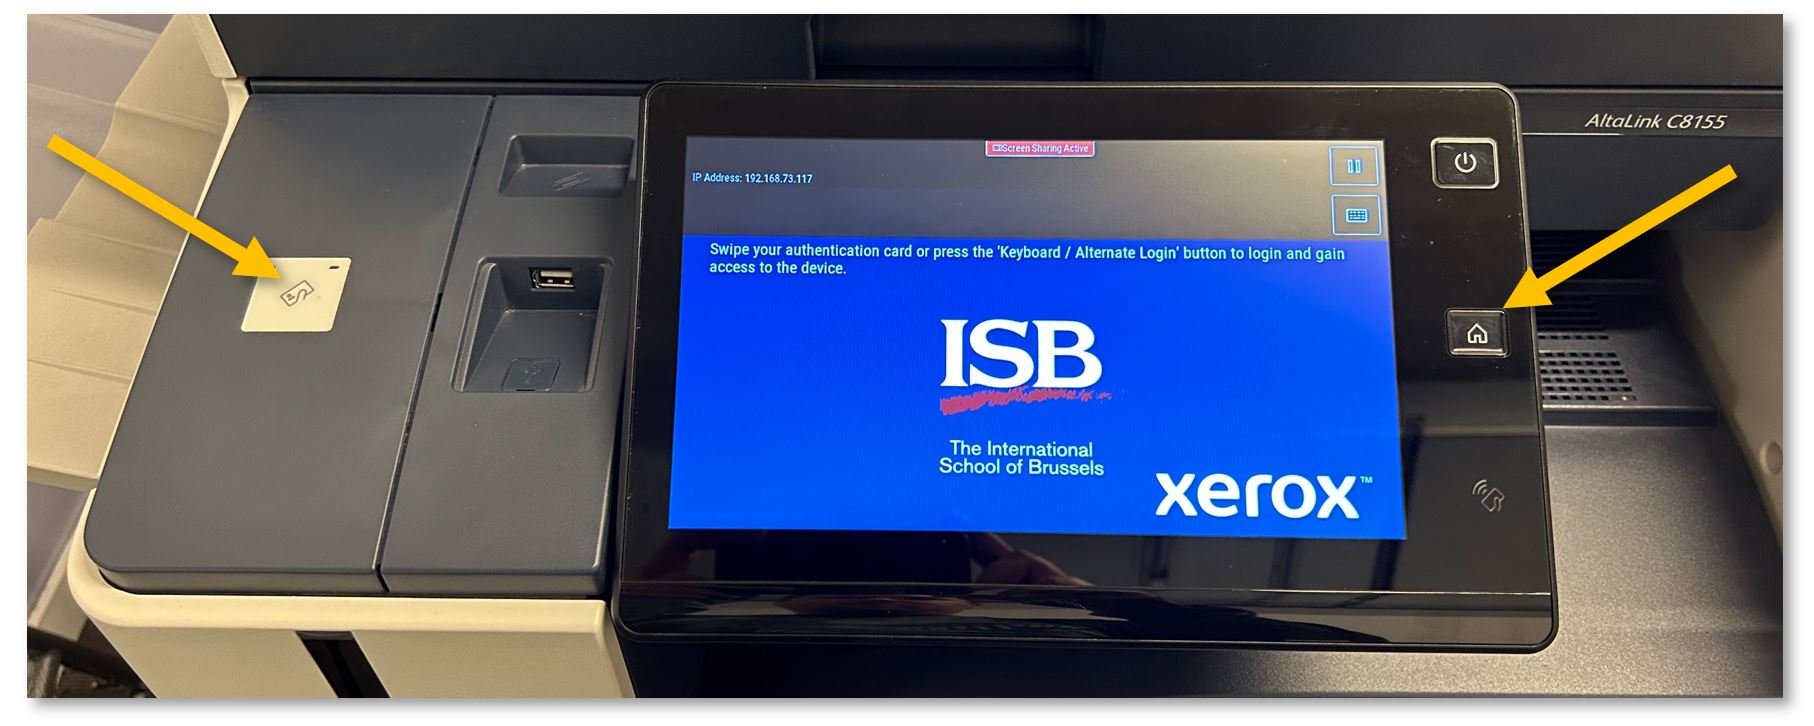
If the copier is in standby, scan your card or press the Home button to wake it up.
|
|
|
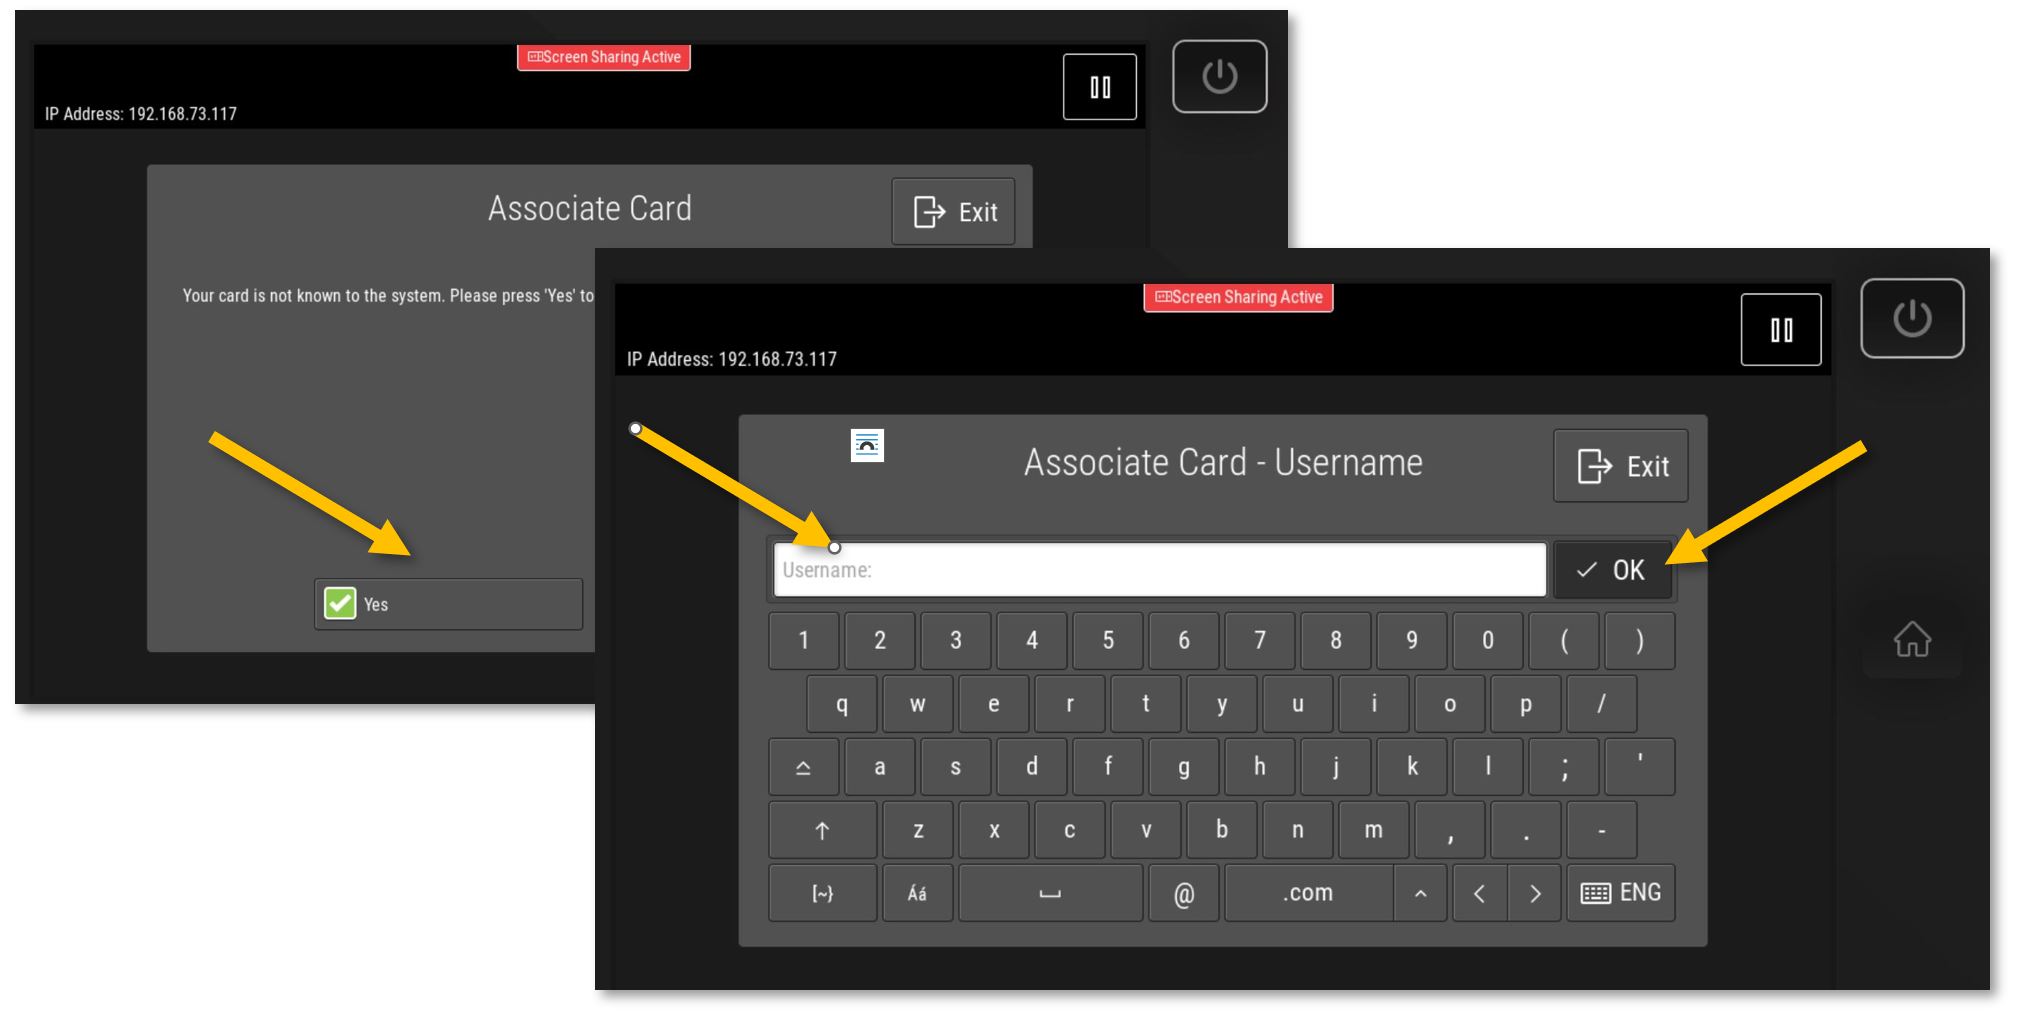
If you have never used the copiers at ISB, scan your card, press Yes, type your username (your email without @isb.be), press OK, and add your network/email password. Press OK again; the copier will associate your card with your account.
Swipe your card again to log in.
|
|
|
|
|
Xerox Copiers - Copy, Print, Scan (work in progress)
|
If the copier is on standby, scan your card or press the Home button to wake it up.
|
|
|
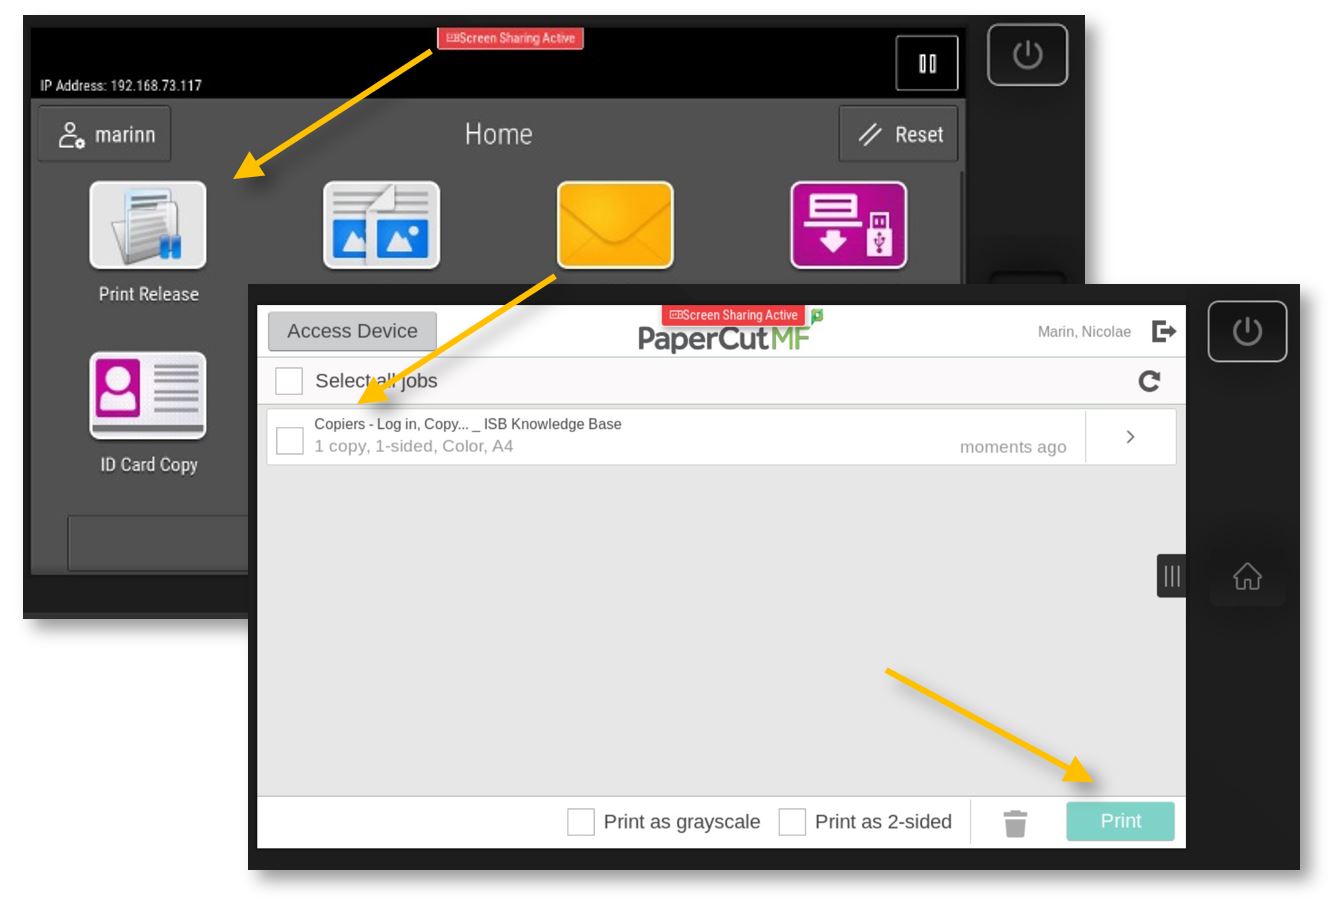
Print Release: Computer: if not already the default, select the 'XeroX-Papercut' printer and press Print.
Copier: Swipe your card to log in and select the Print Release option. Select the job that you want to print and press Print. Log out by pressing your name, the sign-out icon next to your name, or by swiping your card again.
|
|
|
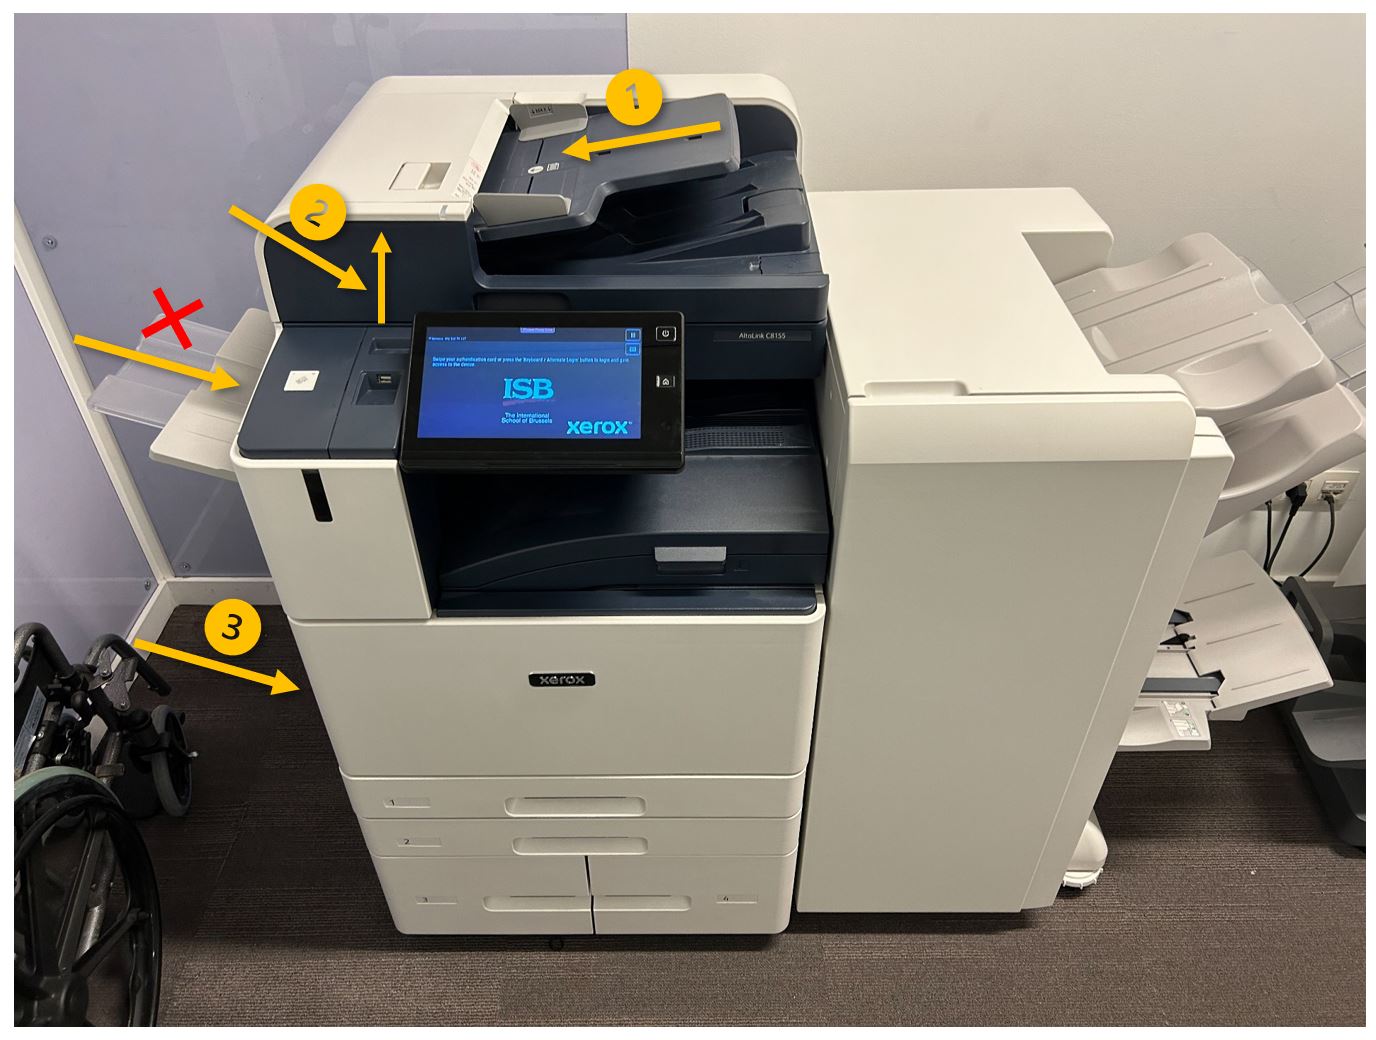
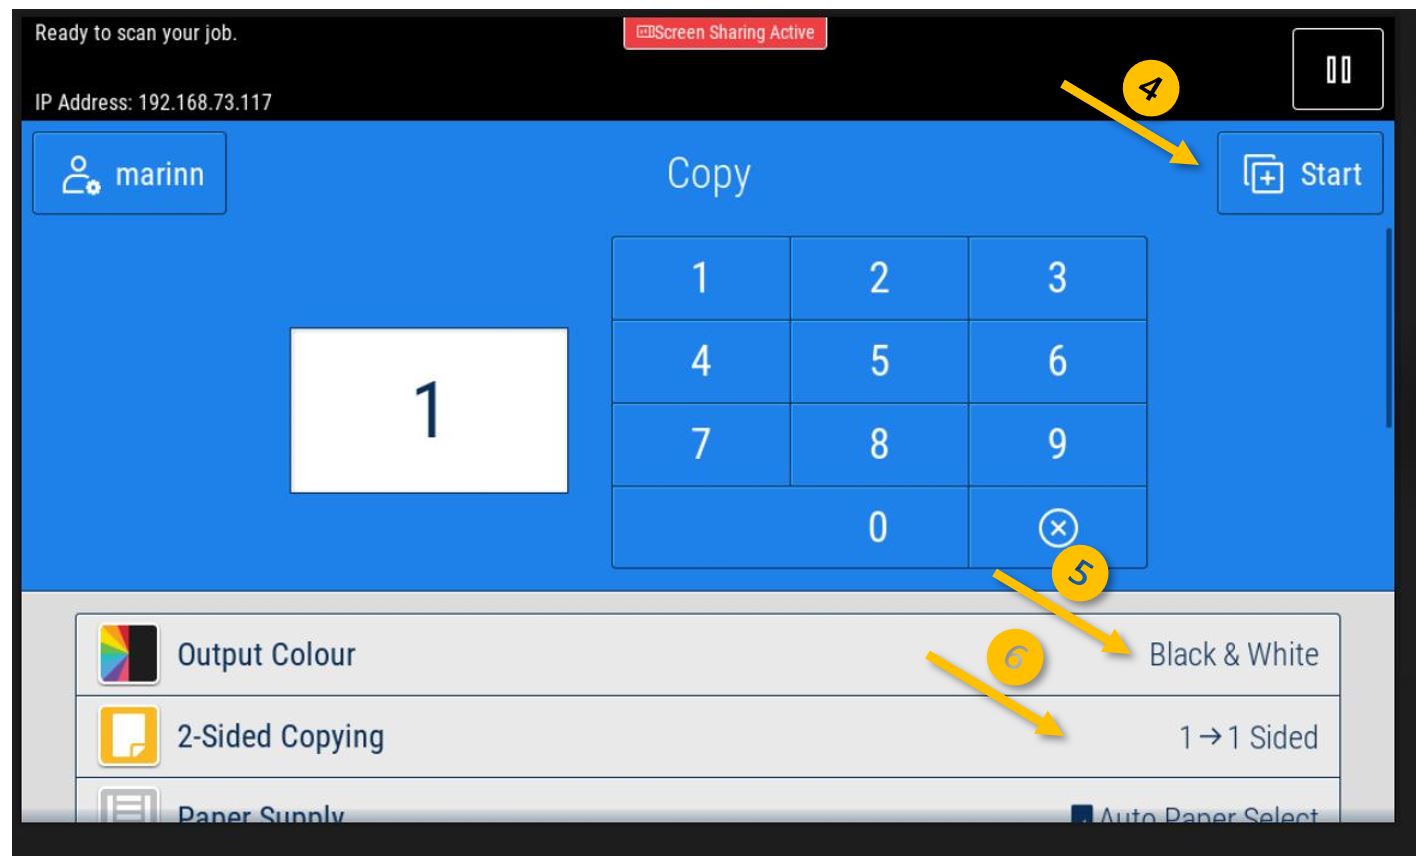
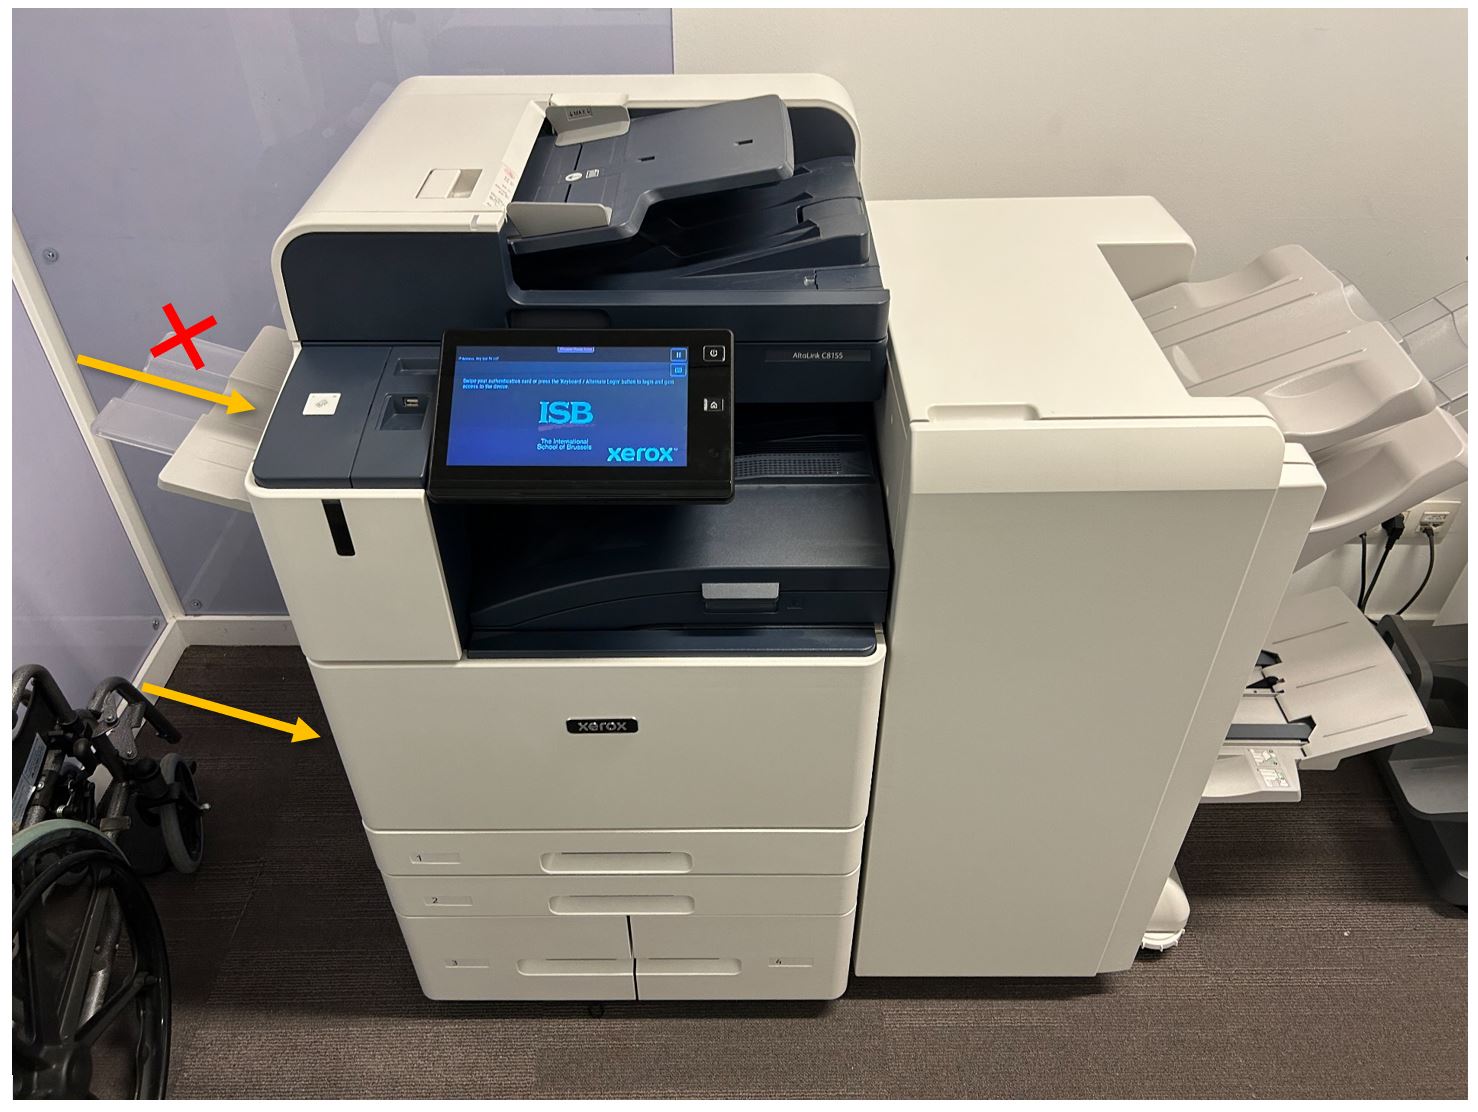
Copy: Swipe your card to log in and select the Copy option. Put the document you want to copy in the tray that will give you the best/fastest results (arrows 1 or 2), and press Start (4).
For simple pages that are not stapled, creasy, too thick, etc., you can use the ADF (automatic document feeder) on top of the copier (1). The ADF will rapidly scan all the pages. To scan both sides automatically, press the '2-Sided Copying” option (6) on the display and change it as desired.
If your document is a book, maybe it is stapled, you need/want to use multiple small pages at once, etc., please open the lid and place the original/s on the glass (2).
If you want the results on a different type of paper (thicker, colored, labels, etc.), please open and use the side tray (3), which you can find underneath the small tray noted with X (the X tray is used for faxes). Please remember that once this tray is opened, the copier will prioritize it.
Copying defaults to black and white; you can change to color from the Output Colour (5) option.
If you scroll down, you can find more interesting options, like Reduce/Enlarge, Finishing (staples, hole punch, folding), or Booklet Creation. Mirror Image, Book Copying, or Page Layout (for when you want multiple pages on the same page). ETC. |
|
|
Scan to Email:
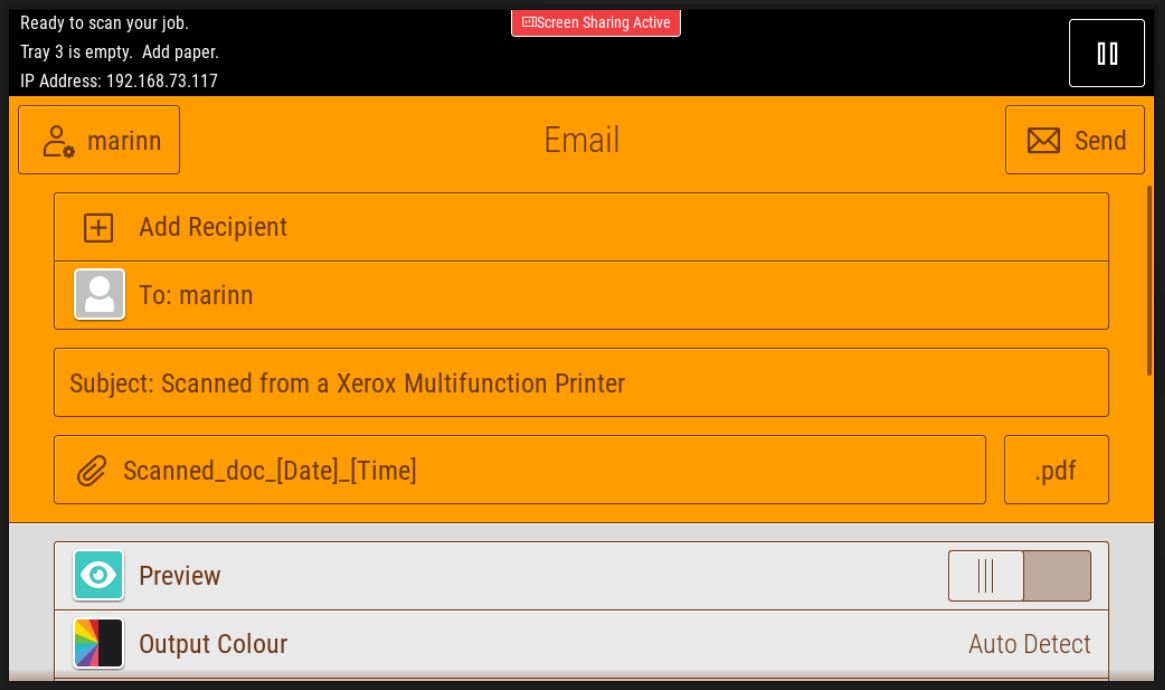
Swipe your card to log in and select the Email option. Press Send, and the Copier will scan all the pages in the ADF or the one from the glass. A PDF will be sent automatically to your email.
The 'To:' field is automatically set to your email; if you want to send the email to somebody else (it only works internally), you can add it/them to the Cc or the Bcc by pressing the 'Add Recipient' field. You can erase your email and add a different one if you click the 'To:' field. You can also change the 'Subject:' with something more meaningful.
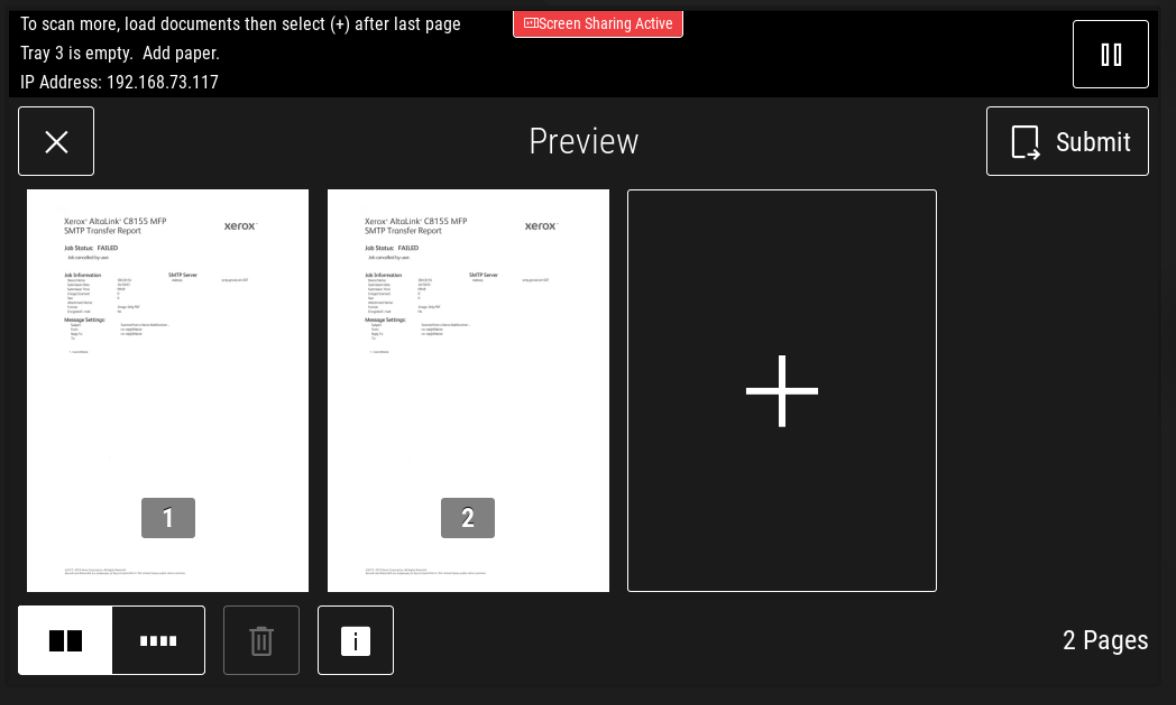
Under Options, you can find more interesting options: To scan multiple pages and create a single PDF without using the ADF, toggle the Preview Mode. The Send button will change to Preview. Press it to open the preview menu. Here, you can press on the big + to add and scan another page, reorder, or delete unwanted pages. Press Submit when ready to send the email.
If needed, you can ask the ADF to scan both sides of the documents by pressing the '2-Sided Scanning' option.
If you want to create a searchable PDF, in which you can select the text and copy-paste it, you can click on the “.pdf” button, select More, and in the File Format menu that pops up, select Searchable - Yes.
From the same menu, you can change the type of file to be attached to the email - '.jpg' is a picture and is usually smaller than a .pdf
If the copier has problems guessing the content orientation or the size, you can change it from “Original Orientation" and 'Original Size,' respectively.
To enhance the scan further, scroll down, click 'Show Additional Features' and select a bigger 'Resolution.' Do not send too many high-resolution JPEG/PDFs simultaneously; the server will block the email because of the active size limitations. ETC. |
|

Xerox Copiers - Enlarge/Reduce
From Copier:
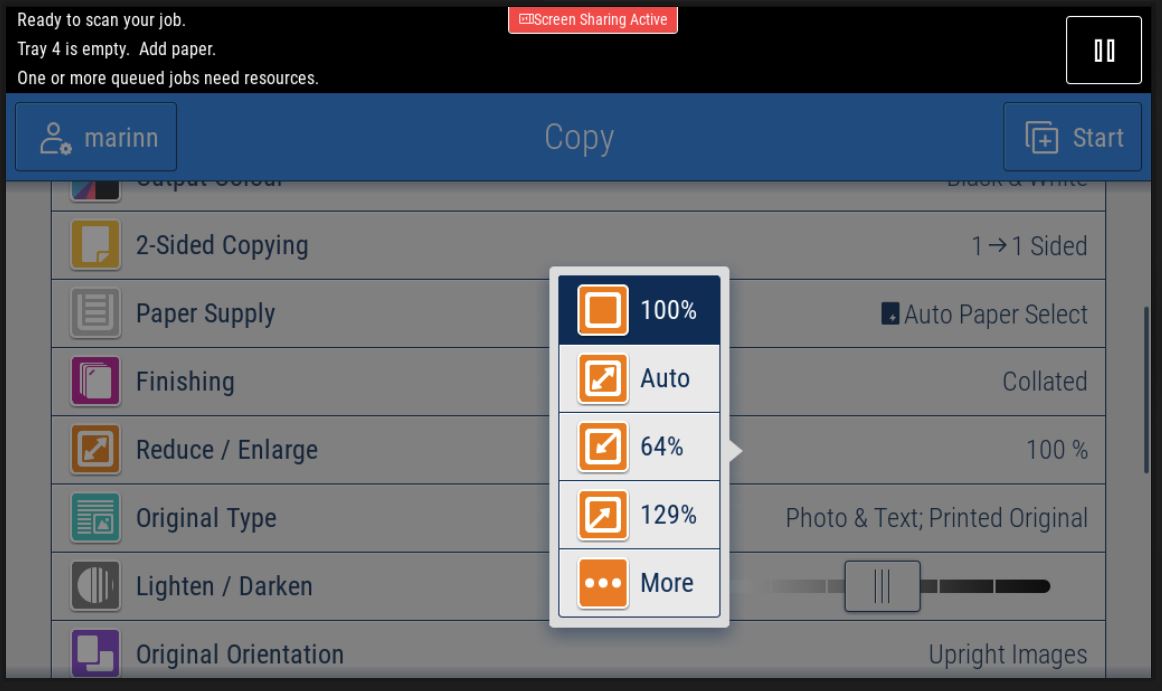
Sign in, place the originals on the glass, and choose Copy. Scroll to 'Reduce / Enlarge' and select 'Auto' from the pop-up menu.
Select the needed size from the following menu - usually A4 or A3 - press OK and Start.
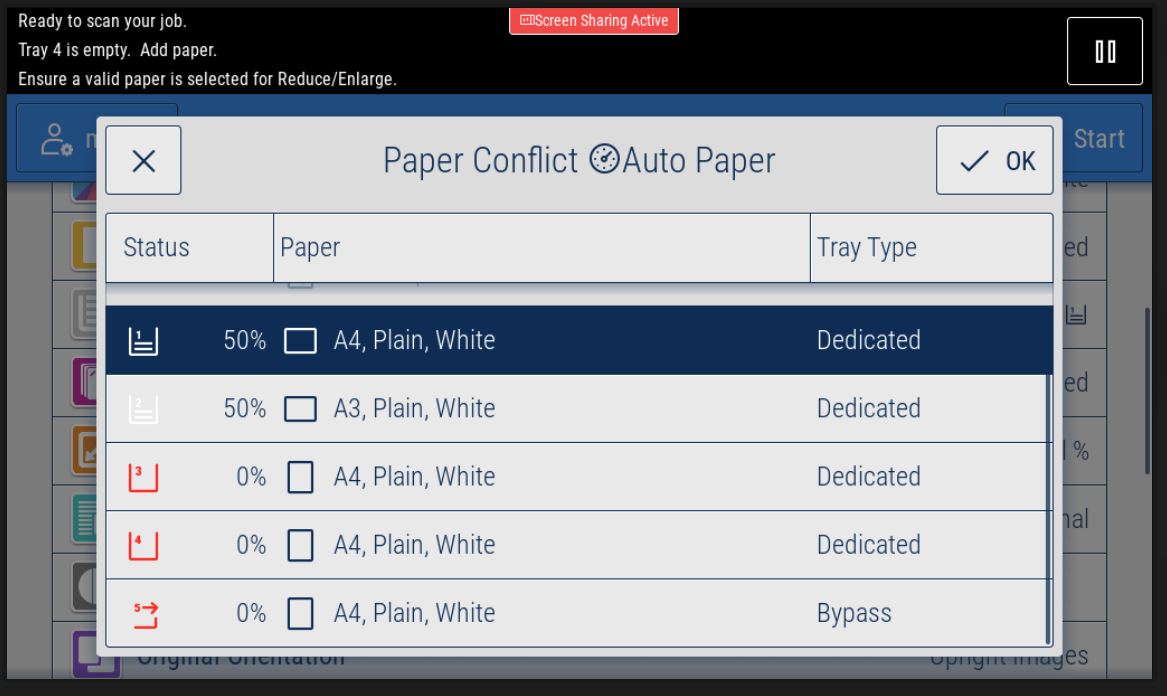
If you need a different size than the copier usually has in one of its trays, for example, A5, you will have to open the side tray and place A5 paper in it (not the X one, the one underneath). The copier will try to guess what type of paper you added - correct it if it chooses wrong.
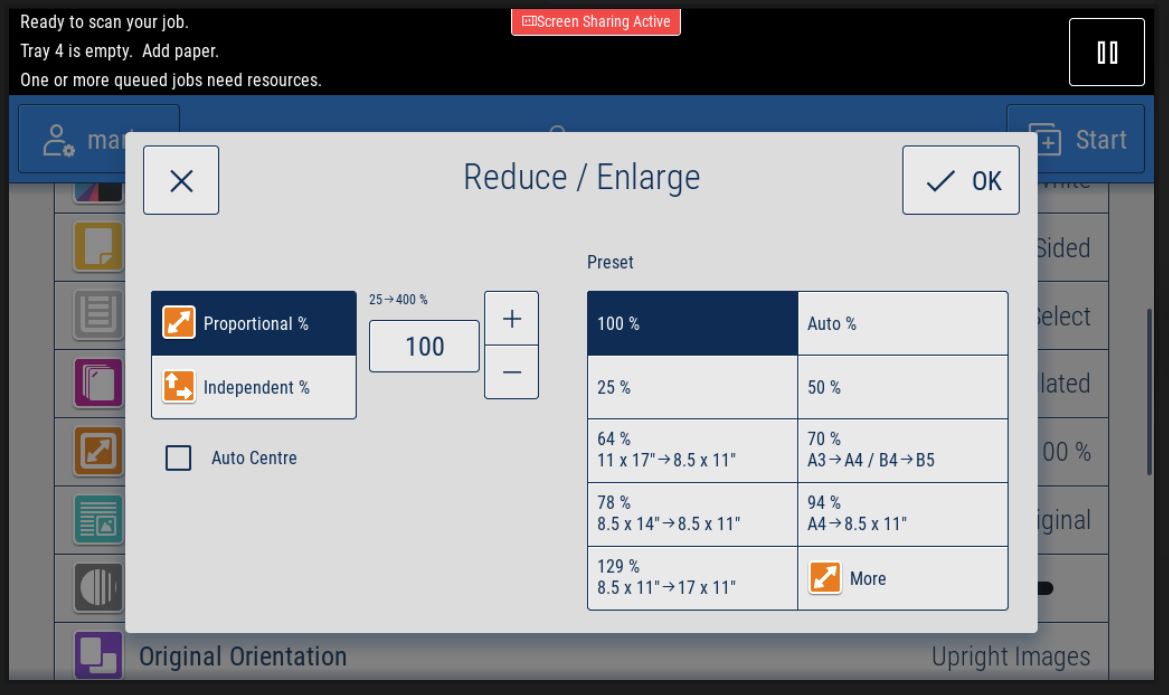
In the rare cases when the copier does not recognize the size of the original, or you want to extend/reduce the scanning area, please select 'More' instead of 'Auto' after selecting the 'Reduce / Enlarge' options. In the occurring menu, you can play with the percentages or select a premade preset - for example, from A3 to A4 or from A4 to letter (8.5x11).
From Windows: (If you print from a Mac, please jump to the next section)
Most apps cannot interact with the copier's menu directly. After pressing print, we must find the Xerox settings in the print menu. In Adobe Acrobat, for example, we need to press on 'Properties...'; in Chrome, 'More settings' and 'Print using system dialog...'; in Word, 'Printer Properties.'

If the Windows Print menu pops up á make sure that Papercut_Xerox is selected and click on Preferences.
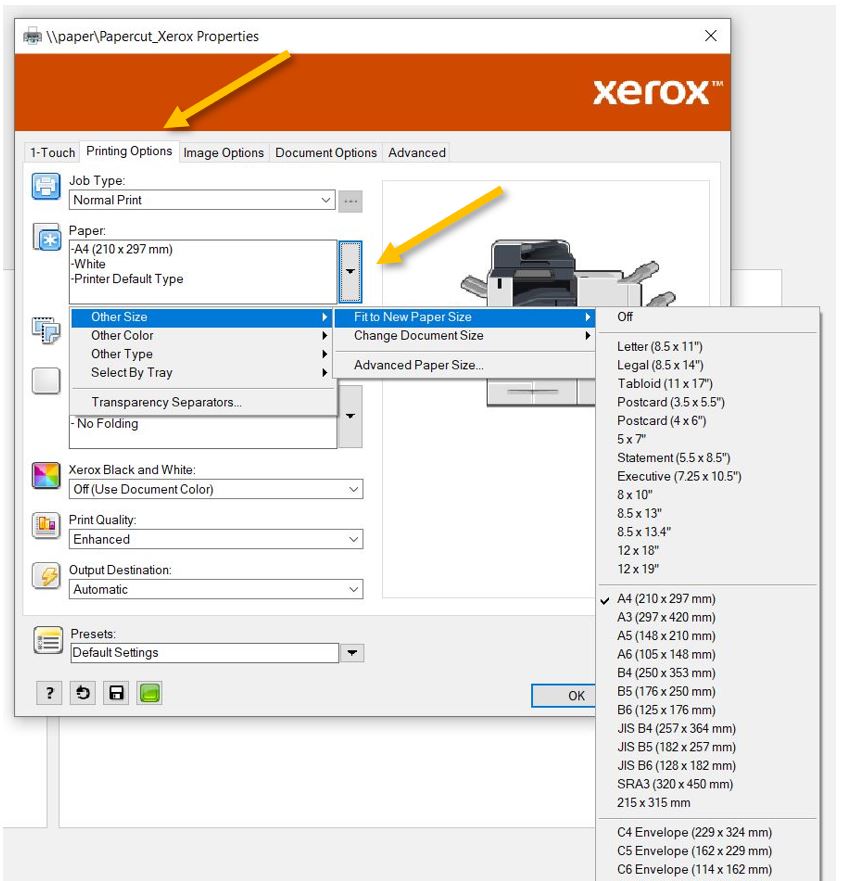
In the Xerox print menu, go to the Printing Options tab, extend the Paper menu, and from 'Other Size' - 'Fit to New Paper Size,' select the needed size. OK - Print - Print.
If you need a different size than the copier usually has in one of its trays, for example, A5, you will have to open the side tray and place A5 paper in it (not the X one, the one underneath). The copier will try to guess what type of paper you added - correct it if it chooses wrong.
From Mac:
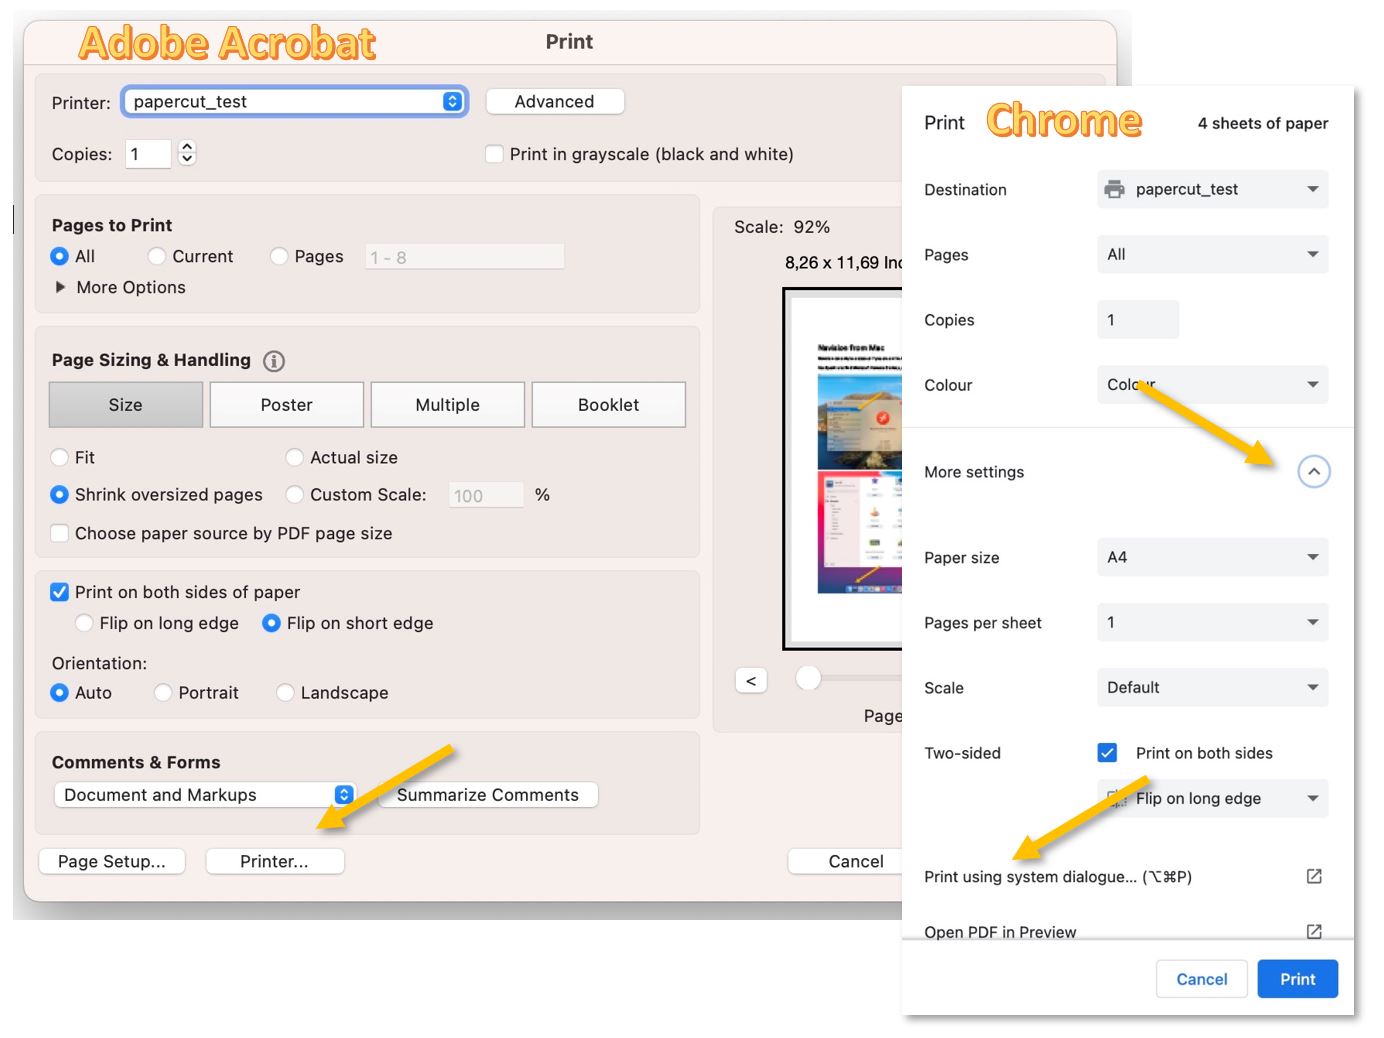
Most apps cannot interact with the copier's menu directly. After pressing print, we must find the printer settings in the print menu. In Adobe Acrobat, for example, we need to press on 'Printer...'; in Chrome, 'More settings' and 'Print using system dialog'.
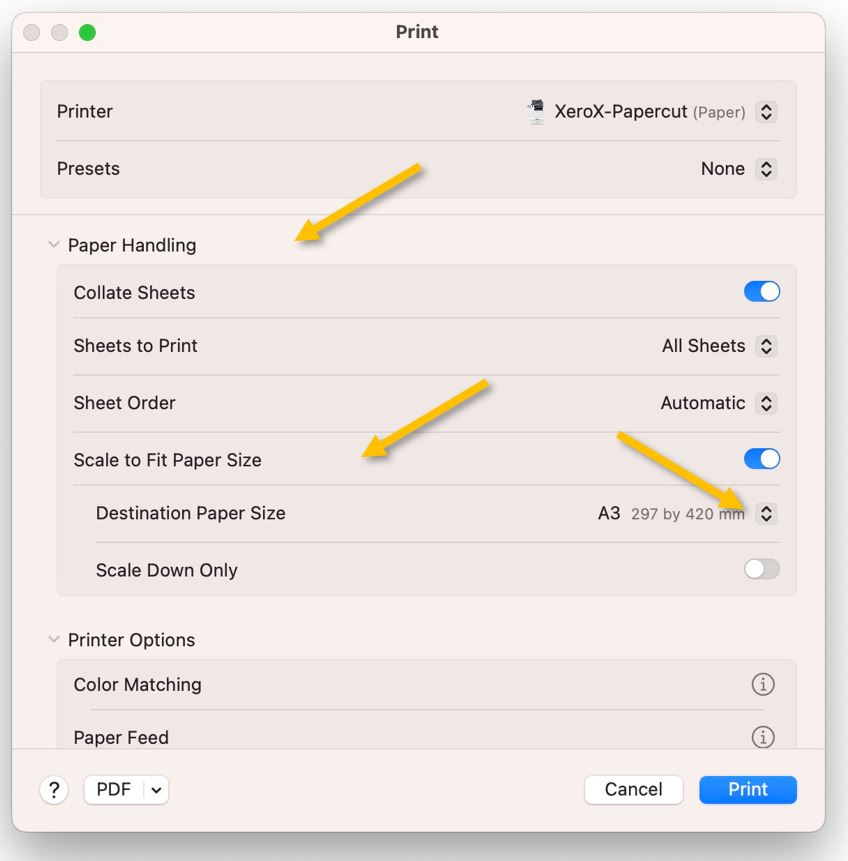
In the new pop-up window, scroll down to 'Paper Handling,' extend it, and turn on 'Scale to Fit.' Under 'Destination Paper Size,' select the needed size.
If you need a different size than the copier usually has in one of its trays, for example, A5, you will have to open the side tray and place A5 paper in it (not the X one, the one underneath). The copier will try to guess what type of paper you added - correct it if it chooses wrong.
Xerox Copiers - Booklets
Please keep in mind that not all copiers are created equal; only some of them can make a booklet, perforate, staple, or fold your print/copy job. However, if the nearest copier cannot do what you have in mind, do not fret. Print the job and find the closest copier with the capabilities you need. No matter where you print, the job will be visible on any of the school's copiers when you log in:
|
Location |
Hole Punch |
Staple |
Folding / Booklet* |
|
Annex 2nd Floor |
no |
yes |
no |
|
Blue Gim GO |
no |
yes |
no |
|
Chateau 1st Floor |
yes |
yes |
no |
|
Chateau Comm. Off. |
no |
no |
no |
|
ECC Ground Floor |
yes |
yes |
yes |
|
ES Ground Floor |
yes |
yes |
yes |
|
ES Second Floor |
no |
yes |
no |
|
HS Ground Floor |
yes |
yes |
yes |
|
ICC Ground Floor |
yes |
yes |
yes |
|
Metairie Ground Floor |
no |
yes |
no |
|
MHS Lib. 1 |
yes |
yes |
yes |
|
MHS Lib. 2 |
no |
no |
no |
|
Chalet |
no |
yes |
no |
*Almost all the copiers in the school can print or create a booklet, but only a few can fold it and staple it.
** If you need to create more than 10 booklets, please use the copiers outside the MHS library or plan your printing with the schools' GOs. When creating booklets, the copiers must print on both sides, fold, and staple. This could take a long time, and nobody else would be able to use them.
How to Create Booklets from the:
Copier:
Sign in, place the originals in the Automatic Document Feeder, choose Copy, and scroll down to see the options. The default copy mode is black and white; if needed, please change it to Color from the Output Colour option.
Select the Booklet Creation option and More. In the pop-up window - On and OK. Then, choose the paper size that you want to use. If A4 is chosen the resulting booklets will be A5. With A3, the booklets will be A4. Press OK again.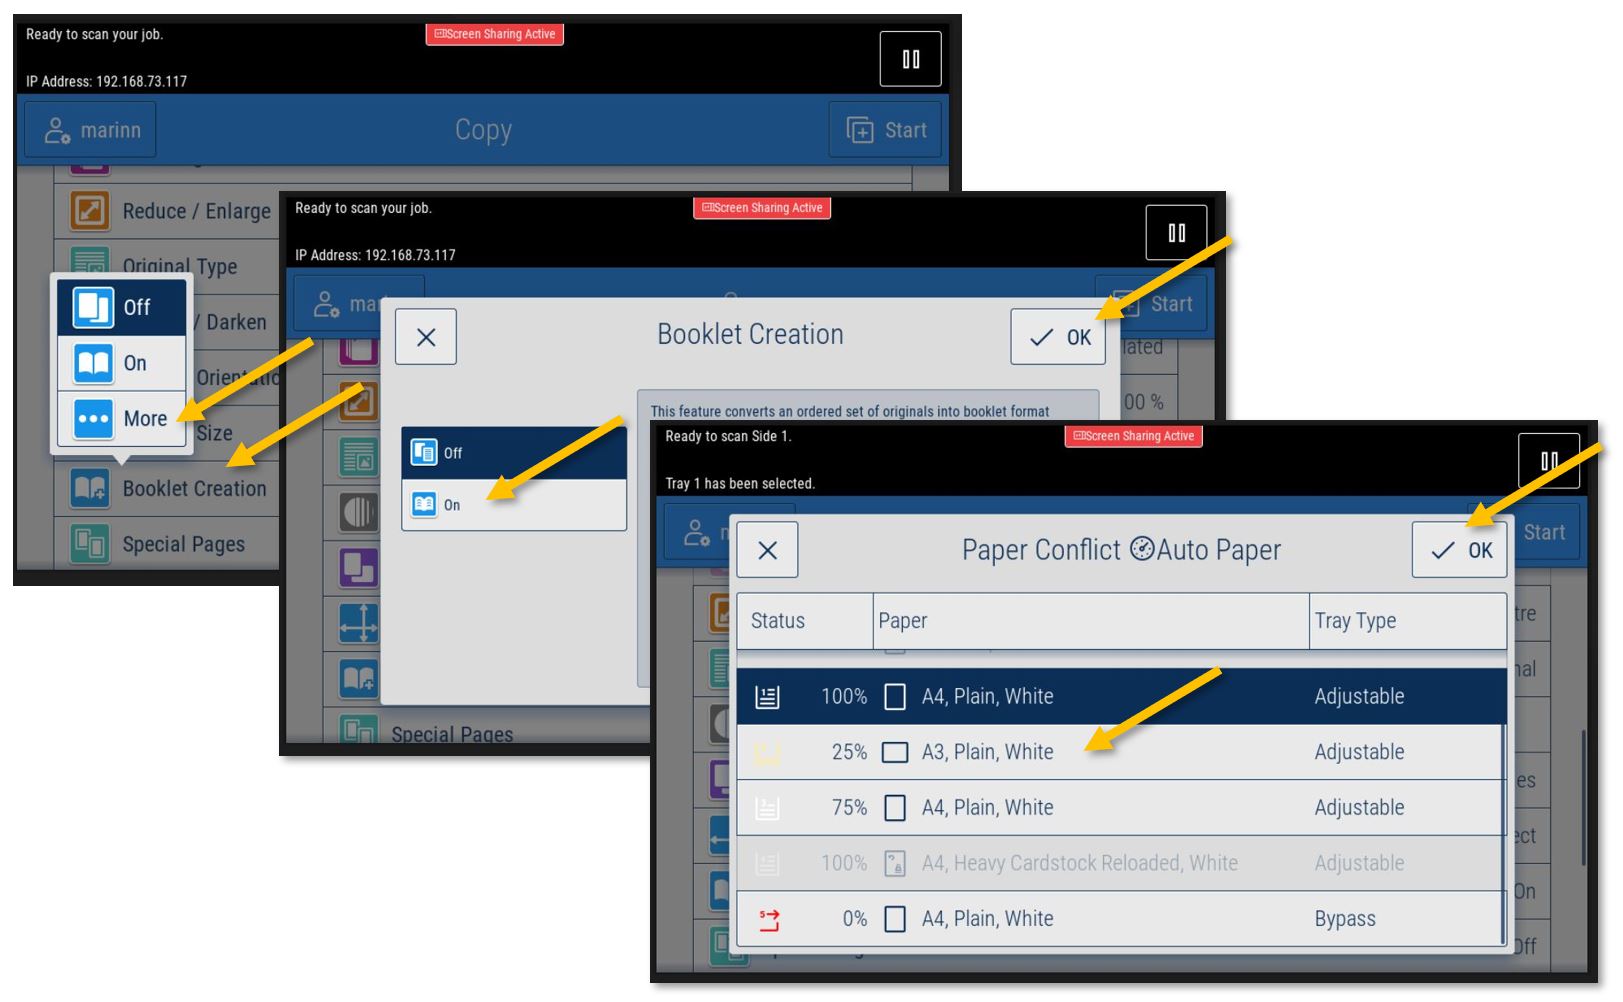
Mac:
(If you print from a Windows machine, please jump to the next section.)
Most apps cannot access the booklet menu directly. After pressing print, we must find the printer settings in the print menu. In Adobe Acrobat, for example, we need to press on 'Printer...'; in Chrome, 'More settings' and 'Print using system dialog'.
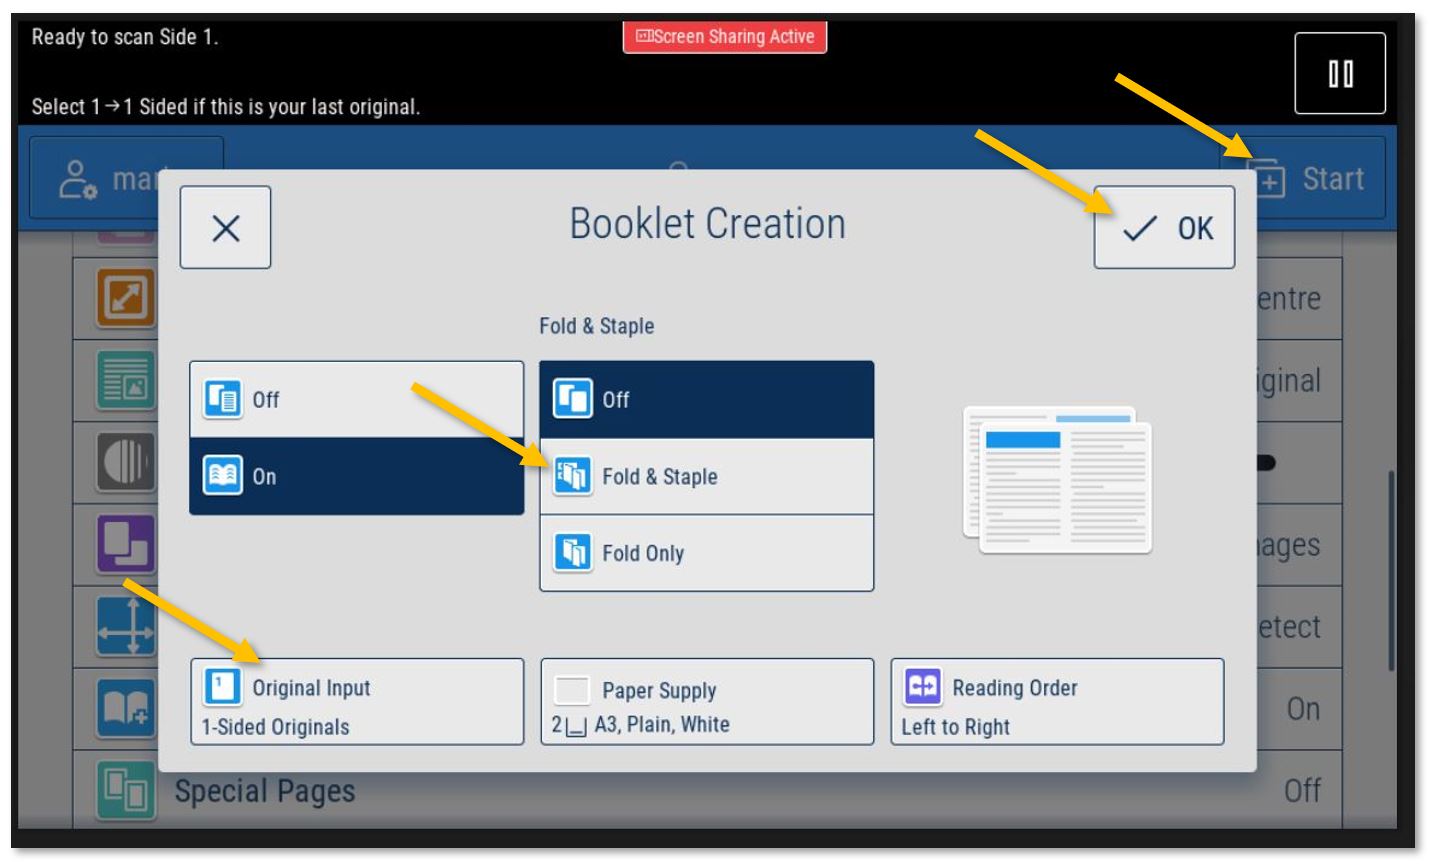
In the new pop-up window, scroll down to 'Printer Options', extend it, and select Xerox Features. Click on the 'Finishing' box and select from the drop-down list 'Booklet Creation...'
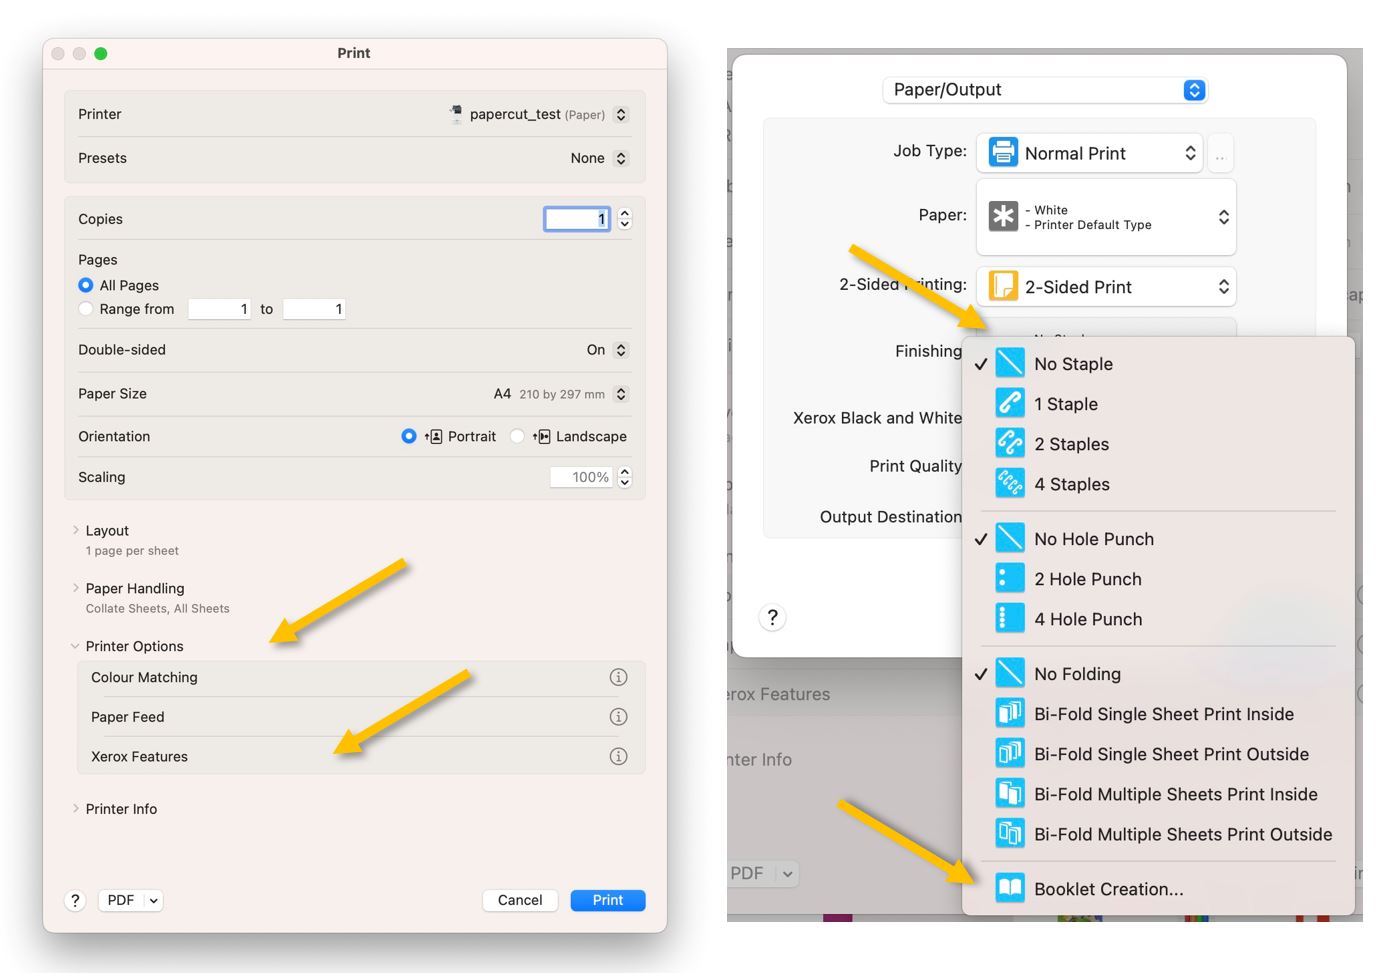
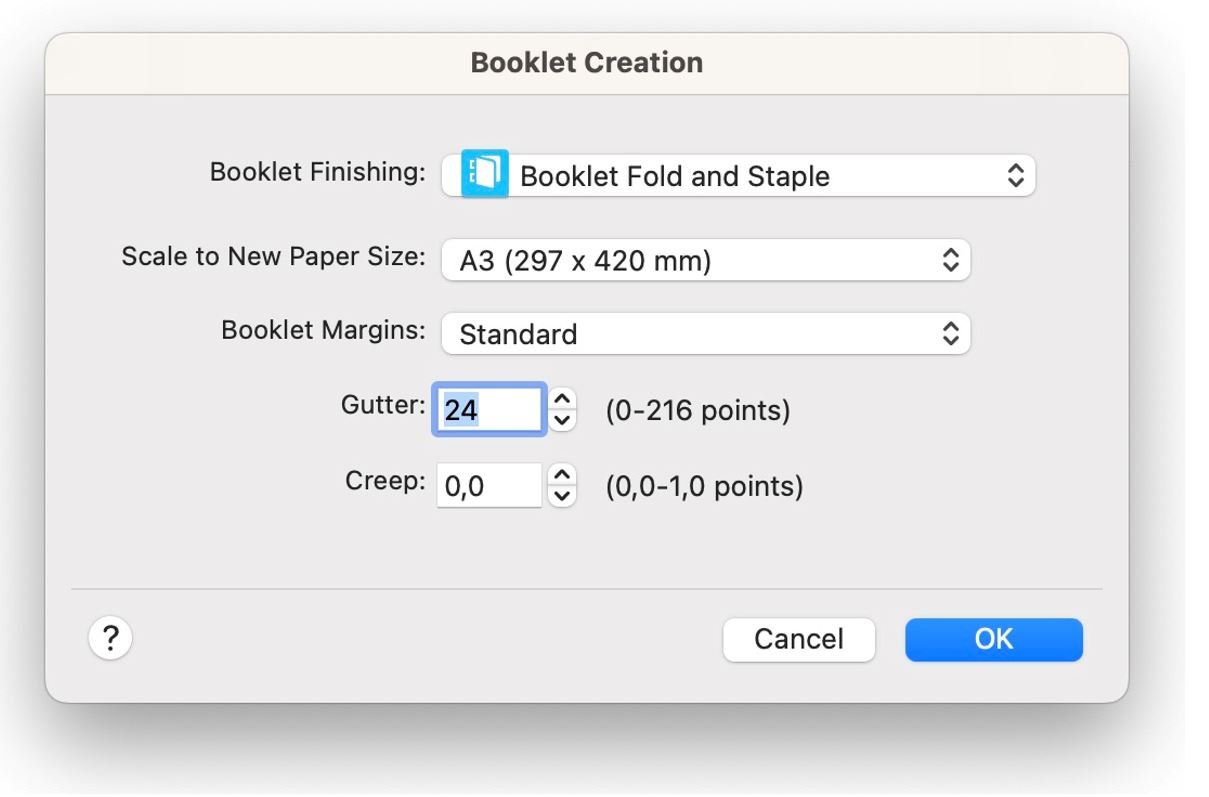
In the 'Booklet Creation' menu, select the appropriate 'Booklet Finishing' for your case, usually 'Booklet Fold and Staple' and, from 'Scale to New Paper Size:' the paper size to be used. Usually A3 (for A4 booklets). A4 (for A5 booklets).
Press 'OK', then 'Print' and 'Print' again to send the job to the copier.
Windows:
Most apps cannot access the booklet menu directly. After pressing print, we must find the printer settings in the print menu. In Adobe Acrobat, for example, we need to press on 'Printer...'; in Chrome, 'More settings' and 'Print using system dialog...'; in Word, 'Printer Properties.'
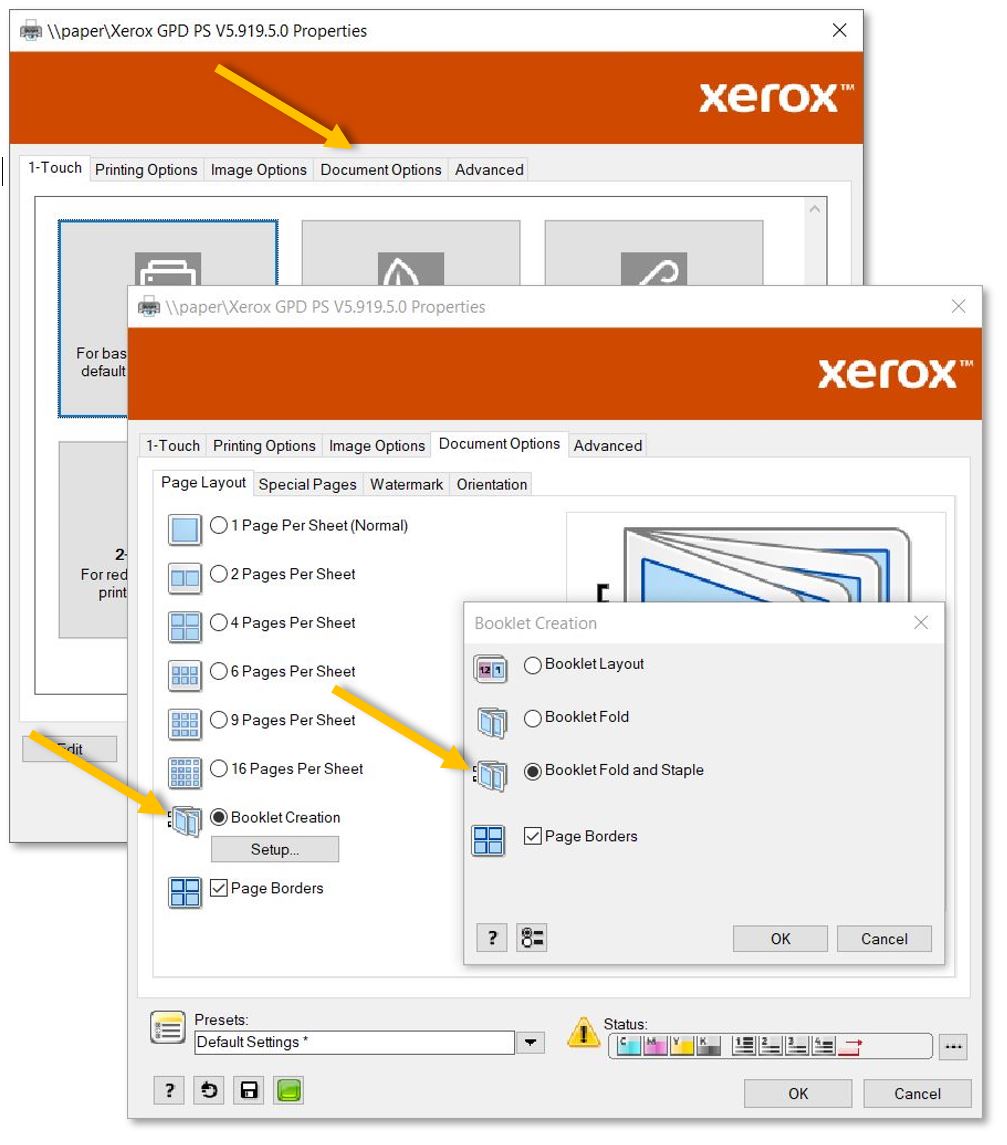
Press 'OK', 'OK' again, and 'Print' to send the job to the copier.
XeroX-Paparcut Missing on Mac? Install it from Self-Service
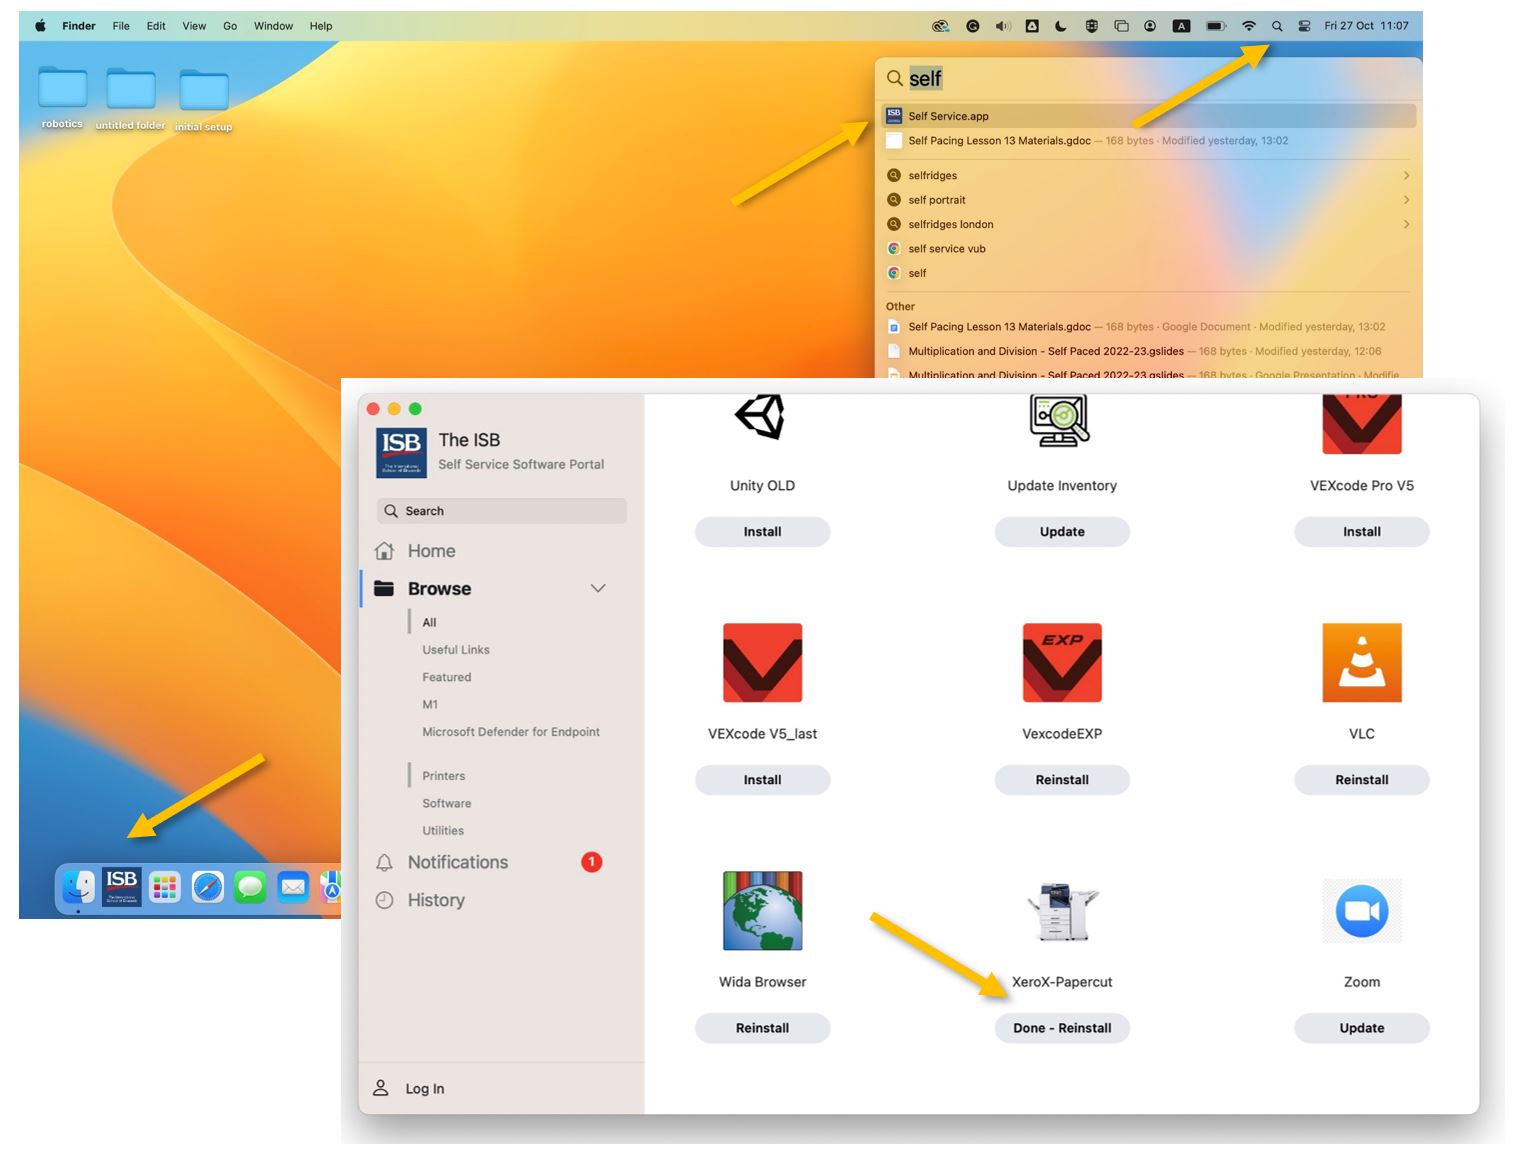
If XeroX-Papercut is not in your list of printers, please install it from the Self-Service portal.
If Self-Service (the icon with the ISB logo) is not present in the dock, please search for and open it using the magnifying glass (Spotlight) in the upper-right corner. In the window that opens up, scroll down to find the XeroX-Papercut printer in the list and click on Install.
The first time you print to the new copiers will require your password. Do not forget to mark 'Remember this password.'
If the password window does not pop up or your print jobs are stuck saying 'Hold for Authentication,' click the reload sign (screenshot on the right) and insert your email password in the new pop-up window.
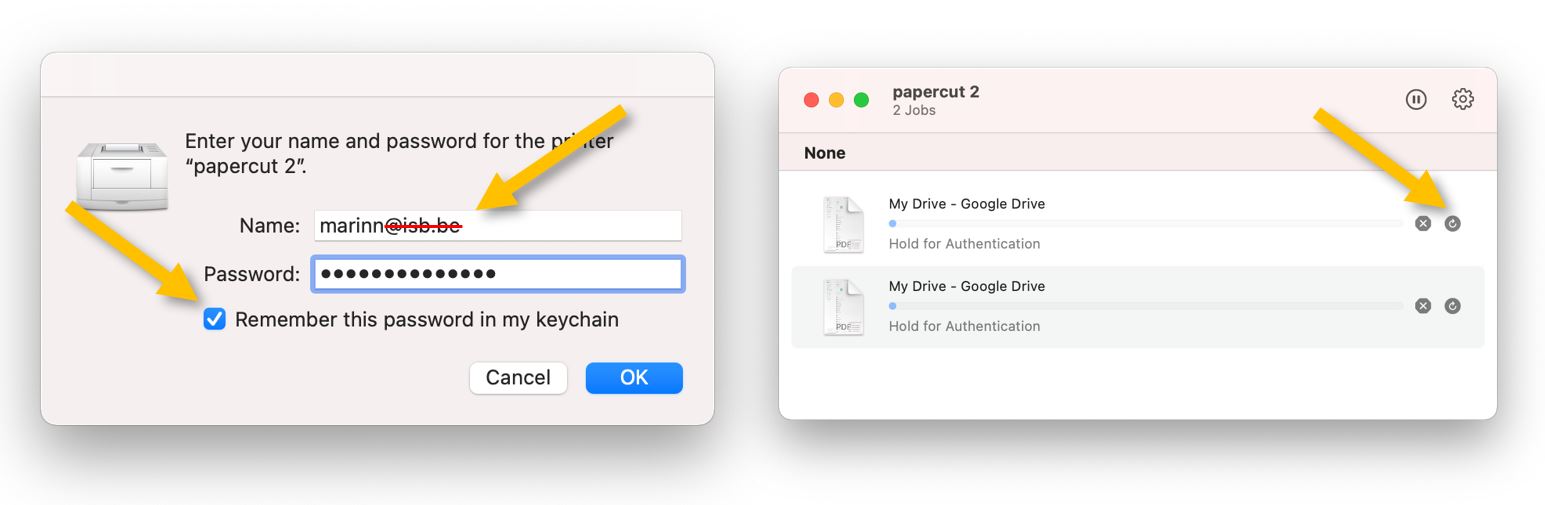
Good to know: In rare cases, the operating system could prefill your username (Name) with your email. Please erase @isb.be and continue as above.
Once the print jobs disappear from your queue, you can find them at the copier (click here for instructions).
XeroX-Paparcut Missing on Windows? Install it from \\paper
If you cannot find the new XeroX-Papercut printer in your list of printers, please open a folder and copy-paste \\paper into the location field. Press enter and double-click Papercut_Xerox from the list of printers to install it.
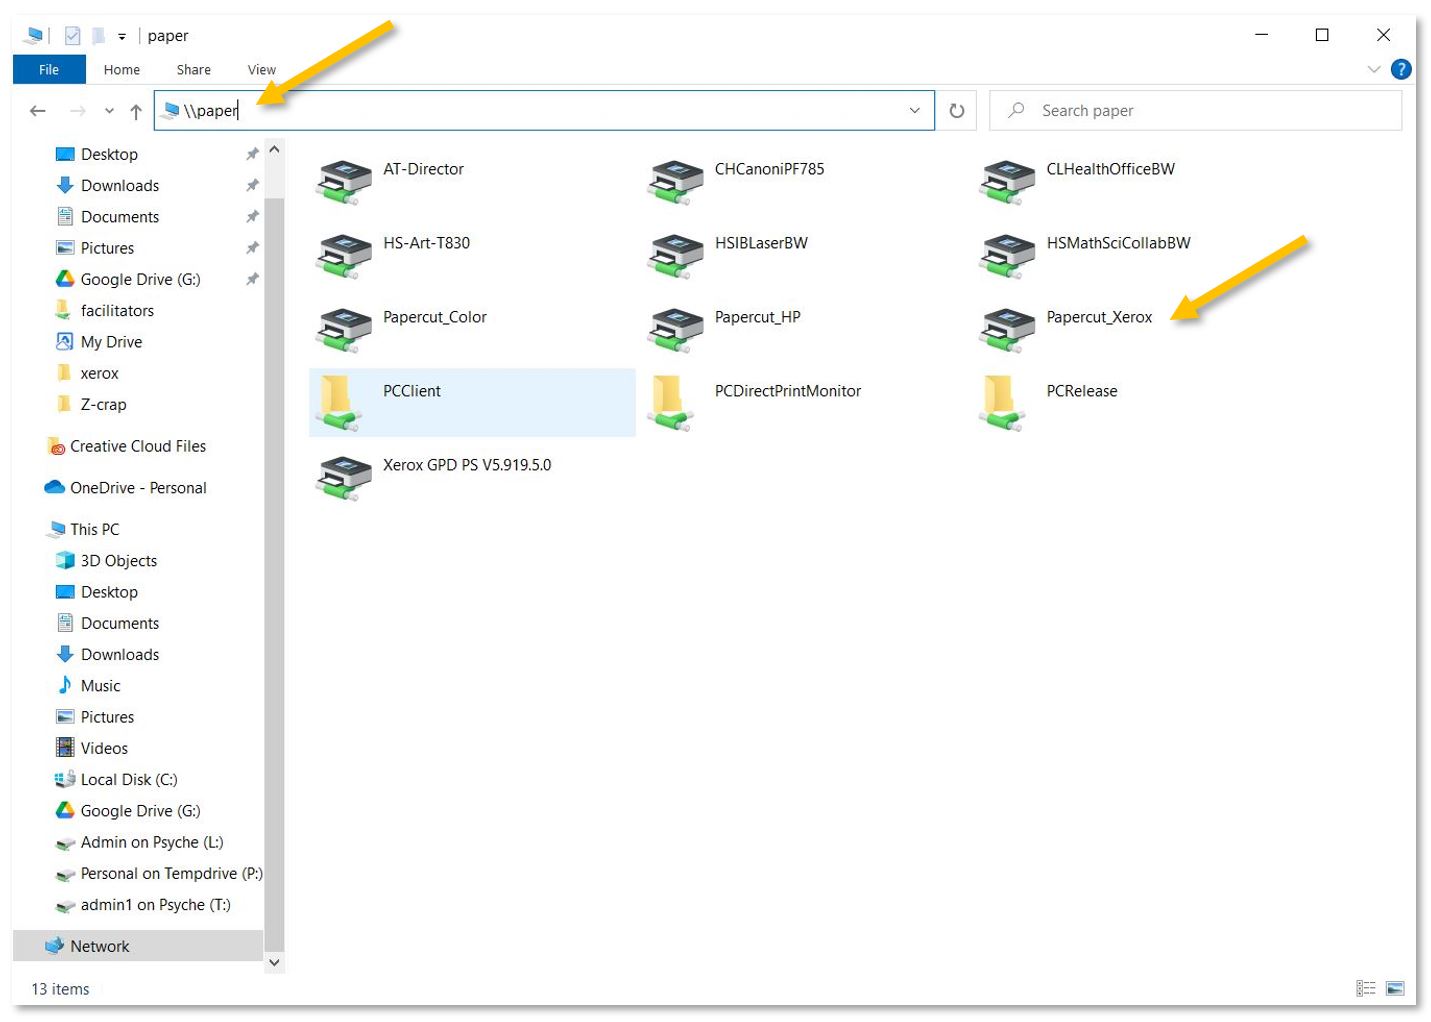
Reopen the print menu and select Papercut_Xerox from the list of printers.
Xerox Printing - Jobs Stuck in the Queue - Fixes
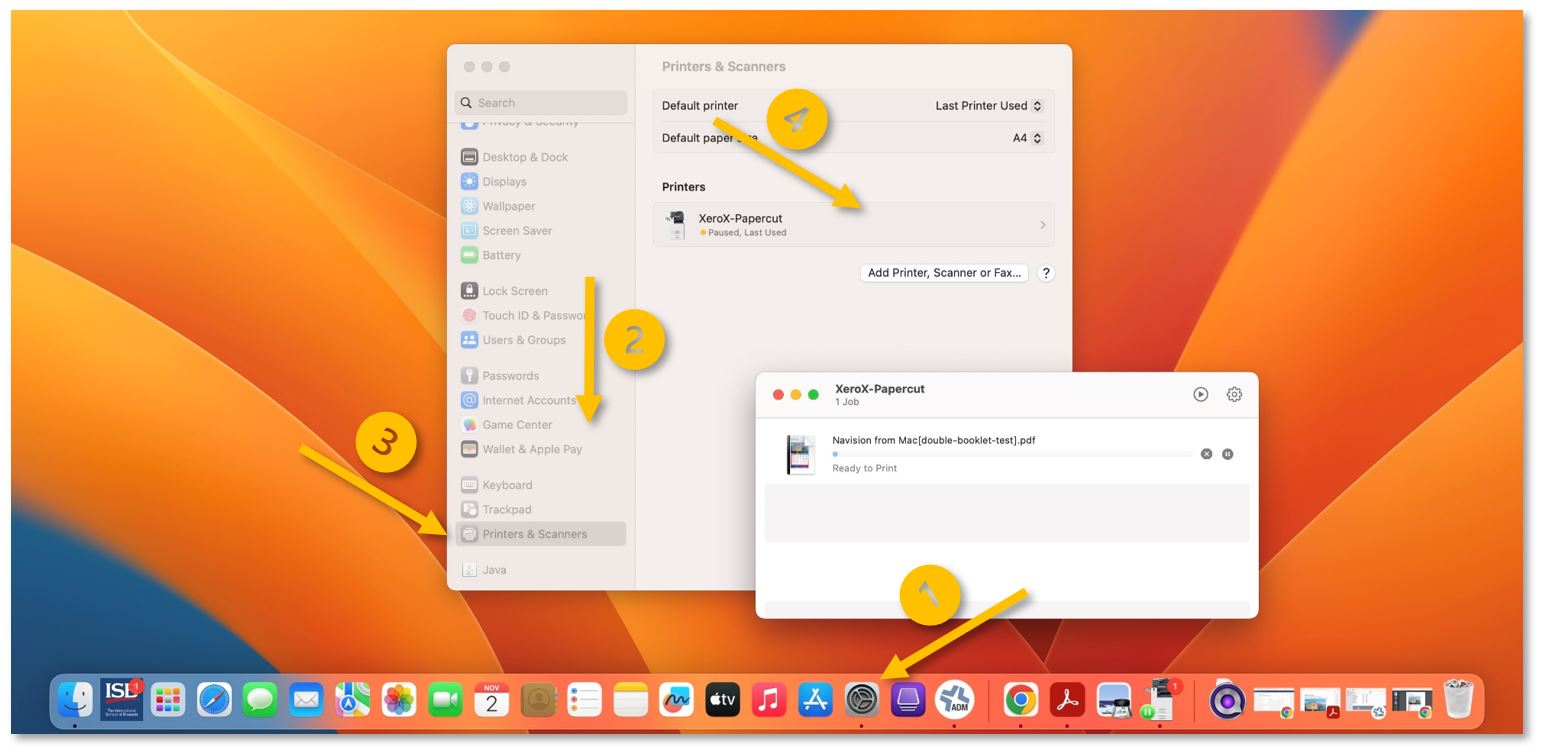
If you cannot find your queue, please open it from System Properties (settings) - scroll down to Printers and Scanners - and double-click on XeroX-Papercut.
Hold for Authentication fix:
Usually, when your print jobs get stuck in your queue with the message Hold for Authentication, you need to input your username and password to convince them to leave.
Click the reload sign (right panel) and insert your email password in the new pop-up window. Mark 'Remember this password' before pressing OK.
Once the print jobs disappear from your queue, you can find them at the copier level.

Good to know: In rare cases, the operating system could prefill your username (Name) with your email. Please erase @isb.be and continue as above.
Hold for Authentication usually shows its ugly head the first time you installed or reinstalled the printer, when you change your email/system password, after logging in on a new computer, or after a reimage.
Ready to Print fix:
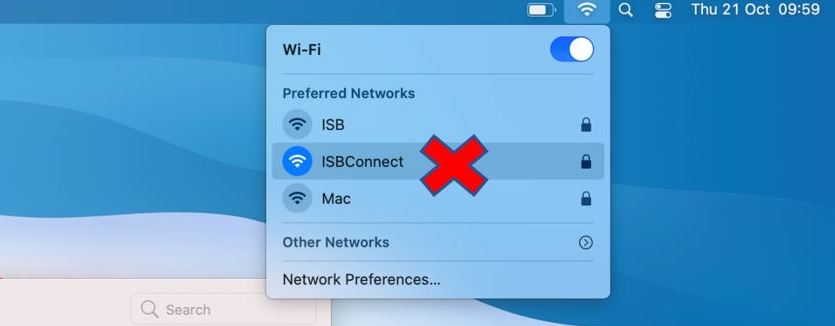
If your print jobs stay in your queue with the message Ready to Print, the usual fix is to make sure that you are connected to ISB and then press the Play button in the upper right corner.

Once the print jobs disappear, you can find them in the copier queue.
Good to know: printing only works if connected to the ISB network.
If you print and the Mac cannot communicate with the printer, it automatically pauses the process.
It could happen if you are not on the ISB network. For example, if you do not want to forget and print something from home.
Unfortunately, the Macs do not resume printing when the communication is reestablished, not even when you print something new.