Interactive Displays
HOWTOs and resources
- Hardware introduction (the screen itself)
- Side View of the Interactive Display - Ports and Connectivity
- Android Lookaround
- Whiteboarding (Notes app)
- Windows Lookaround
- Lynx - Basic User Manual, Icon Guide and HOWTOs
- File Stream (Google Drive)
- Clevershare
- Connect to an Interactive Display using Apple TV
- Connect to an Interactive Display using Miracast (CH, MS and HS)
- Camera Sign In - Windows Hello Setup
- Sign out - Shut down
Hardware introduction (the screen itself)
- Powering on and off / stand by
- Changing inputs (Windows OPS, Android OPS, Miracast / Apple TV)
- Volume / Brightness
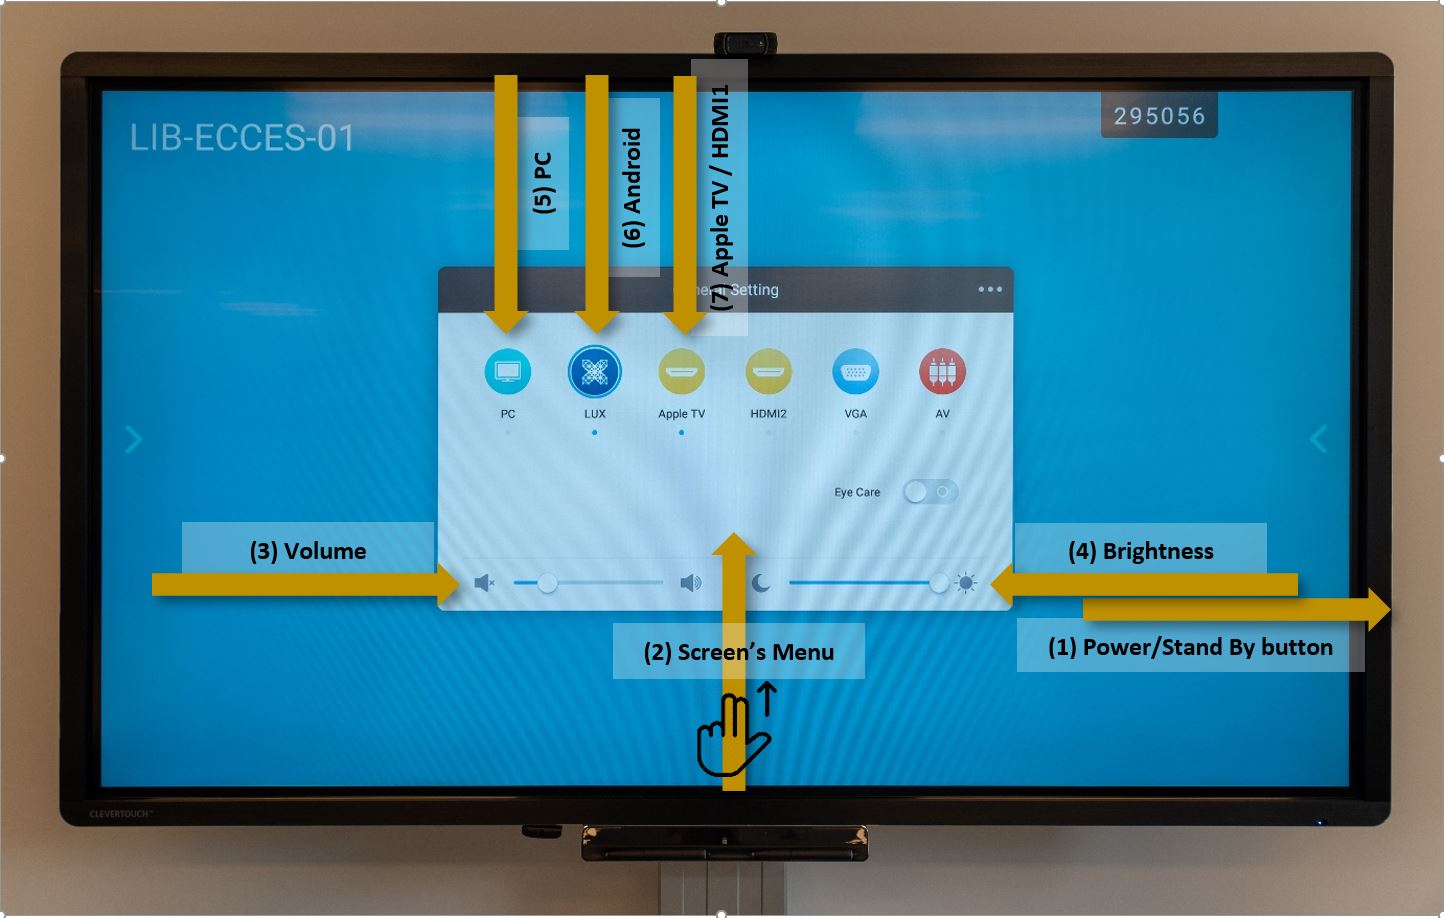
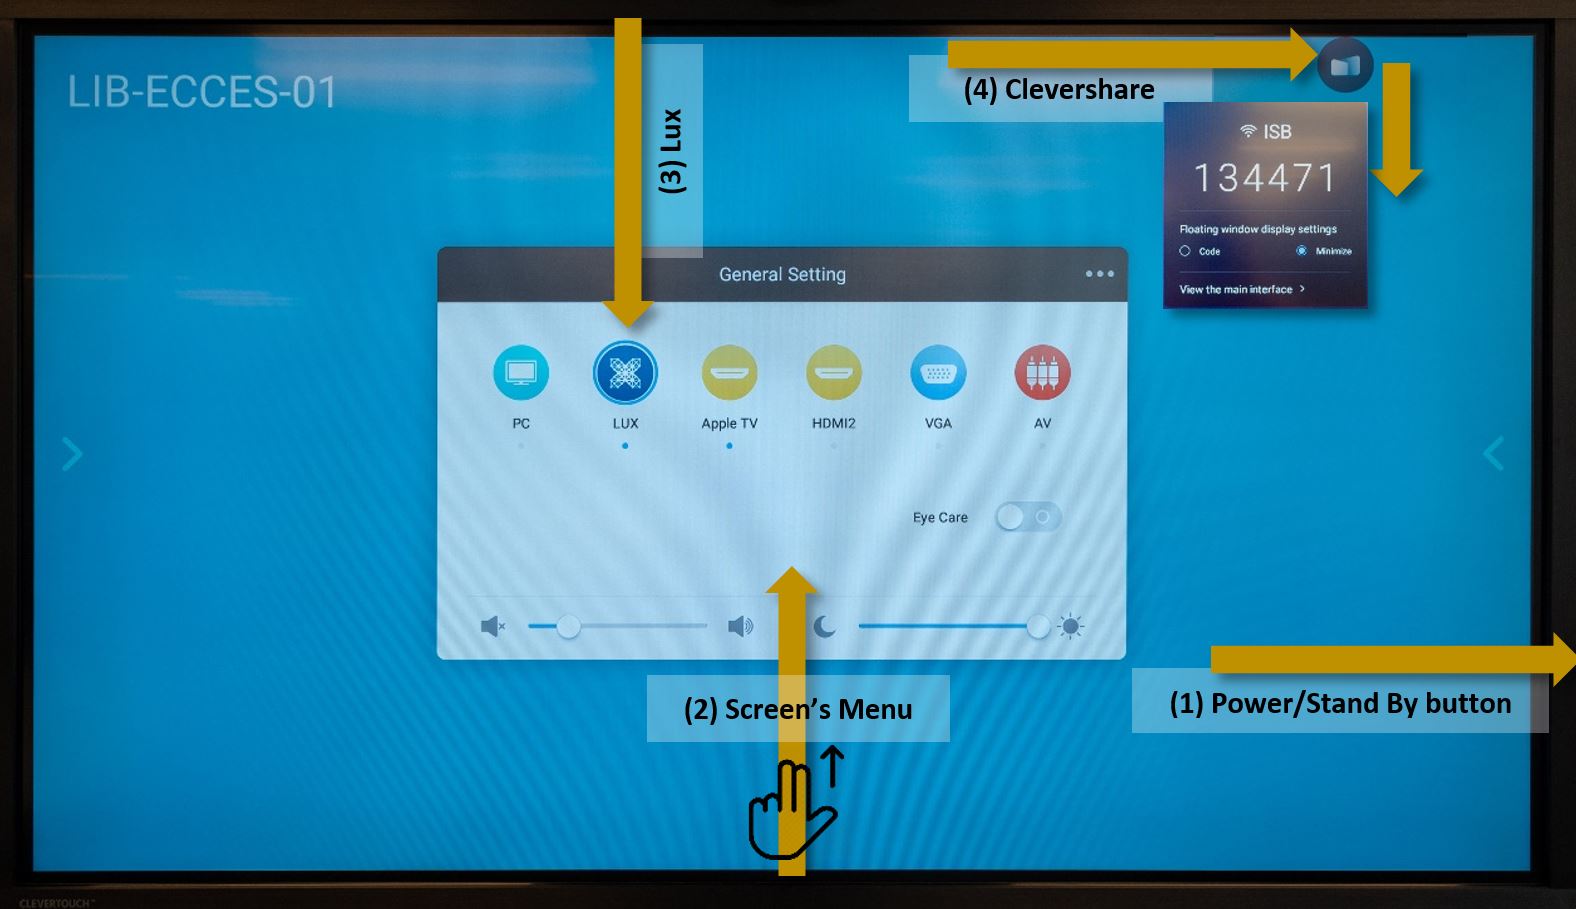
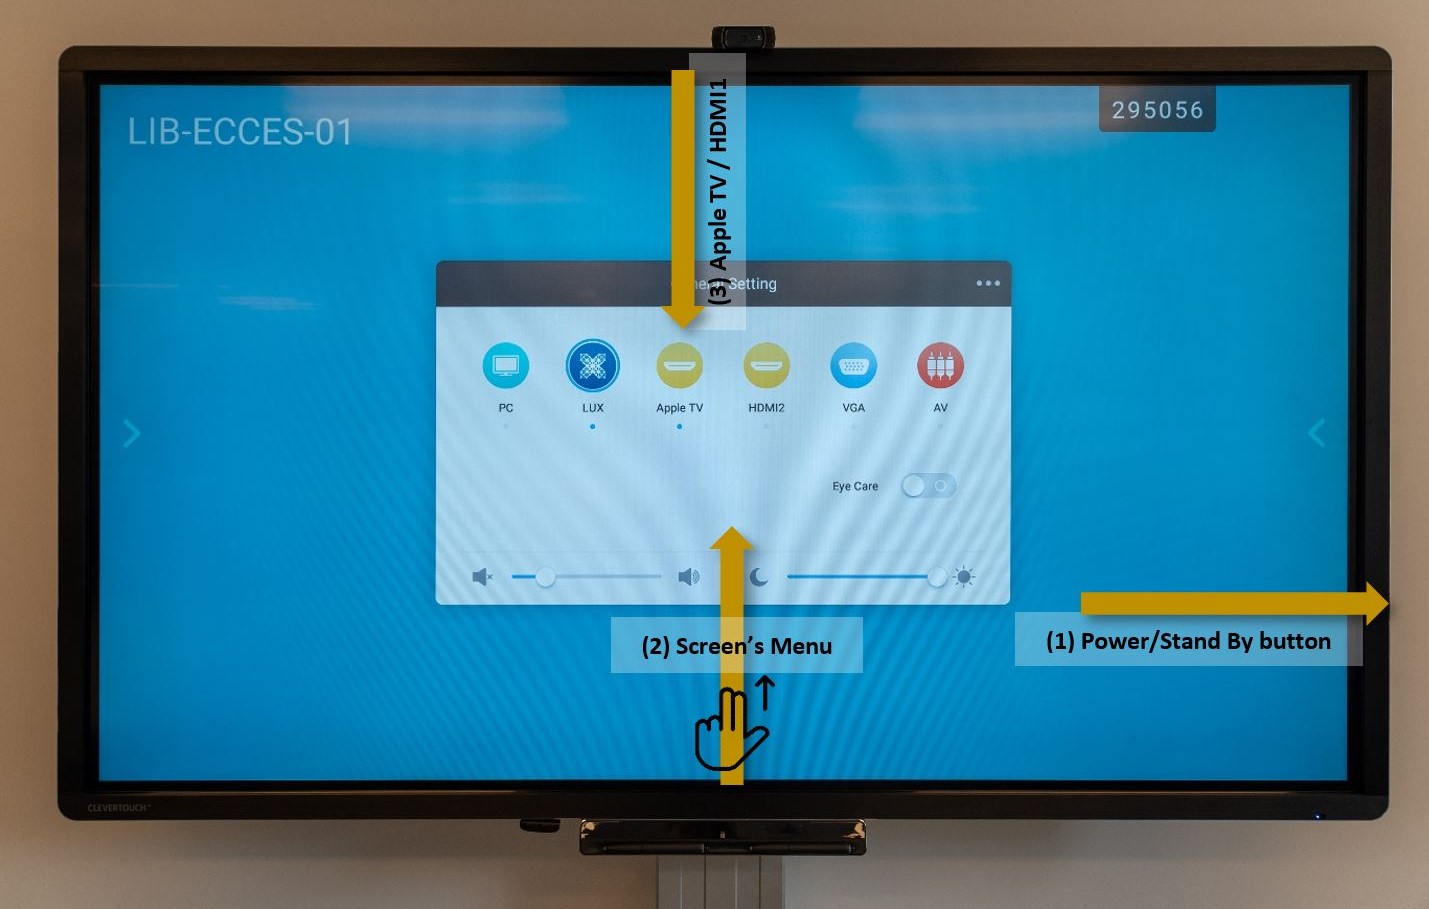
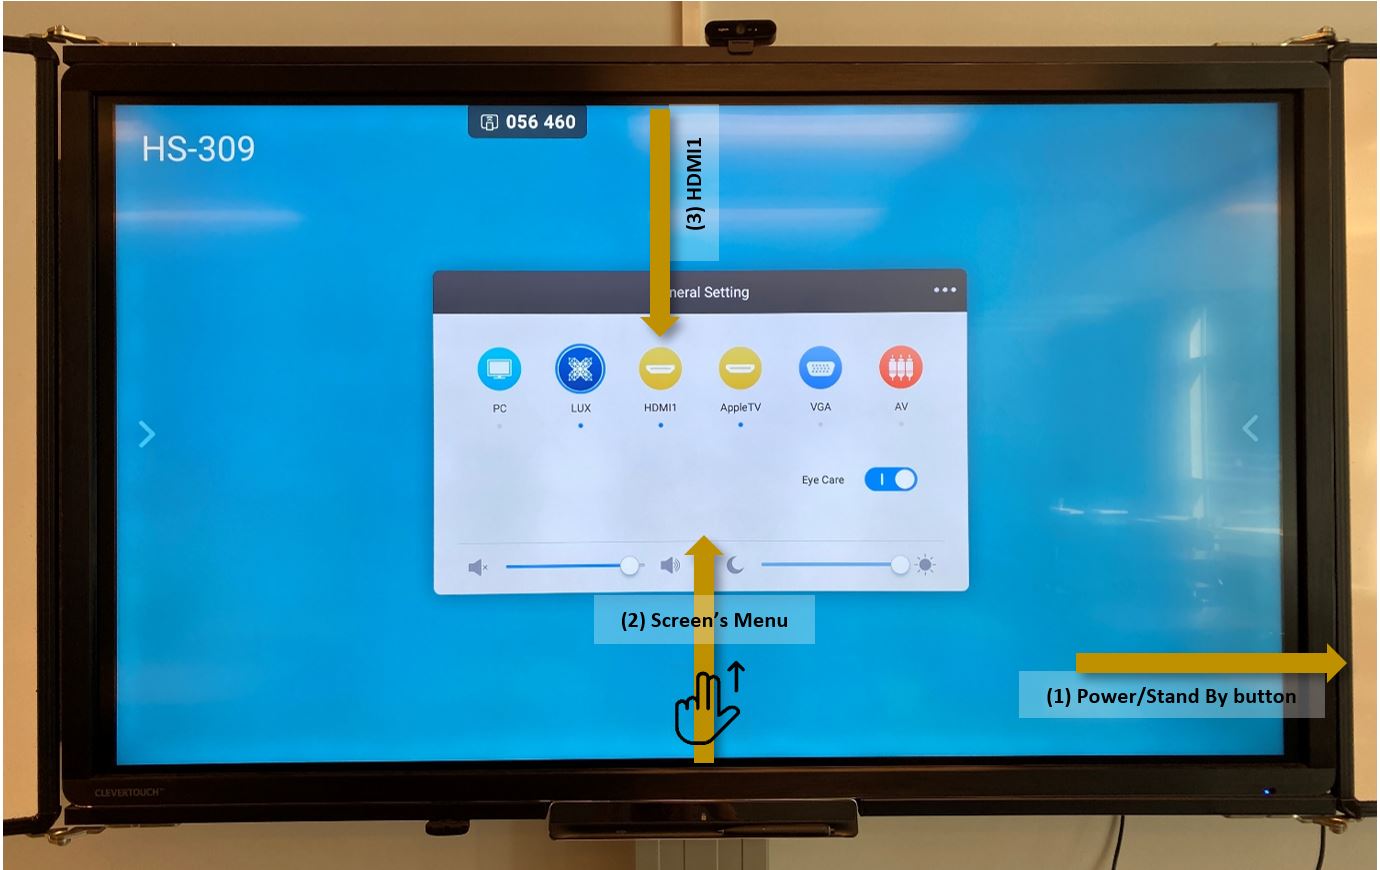
(1) To Turn On the Interactive Display (ID) - Press the Power Button once on the side of the Interactive Display
To put the ID in Stand By (turn the screen black) - Short press the Power Button
To Shut Down the ID - Long press the Power Button - a menu will pop up - select OK to immediately shut down; select Cancel to cancel the shut down; do nothing and the ID will shut down in 10 seconds.
(3) Volume - move the left slider to change the sound volume.
(4) Brightness - move the right slider to change the display brightness.
Change the ID's Input:
Select:
(5) PC - to change to (and turn on) the PC module.
(6) Lux - to change to (and turn on) the Android module.
(7) Apple TV / HDMI1 - to wake up the Apple TV (ECC/ES) or the Miracast (MS/HS/CH) devices connected to the ID. Mirror your Apple or Windows/Android devices respectively by connecting them to the Apple TV or the Miracast devices. The procedure is similar to how we connected to the projectors in the past. More info here (Apple TV) and here (Miracast).
Side View of the Interactive Display - Ports and Connectivity
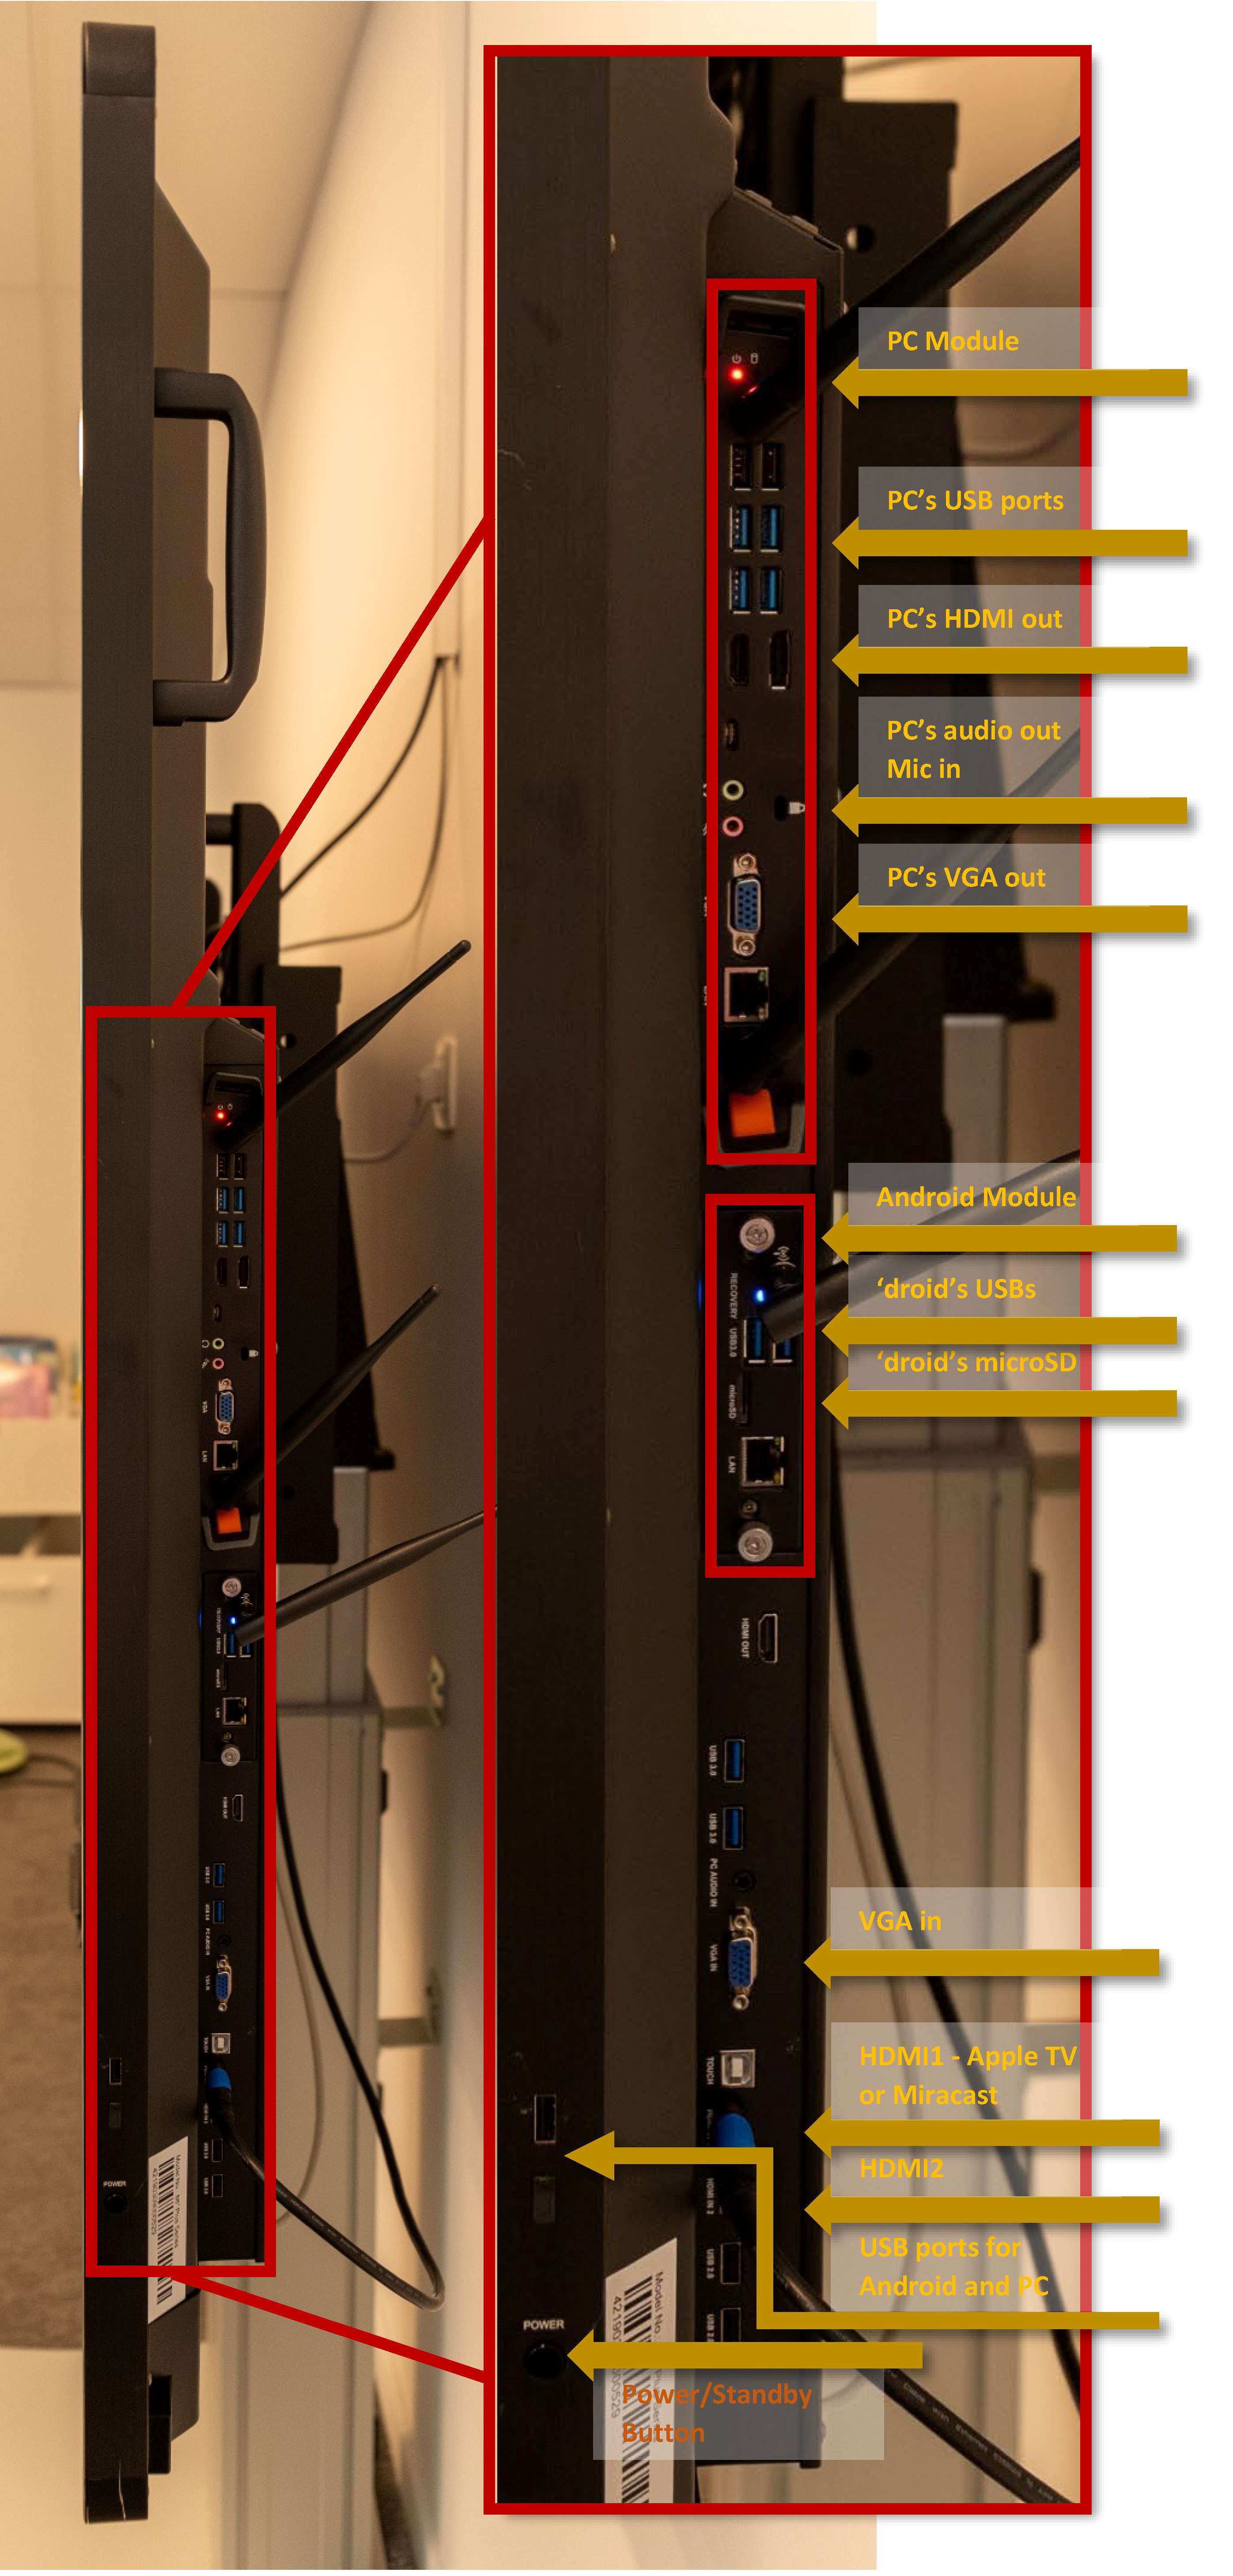 |
You can use the PC's module ports to:
If a device is plugged in the PC's USB ports it will only be available for the PC - in Windows.
If the device is compatible with both Android and Windows (ex. an USB flash drive) and you want to make the device available for both, please use the common USB ports for Android and PC that can be found above the power button, remove the plastic cover if needed.
You can use the Android's module ports to:
If a device is plugged in the Android's USB ports it will only be available for Android - Lux.
To make the device available for both Android and PC please see above.
You can use the ID's ports to:
|
Android Lookaround
- Explore and manage files
- Cleverstore
- Other apps (apps can be requested and “pushed” to screens by IT
- Switch between active apps
- Favorites
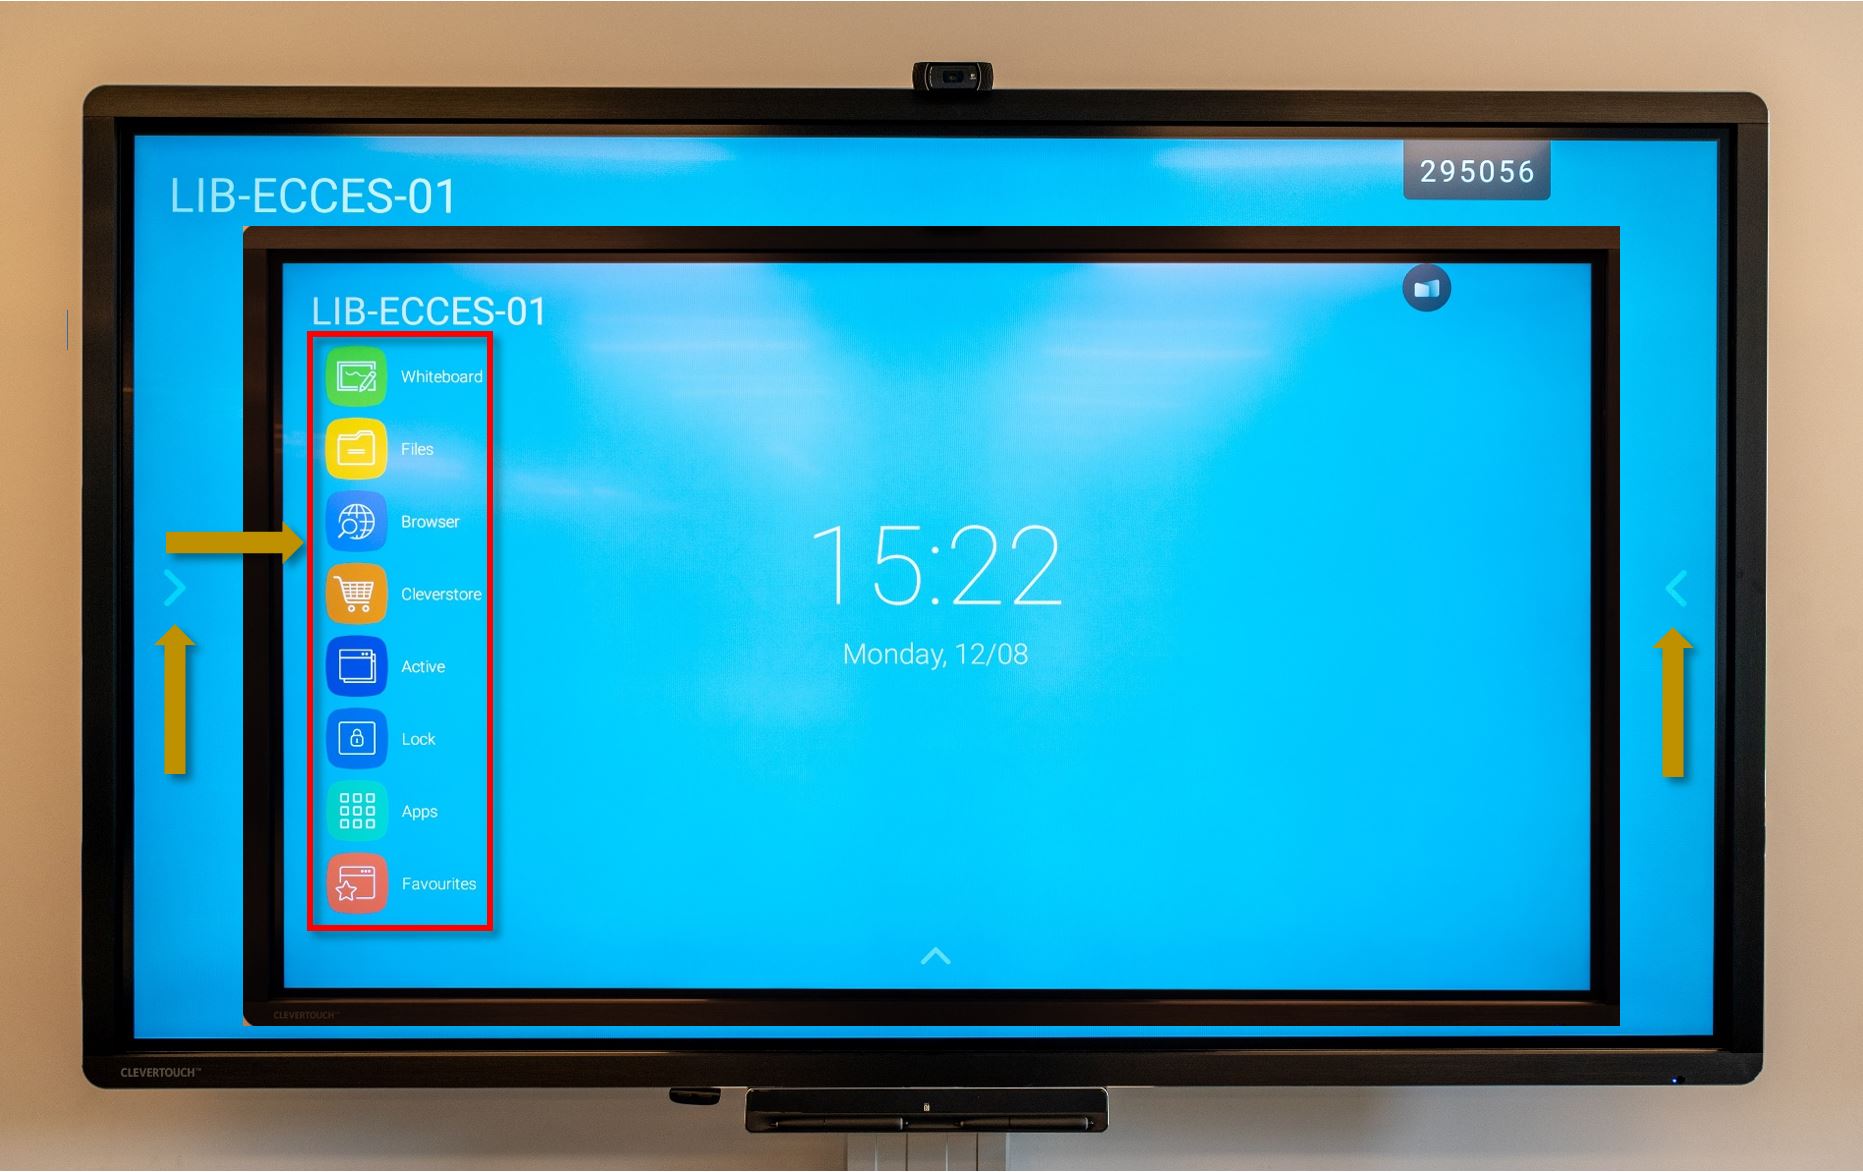
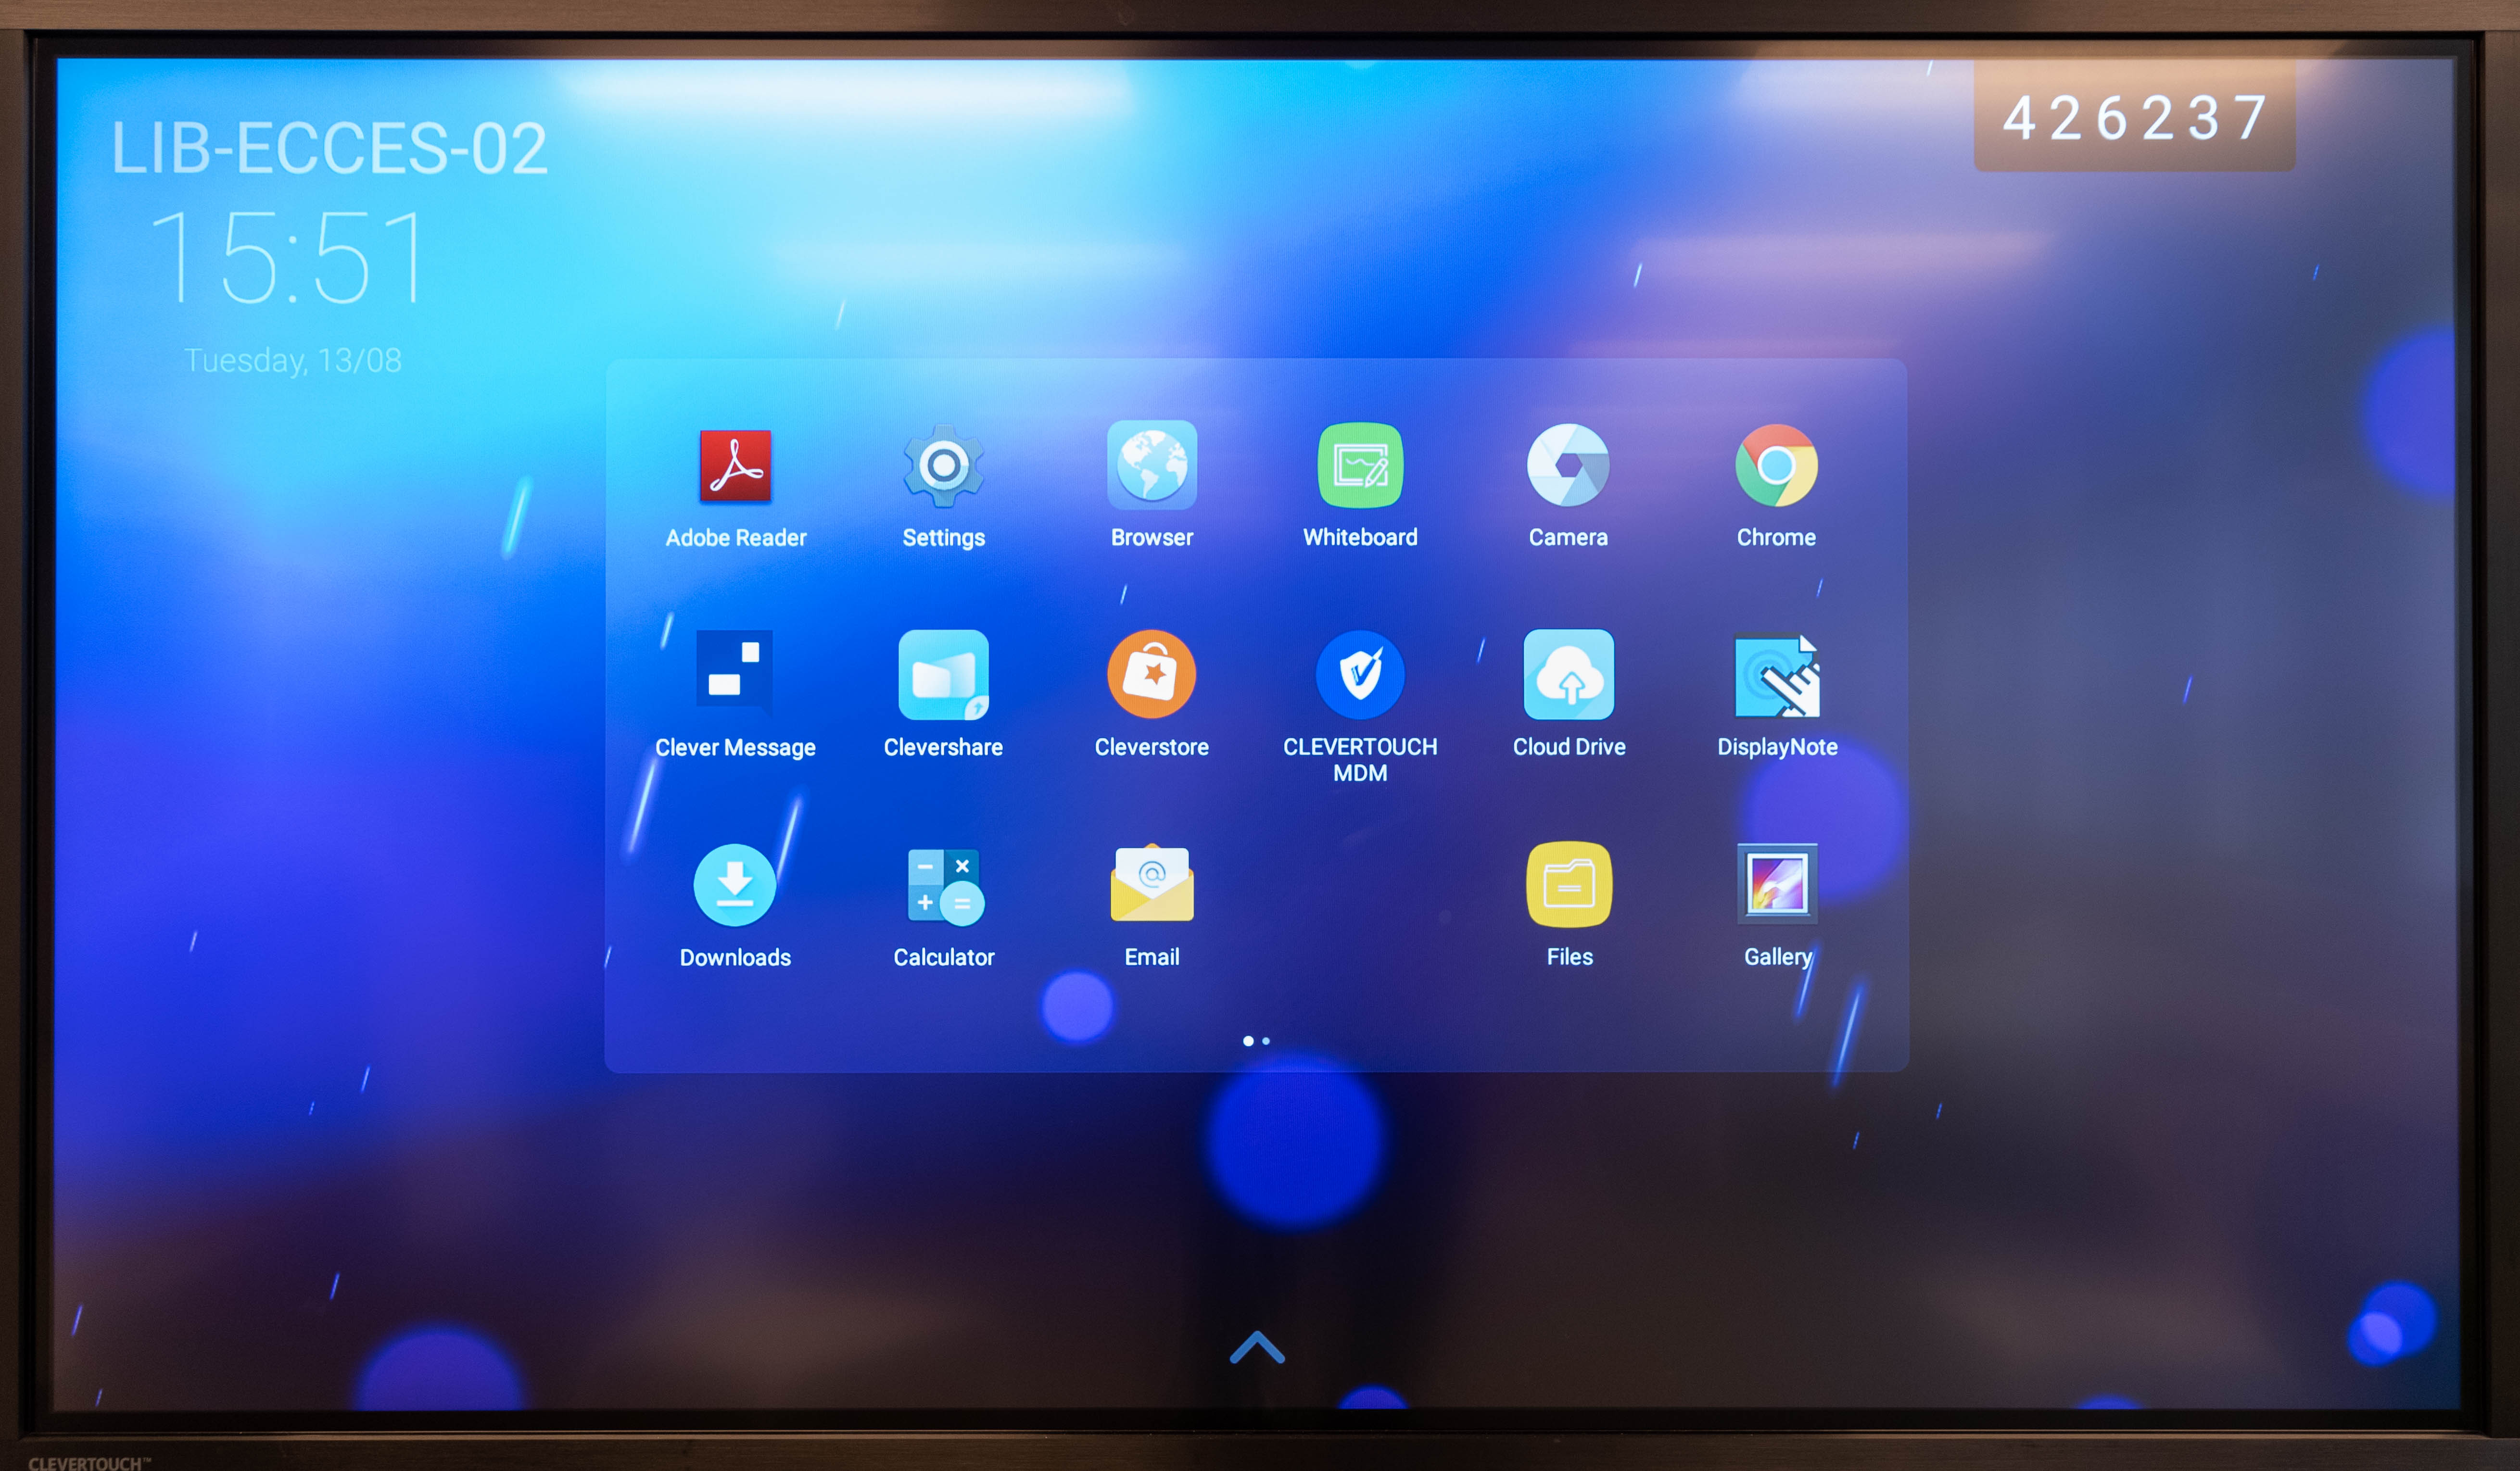
While on the Android (LUX) module, click on the side arrows to make the side menu show up. Inside you will find the following apps and tools:
Whiteboard - a simple and fast whiteboarding tool - you can find a more in depth look here.
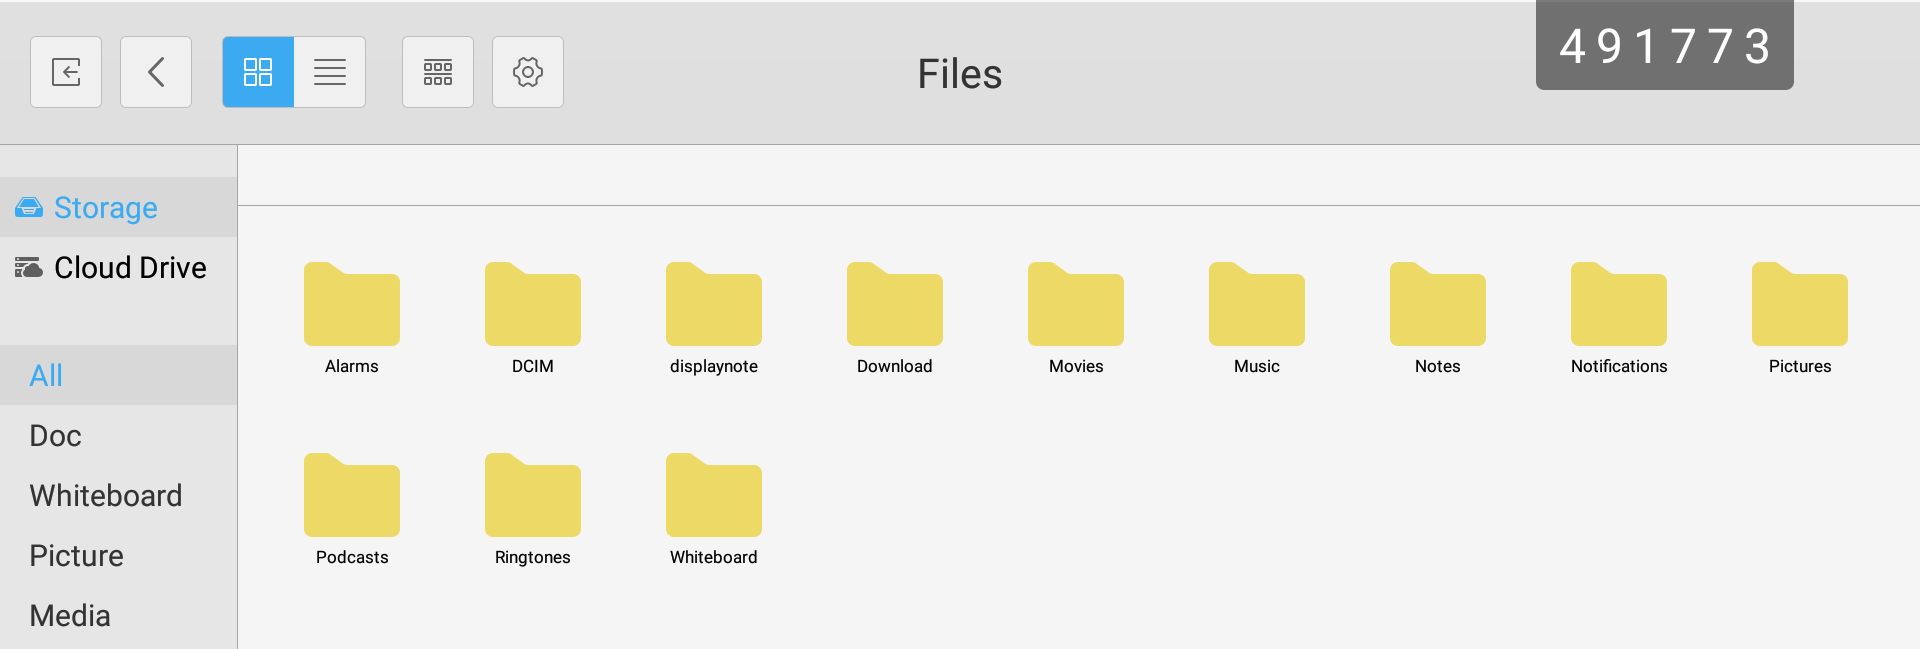
Files - lets you explore and manage (move, copy, delete, create, rename, etc.) the files and folders of the local system and all the external connected devices (ex. an USB flash drive).
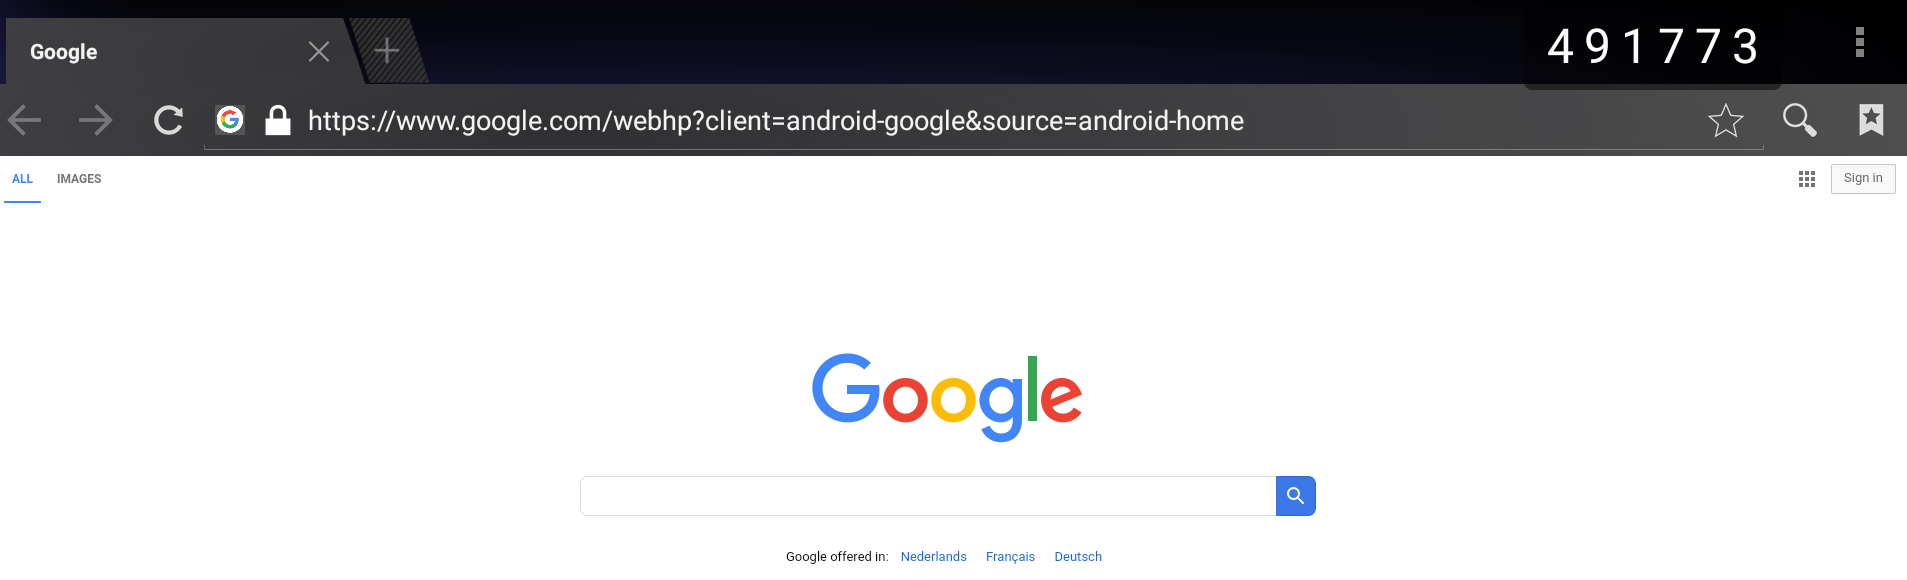
Browser - a simple internet browser. Chrome based.
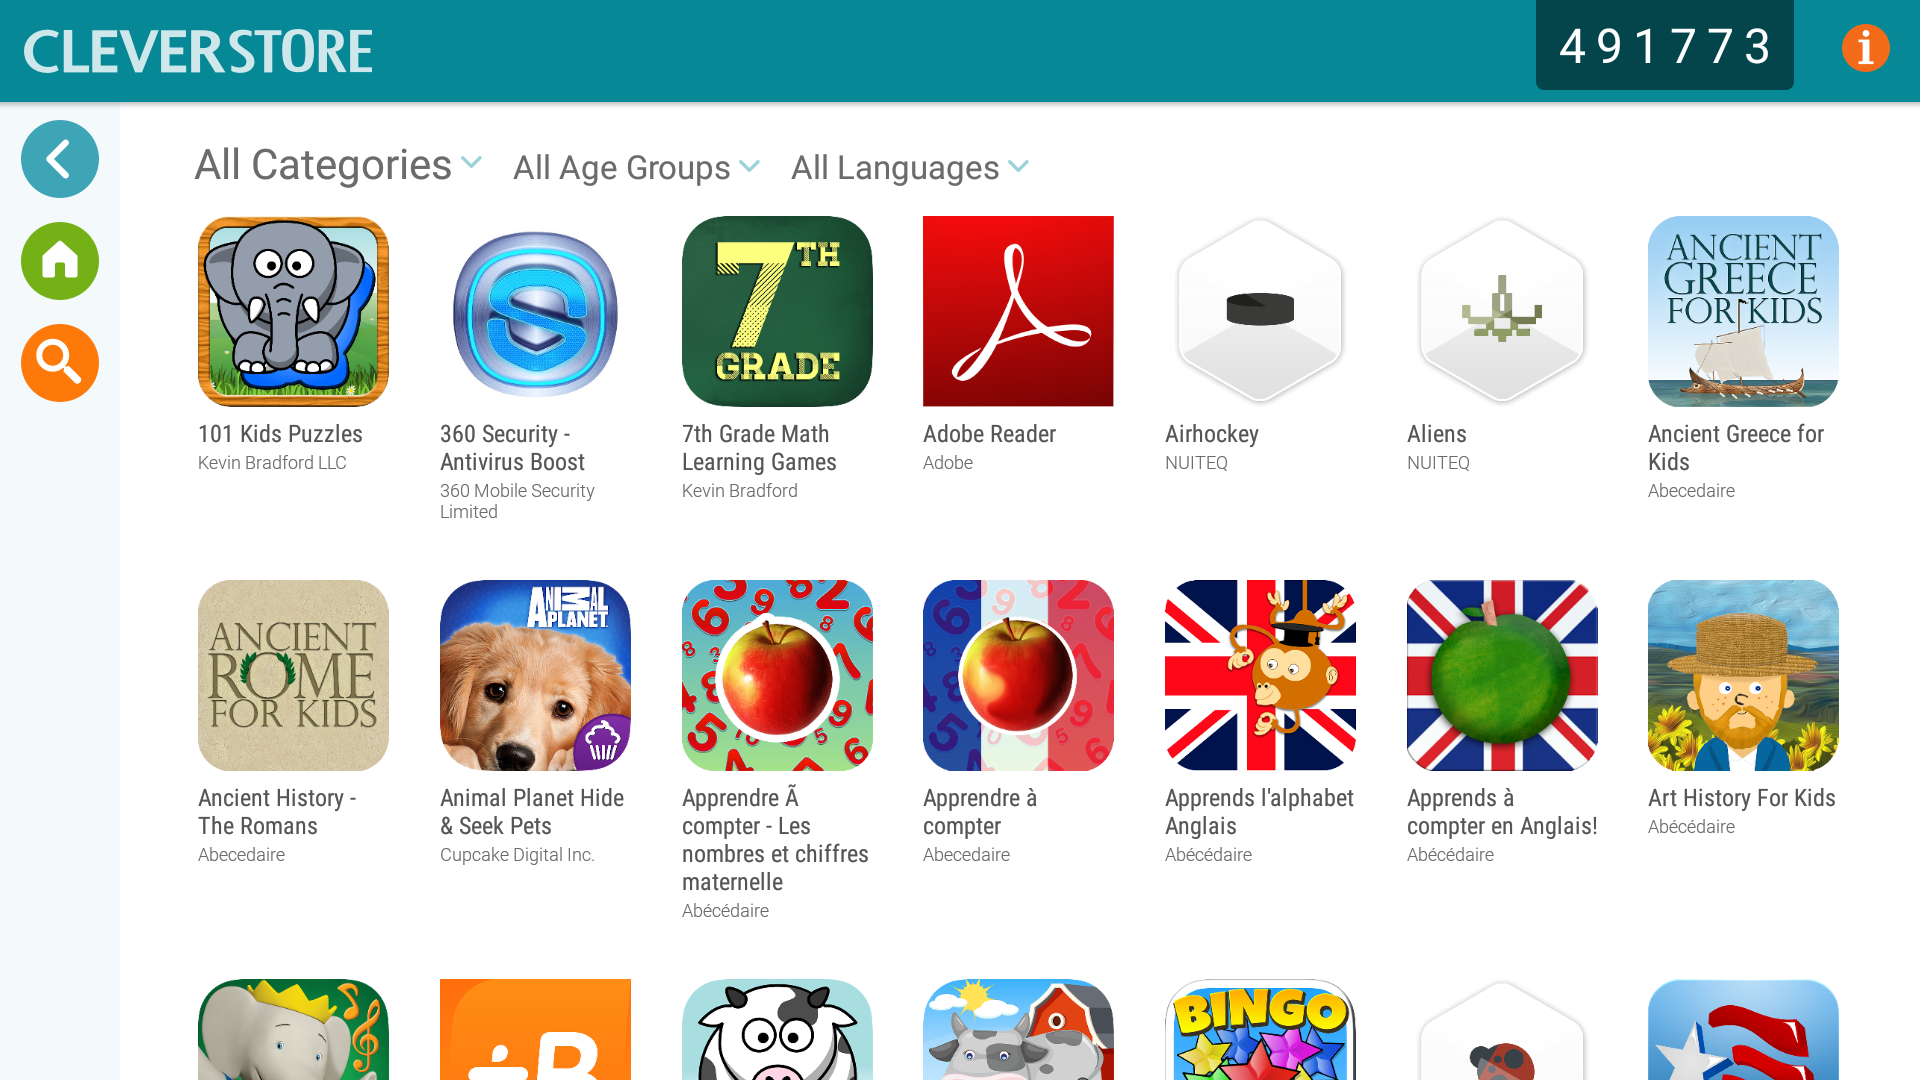
Cleverstore - is a portal to numerous educational apps. Browse, install, test and use the ones you like. After an app is installed it can be found under Apps.
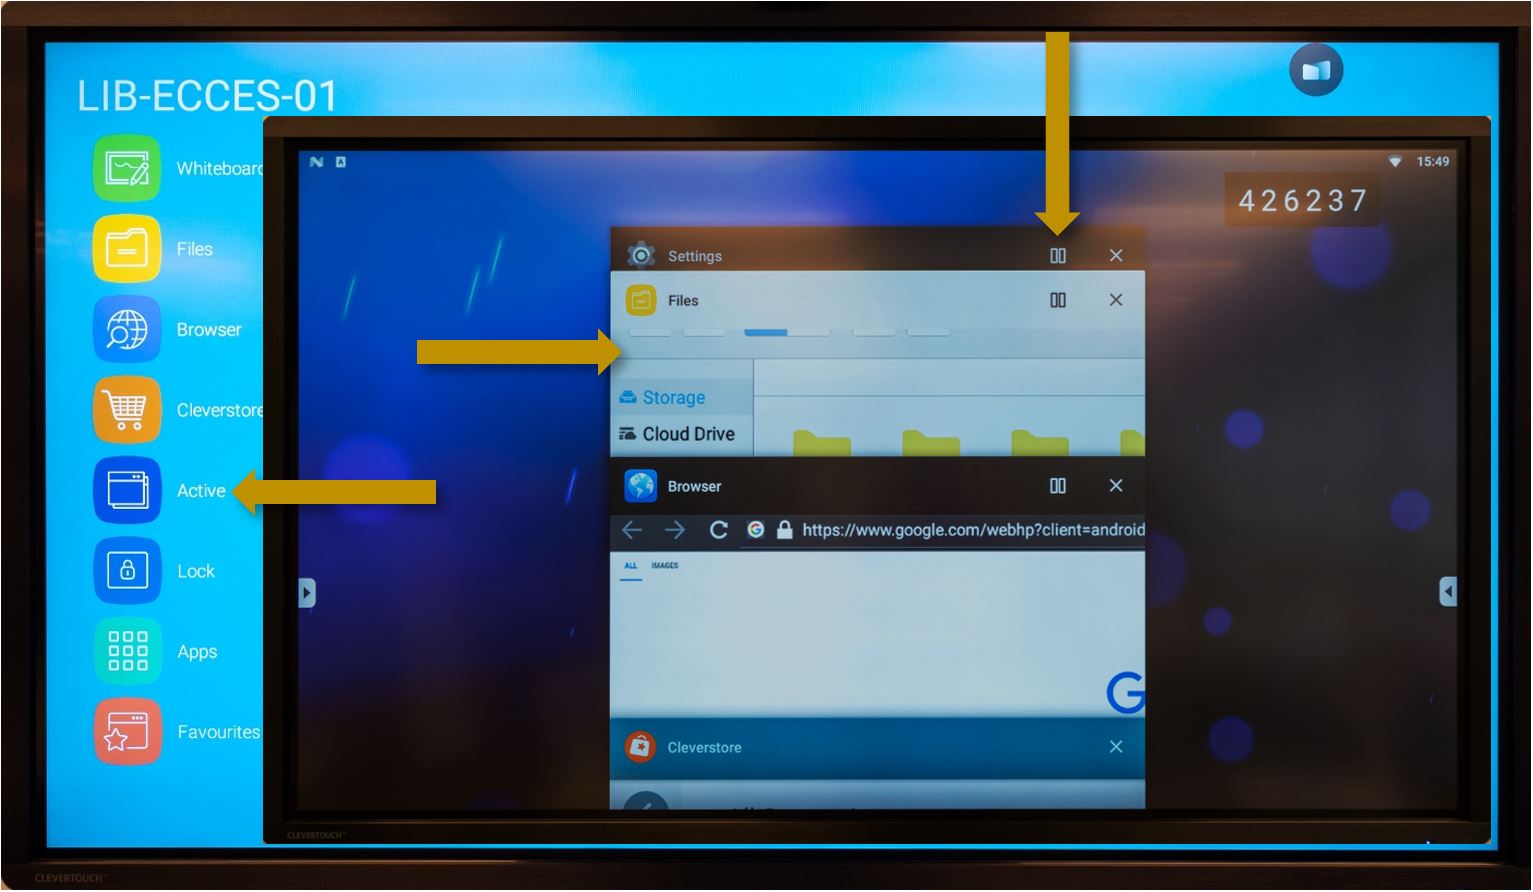
Active and Splitscreen mode:
To switch between the active apps (for example between the Browser and the Whiteboard) without closing them click on the Active icon and select the desired app.
If needed, 2 apps can be used at the same time (for example the Browser and the Whiteboard). While in "Active" mode click on the ∏∏ option in the upper right corner of the active panels to open them on only half the screen.
While in splitscreen mode move the separator to make the working area of the left or the right app smaller or bigger.
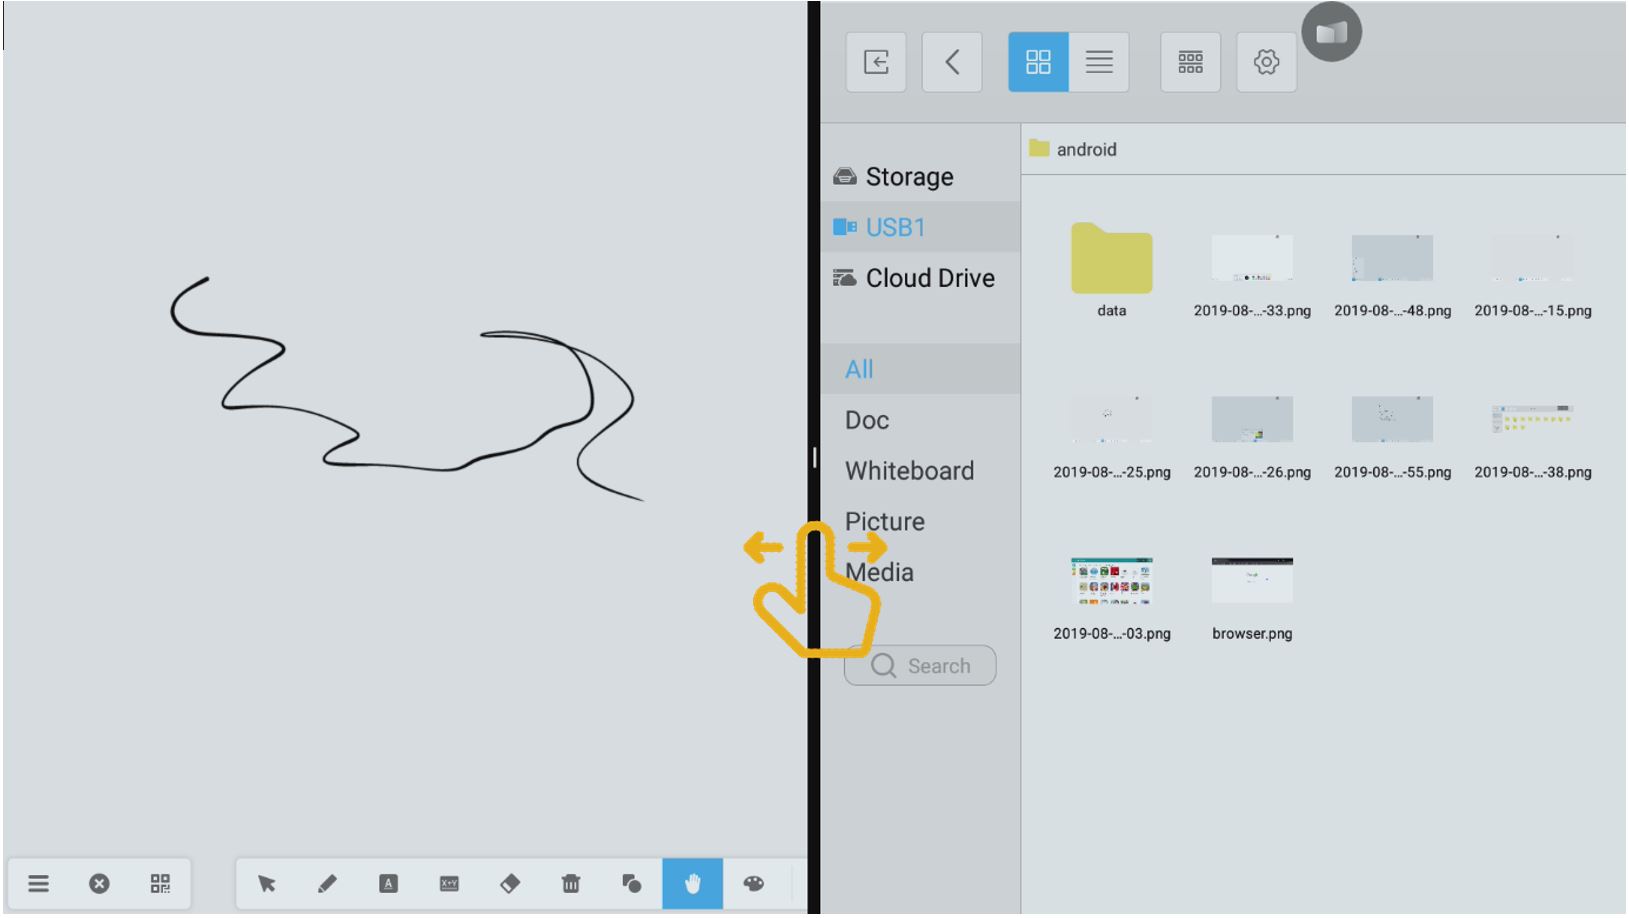
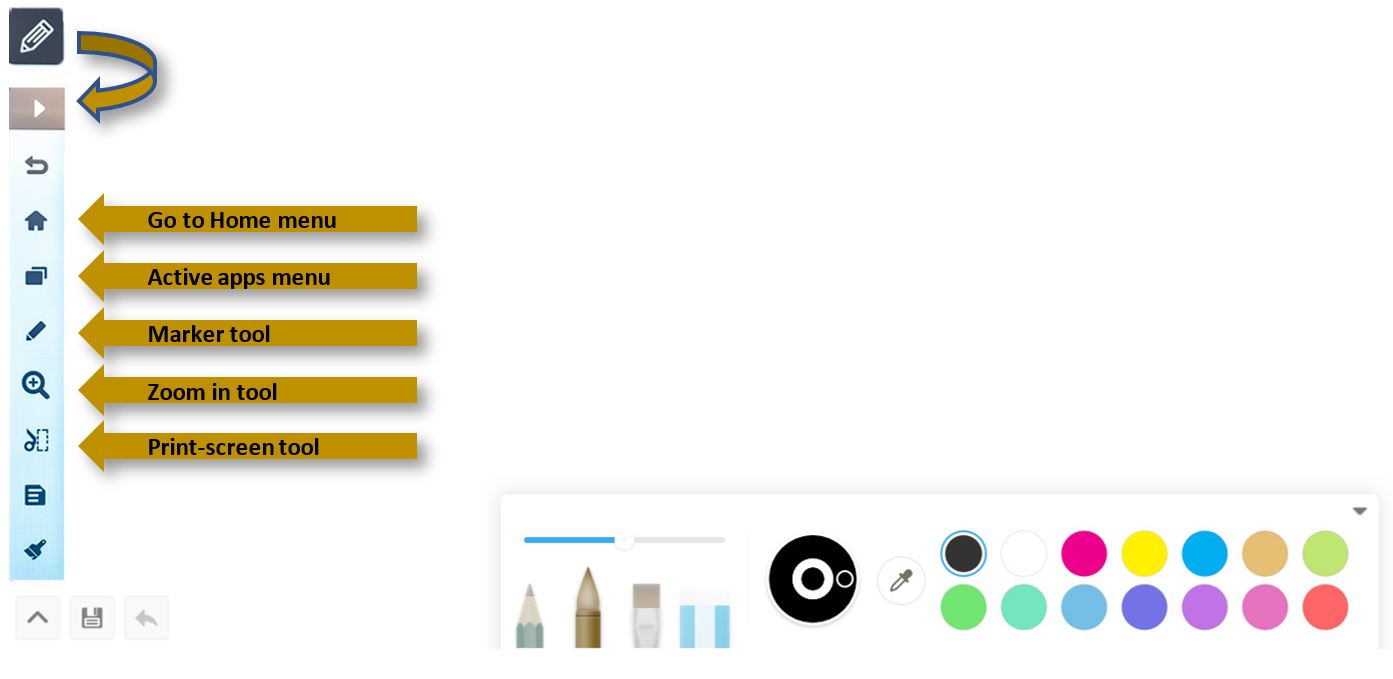
While using an app you can use the bubble menu to go back to the home screen, change between apps, use the marking tool, zoom in on a portion of the screen or take a print-screen. Some of these options may not be available at all times.
Lock - to lock the Lux module (for the moment it doesn't do anything special)
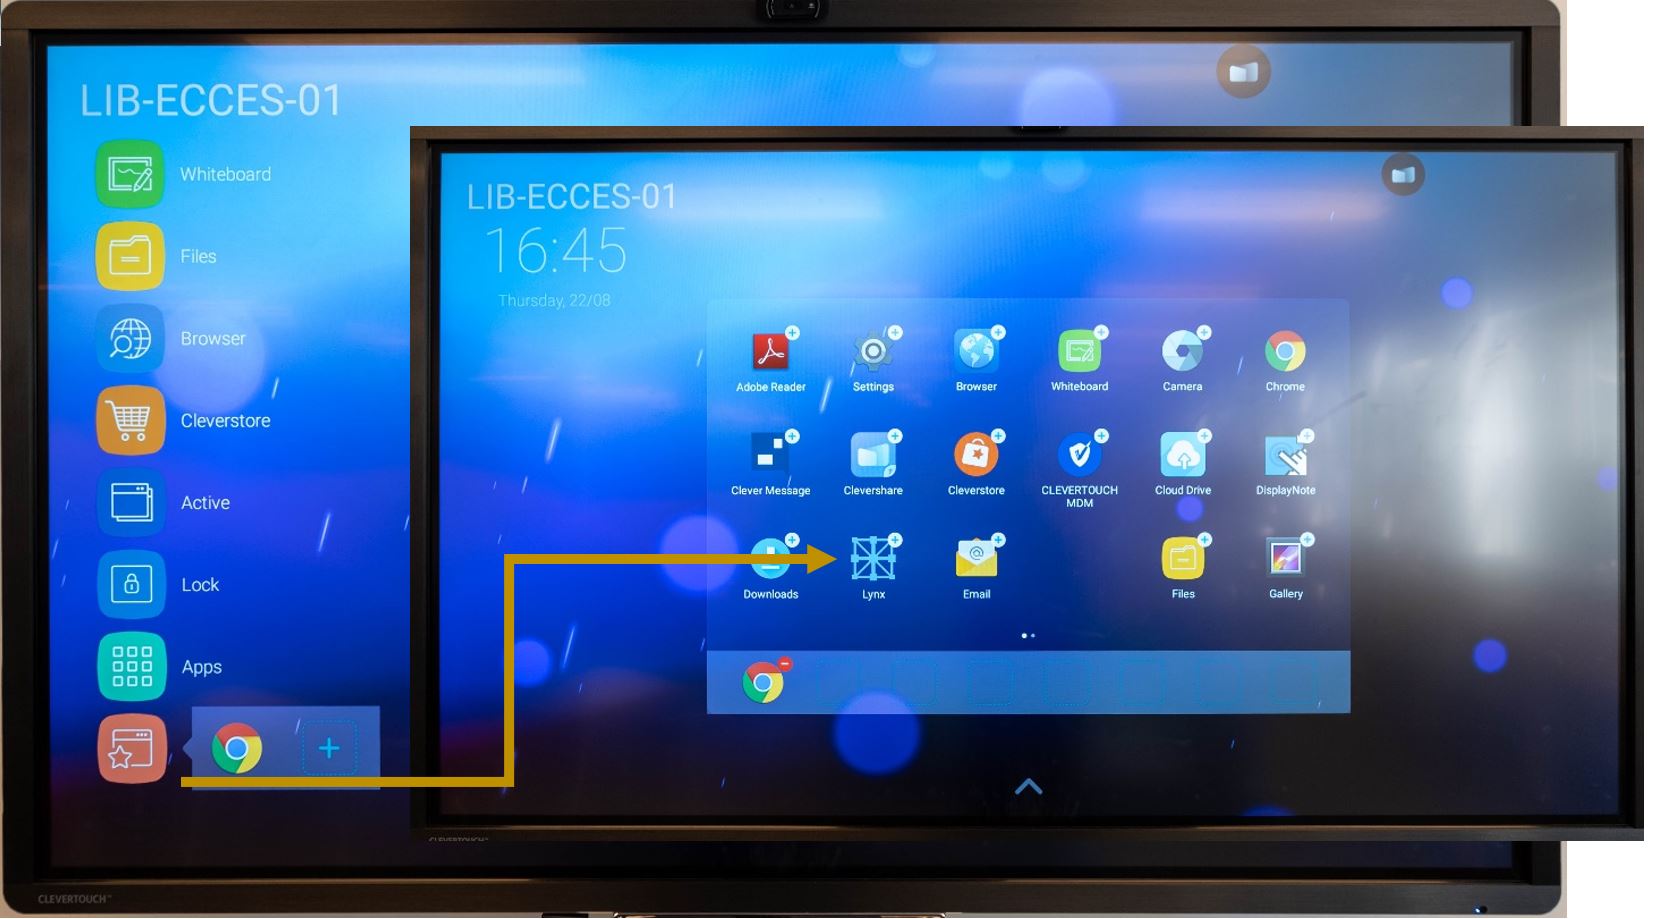
Apps - browse and open the installed apps, including the ones added using the Cleverstore. If you find an app either on the App store or the Google Play store that could be interesting to use on the Interactive Displays ask the IT team to check. If it's compatible with the interactive displays and GDPR friendly we will install it for you.
Favorites - can be used to bookmark the favorite apps from the Apps panel.
Whiteboarding (Notes app)
While on the Android (LUX) module, click on the side arrows to make the side menu show up.
Select Whiteboard to open the Notes app.

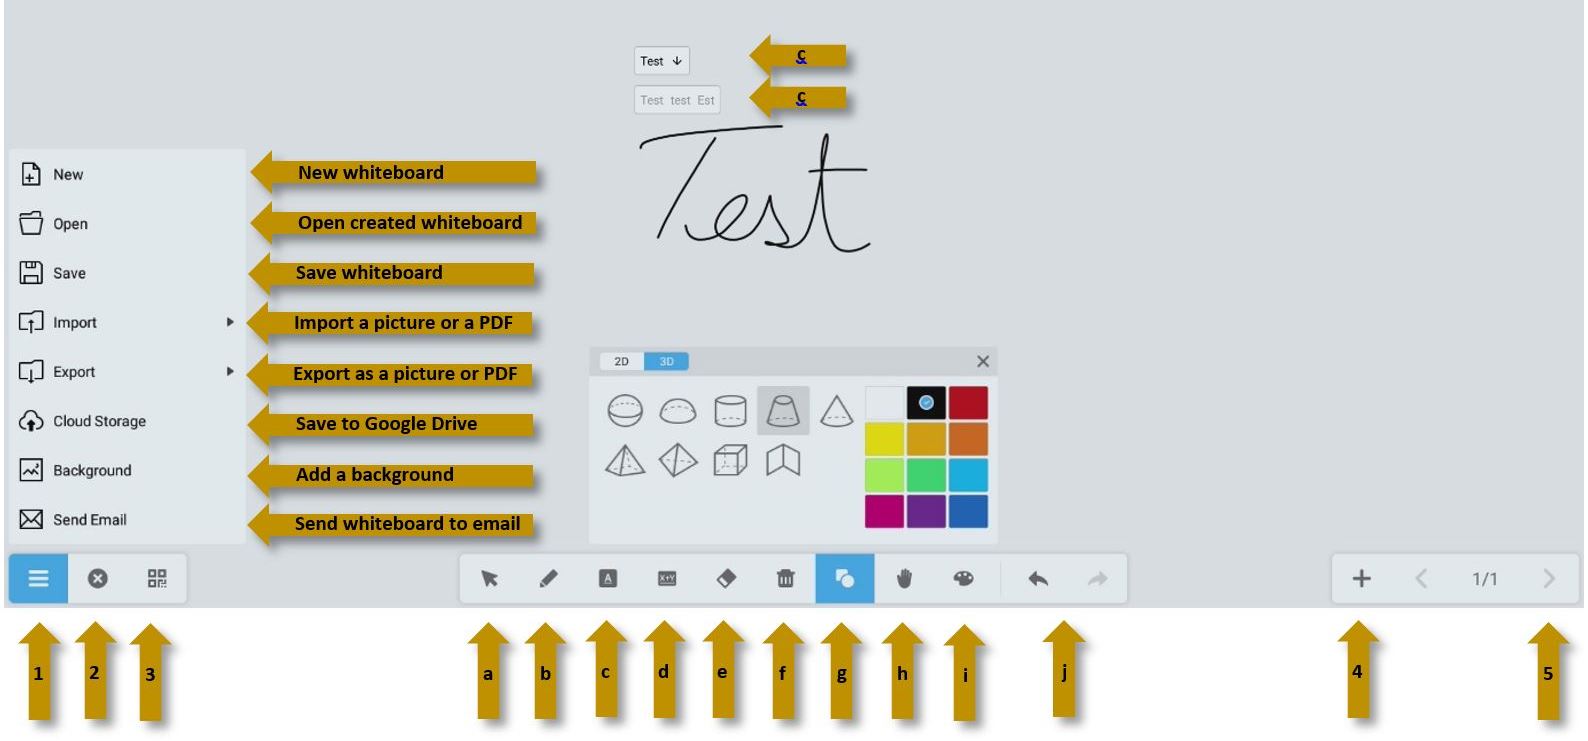
2. Close (x) the Notes (Whiteboard) App
3. Create a QR code ![]() and share the Whiteboard with any device that can scan it and is on the same wireless network
and share the Whiteboard with any device that can scan it and is on the same wireless network
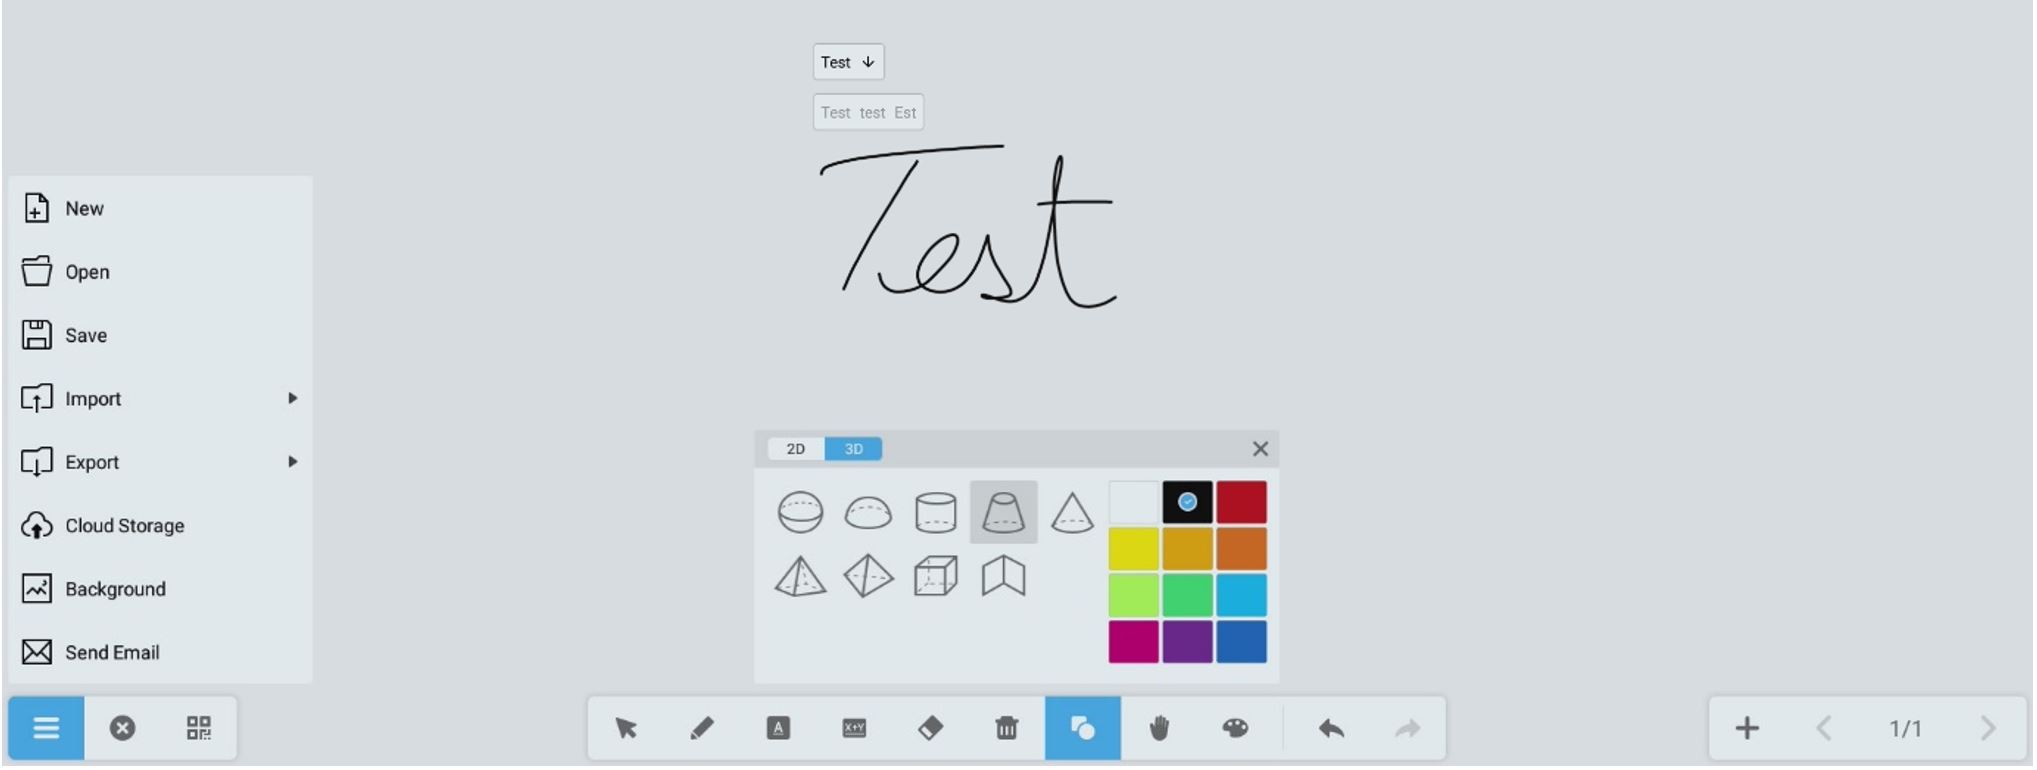
4. Press the + to add a page
5. Press the <> arrows to browse between pages
a, b, c, d, etc. tools
a. use the Select ↖ tool to select and move objects (text, shapes, doodles etc.) around, resize (pinch with two fingers and extend to zoom) and rotate (pinch with two fingers and rotate).
b. select the Pen tool to start drawing. After the tool is selected press it again for extra options. In this case, styles, colors and sizes.
c. select the Text Recognition tool and start writing. The app will recognize the text and it will give you 3 variants of what it thinks you wrote. Select the correct option and press the arrow to change the handwriting into typed text. If the text is too small use the select tool to select it then pinch and zoom.
d. select the Math Recognition tool and start writing. The app will try to recognize the numbers and mathematical symbols that you used.
e. select the Eraser and start erasing. You can use your fist for heavier strokes or cross multiple objects to erase all selected. Create a circle and everything inside will disappear.
f. select the Trash Bin (clear all) tool and erase the whole board (use the undo button j. if you press it by mistake).
g. select the Shapes tool and start drawing shapes. After the tool is selected press it again for extra options. In this case, 2D objects, 3D objects and color.
h. select the Hand tool to extend the board - grab the whiteboard and move in any direction. Pinch and zoom if needed - everything will become smaller or bigger. Press the Hand tool again for a map of the whole whiteboard. Tap the map in the desired location for a quick jump to that location.
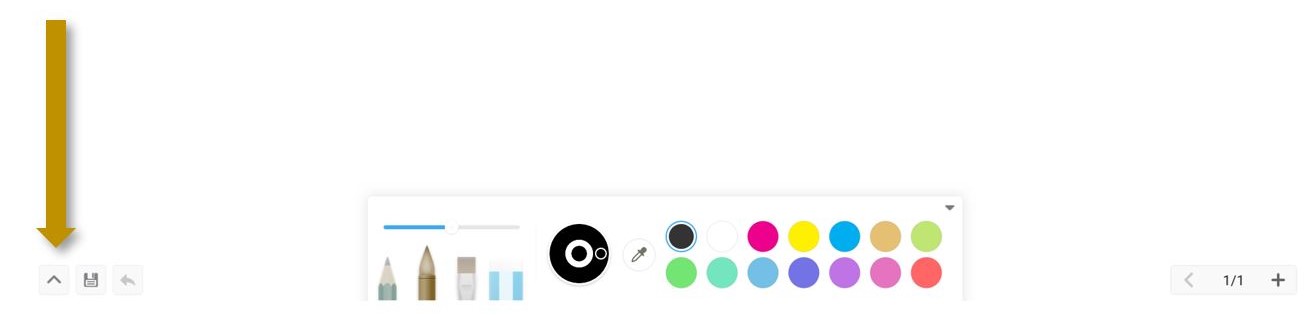
i. select the Painter Pallete option to open a canvas and tools for more artistic purposes (please see underneath). To switch between the normal whiteboard style and the artistic canvas click on the arrow in the lower left corner and the the Painter Pallete icon respectively.
j. Undo or Redo.
Windows Lookaround
Log in, Search, Explorer, Chrome, Lynx, On-Screen Keyboard, Lock and Sign out.
To access the PC (Windows) module please select the PC input (5) in the Interactive Display menu.
If you are welcomed by the underneath screen of gloom do not panic, it usually just means that the PC module is sleeping. Touch the screen to wake it up.
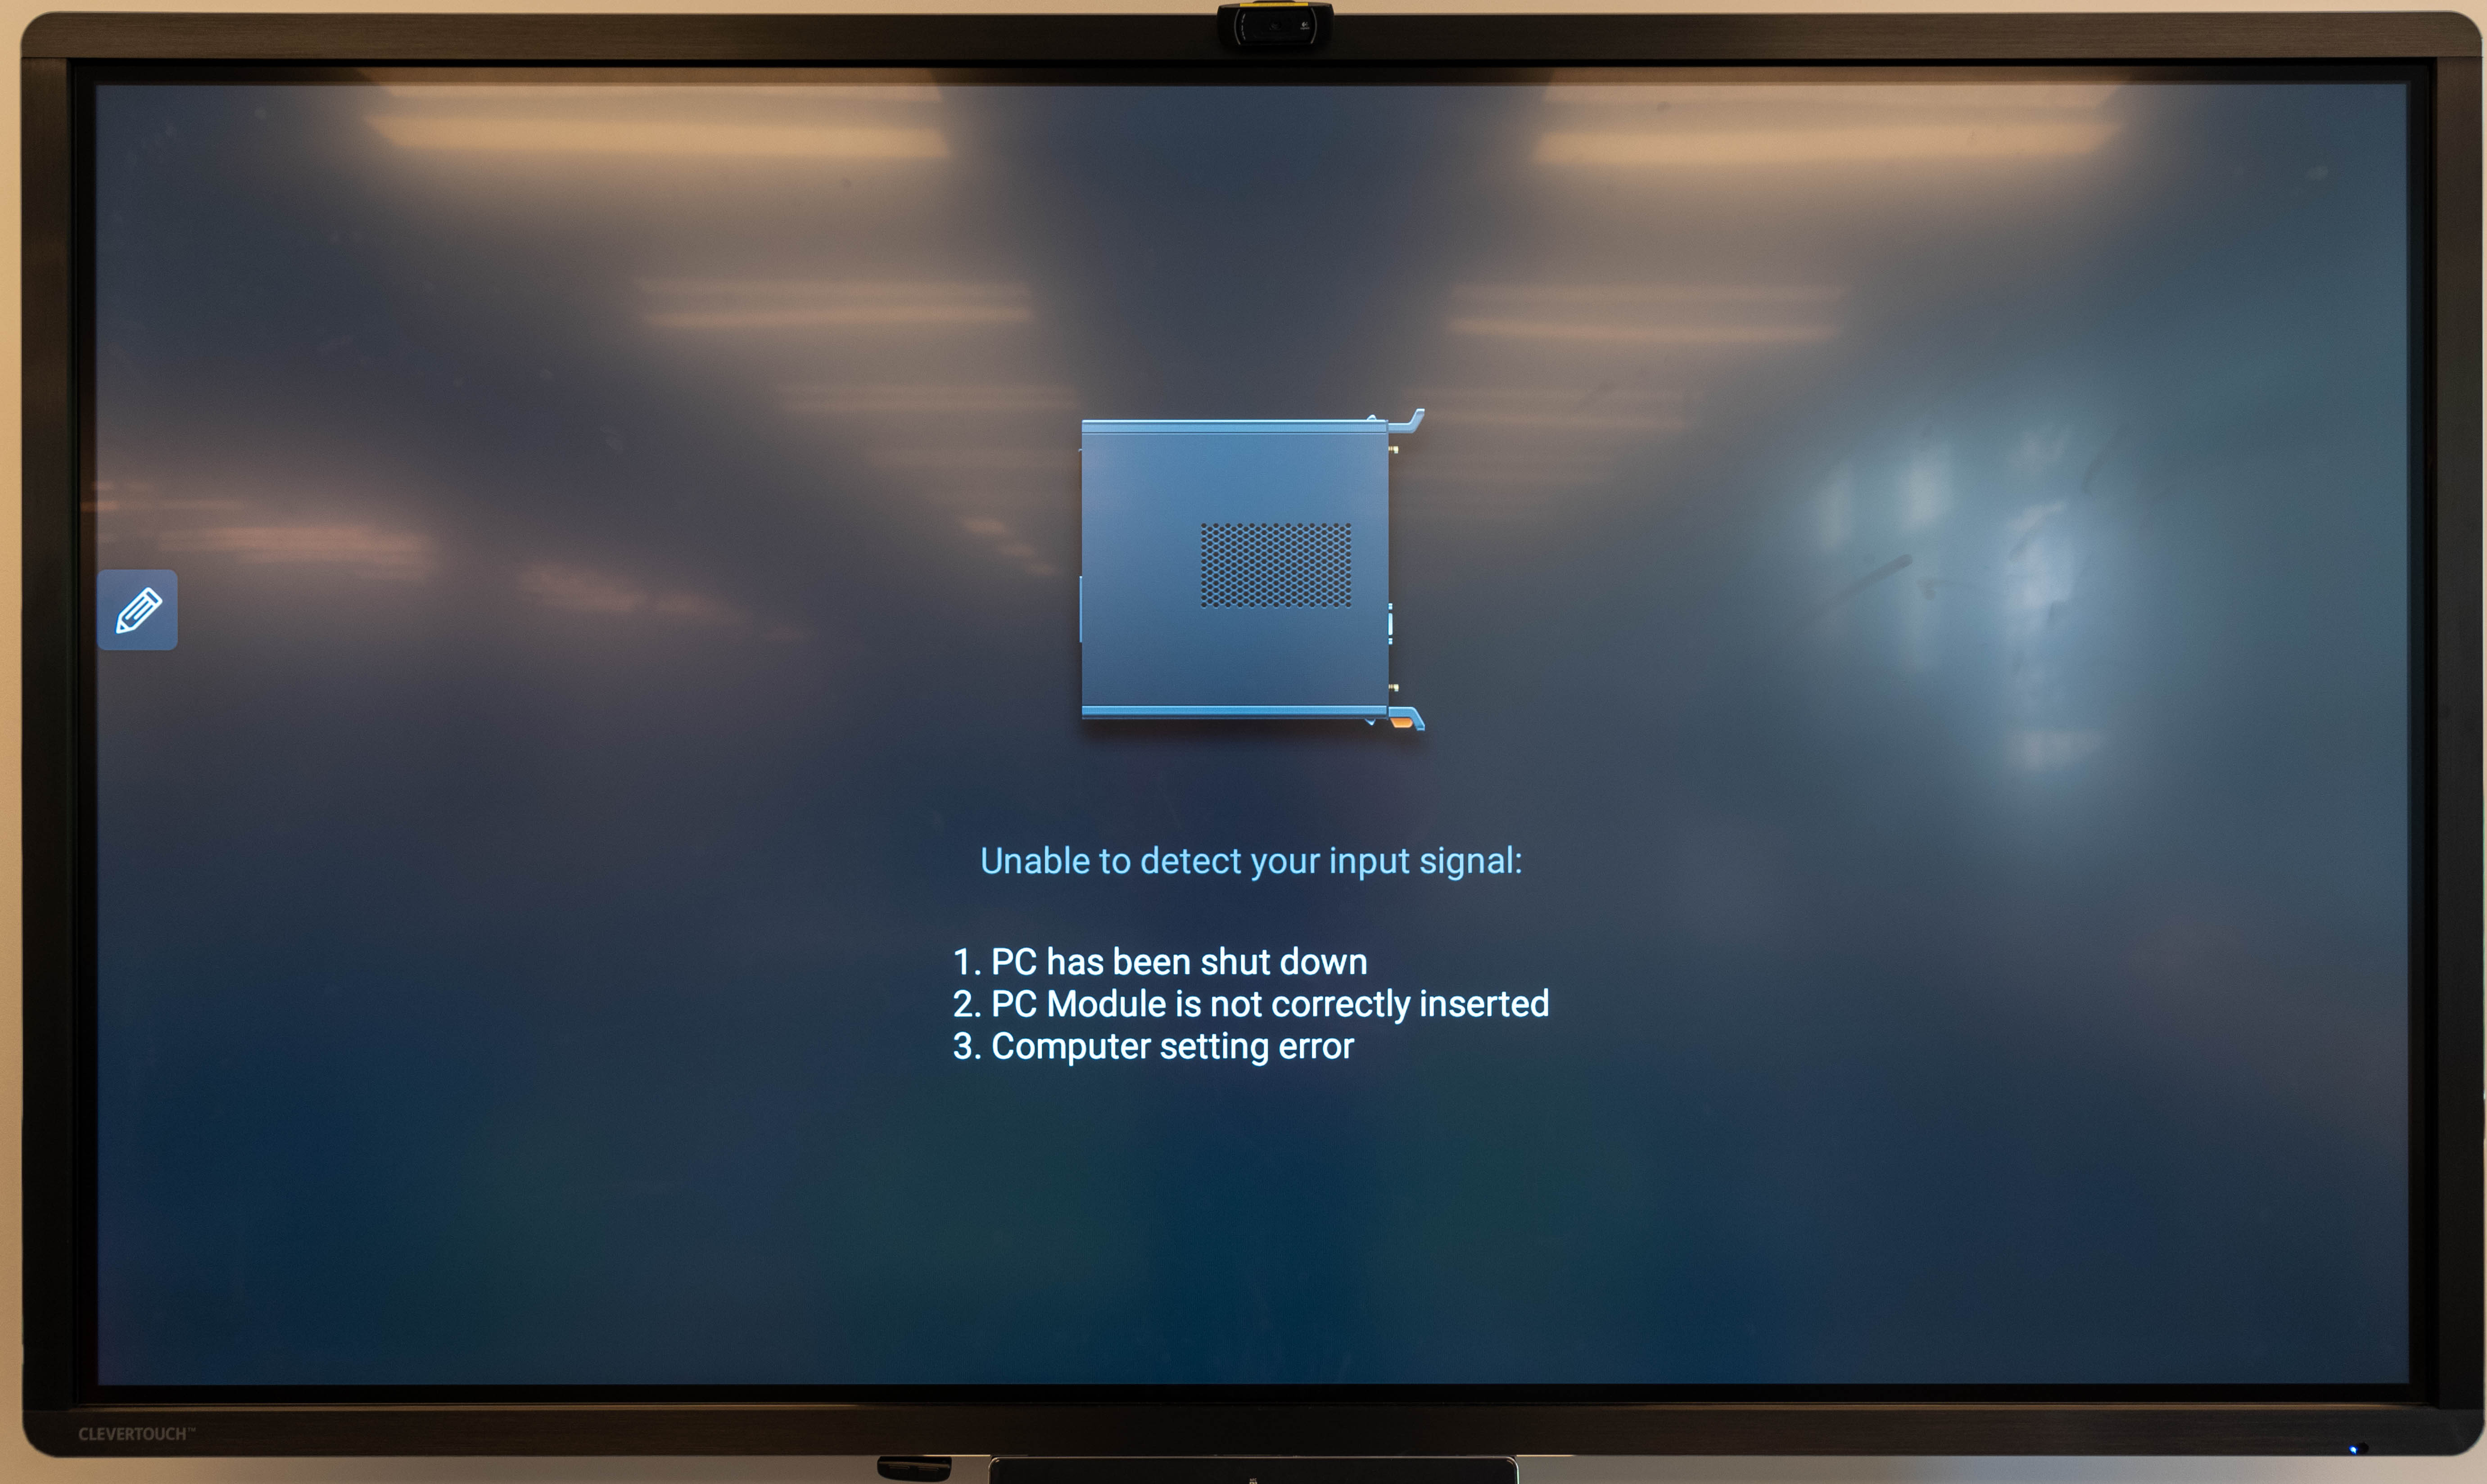
Windows will go back into Sleep mode after 10 minutes of inactivity.
Scroll up from the middle of the screen to pass the welcome screen.

If you were the last person to use the PC module, insert your password to log in. Please make sure that the students do not see your password (this a momentary solution, in 2-3 weeks we will attach a camera to every screen and we will help you set up the face recognition option which will let you log in without inserting the password).
If you were not the last person to use the PC module please select "Other user" in the lower-left corner, insert your user (your email account without "@isb.be") and your password.
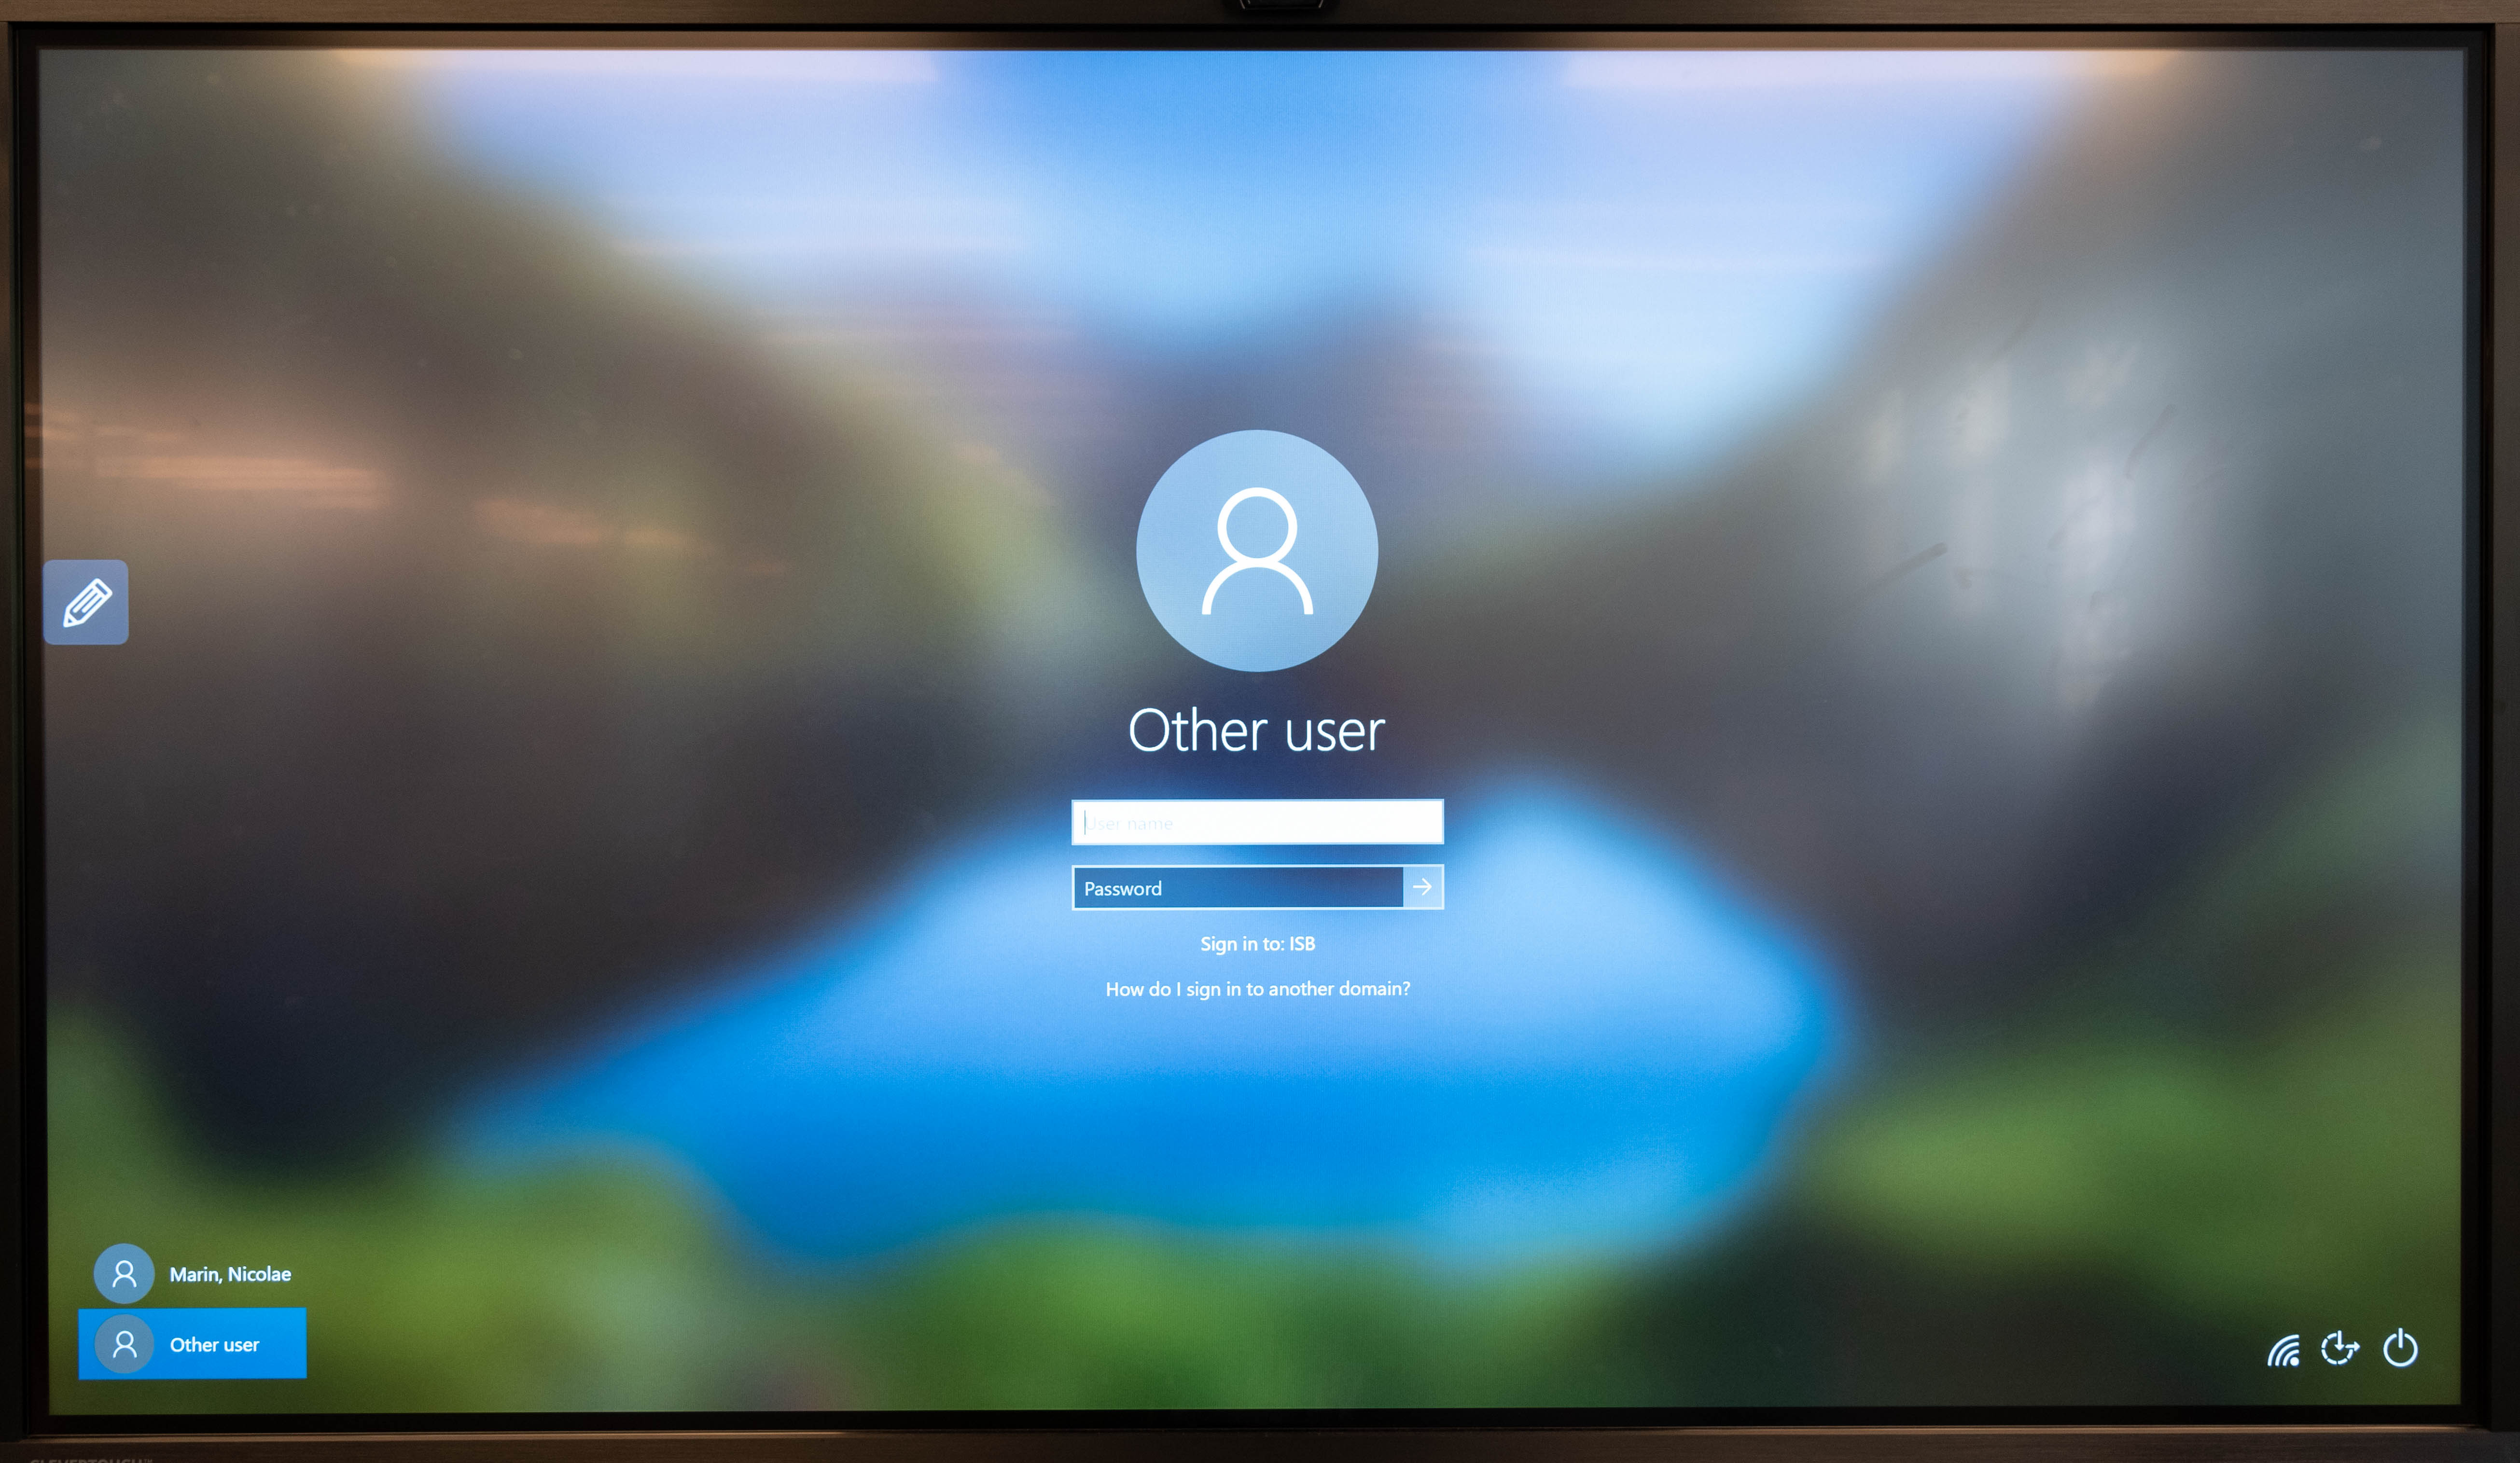
For MS and HS the password is the same as the one that you use to log in on your school computer. You can be logged in on multiple computers at the same time without any problems. For ECC and ES the password is the one that you used to connect to the ISB network. Usually, the same one that you use to log in. If you forgot your network password please stop by the IT office and we will reset it together.
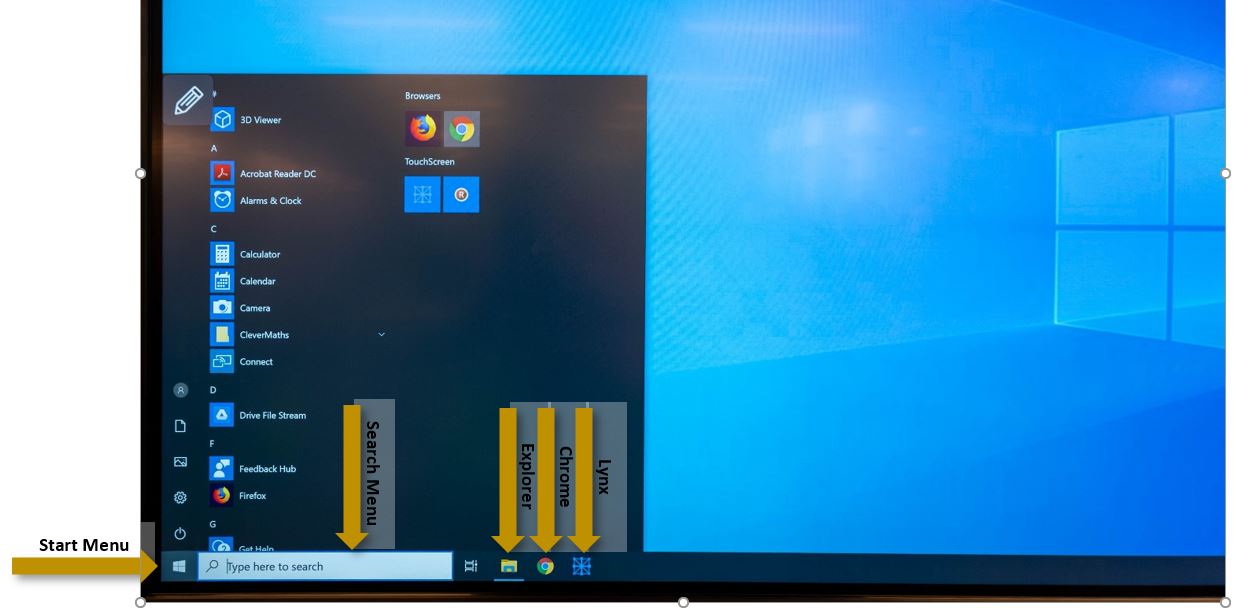
From the desktop, you can click on the Start button to scroll through and access the installed software and apps. Search for any software, apps or documents using the search field. Open Explorer to see all the system's folders, files, and your Google Drive, or open applications like Chrome or Lynx, directly.
If in time you discover that you use a particular app frequently, you can pin it to the taskbar (next to Chrome and Lynx), so that it's always available. Open the app and long click (=right click) the associated icon now present next to Chrome and Lynx. From the menu that pops up select "Pin to taskbar" and the icon will remain in the taskbar even after the app is closed. To switch between apps you do not need to minimize the active ones. You can click on their respective icons on the taskbar.
Windows will try to recognize all the fields that can be text-filled or edited and when single or double-clicked, an on-screen keyboard will popup. Unfortunately, the default settings for the on-screen keyboard are not the best for our needs and cannot be managed at an administrative level. To get the most out of your on-screen keyboard we recommend pressing the settings button (1), selecting the more complex layout (2) and detaching the keyboard from the taskbar (3). Now we have a complete keyboard that can be moved around as needed.
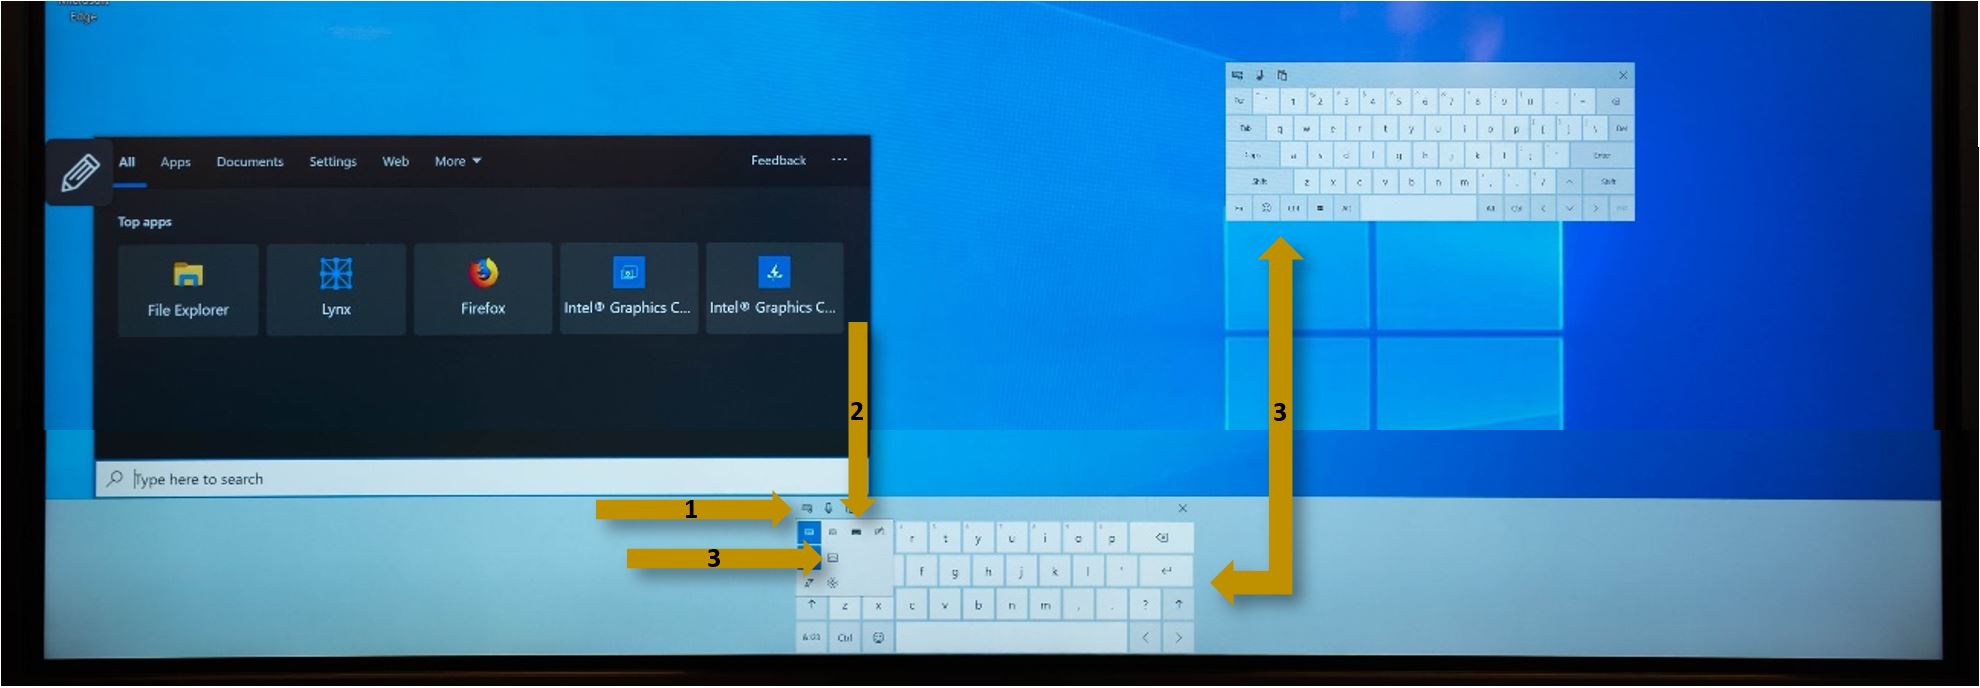
If Windows fails to recognize a text field you can always summon the keyboard by pressing the associated icon in the lower right corner. ![]()
Important. Please remember to Lock your screen every time you leave your room or to Sign out if somebody else will use the interactive display. While logged in, your Google Drive, your mail and all the files on the L and T drives can be accessed.
Important 2. Do not forget to save your work and always save on your drive. The Interactive Displays are set up to automatically shut down every day at 18.00. All your unsaved work will be gone.
Lynx - Basic User Manual, Icon Guide and HOWTOs
Click to open the Lynx Installation Guide (for Mac users - Lynx was automatically installed on all Windows PCs).
Click to open a Basic User Manual
Click to open the Icon Guide
Short HOWTOs:
File Stream (Google Drive)
Login and functionality.
File Stream is an app that adds your Google Drive as a drive/folder in Explorer. Once set up, all the files inside your drive will become readily available and accessible by any other software installed on the PC module of the Interactive Display. For example, you can save a Lynx file directly on your drive, without the need to save in your desktop/documents and move the file afterwards. Or, you can open a Lynx file directly from your drive, without the need to download it first.
To set it up please write 'drive' or 'stream' in the search field and select the 'Drive File Stream' app.
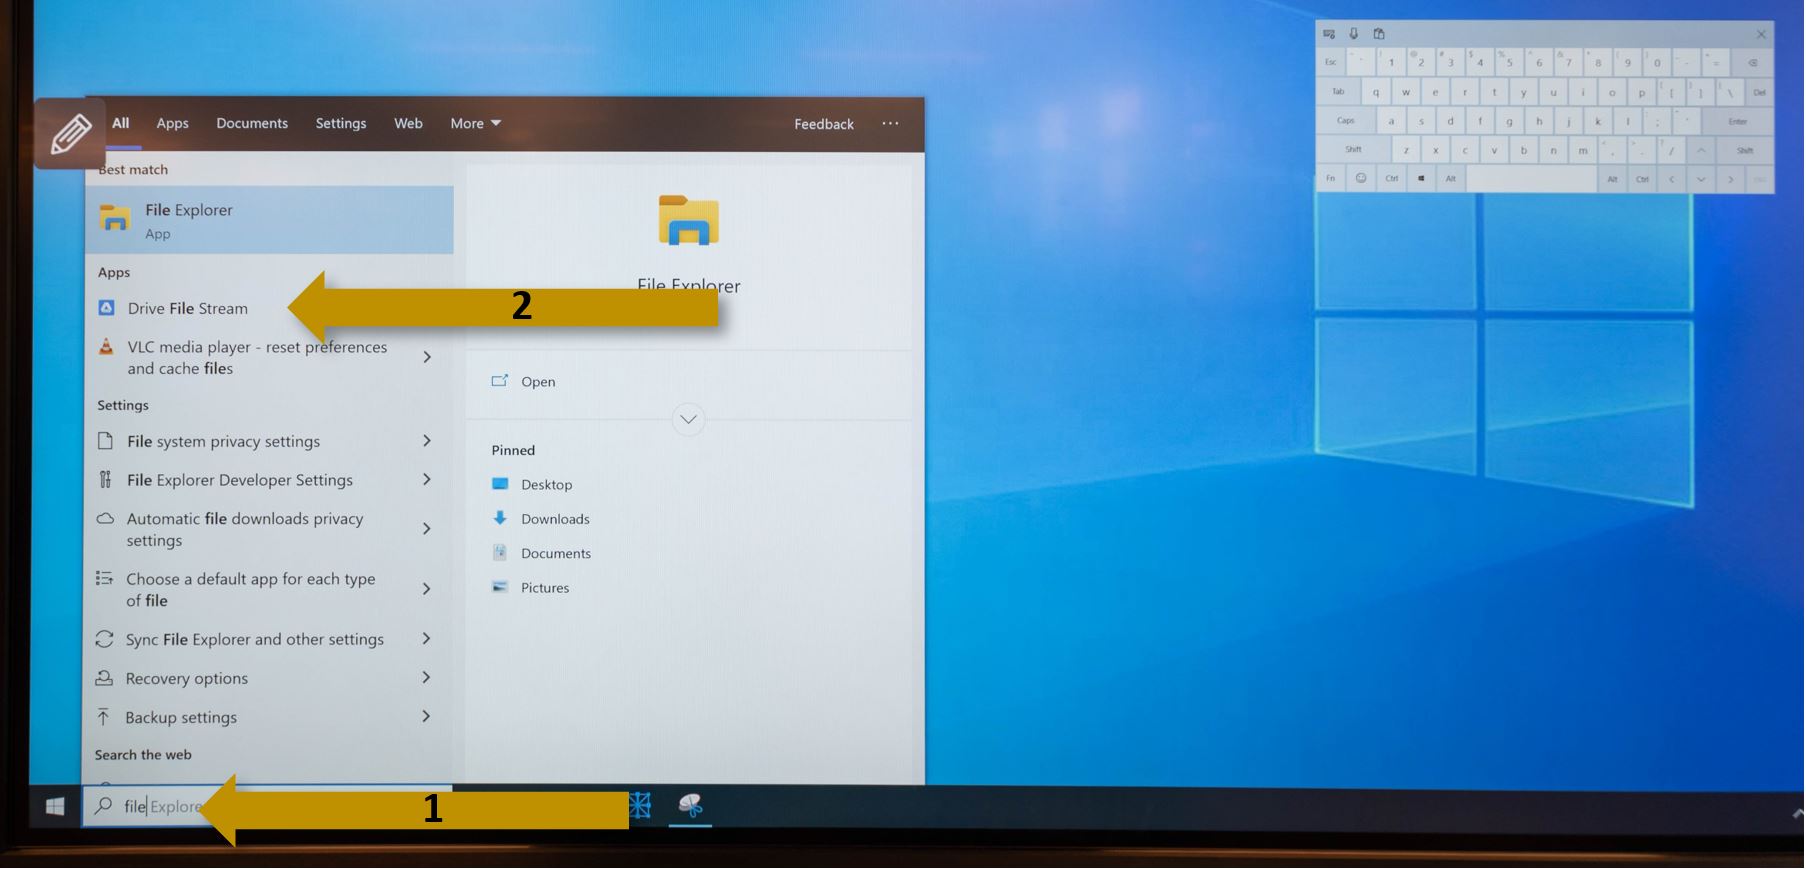
Sign in using your email account and password, insert the code that Google sends, close the Welcome message, and you are ready to go.
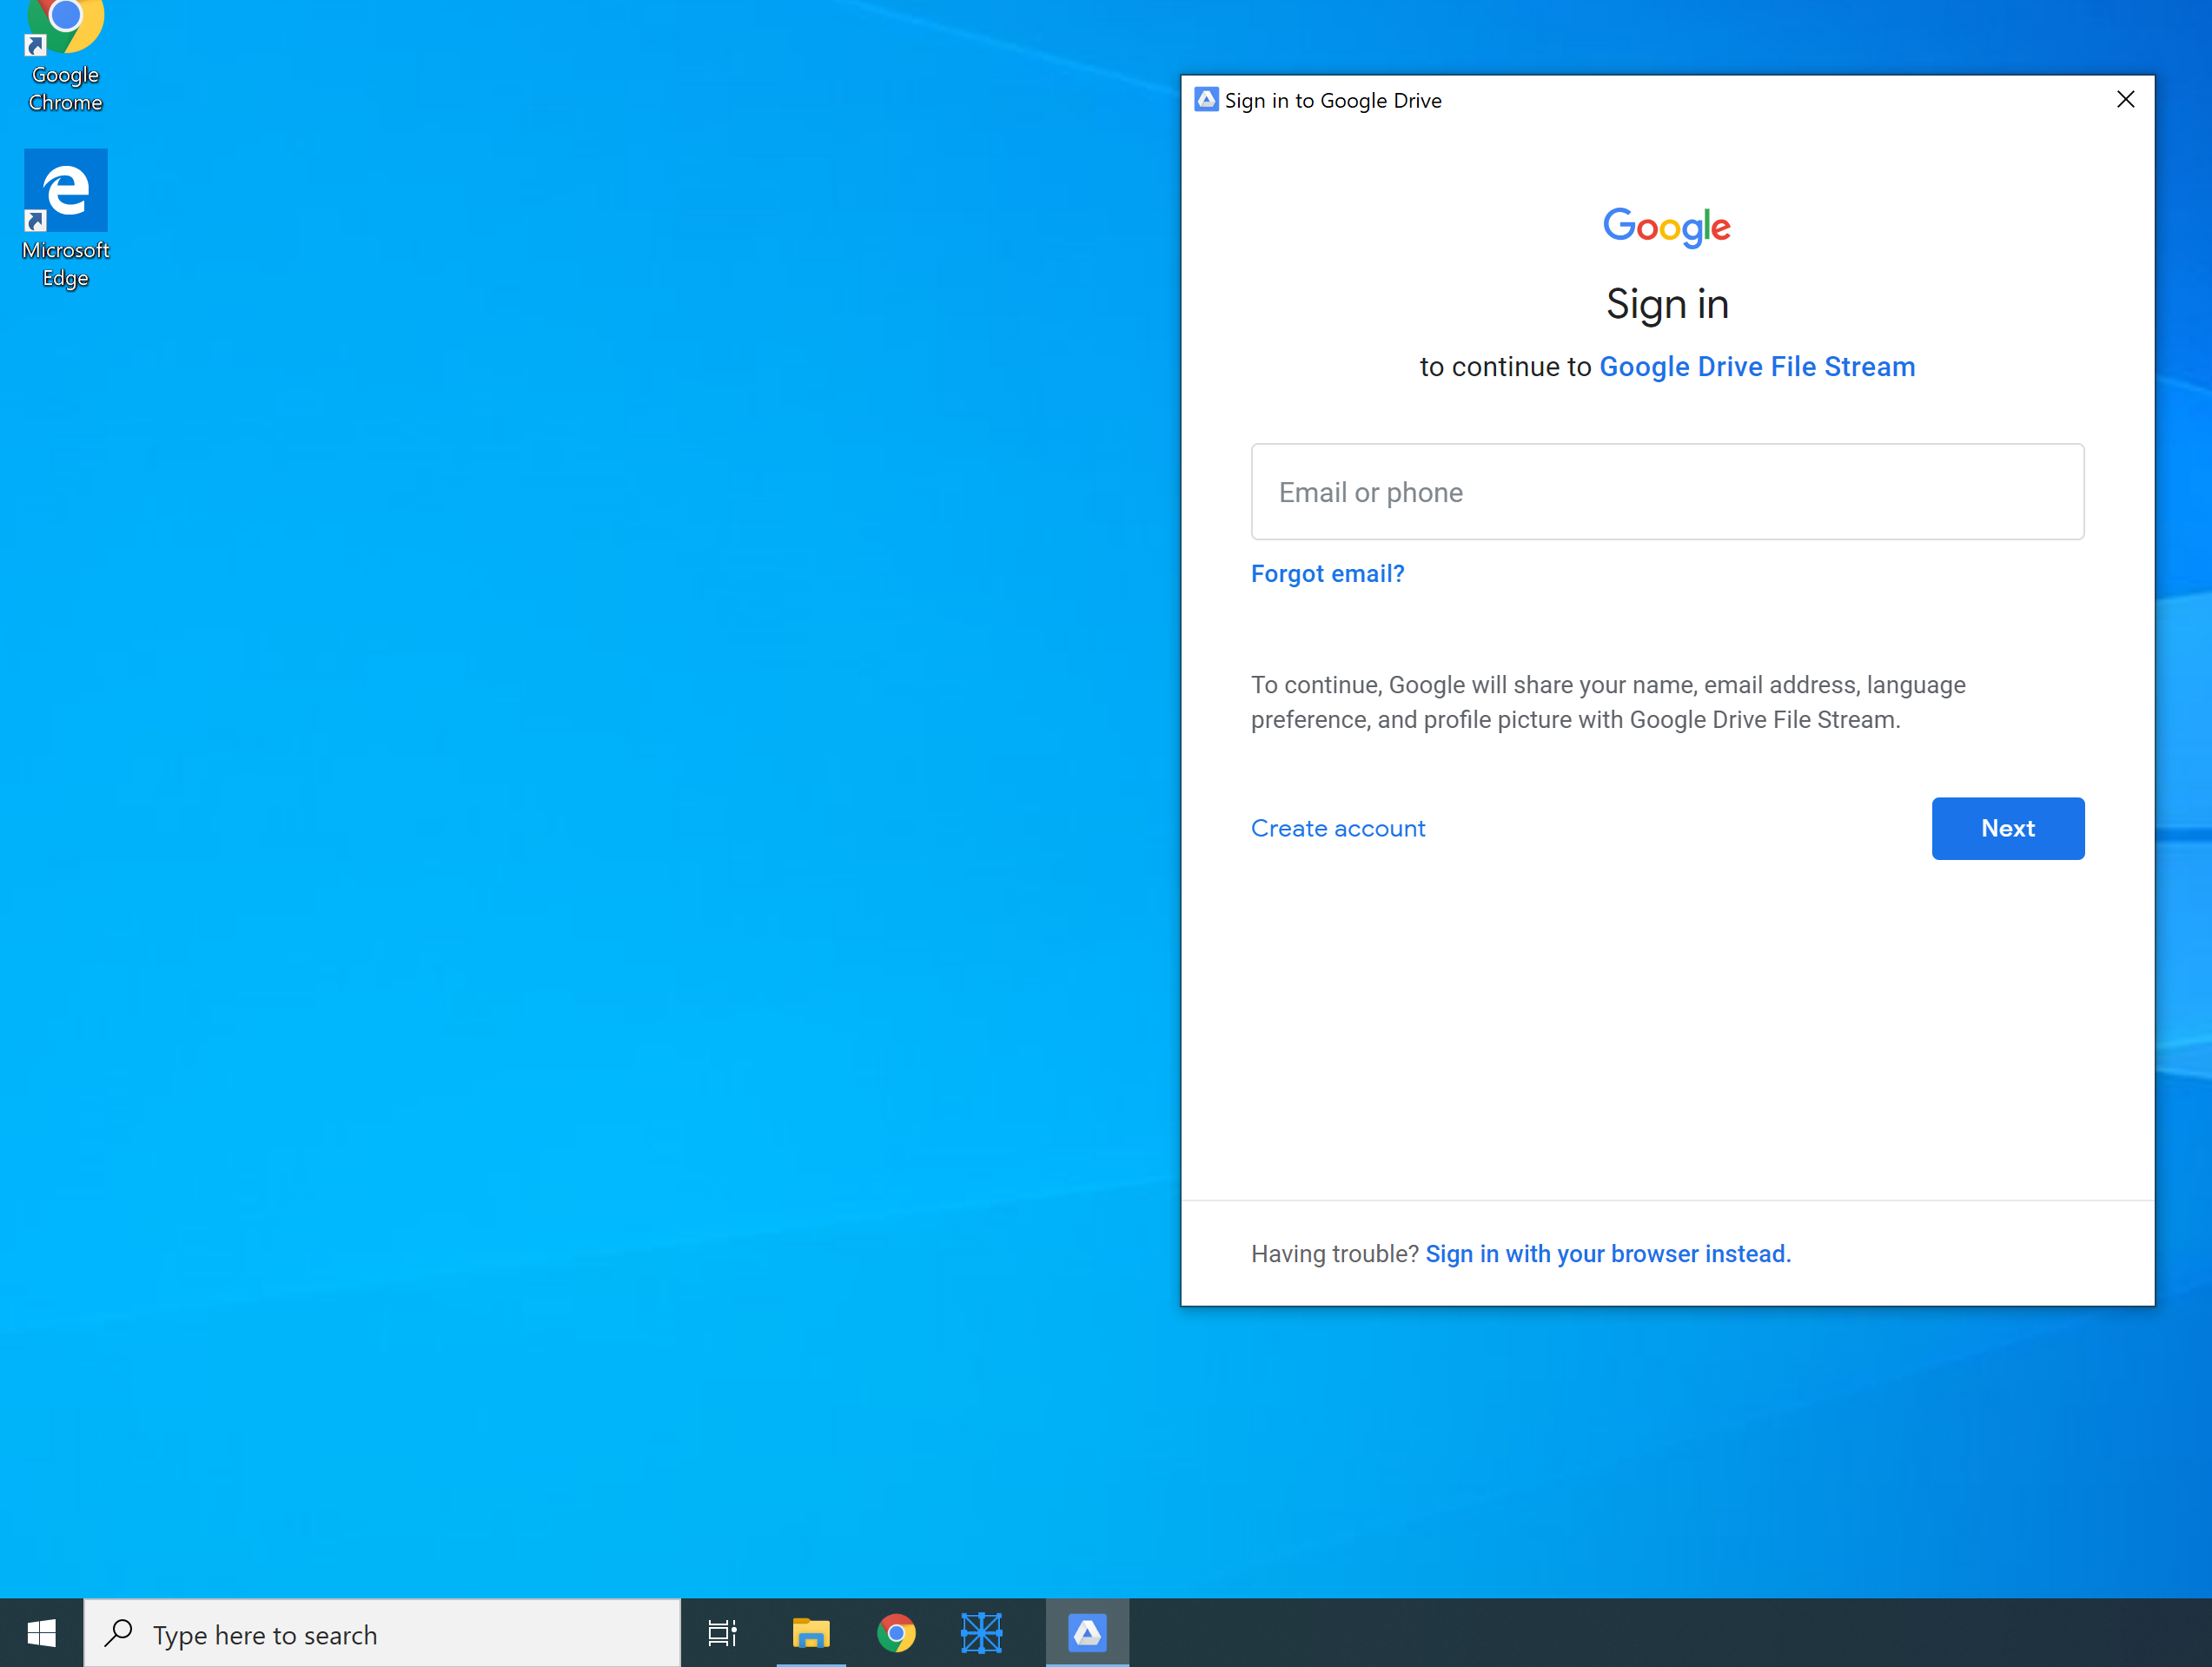
To access the drive simply open Explorer and click on the Google Drive File Stream drive/folder in the Quick access panel.

Clevershare
(communication between the screen and PC, Macs and iPads)
Clevershare was automatically installed on all school's Windows PCs, the shortcut should be on your desktop. If you cannot find Clevershare on your Mac please follow the installation procedure here.
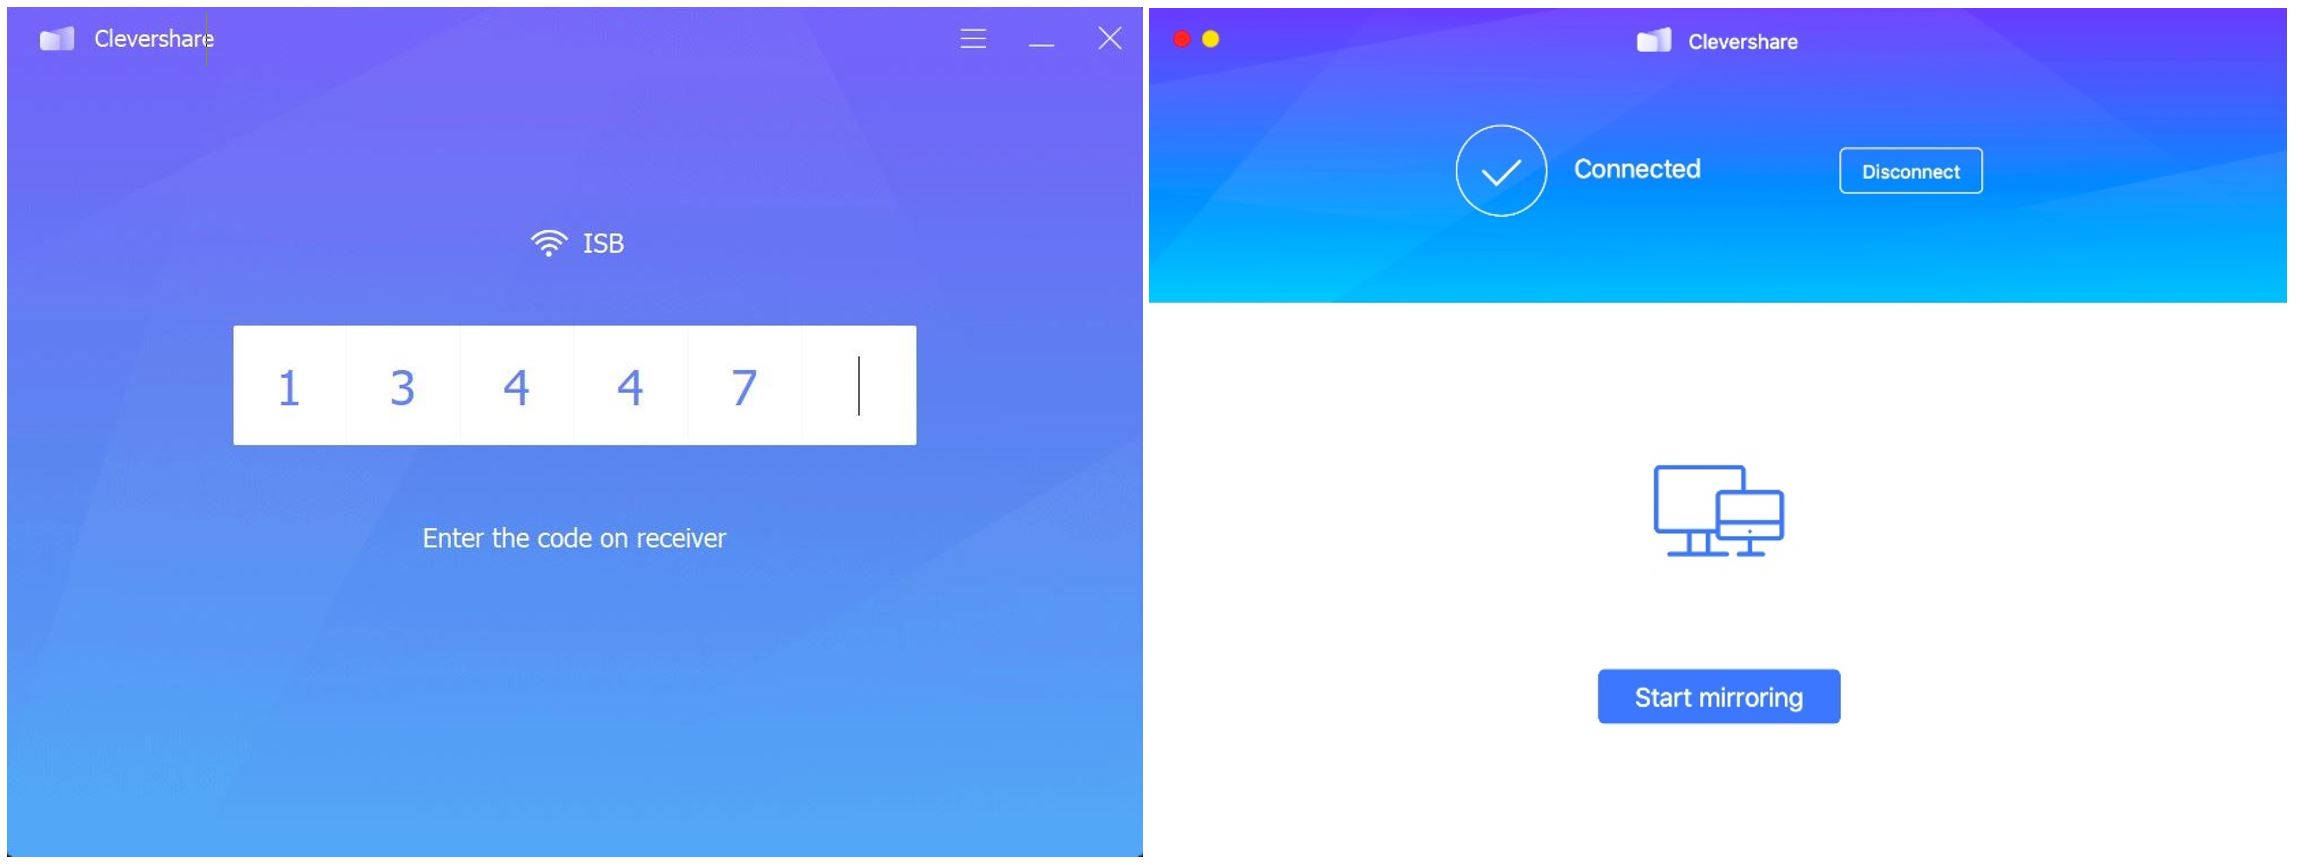
To connect using Clevershare turn on the Interactive Display, switch to the Lux module and press on the Clevershare bubble, usually present in the upper right corner of the screen. Open the Clevershare app on your PC or Mac, insert the code now visible on the Interactive Display screen, press "Start mirroring" and you should be ready to go.
The new technology comes with big advantages like:
- the possibility to connect with any ISB laptop PC, Mac or iPad on every Clevertouch Interactive Screen in the school.
- enhanced interactivity - you can control everything on your Mac or laptop PC by touching the Interactive Screen. For example: you can open a PDF present on your PC or Mac's desktop by touching it on the Interactive Screen.
- multiple devices can connect and present at the same time (maximum 4). Use the same code for the next device that you want to connect.
- fast switch between the PC module and the presentation. For example: you can present a Slides/PowerPoint/Keynote file using Clevershare and, at the same time, open a related app or software on the PC module. Switch between them with ease by changing the source.
The only minus that we found until now is the missing Extend Displays option. If you need to use your computer while presenting please connect using the Apple TV or the Miracast devices, or, log in on the integrated PC module and start the presentation from there - which will free your device completely.
If on top of the code on the interactive screen you have something other than ISB or Ethernet, for example ISBConnect, Clevershare will not be able to find the screen and Start mirroring. Both devices need to be on the same network. If you find a Cleverhare screen that is not connected to ISB or Ethernet please let the IT team know.
If you have sound problems or the connection drops while you are using a different app, please press Disconnect and/or Start mirroring again.
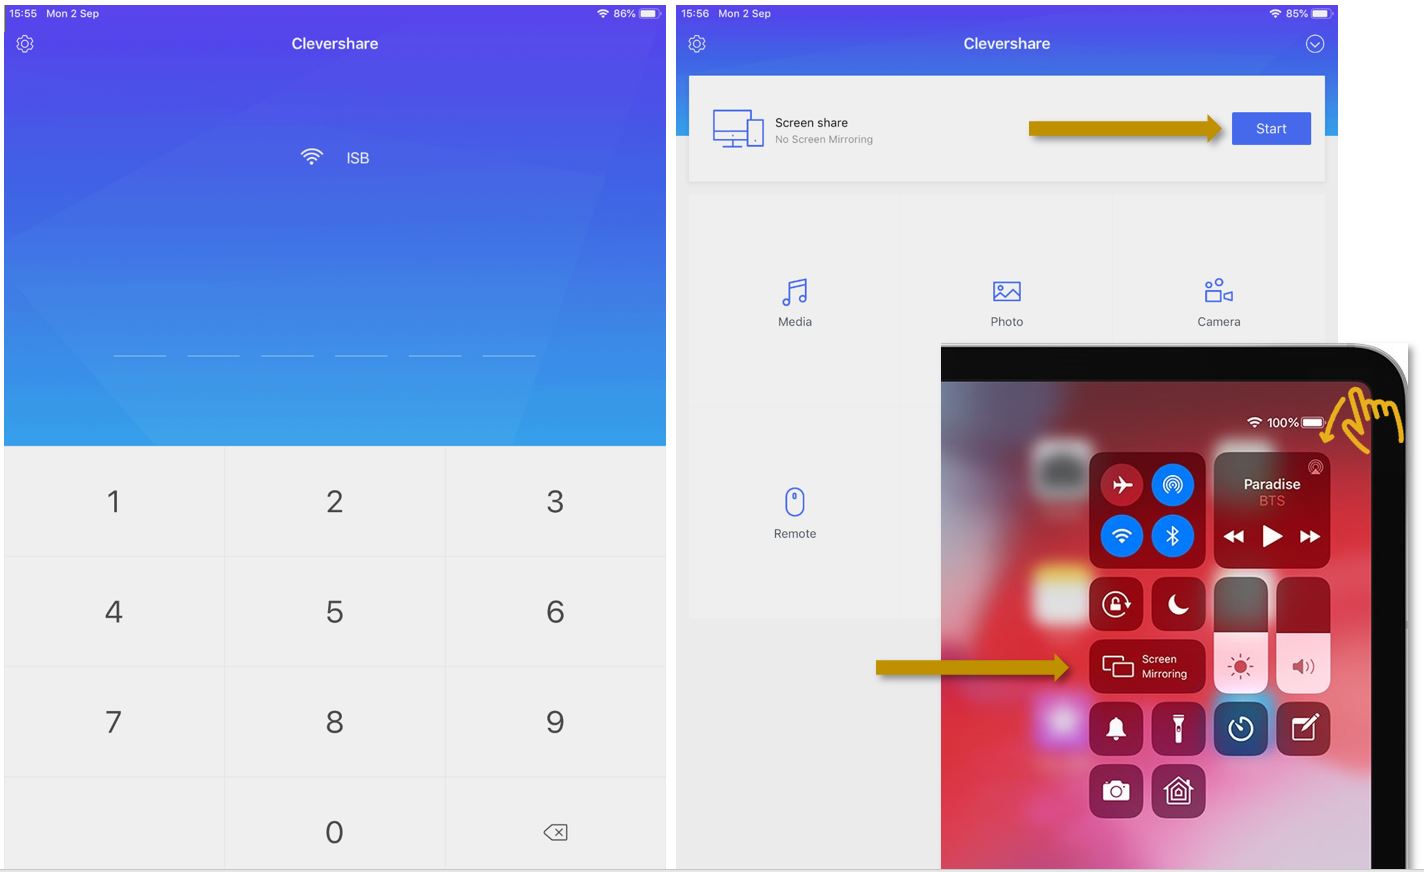
To mirror an iPad using Clevershare find the app (installed on all student and teacher iPads) open it and insert the code present on the Interactive Screen. Start the Screen share function then open the Control Center select Screen Mirroring and find Clevershare in the list of devices.
When mirroring mobile devices we lose the interactivity but we gain other interesting capabilities.
If instead of Start we select Media or Photos we can stream only the music or the photos; Camera lets us see on the screen what the connected device camera sees and Remote transforms the iPad into a touch-pad that will let us control the Interactive Screen from afar.
Connect to an Interactive Display using Apple TV
|
Make sure that the device (Mac, iPad, or iPhone) is connected to the ISB or the ISBConnect wireless network. |
|
|
Turn on the interactive display (1), swipe up from the bottom of the screen using 2 fingers to raise the screen's menu (2), and select/switch to the Apple TV input (3). |
|
 |
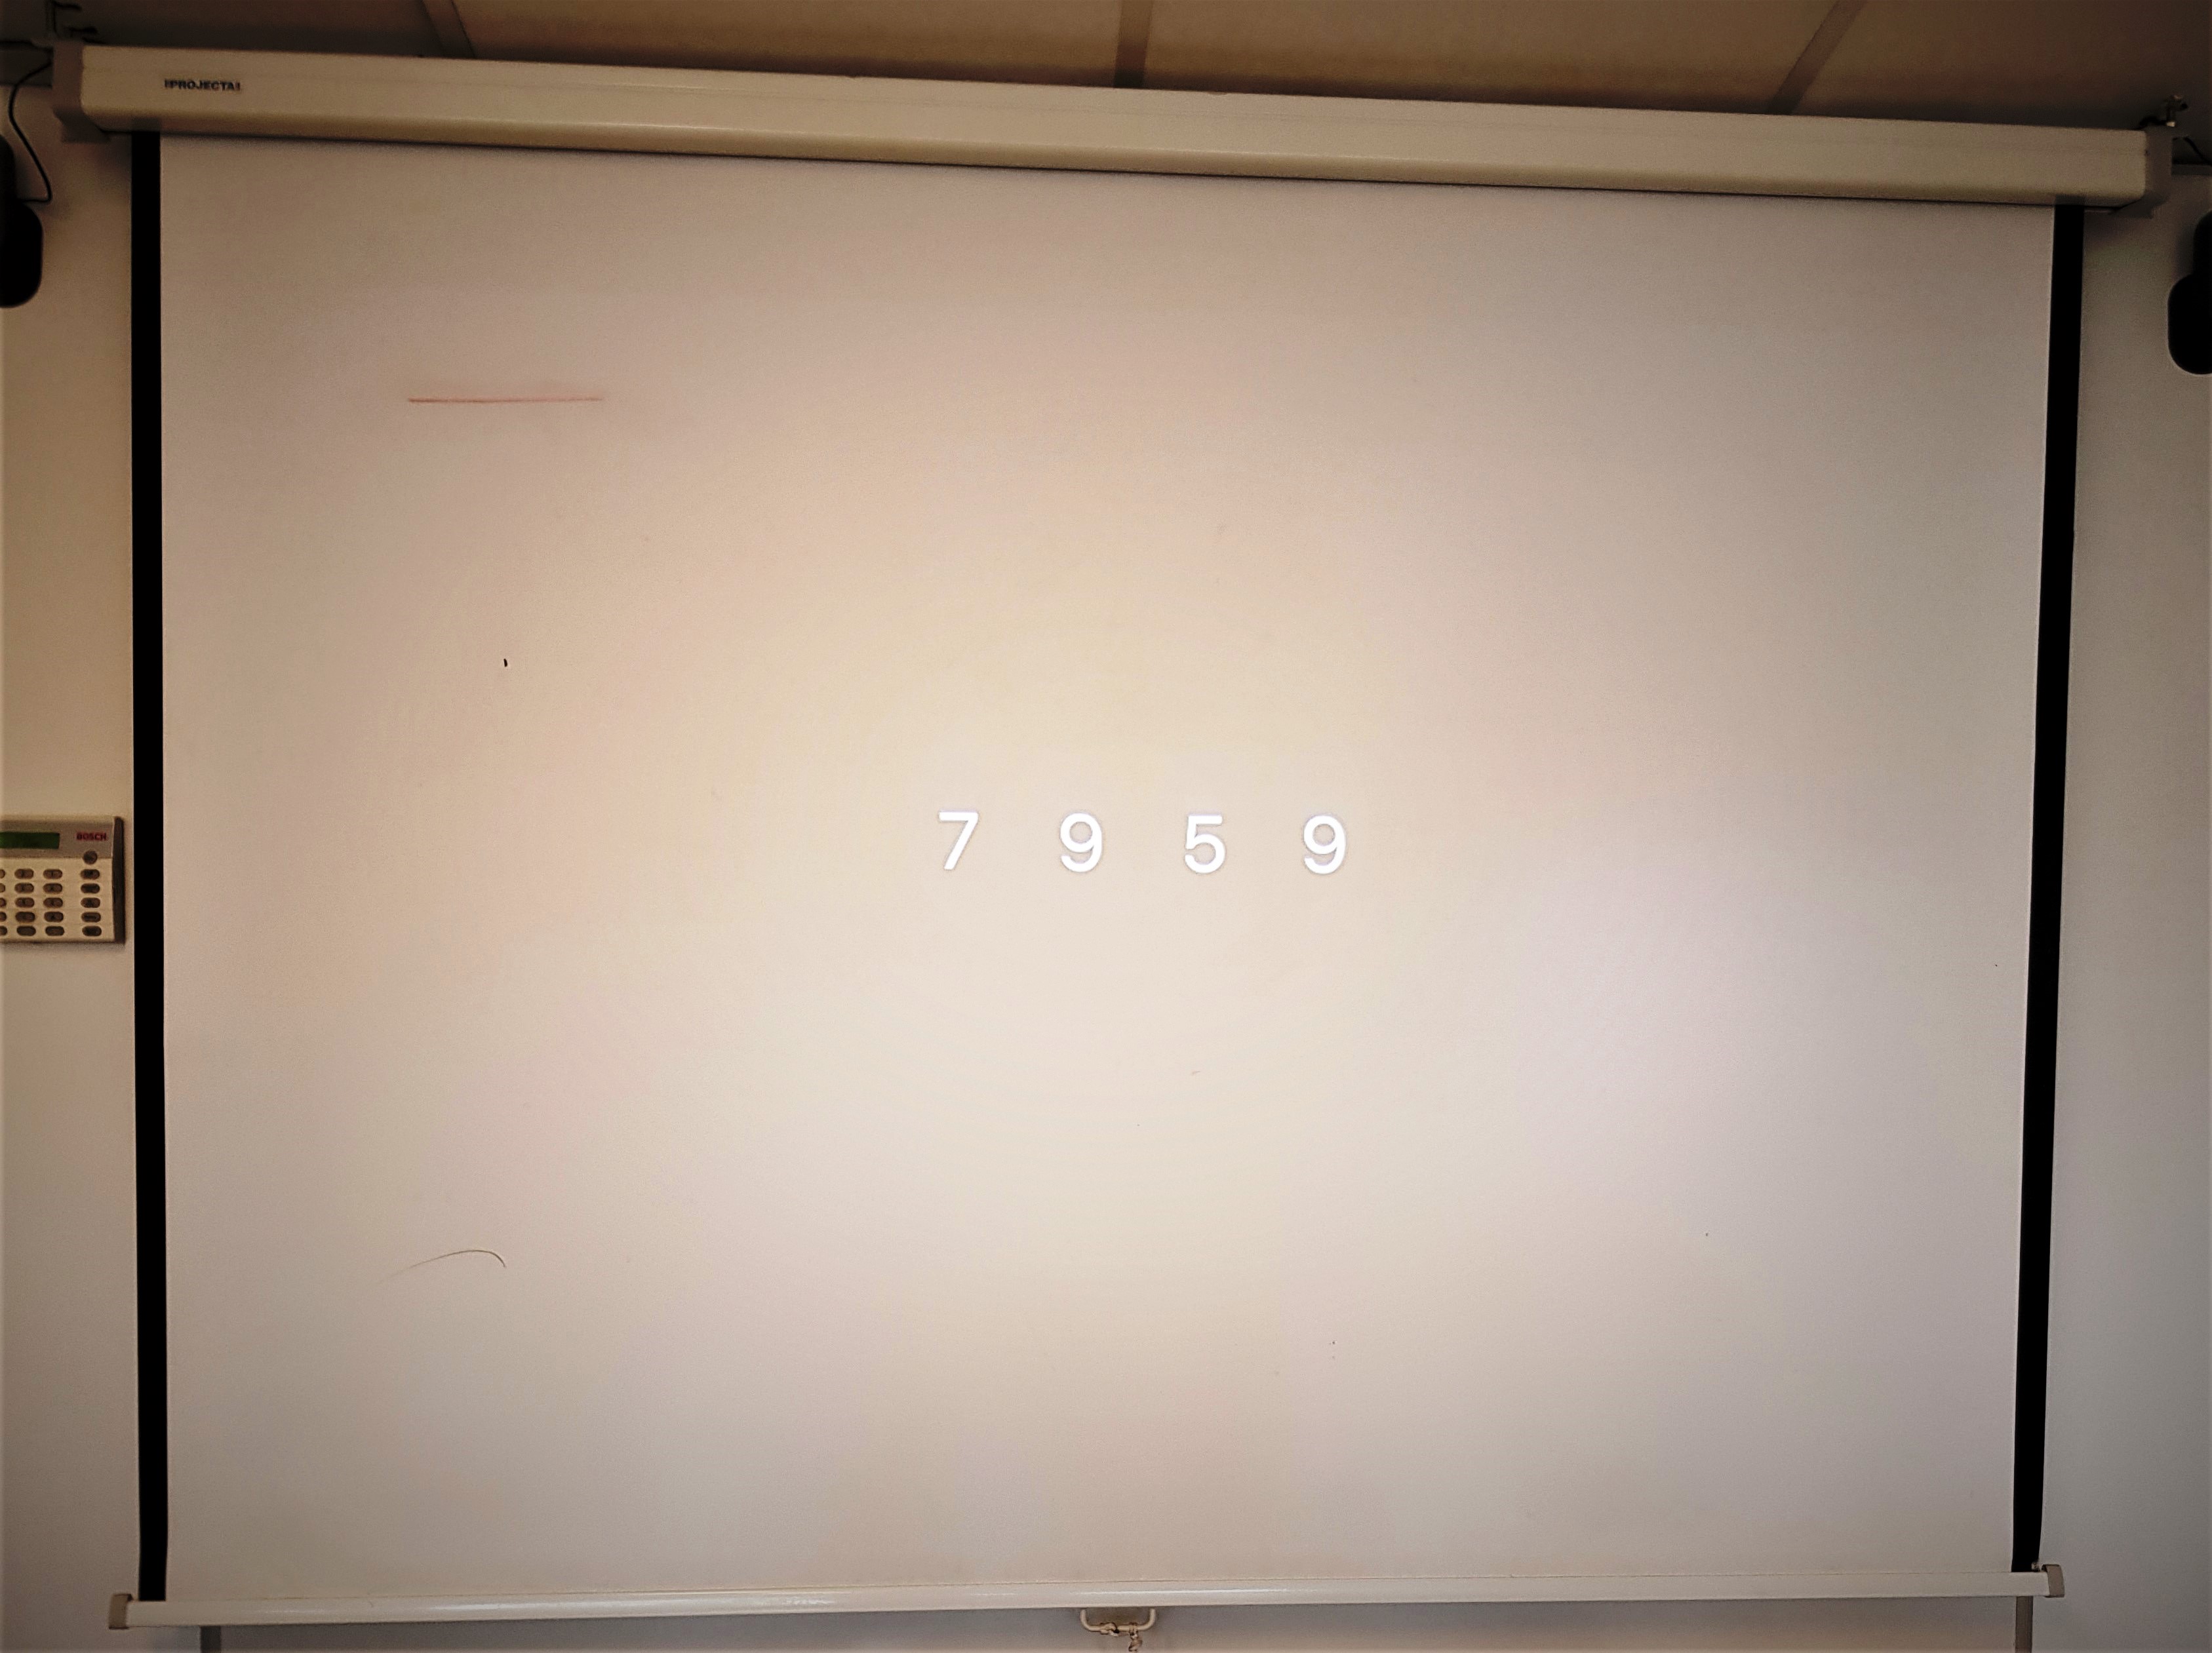
If instead of the usual AirPlay message, the screen states that is "Unable to detect the input signal," it means that the AppleTV is on stand by - check the room number, find the AppleTV in the list, and connect- it should wake up; once clicked. |
|
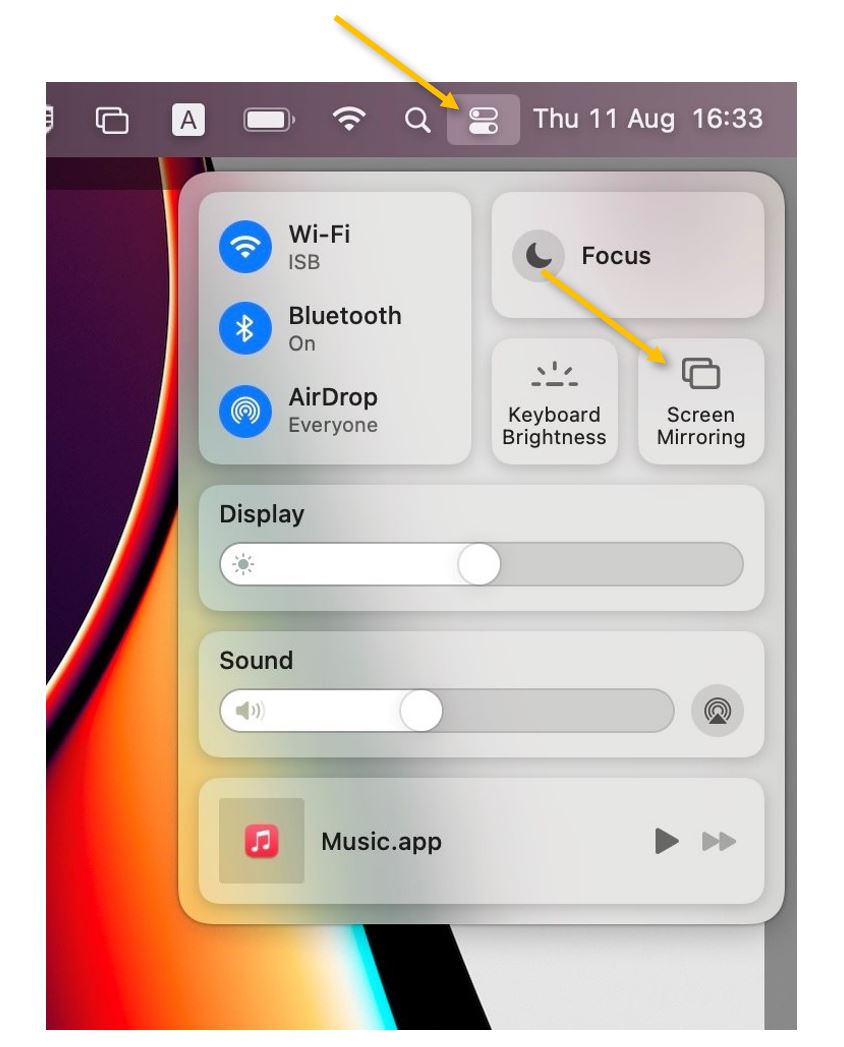
On a MacBook click on the Control Center icon on the upper right side of your menubar and then on Screen Mirroring. Select from the rolling list the correct AppleTV – usually named after the room number. In this example, ES-103.
|
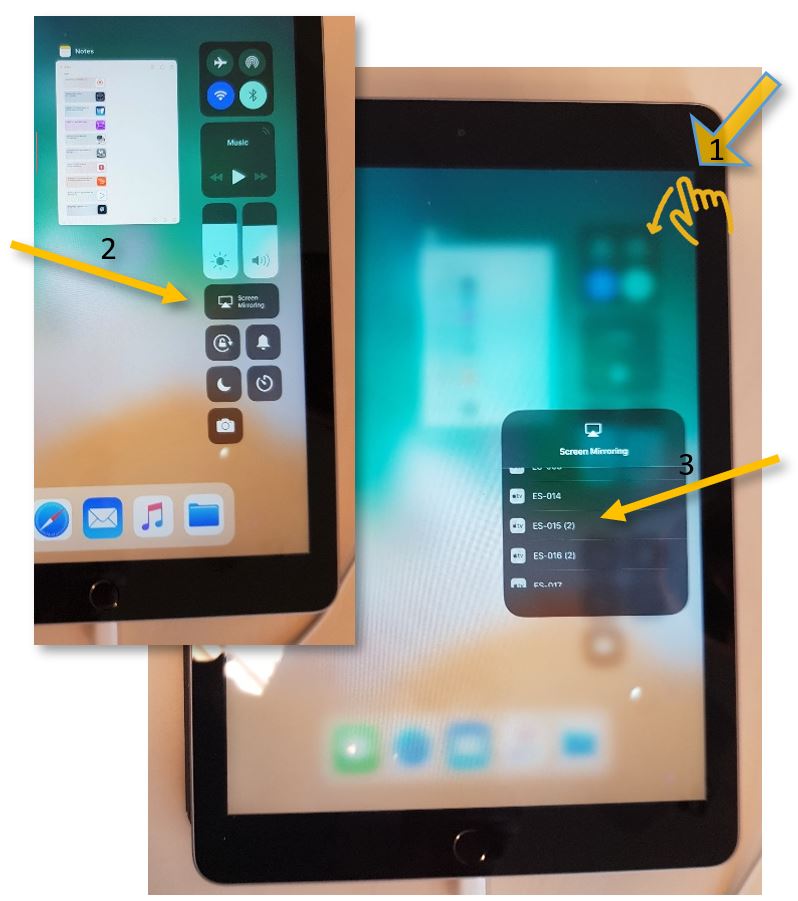
On an iPad/iPhone, swipe down diagonally from the upper right corner onto the screen to bring up Control Center. Press on the Screen Mirroring button and, on the menu that pops up, select the correct AppleTV – usually named after the room number. In this example, ES-103.
|
|
If it’s the first time you connect this particular device to the interactive display, you will be asked to pair the devices – please insert the number that will pop up on the screen, and you should be ready to go.
|
If the projected text is too small for the students or on your screen, you can open the System Preferences menu, click on Displays, and, in the new pop window, select Scaled and 720p or respectively Optimize for: built-in display
|


Connect to an Interactive Display using Miracast (CH, MS and HS)
|
Make sure that the Windows or Android device is connected to the ISB or the ISBConnect wireless network. |
|
Turn on the interactive display (1), swipe up from the bottom of the screen using 2 fingers to raise the screen's menu (2), and select/switch to the HDMI 1 input (3).
|
|
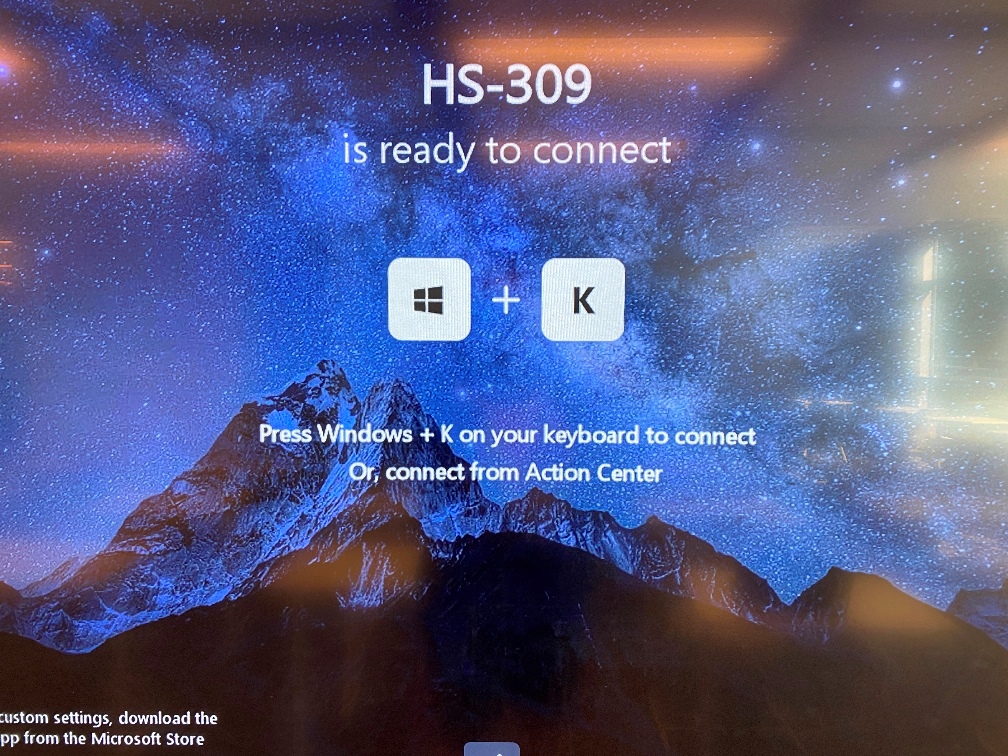
Wait for this screen to show up
|
|
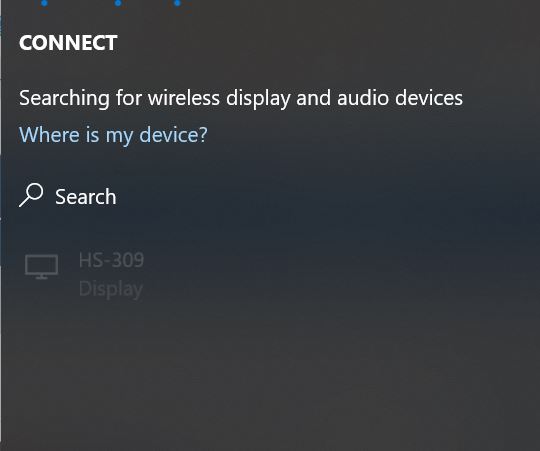
Press the ⊞ Windows button and K at the same time. In the list that pops up, find and connect to the correct device - in this case, HS-309. You should be ready to go.
|
Camera Sign In - Windows Hello Setup
Privacy concerns?
- Scanning your face is not mandatory. It is just one of the ways you can log in to your screen's Windows (PC) machine.
- When you do scan your face, you are asked to give explicit consent for Windows to use it.
- Windows is scanning the topography of your face, stores it locally and encrypted, and it only sends "yes/no" information to Microsoft whether your login worked or not.
- Nobody can access your "face scan" file.
How to set up the face recognition function on the Interactive Screens:
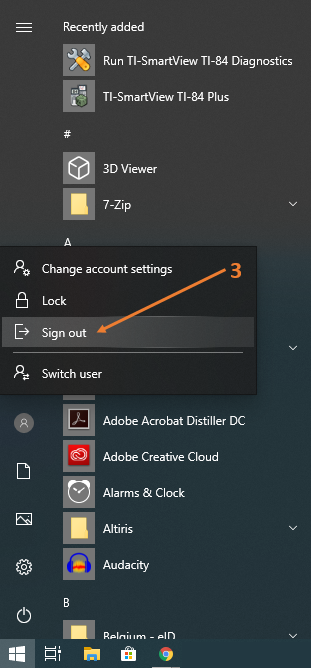
Sign out - Shut down
If you press the Power Button for a second, the computer doesn't shut down or sign you out. The Interactive Display just turns the screen off. You can use the function if you need everybody's attention or to hide what is displayed. Press it again to turn the screen back on, your desktop/all your open apps should show up exactly the way you left them.
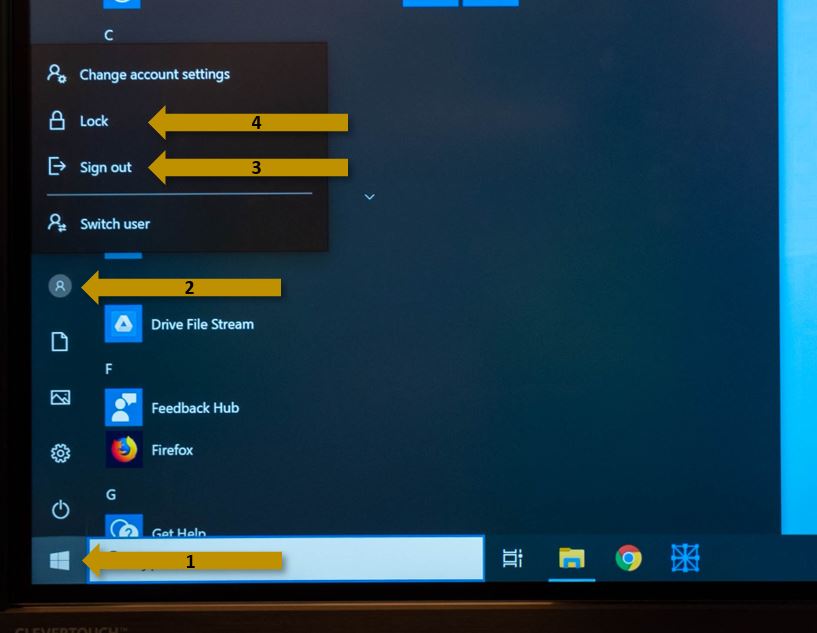
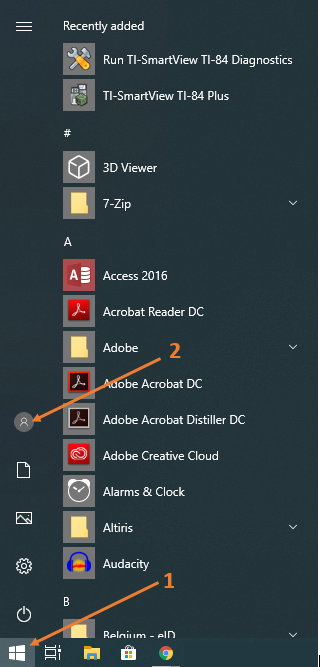
To avoid people using your Windows account when you leave the classroom please follow these 3 steps:
1. Click on the start menu
2. Click on the user icon.
3. Click on Sign out.
If you want to shut down the Interactive Display please press the Power Button for a few seconds. A message will pop up asking you if you want to shut down. Press Yes to shut down immediately or wait 10 seconds and the ID will shut down by itself.