Mac, getting started
Tips and tricks for beginners.
- Where are my menus? (File, Save As, Print, Insert, etc.)
- How do I minimize, maximize, close an app, exit full screen?
- How do I take a screenshot?
- What about my keyboard shortcuts? (Copy-paste, print, find, etc.)
- Where are my Documents, Apps, Downloads?
- Mac - Install Software - Self Service
- Zoom Setup
- Automatically Delete Files in Bin after 30 Days
- Getting Mac Version Information
- Installing Zoom for students
- Setting Up Zoom for Students
- Update MacOS
- Accessing ISB Drives
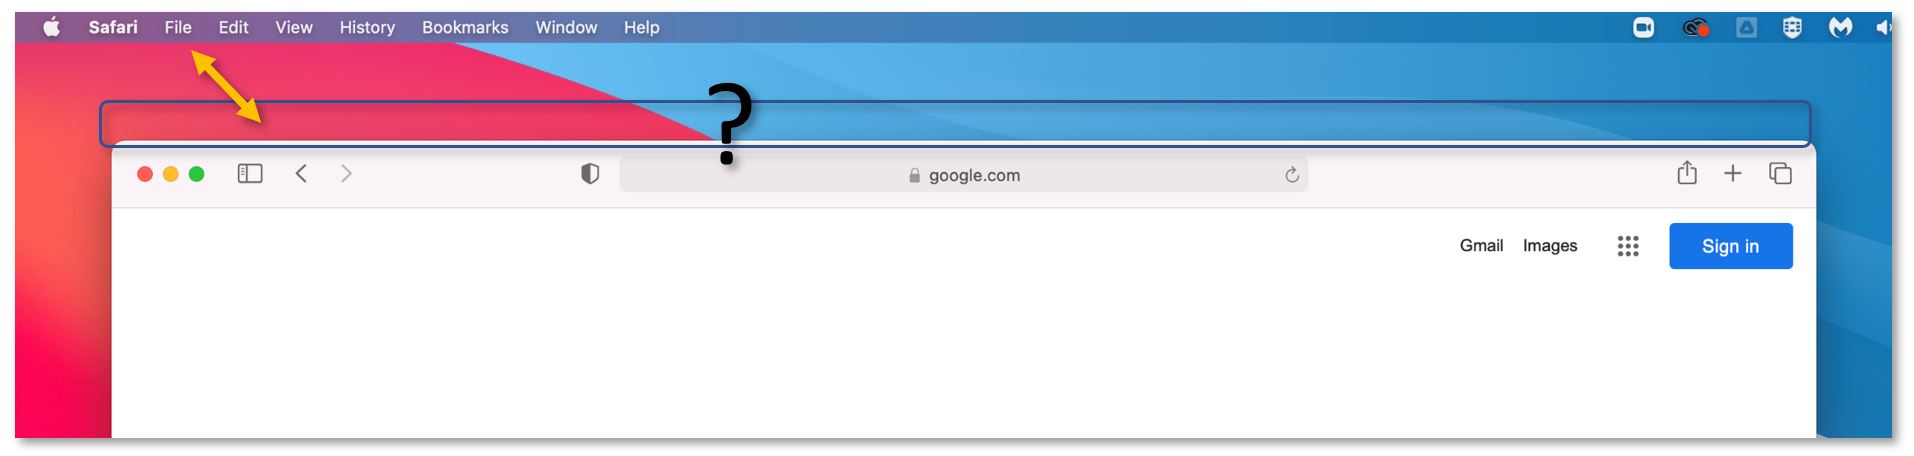
Where are my menus? (File, Save As, Print, Insert, etc.)
On macOS, the majority of the apps do not carry the menu bar on top of their windows. The menu is anchored at the top of the screen and changes depending on what app is in focus.
If no apps are open, the available menu is the Finder’s (File Explorer / My Computer) menu. If you need to access the Finder’s menu, a fast way to do it is to click on an empty space on the desktop.
How do I minimize, maximize, close an app, exit full screen?
To exit full screen, you can press control+command+F at the same time, or you can push the mouse cursor against the screen's upper edge, forcing the menus to appear- click on the green button again to exit full screen.
On a Mac, the difference between closing and minimizing an app became vague in time. Minimizing an app keeps it active in the dock (taskbar) while closing it, forces the app in a standby state. The app is still active and ready for future use.
If an app has a dot underneath its icon, it means that it's still active, either minimized or in standby mode.

To truly close an app - maybe it became heavy, and it slows down the whole system (I'm looking at you Chrome) or is misbehaving, and it needs a restart – right-click (click on it with 2 fingers) its icon on the dock and select Quit from the contextual menu that appears.
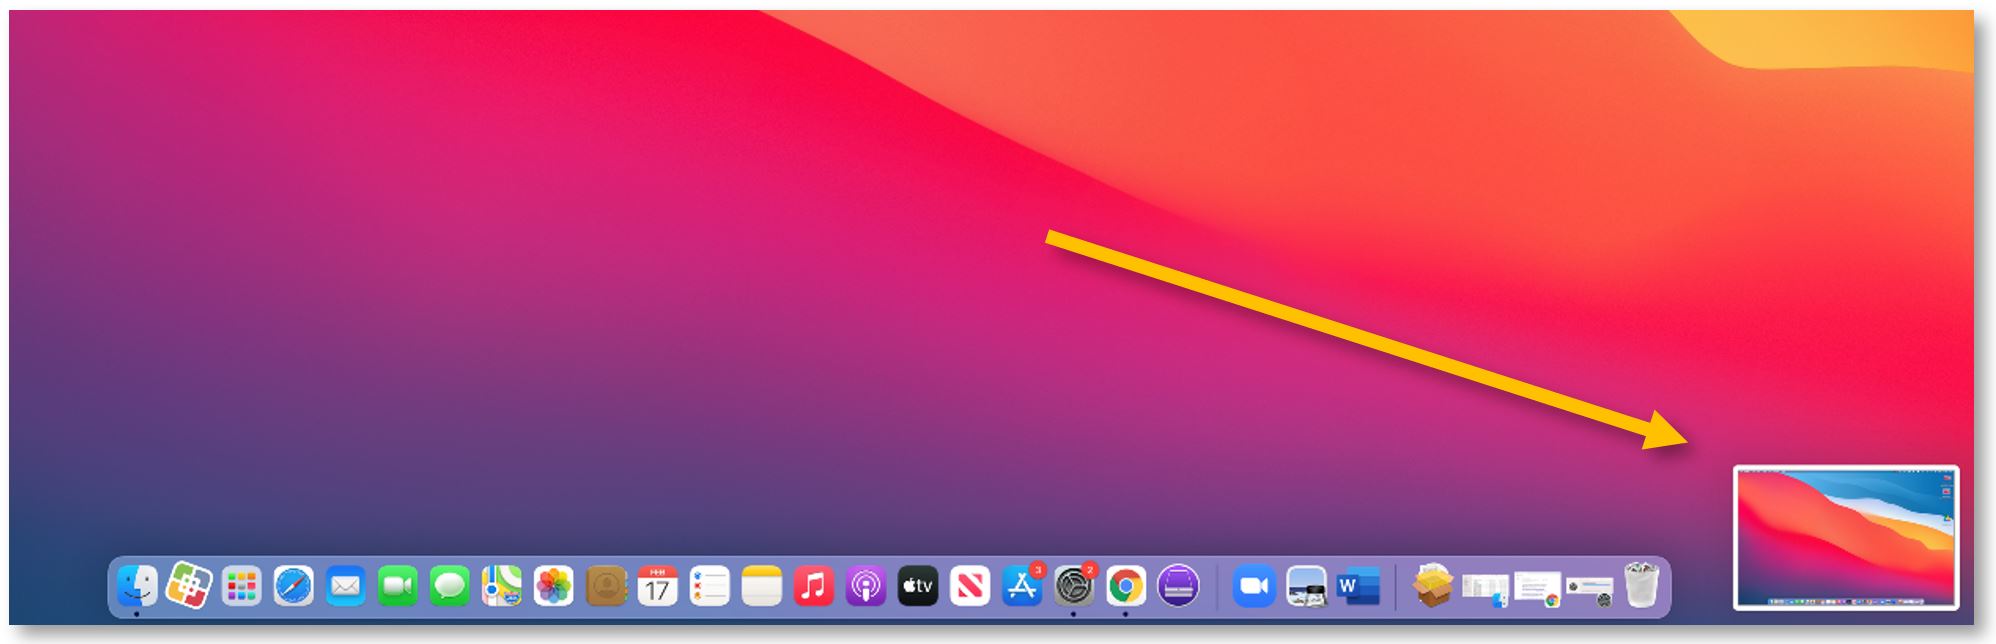
How do I take a screenshot?
Press together Shift, Command, and 3.

A thumbnail with the screenshot will appear in the lower-right corner of your screen. You can click on it to edit the screenshot. Or wait 1 second for the thumbnail to disappear – the screenshot will automatically be saved on your desktop.
To capture a portion of the screen, press and hold together Shift, Command, and 4.

Your mouse pointer will change into a crosshair. Drag the crosshair to select the area of the screen to capture. To move the selection, press and hold Space bar while dragging. To cancel taking the screenshot, press the Esc (Escape) key.
To take the screenshot, release your mouse or trackpad.
A thumbnail with the screenshot will appear in the lower-right corner of your screen. You can click on it to edit the screenshot. Or wait 1 second for the thumbnail to disappear – the screenshot will automatically be saved on your desktop.
How about a window or menu?
Open the window or menu that you want to capture and press these keys together: Shift, Command, 4. Press the Space bar once, the crosshair will change into a camera icon. Click the window or menu to capture it.

A thumbnail with the screenshot will appear in the lower-right corner of your screen. You can click on it to edit the screenshot. Or wait 1 second for the thumbnail to disappear – the screenshot will automatically be saved on your desktop.
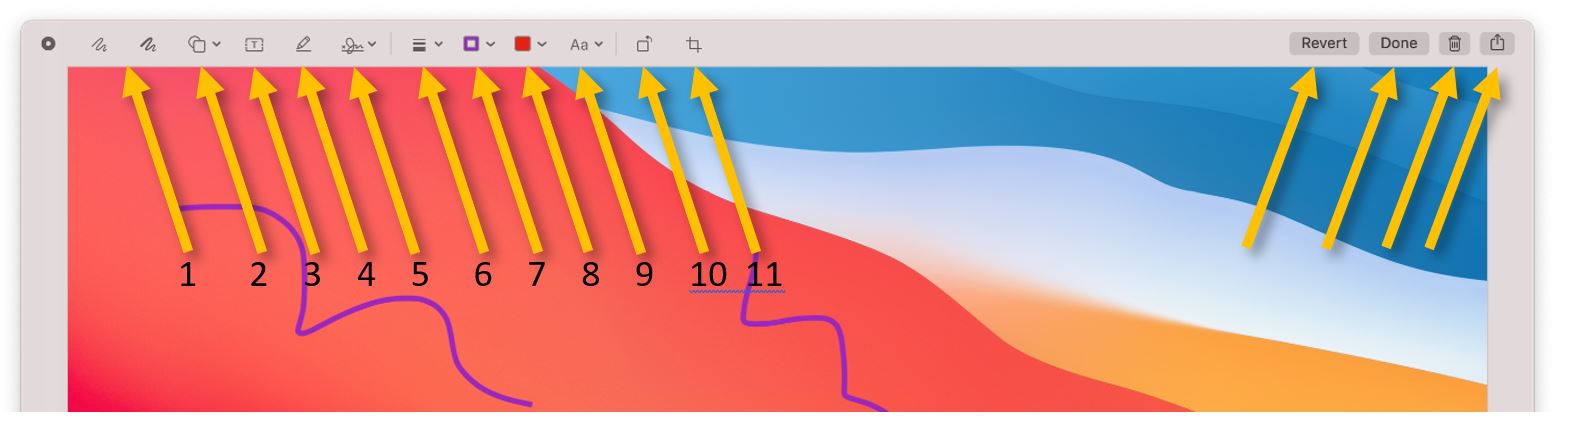
What can I do with the editing tool?
1 – scribble; 2,3 – add shapes or text; 4 – highlight the selection; 5 – sign; 6,7,8,9 – change the shape, size or color or the scribbles, shapes or text; 10 – rotate the screenshot; 11 crop; Revert – undo; Done – save on desktop; Trash -?; Share – attach to email, share it with other Apple devices, add it to photos, etc.
What about my keyboard shortcuts? (Copy-paste, print, find, etc.)
For most of them, use the '⌘ command' key instead of the Windows' darling, Ctrl.
You can find underneath the most used shortcuts in alphabetical order. Please read the last phrases if what you need is not on the list.
Close window or tab: ⌘ command + w
-
-
- Reopen closed tab: ⌘ command + shift + t (Safari, Chrome, etc.)
-
Copy: ⌘ command + c
-
-
- Paste: ⌘ command + v
-
Cut: ⌘ command + x
Cycle through all open apps: ⌘ command + tab
Cycle through browser tabs: ⌘ command + options + arrows (← →)
Find: ⌘ command + f
Find and replace: ⌘ command + Shift + f
Force quit an app (task manager style): ⌘ command + option + esc
Minimize window: ⌘ command + m
New: ⌘ command + n
Paste: ⌘ command + v
Print: ⌘ command + p
Quit: ⌘ command + q
Rename file: select the file and press return (Enter)
Reopen closed tab: ⌘ command + shift + t (Safari, Chrome, etc.)
Save: ⌘ command + s
Search (for apps, documents, etc.): ⌘ command + spacebar
Select all: ⌘ command + a
Undo: ⌘ command + z
Where can I find the whole list?
Open System Preferences, select Keyboard and go to the Shortcuts tab.
OK, OK, but where are my function keys? (F1, F2… F12)
Press and hold the Fn key (the first key in the lower-left) - the Control Strip will show the old function keys.
What's up with the Control Strip?
The Control Strip is in flux, and it tries to show the most used actions or shortcuts when needed. The screen brightness and the system volume controls tend to be there all the time, but the buttons will change depending on the in-use app. You can select back-forward, search, new tab, and so on, while browsing, or play, pause, and jump to, when listening to music or watching a video.
The Control Strip can also be customized to show other buttons if needed. For example, I do not use Siri, but I need to lock my screen every time I leave my desk. I've changed the Siri button with the lock-screen one.
To customize the Control Strip, open System Preferences, select Keyboard, and click on Customize Control Strip. If what you need is in the list, grab it with the mouse cursor and drag it into the Control Strip. Press Done.
What if the shortcut that I need, or usually use on Windows, it's not available on Mac?
You can try to create it using the underneath tutorial:
https://support.apple.com/guide/mac-help/create-keyboard-shortcuts-for-apps-mchlp2271/mac
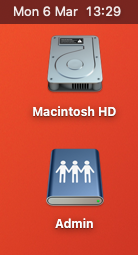
Where are my Documents, Apps, Downloads?
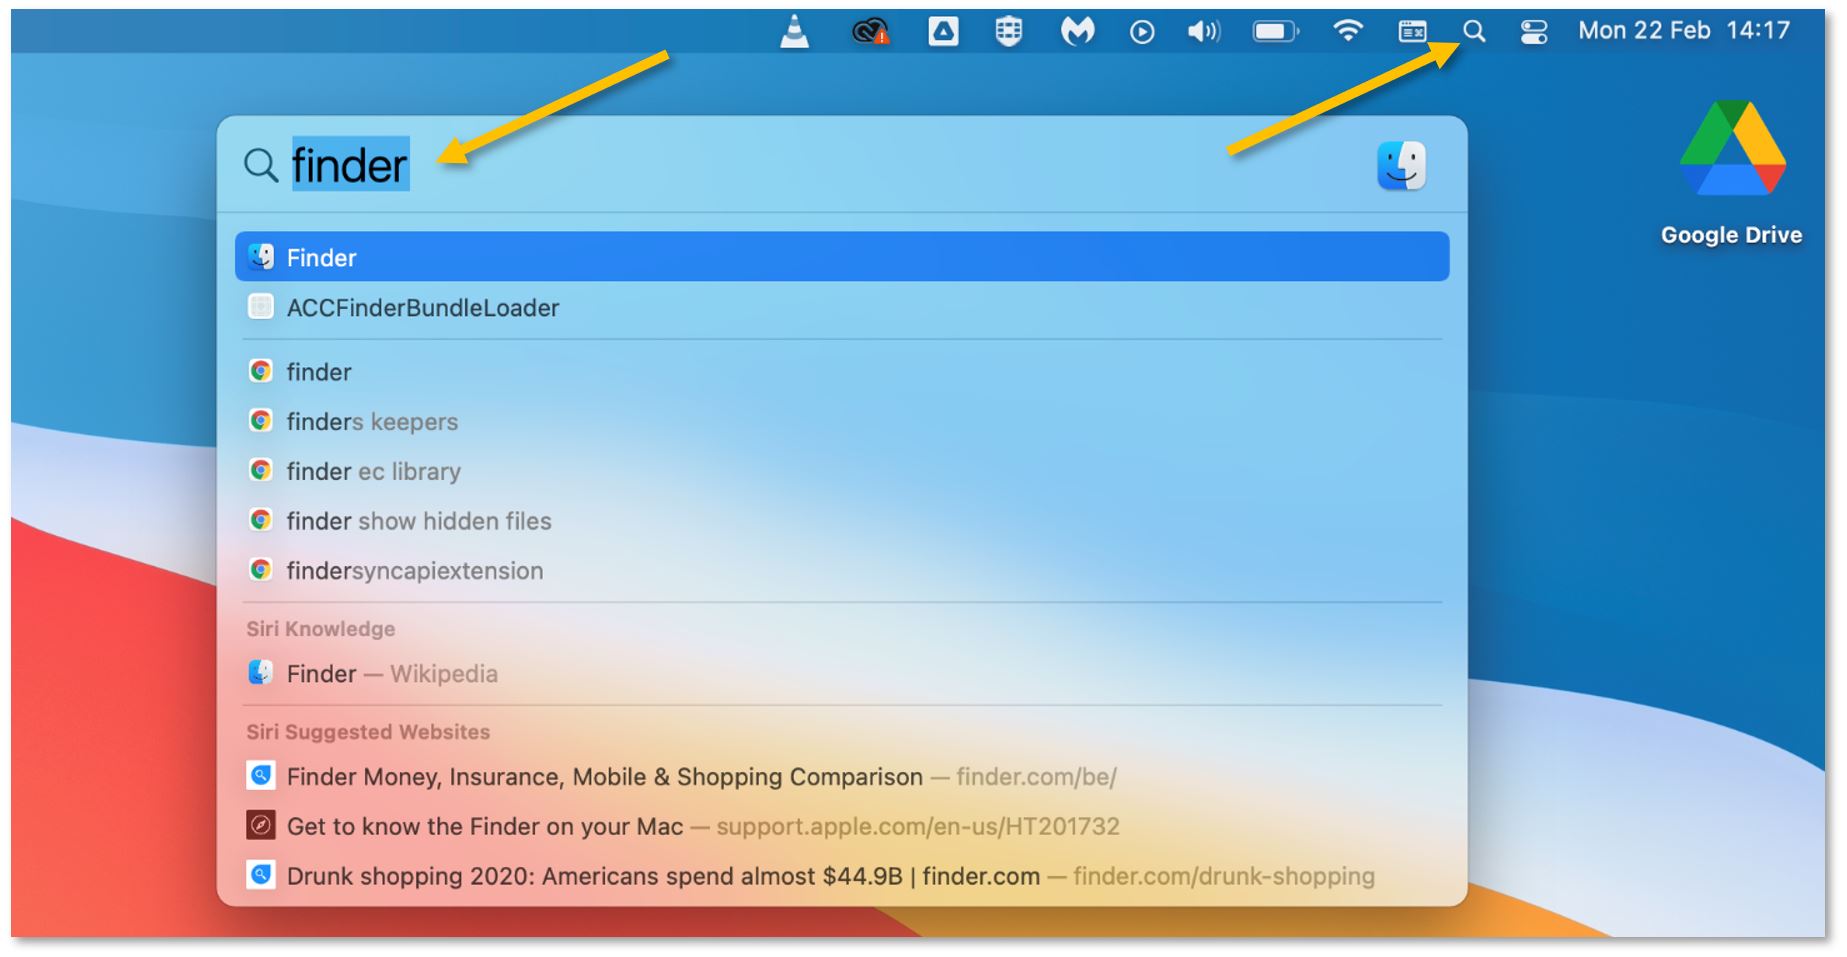
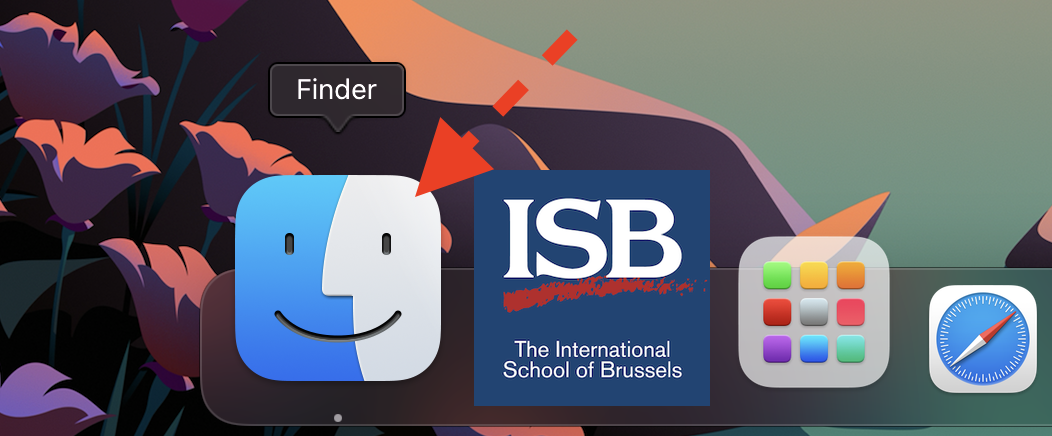
On a Mac, My Computer (or File Explorer) is called Finder (1). Its shortcut is usually the first one in the dock (1). You can also invoke it by pressing Option+Command+Space, or by searching for Finder.
By default, everything that you download or receive through Airdrop goes into the Downloads folder (2).
Almost all productivity apps (Word, Pages, Excel, etc.) will ask where you want to save your work; the default save location is your Documents folder (3) or, rarely, your Desktop (4).
All the apps are installed in the Applications folder (5).
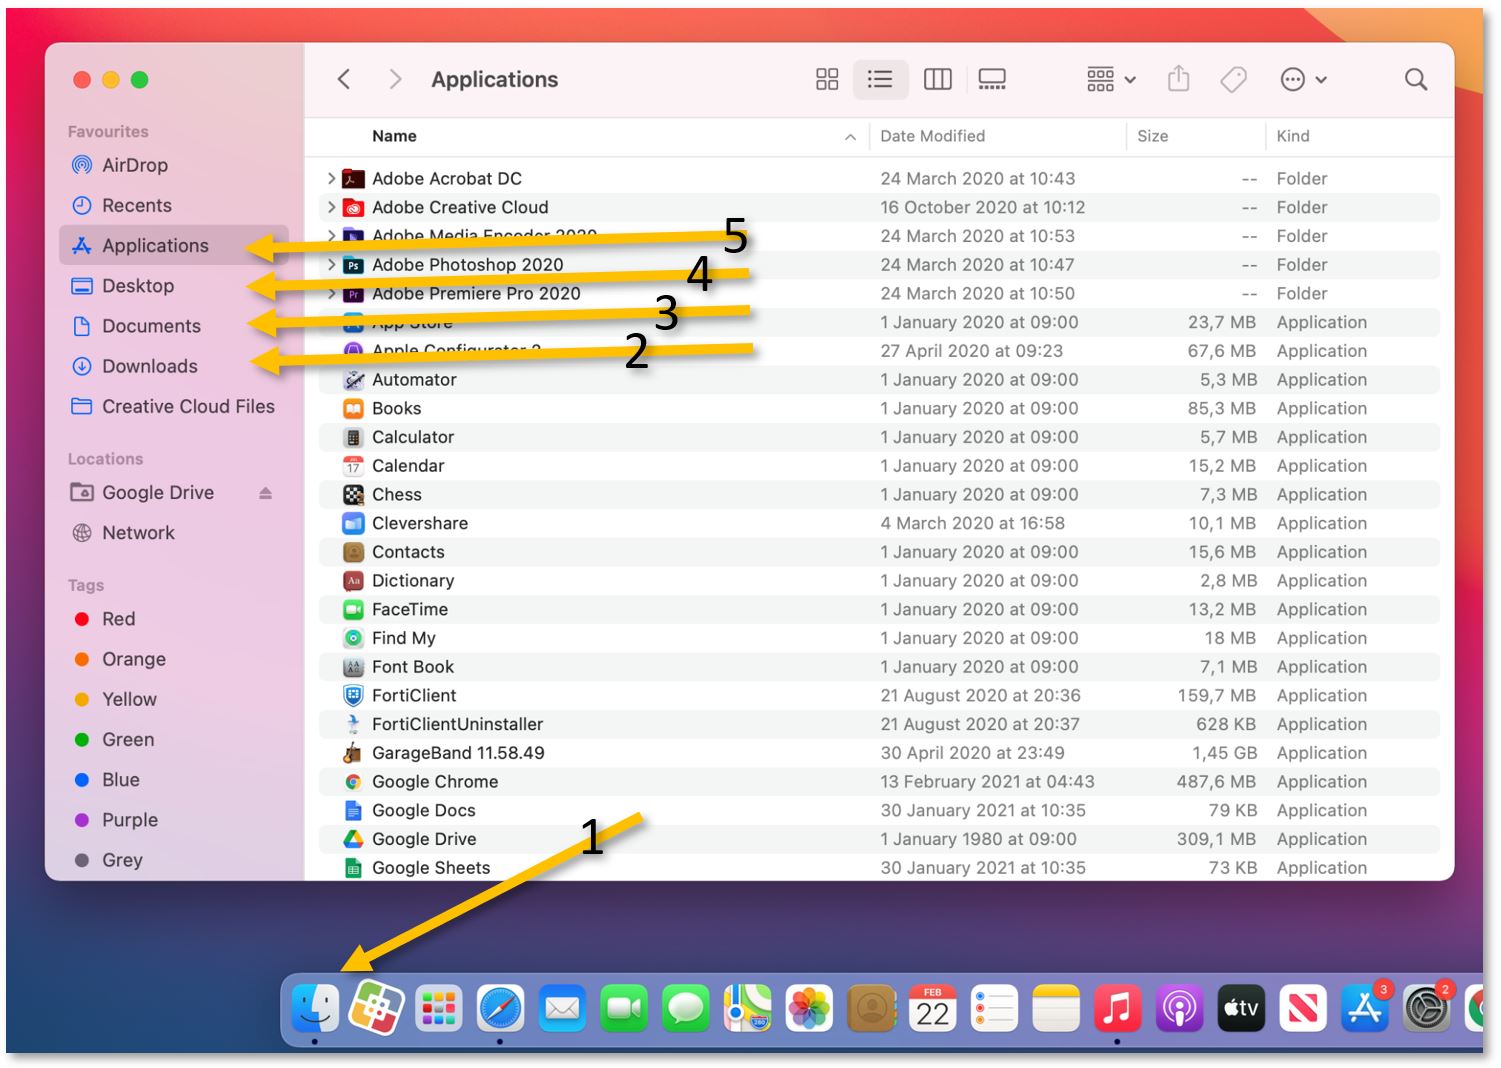
If you remember the name of the app or document that you need, you can also use Spotlight (the magnifying glass in the upper-right part of the screen) to search for it.
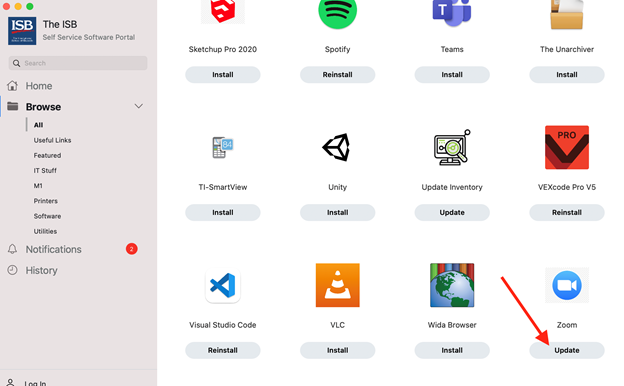
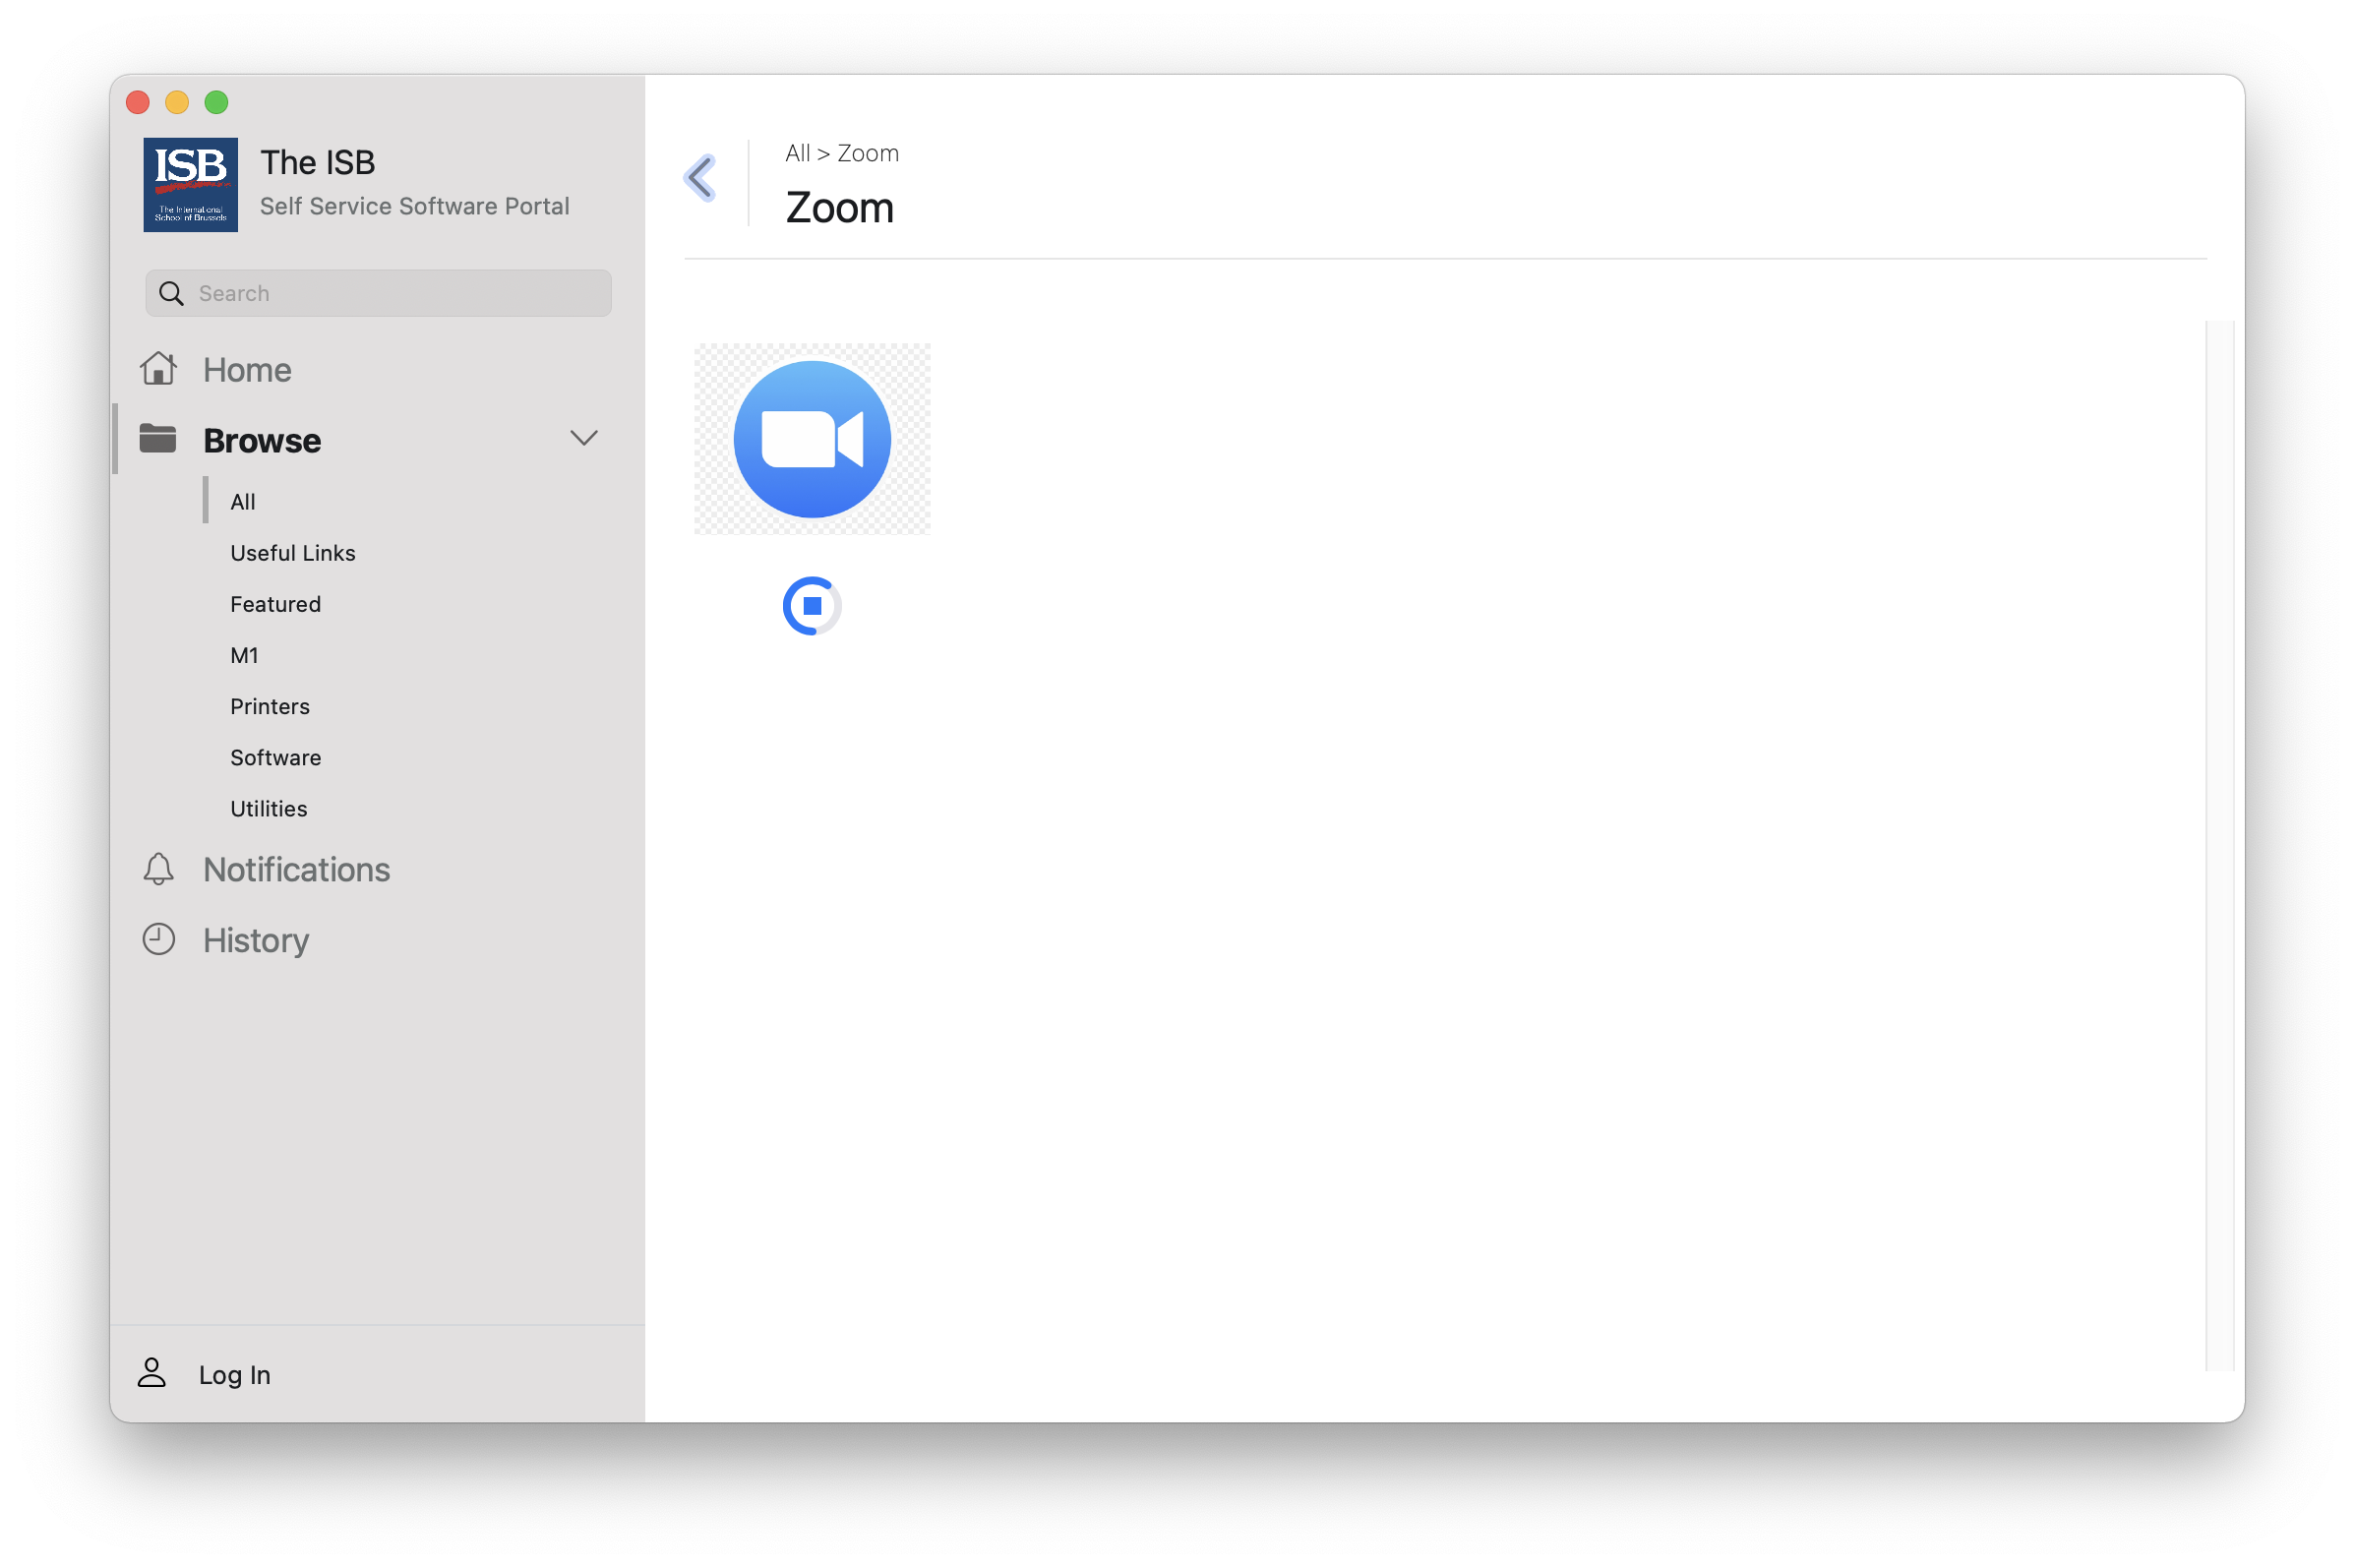
Mac - Install Software - Self Service
Self Service is a software distribution platform from where you can install apps on Mac machines.
If Self Service is not present in the dock (the icon with the ISB logo) please search for and open it using the magnifying glass (Spotlight) in the upper-right corner. In the window that opens up find the app that you need in the list, and click on install.
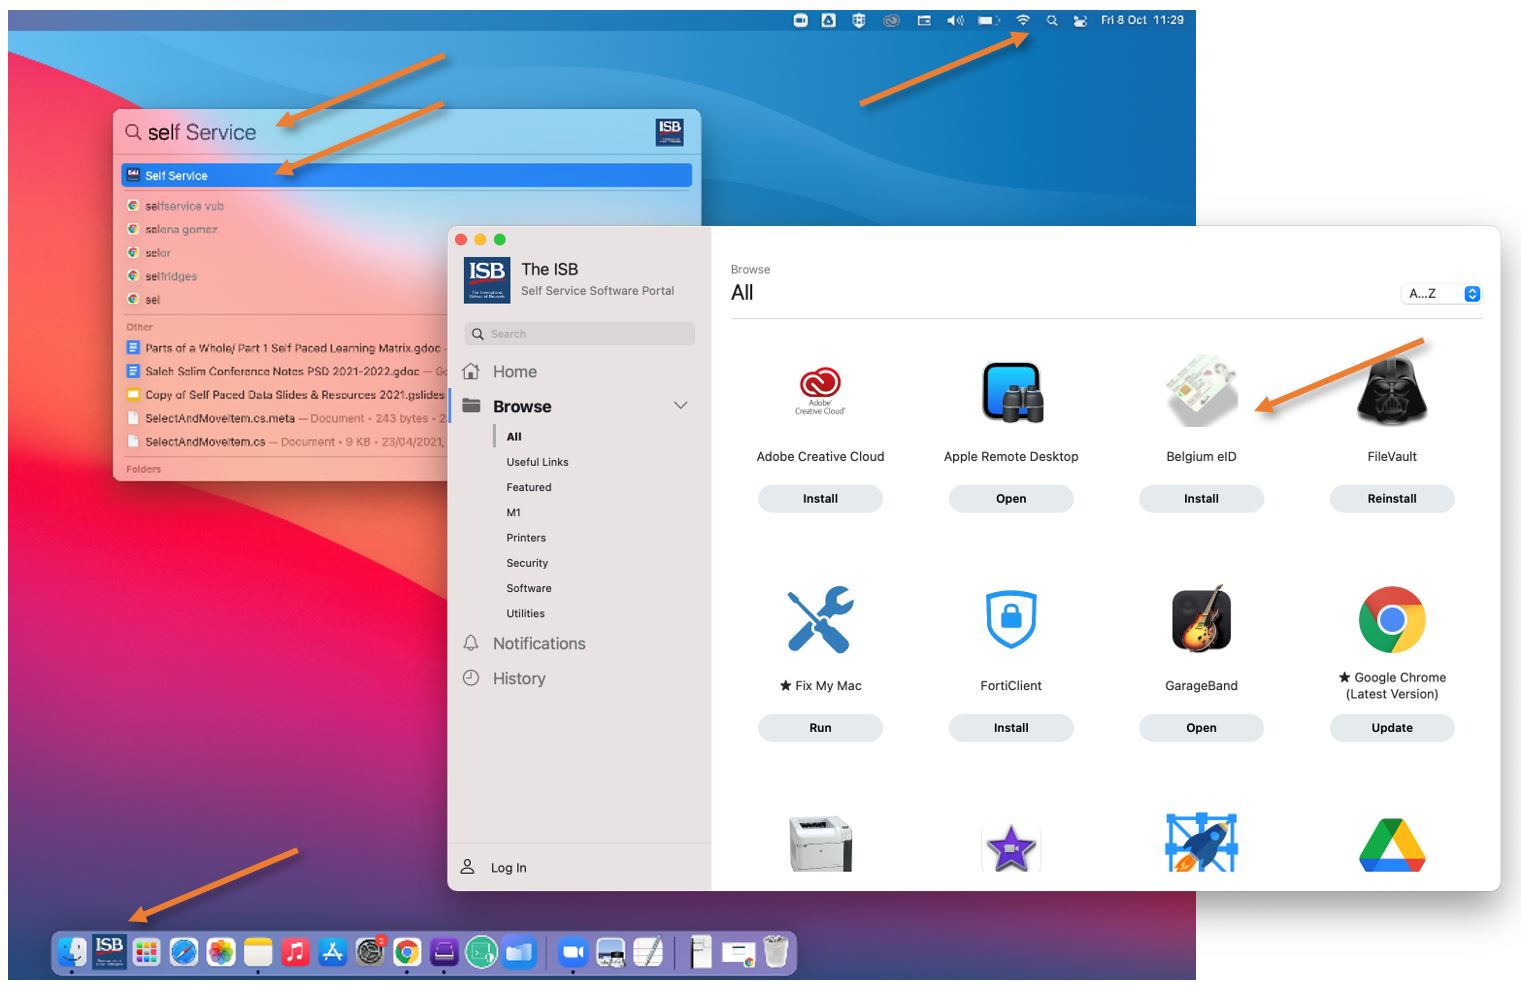
The list of applications is constantly being updated. We are trying to add all the usually requested apps. If what you want/need to install is missing from the list, please let us know by sending an email to IThelpdesk@isb.be, and, if possible, we will make it available for you in the Self Service portal.
Depending on the application, the installation can take between 1 and 30 minutes. When done, the Install button usually changes to Reinstall. To start the installed application, search for it as you did with the Self Service.
Zoom Setup
1. Click here to Update or install Zoom or install via the Self-Service Portal (ISB Logo)
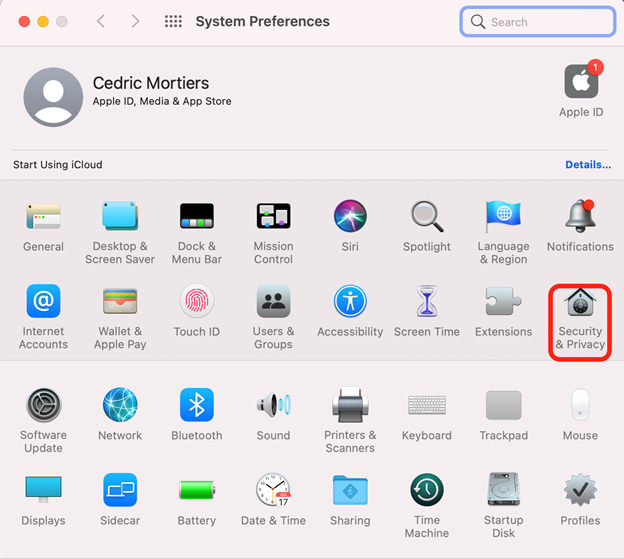
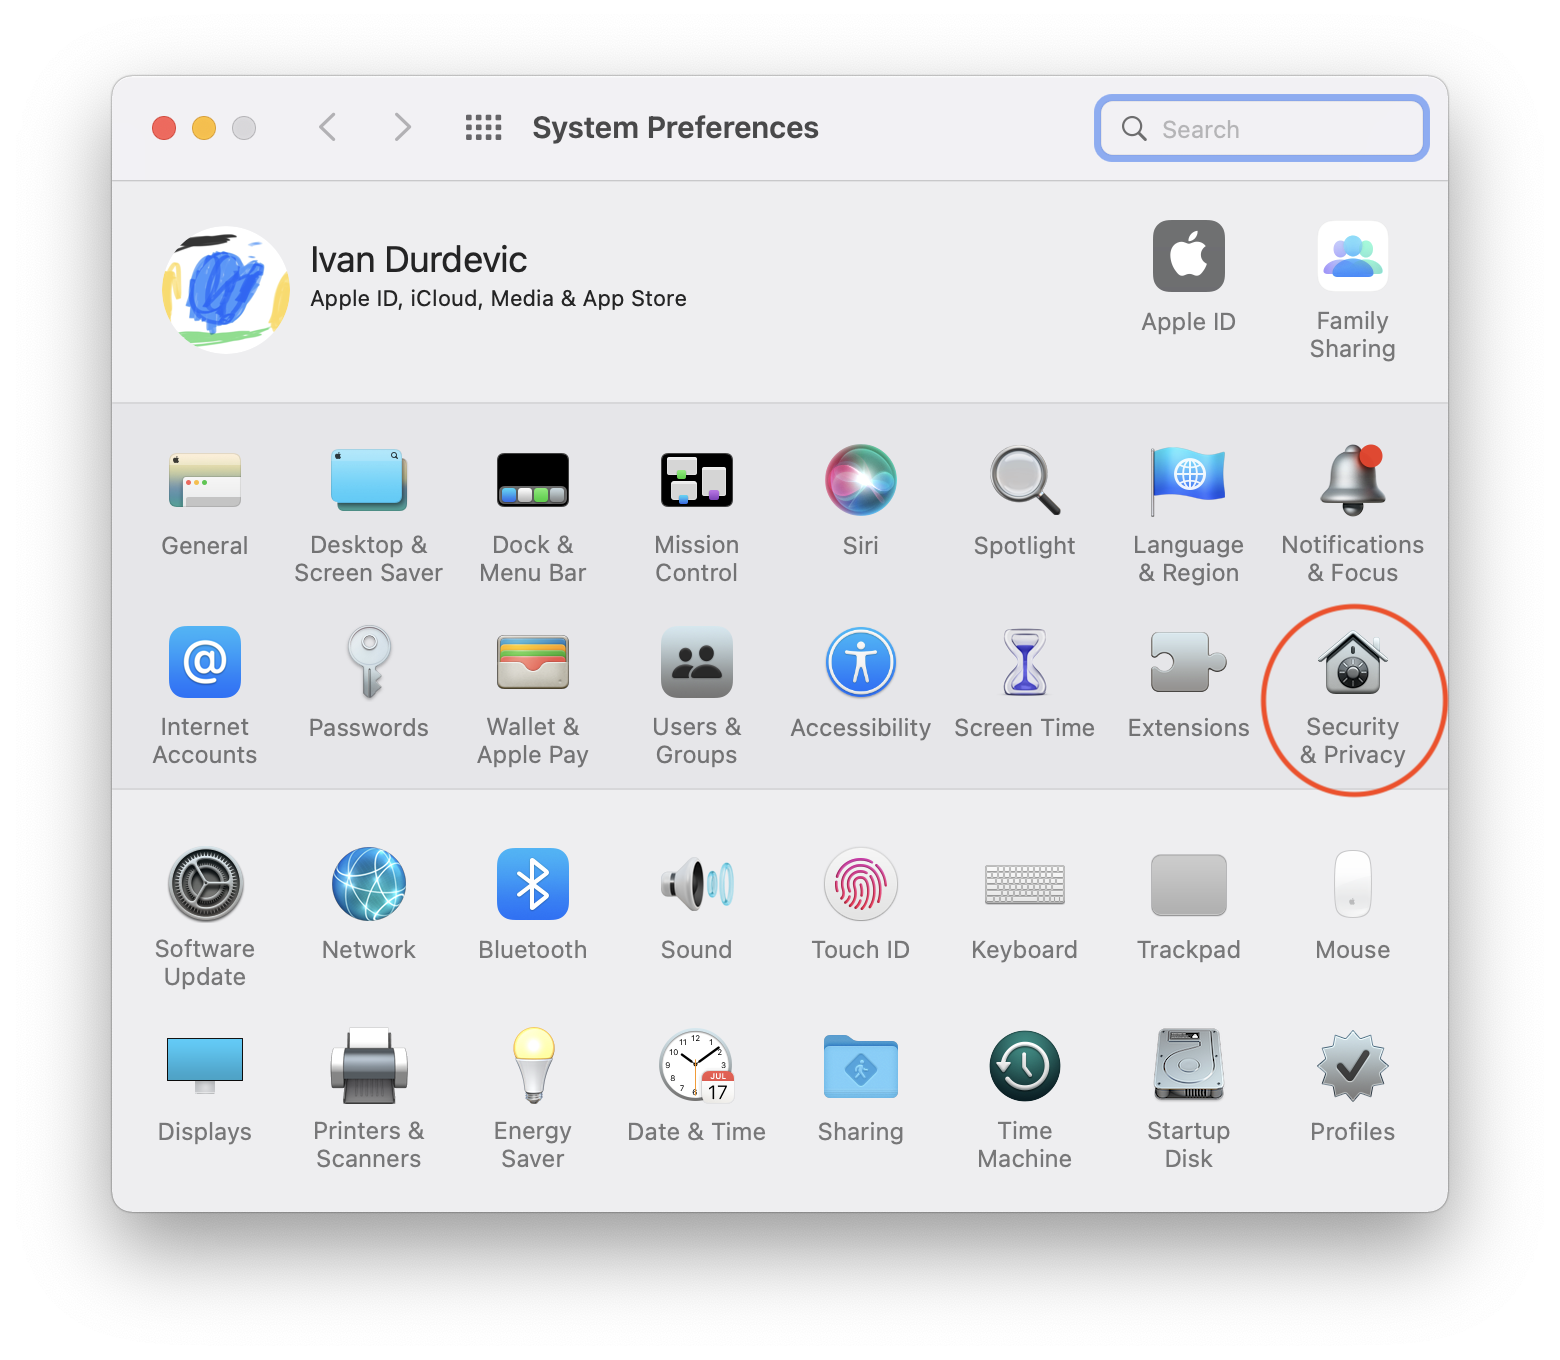
2. Once installed, go to System Preferences and select Security & Privacy
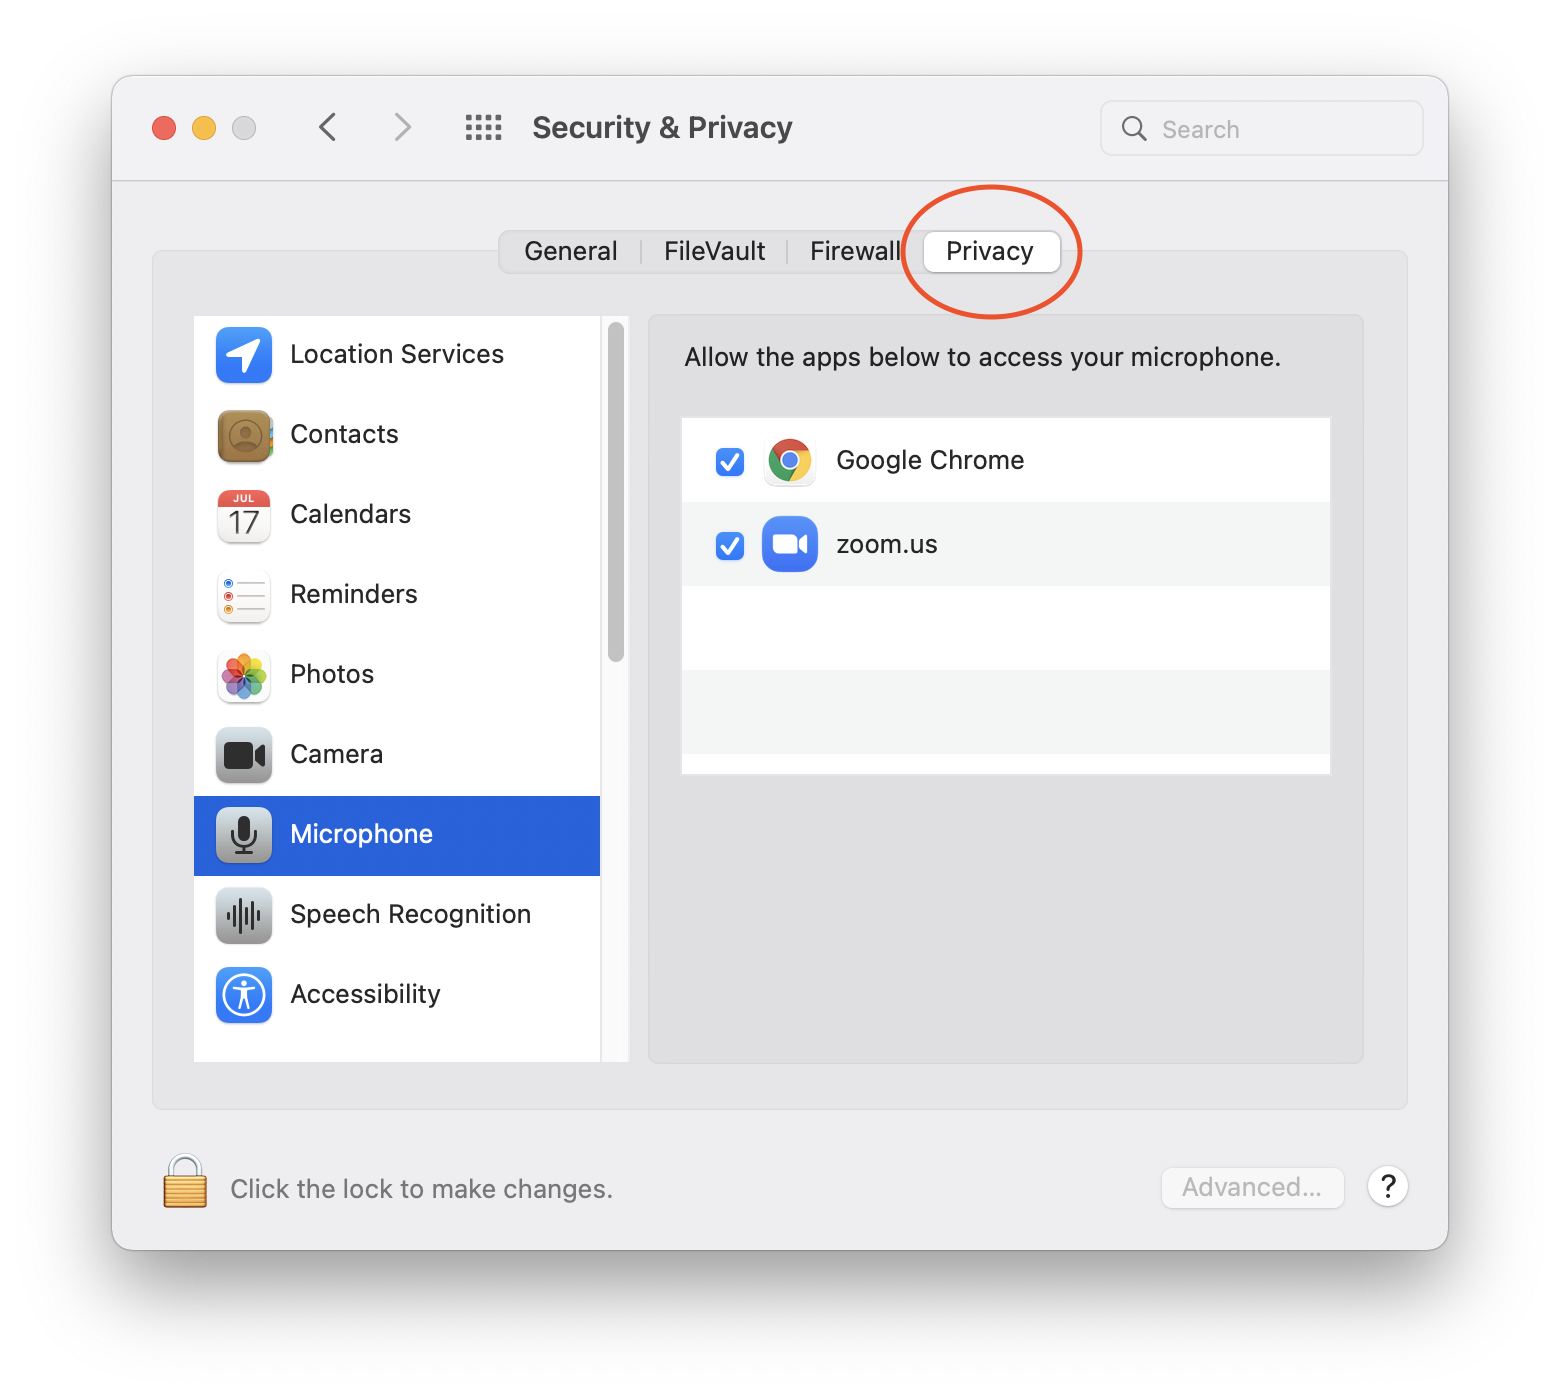
3. Then click on Privacy, Microphone and make sure that zoom.us is ticked. (this needs to be done to be able to mute your microphone)
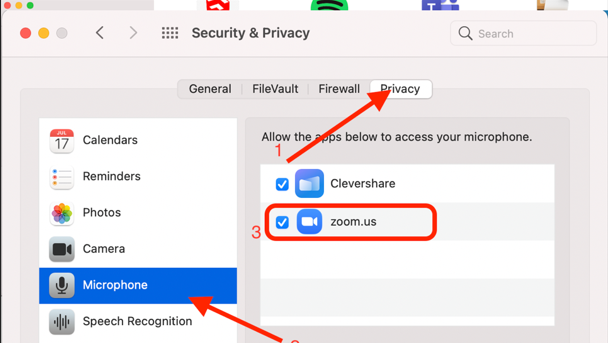
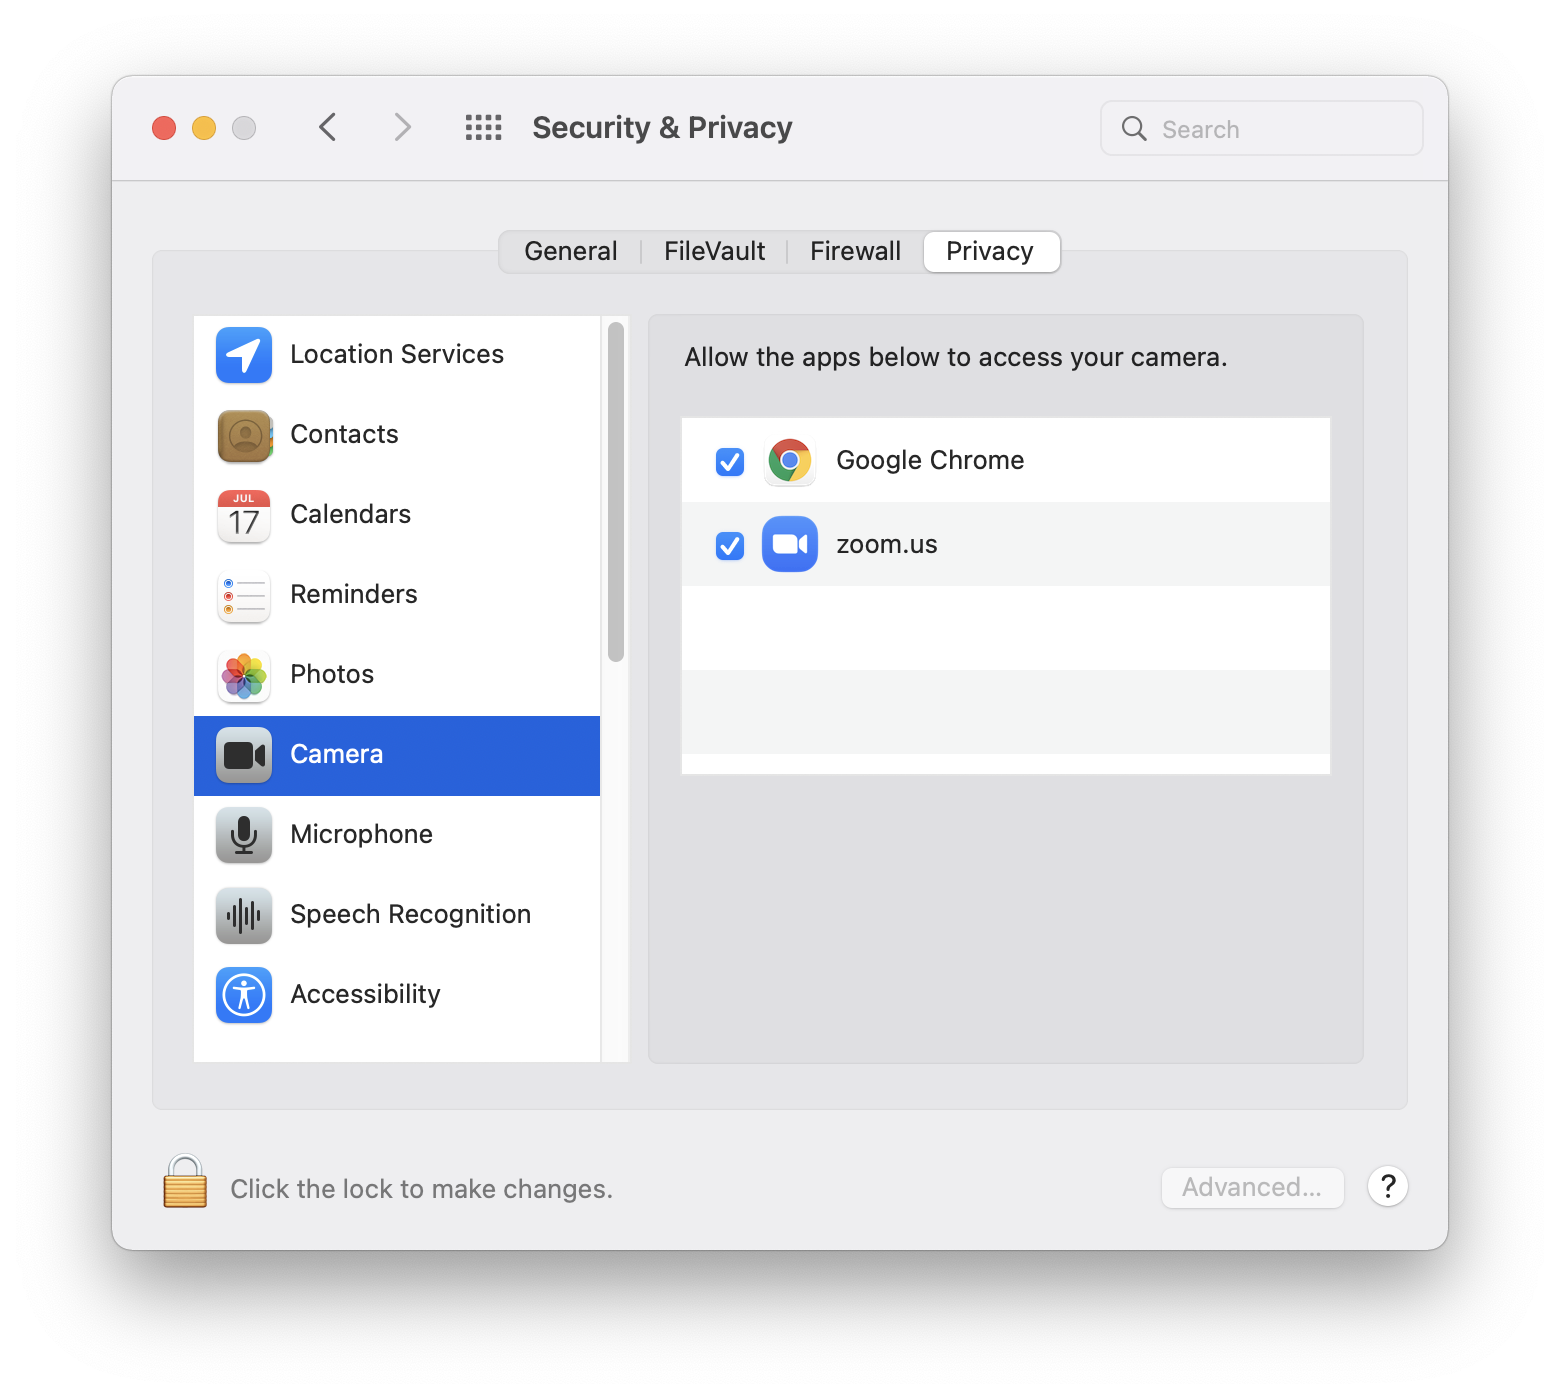
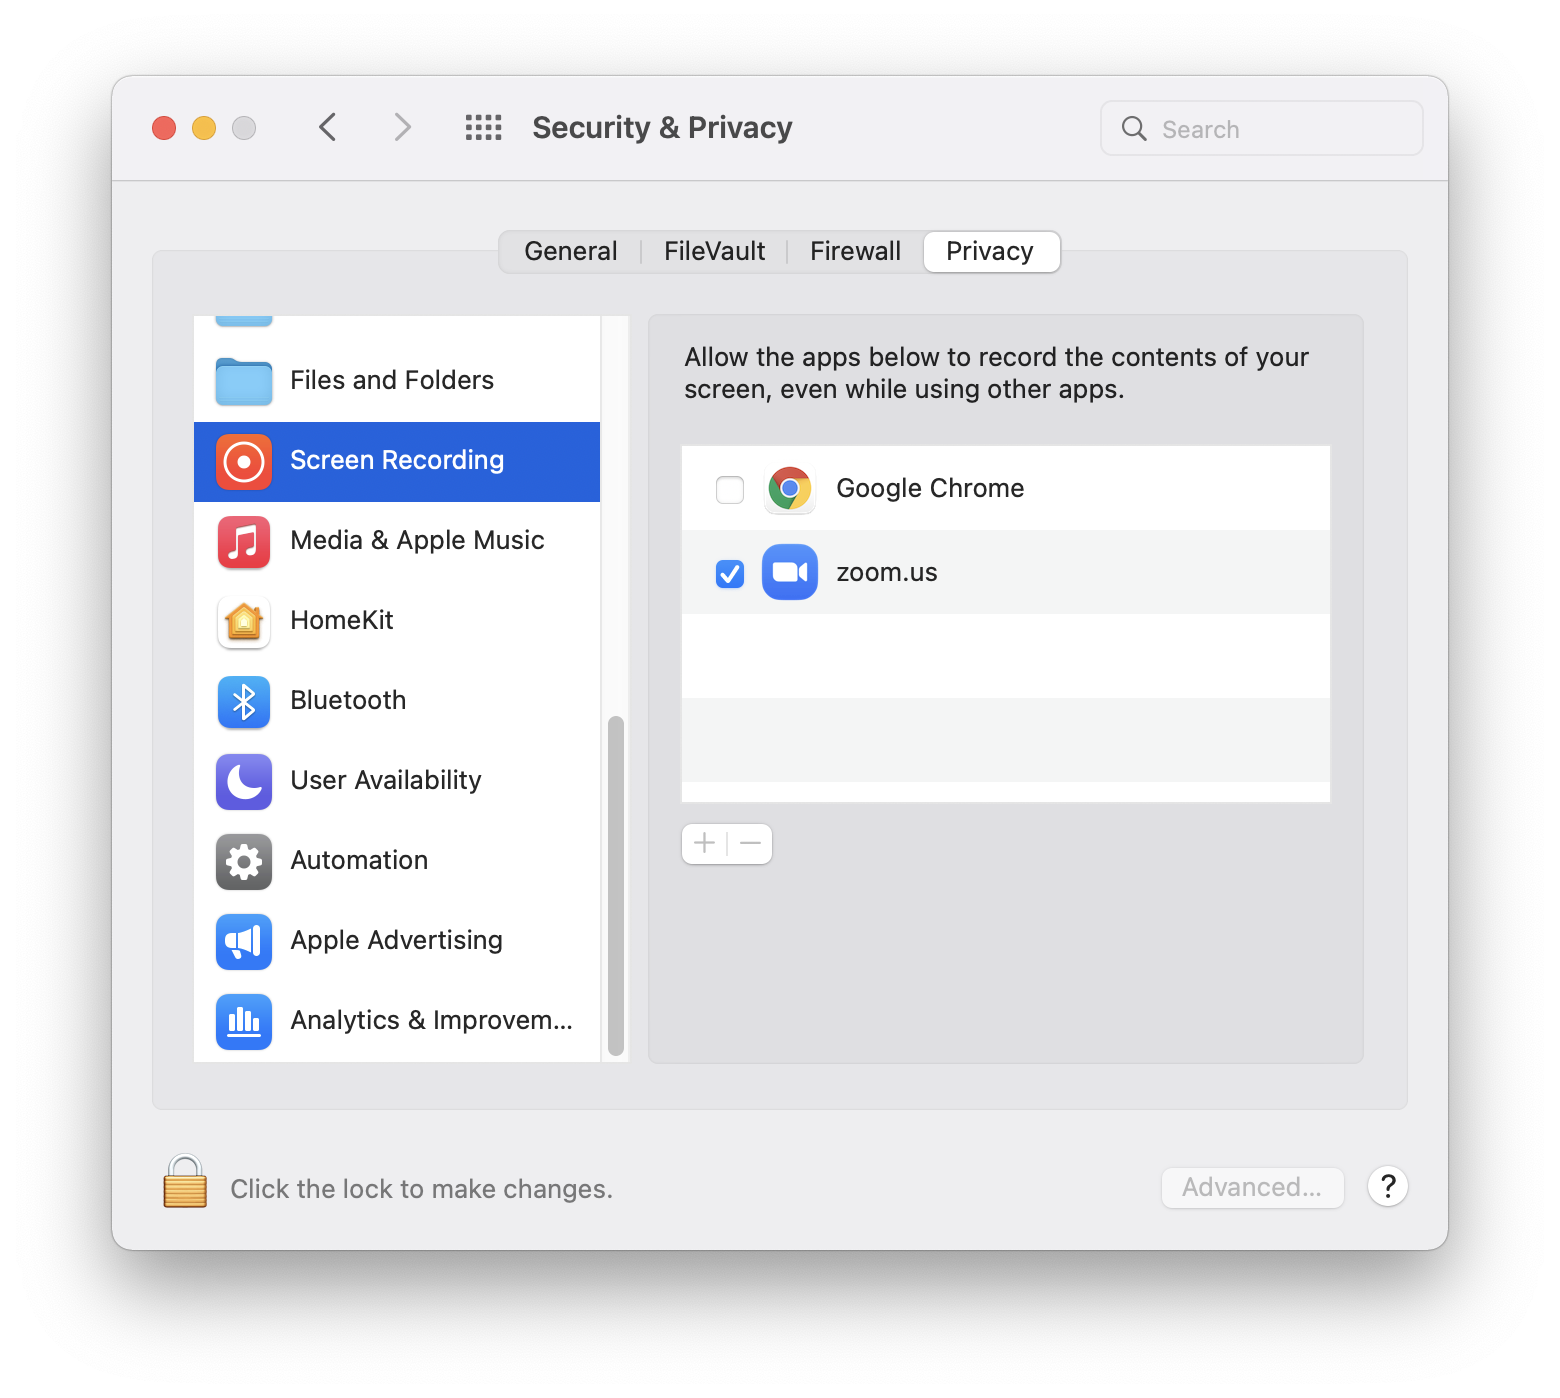
4. Do the same thing for the Screen Recording and the Camera settings. (This will allow you to share your screen)

5. Finally, you can open Zoom and you should be ready for your Zoom meetings
Automatically Delete Files in Bin after 30 Days
Automatically Delete Files in Bin after 30 Days
By default, on the Mac laptops, your recycle bin does not delete files automatically. This means that the recycle bin can grow very big.
The Mac laptops can actually automatically delete files in the recycle after they have been there for 30 days. To enable this feature, follow these steps:
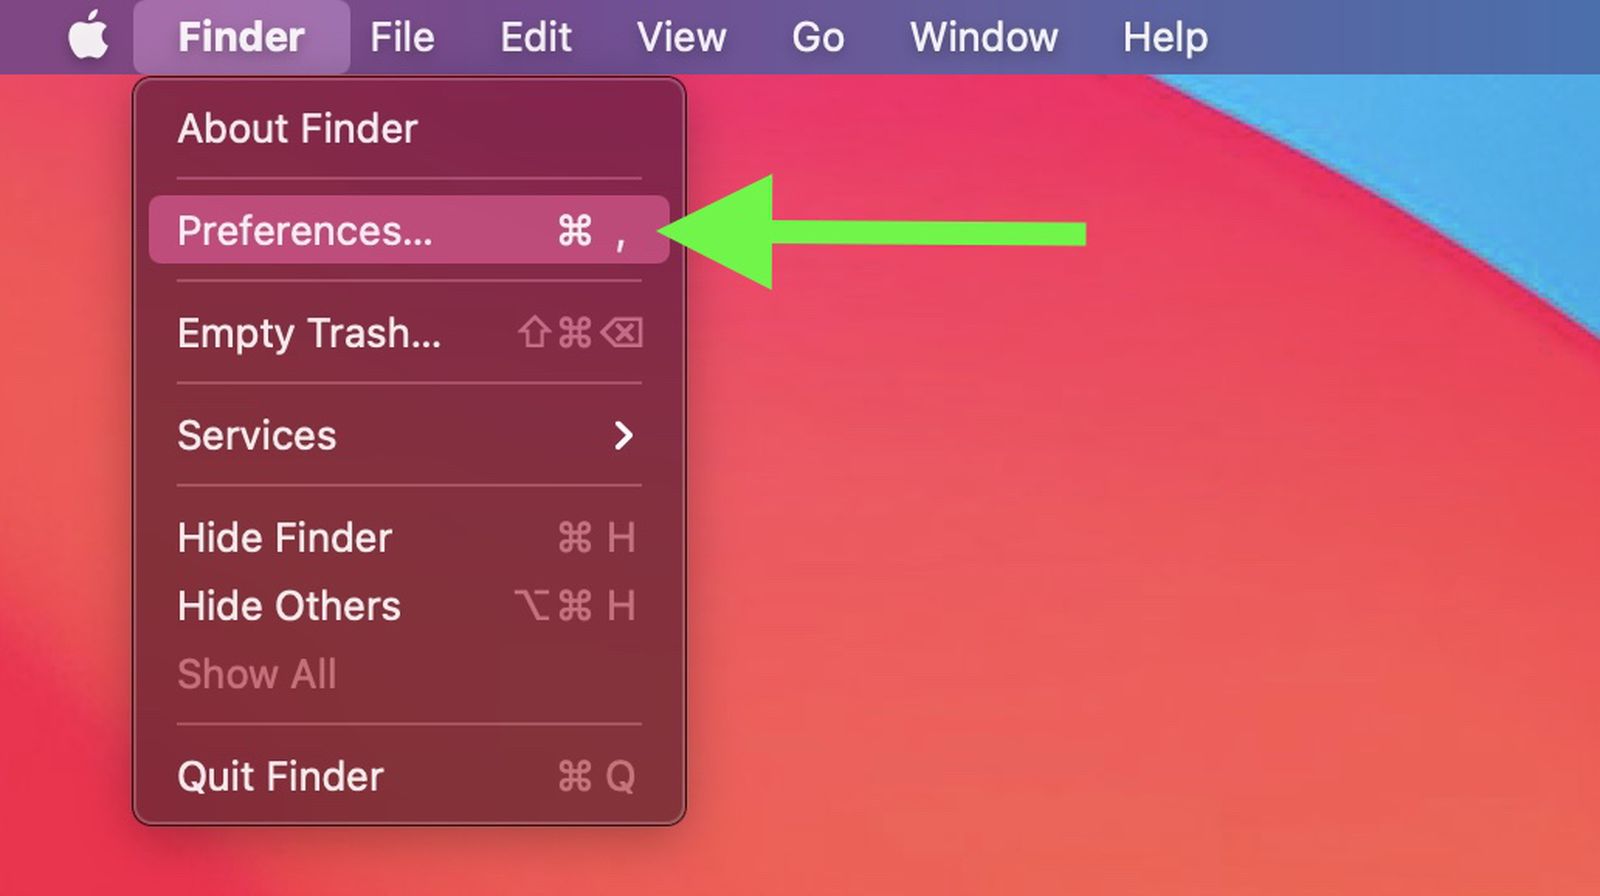
Open a Finder window:
Go to Finder Preferences:
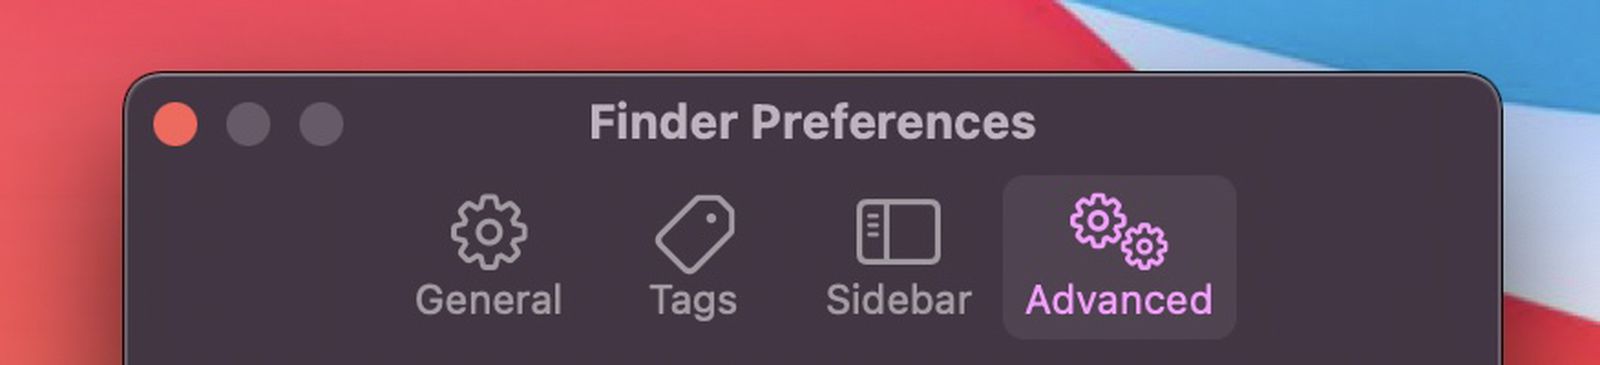
Click on the "Advanced" tab:
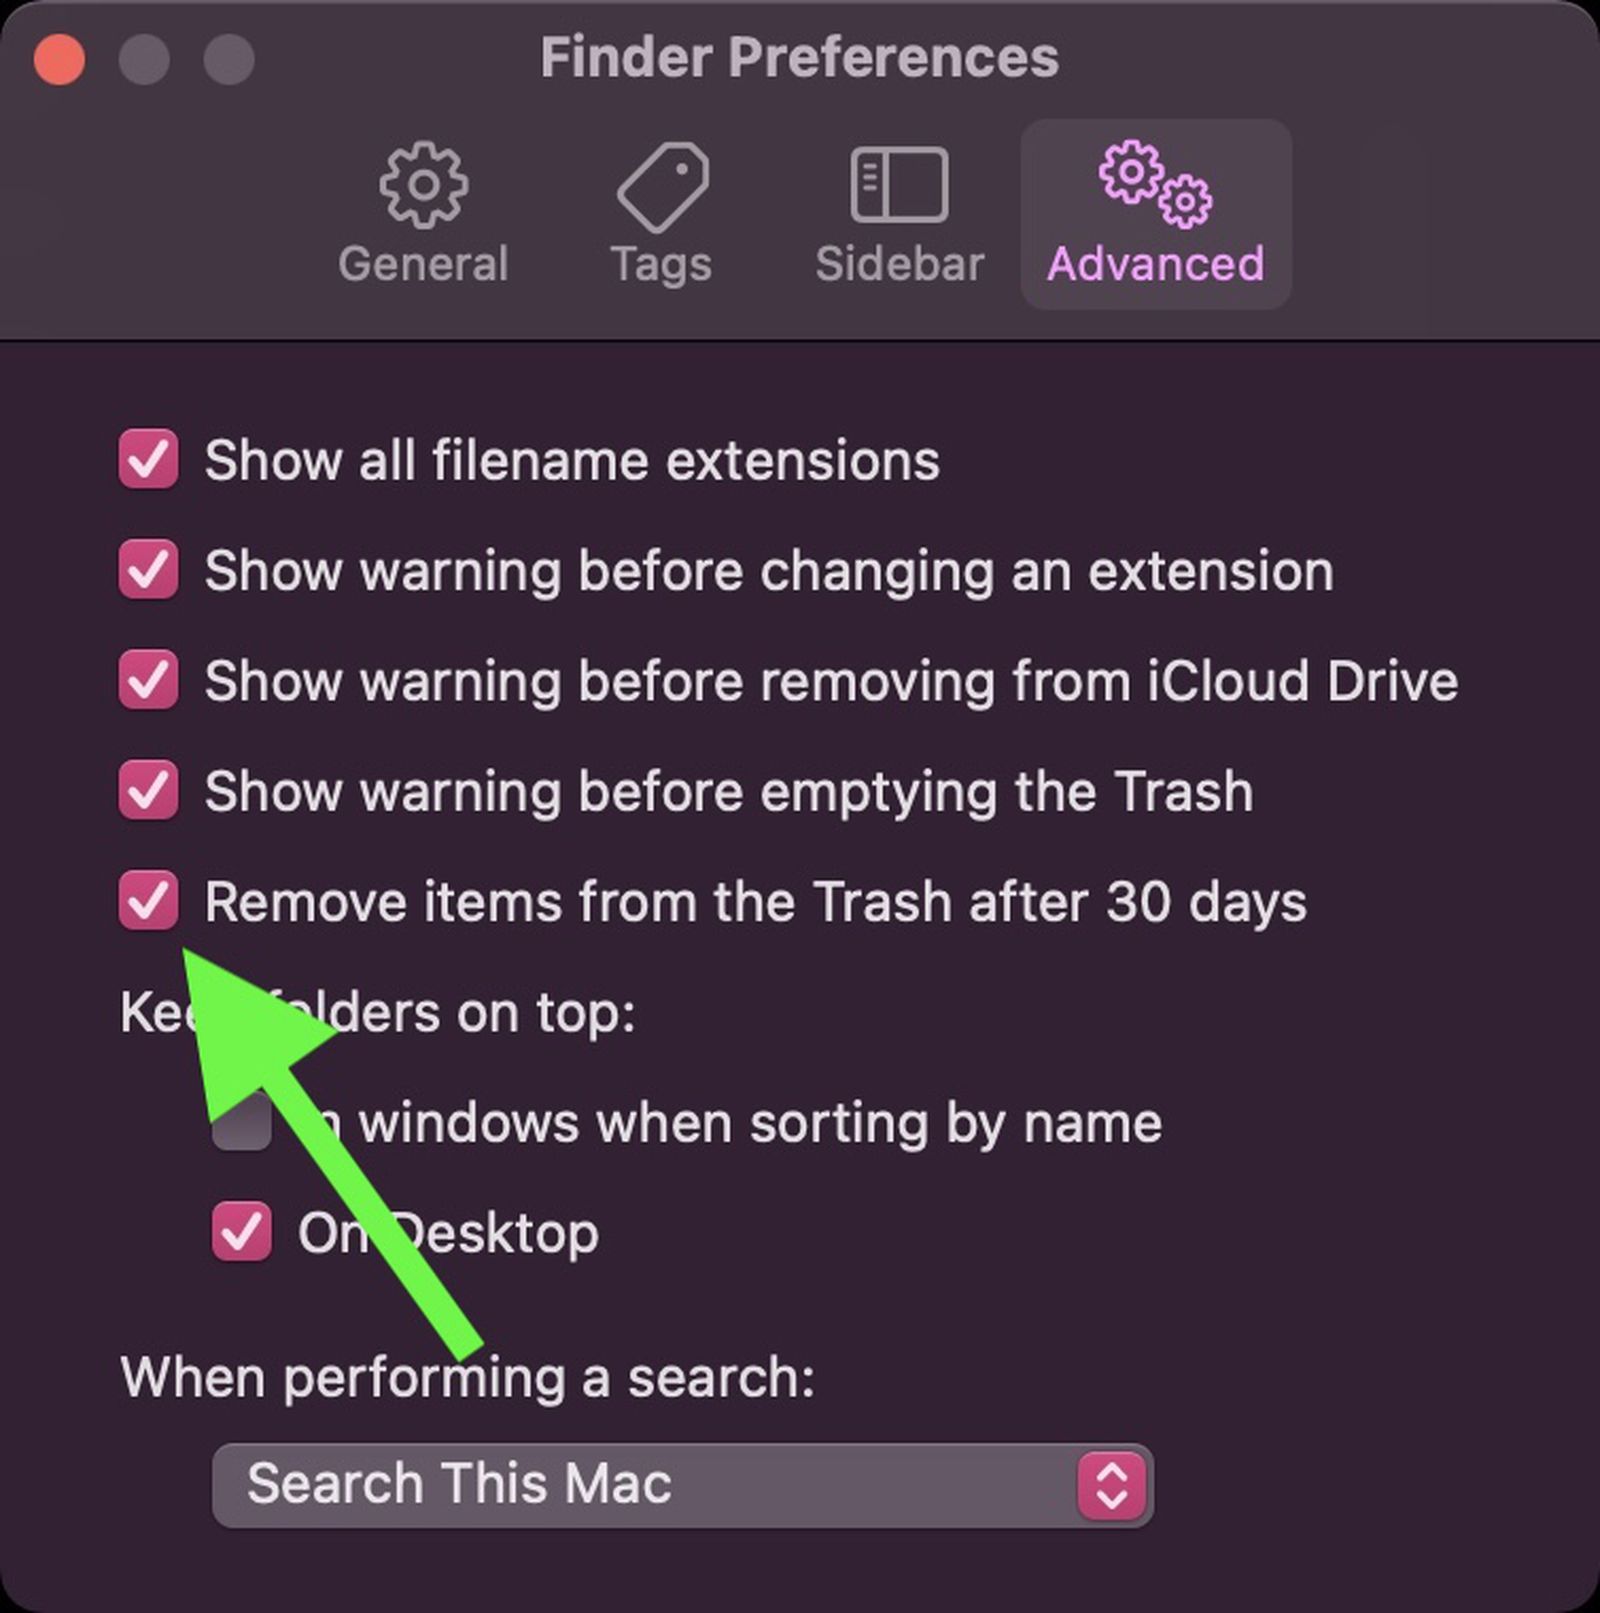
Tick the box "Remove items from the Trash after 30 days":
You're done :-)
Getting Mac Version Information
To get the current version of Mac you have installed, follow these steps:
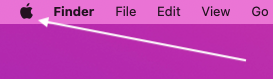
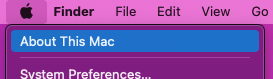
Click the Apple logo in the top left corner of the screen:
Select "About This Mac":
The version information is now available to you:

Installing Zoom for students
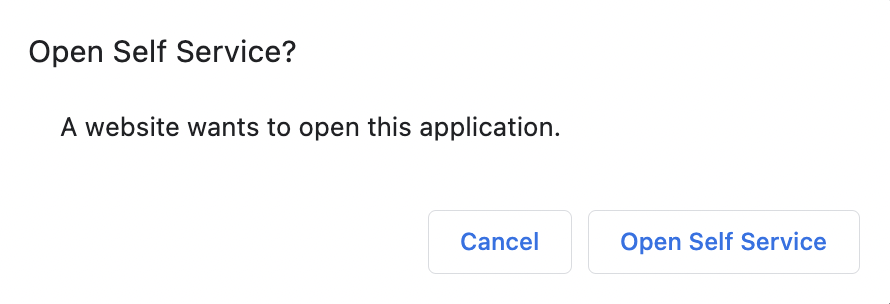
1. To install the Zoom app on your laptop, click on this link.
2. In the pop-up window, select Open Self Service.
3. Wait until the latest version of the Zoom app gets installed.
Setting Up Zoom for Students
To make sure your camera, microphone and screen sharing works on your computer, please follow the next steps.
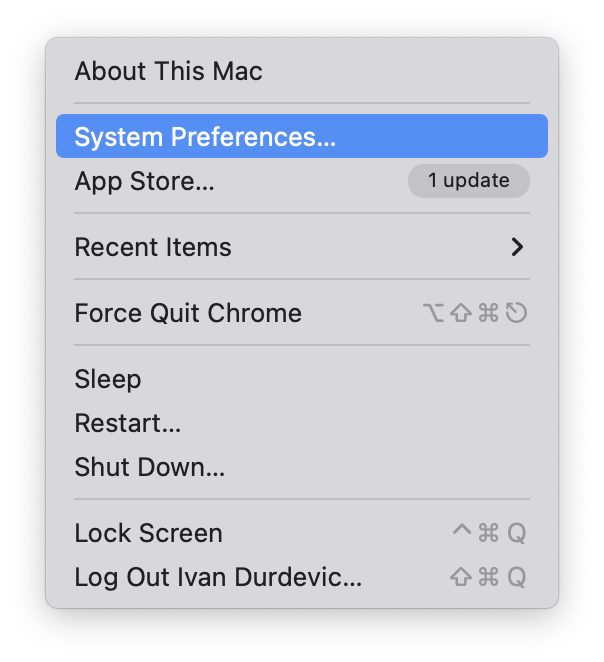
1. On your computer, open System Preferences. You can do so by clicking on the Apple logo in the top-left corner of your screen, and select System Preferences from the manu.
![]()
2. Once opened, head out to Security & Privacy.
3. Make sure to select Privacy tab, and in the column on the left, we will have to go through Microphone, Camera and Screen Recording, making sure the Zoom app has the blue checkmark next to it.
Now you can close the System Preferences, and your Zoom app will have all the features you need.
Congratulations!
Update MacOS
Due to changes in how macOS is being updated, you cannot update your school computer by going into System Preferences.
To bypass the administrative needs, we have deployed an application in Self Service.
Please note that once started, the process cannot be stopped.
Follow these steps to update your Macbook:
- First, open the Self Service (the ISB Icon in the Dock)
- Search for the application called Update MacOS and click on install.
- Enter the password you use to login into your Mac.
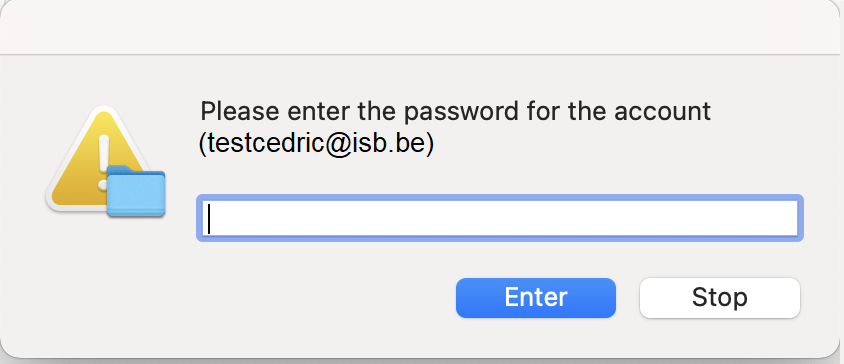
If you don't see the pop up, restart your Mac and start the process again. (Click the Apple logo at the top Left corner, then Restart)

- The update process will start. If the MacOS Installer is not downloaded, you will see the following message

Once the MacOS Installer is downloaded, the update will start and take from 30 min to an hour.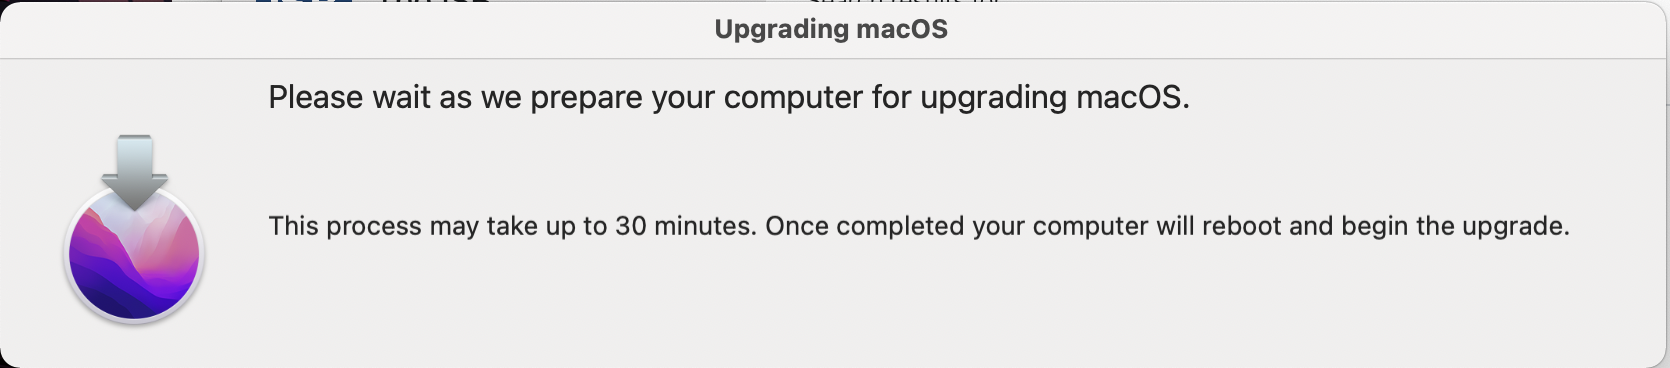
After it restarts and the installation process is done, you might not see the bubble with your user on the login page.
To fix it, you need to restart your computer.
Your username is your email address without @isb.be.
The password is the same as the one you usually use to log in to the computer.
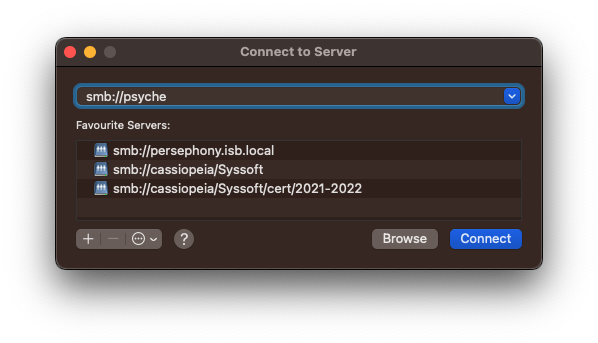
Accessing ISB Drives
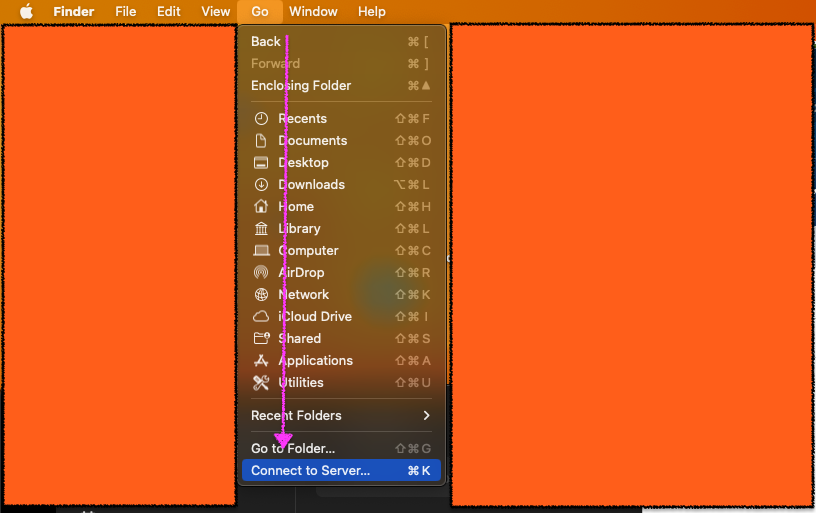
ISB has many drives. To connect to one, follow these steps:
Open a Finder window:
In the top bar, click on "Go" and then "Connect to Server":
Type in the name of the server:
Be sure to put smb:// before the name of the server or it won't be able to connect
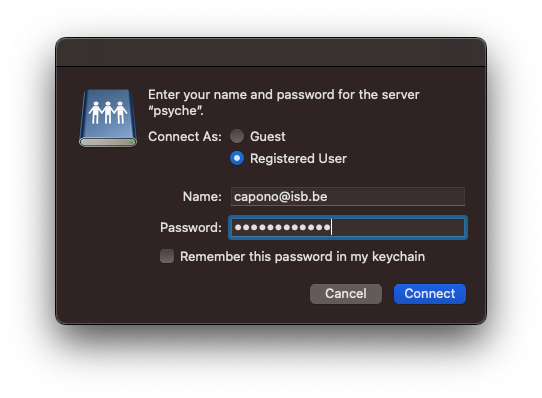
You will be prompted to sign in, this should be the same user details as you use to sign in to your email:
Select the folder you wish to access:
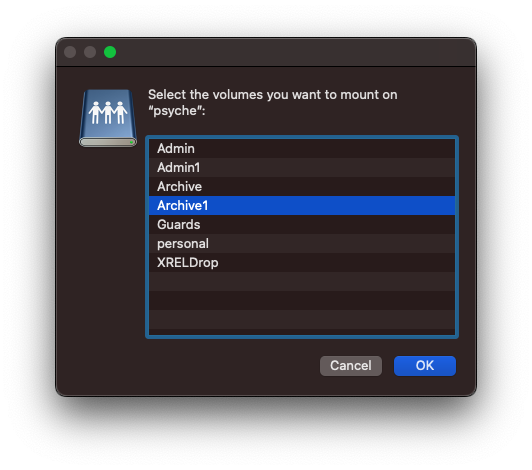
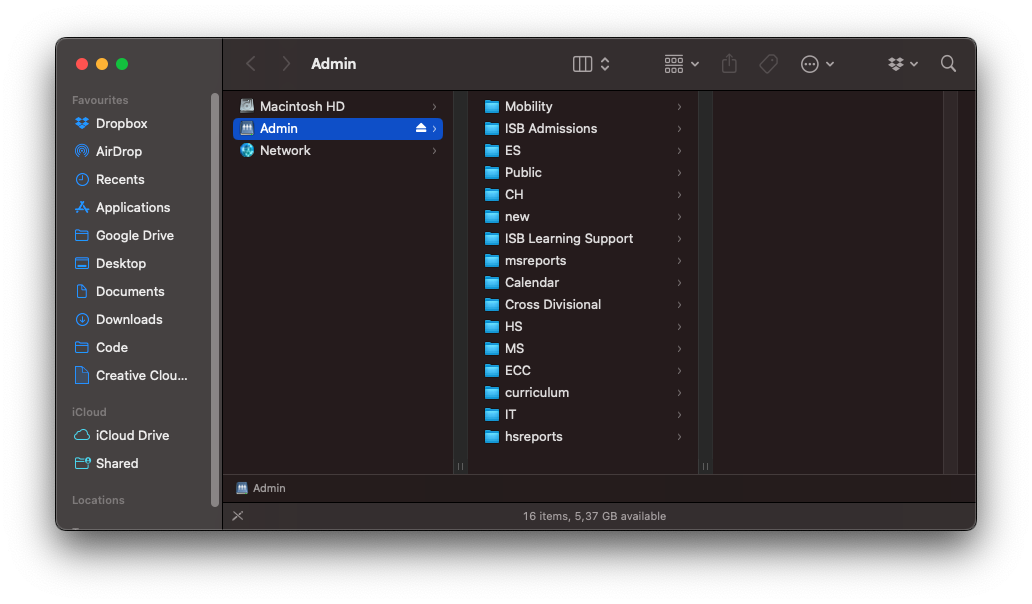
Click ok, you are now connected to the drive:
If the window doesn't open, you will see an icon in the top right corner of your desktop which you can click to open the drive: